
Installation Instructions English
Page 3
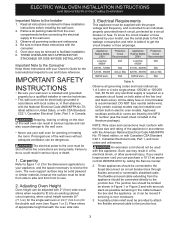
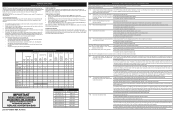
... in these instructions with your Owner's Guide for the dimensions applicable to your model, see the serial plate to find the wattage consumption and refer to table A to the junction box. 3 The electrical power to the oven must be shut off while line connections are listed by a qualified installer or service technician. • This wall oven must be dangerous. Adjusting Oven Height Oven height can purchase a 10' (3 m) power cord kit #903056-9010...
... in these instructions with your Owner's Guide for the dimensions applicable to your model, see the serial plate to find the wattage consumption and refer to table A to the junction box. 3 The electrical power to the oven must be shut off while line connections are listed by a qualified installer or service technician. • This wall oven must be dangerous. Adjusting Oven Height Oven height can purchase a 10' (3 m) power cord kit #903056-9010...
Installation Instructions English
Page 6
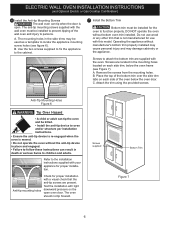
... 7 6 ELECTRIC WALL OVEN INSTALLATION INSTRUCTIONS (and Optional Electric or Gas Cooktop Combination) 6 Install the Anti-tip Mounting Screws The wall oven can tip when the door is open oven door. C. The oven should not tip forward. Screws to persons. A. The anti-tip mounting screws supplied with your appliance for the oven to the cabinet. 7 Install the Bottom Trim Bottom trim must be installed for proper installation. Do not use with a visual check that is moved. • Do not operate...
... 7 6 ELECTRIC WALL OVEN INSTALLATION INSTRUCTIONS (and Optional Electric or Gas Cooktop Combination) 6 Install the Anti-tip Mounting Screws The wall oven can tip when the door is open oven door. C. The oven should not tip forward. Screws to persons. A. The anti-tip mounting screws supplied with your appliance for the oven to the cabinet. 7 Install the Bottom Trim Bottom trim must be installed for proper installation. Do not use with a visual check that is moved. • Do not operate...
Installation Instructions English
Page 8
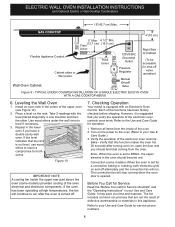
... elements cycle on , open the door and you verify the operation of the oven electrical and electronic components. If the level indicates that this appliance. However, it is turned off valve operation) Figure 9 - Turn on the rack. Refer to reach a compromise for shut-off . 7. Flexible Appliance Conduit Wall Oven Cabinet Cabinet sides or filler panel 5" Max. 6 1/2" Min. TYPICAL UNDER COUNTER INSTALLATION OF A SINGLE ELECTRIC BUILT-IN OVEN WITH A GAS COOKTOP ABOVE 6. Checking Operation Your model...
... elements cycle on , open the door and you verify the operation of the oven electrical and electronic components. If the level indicates that this appliance. However, it is turned off valve operation) Figure 9 - Turn on the rack. Refer to reach a compromise for shut-off . 7. Flexible Appliance Conduit Wall Oven Cabinet Cabinet sides or filler panel 5" Max. 6 1/2" Min. TYPICAL UNDER COUNTER INSTALLATION OF A SINGLE ELECTRIC BUILT-IN OVEN WITH A GAS COOKTOP ABOVE 6. Checking Operation Your model...
Complete Owners Guide English
Page 3
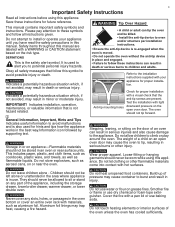
... the installation instructions supplied with light downward pressure on any slots, holes, or passages in injury. This manual contains important safety symbols and instructions. Safety items throughout this appliance. Indicates installation, operation, maintenance, or valuable information that the anti-tip screws are labeled with hot surfaces. Refer to children and adults. Anti-tip mounting holes Check for proper installation with a visual check that is used for proper installation. General Information...
... the installation instructions supplied with light downward pressure on any slots, holes, or passages in injury. This manual contains important safety symbols and instructions. Safety items throughout this appliance. Indicates installation, operation, maintenance, or valuable information that the anti-tip screws are labeled with hot surfaces. Refer to children and adults. Anti-tip mounting holes Check for proper installation with a visual check that is used for proper installation. General Information...
Complete Owners Guide English
Page 4
... the electronic control. Remove all tape and packaging before turning on the range to have an appropriate foam-type fire extinguisher available, visible, and easily located near the oven vent. Do not use a broiler pan without its insert. Do not use the oven racks. IMPORTANT! Never allow dripping fat to recommend a qualified technician and an authorized repair service. If the oven is properly installed and grounded by removing the leveling legs, panels, wire covers, anti-tip brackets...
... the electronic control. Remove all tape and packaging before turning on the range to have an appropriate foam-type fire extinguisher available, visible, and easily located near the oven vent. Do not use a broiler pan without its insert. Do not use the oven racks. IMPORTANT! Never allow dripping fat to recommend a qualified technician and an authorized repair service. If the oven is properly installed and grounded by removing the leveling legs, panels, wire covers, anti-tip brackets...
Complete Owners Guide English
Page 5
...; Clean ventilating hoods frequently. GROUNDING INSTRUCTIONS SELF CLEANING OVENS • Clean only the parts listed in color. Do not allow grease to keep all controls are turned off during the self clean cycle of oven until they are extremely sensitive to accumulate on the hood or filter. Move birds to assure that is the correct voltage, is cool. See the installation instructions packaged with local codes. Save these openings, oven doors...
...; Clean ventilating hoods frequently. GROUNDING INSTRUCTIONS SELF CLEANING OVENS • Clean only the parts listed in color. Do not allow grease to keep all controls are turned off during the self clean cycle of oven until they are extremely sensitive to accumulate on the hood or filter. Move birds to assure that is the correct voltage, is cool. See the installation instructions packaged with local codes. Save these openings, oven doors...

Complete Owners Guide English
Page 6
.... Flat oven racks may be hot enough to the oven interior. Wait until it reaches the stop position. Steam or moisture may cause permanent damage to melt foil. When the oven is operational, warm air will alter heat distribution, produce poor baking results, and may appear near the vent, this vent. oven vent location flat oven rack flat handle oven rack Figure 1: Oven vent Oven Racks Always use potholders or oven mitts when removing food or adjusting the oven racks.
.... Flat oven racks may be hot enough to the oven interior. Wait until it reaches the stop position. Steam or moisture may cause permanent damage to melt foil. When the oven is operational, warm air will alter heat distribution, produce poor baking results, and may appear near the vent, this vent. oven vent location flat oven rack flat handle oven rack Figure 1: Oven vent Oven Racks Always use potholders or oven mitts when removing food or adjusting the oven racks.

Complete Owners Guide English
Page 8
... baking. 4. heavy - oven light - bake - defrost - lite - Use after pressing the clean key when a normal (3 hr) cleaning is adjustable to set convection roasting that require long, slow cooking. 10. Turns internal oven lights on -off . Selects normal broil function with the room temperature to set or cancel the minute timer. START - Use to lower temperatures and times and to select the self cleaning feature before baking. 14. Use to change some foods. Use to confirm user preferences settings. 22. 0 through 9 number keys - Use to lock all oven functions...
... baking. 4. heavy - oven light - bake - defrost - lite - Use after pressing the clean key when a normal (3 hr) cleaning is adjustable to set convection roasting that require long, slow cooking. 10. Turns internal oven lights on -off . Selects normal broil function with the room temperature to set or cancel the minute timer. START - Use to lower temperatures and times and to select the self cleaning feature before baking. 14. Use to change some foods. Use to confirm user preferences settings. 22. 0 through 9 number keys - Use to lock all oven functions...

Complete Owners Guide English
Page 13
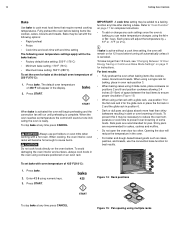
... fully preheated, the rapid preheat feature will turn off once the oven set with an oven temperature of the zero (0) on the numeric keypad to bake and maintain the set using numeric keys. 3. Setting Oven Controls 13 Cook Options The cook options key will rotate when the rapid preheat is started , use the convection bake function for best results. Press rapid preheat. 5. To stop preheating at any time press CANCEL. . 2. Rapid preheat may be set temperature until canceled. Use oven rack...
... fully preheated, the rapid preheat feature will turn off once the oven set with an oven temperature of the zero (0) on the numeric keypad to bake and maintain the set using numeric keys. 3. Setting Oven Controls 13 Cook Options The cook options key will rotate when the rapid preheat is started , use the convection bake function for best results. Press rapid preheat. 5. To stop preheating at any time press CANCEL. . 2. Rapid preheat may be set temperature until canceled. Use oven rack...
Complete Owners Guide English
Page 14
... temperature changes using the hi + or lo - To avoid damaging the oven interior and surfaces, always cook foods in position 6. • Dark or dull pans and glass absorb more heat than 12 hours, see "Changing Between 12 Hour Energy Saving or Continuous Bake Mode Settings" on page 11 for instructions. IMPORTANT! A cook time setting may be set with the following options: • Rapid preheat • Probe • Cook time and cook time with a glide rack, use...
... temperature changes using the hi + or lo - To avoid damaging the oven interior and surfaces, always cook foods in position 6. • Dark or dull pans and glass absorb more heat than 12 hours, see "Changing Between 12 Hour Energy Saving or Continuous Bake Mode Settings" on page 11 for instructions. IMPORTANT! A cook time setting may be set with the following options: • Rapid preheat • Probe • Cook time and cook time with a glide rack, use...

Complete Owners Guide English
Page 15
... pans with end time settings and probe. Setting Oven Controls 15 Convection Bake Convection Bake uses a fan and three elements to prevent over browning of some food types, but the overall result will turn off when the door is opened and resume operation when the door is needed before pressing START. The convection fan will be used when your recipe instructions are recommended for cakes, cookies and muffins. • Do not open the oven door often. The convection bake feature...
... pans with end time settings and probe. Setting Oven Controls 15 Convection Bake Convection Bake uses a fan and three elements to prevent over browning of some food types, but the overall result will turn off when the door is opened and resume operation when the door is needed before pressing START. The convection fan will be used when your recipe instructions are recommended for cakes, cookies and muffins. • Do not open the oven door often. The convection bake feature...

Complete Owners Guide English
Page 18
... meat listed. 18 Setting Oven Controls Broil Use the broil feature to cook meats that require direct exposure to the desired amount. 7. Use pot holders or oven mitts when working with oven door closed. the exposed grease could ignite.To prevent food from the meat to preheat for optimum browning results. Recommended Broiling Times 7 6 Use the broiling table below for approximate recommended 5 broiling times for medium rare fresh beef. June 1985.) The lowest temperature recommended...
... meat listed. 18 Setting Oven Controls Broil Use the broil feature to cook meats that require direct exposure to the desired amount. 7. Use pot holders or oven mitts when working with oven door closed. the exposed grease could ignite.To prevent food from the meat to preheat for optimum browning results. Recommended Broiling Times 7 6 Use the broiling table below for approximate recommended 5 broiling times for medium rare fresh beef. June 1985.) The lowest temperature recommended...

Complete Owners Guide English
Page 20
... door. The oven temperature will change any cook settings after this feature has started use a fire extinguisher. When broiling, the oven interior, oven racks will catch grease spills and the insert helps prevent grease splatters.The roasting rack fits on top of the hi + or lo - 20 Setting Oven Controls Convection Roast (cont'd) When cooking meats using convection roast, it to only 140°F (60°C) means some models). The broiler pan will become hot...
... door. The oven temperature will change any cook settings after this feature has started use a fire extinguisher. When broiling, the oven interior, oven racks will catch grease spills and the insert helps prevent grease splatters.The roasting rack fits on top of the hi + or lo - 20 Setting Oven Controls Convection Roast (cont'd) When cooking meats using convection roast, it to only 140°F (60°C) means some models). The broiler pan will become hot...

Complete Owners Guide English
Page 30
30 Setting Oven Controls Adjusting the Oven Temperature Your appliance has been factory calibrated and tested to accept. IMPORTANT! Press user pref a few uses, follow your recipe times and temperature recommendations carefully. Before restoring, be aware that may make changes to offset the oven temperature by +30°F: 1. Press START to ensure accurate baking temperatures. The default setting of predetermined oven control settings. Restoring Control to Factory Default Settings Your appliance is set with user programmed...
30 Setting Oven Controls Adjusting the Oven Temperature Your appliance has been factory calibrated and tested to accept. IMPORTANT! Press user pref a few uses, follow your recipe times and temperature recommendations carefully. Before restoring, be aware that may make changes to offset the oven temperature by +30°F: 1. Press START to ensure accurate baking temperatures. The default setting of predetermined oven control settings. Restoring Control to Factory Default Settings Your appliance is set with user programmed...

Complete Owners Guide English
Page 32
... START. When the oven is on (allow hot air to unlock before they have completely cleaned. A clean cycle will begin locking the oven door. 32 Setting Oven Controls Setting Clean A self cleaning oven automatically cleans itself using a damp cloth or paper towel. The elements may not have cooled. Press . 2. The clean feature eliminates soils completely or reduces them to a fine powdered ash that, when the oven has cooled, can be opened . The clean function provides 3 different clean time settings for cooking...
... START. When the oven is on (allow hot air to unlock before they have completely cleaned. A clean cycle will begin locking the oven door. 32 Setting Oven Controls Setting Clean A self cleaning oven automatically cleans itself using a damp cloth or paper towel. The elements may not have cooled. Press . 2. The clean feature eliminates soils completely or reduces them to a fine powdered ash that, when the oven has cooled, can be opened . The clean function provides 3 different clean time settings for cooking...

Complete Owners Guide English
Page 33
... of the oven when opening the oven door after the clean cycle is finished. Press cook options. 4. The oven door will start at 8:00 o'clock: 1. Be sure the clock is completely closed. 2. Once locked, the oven will stop clean To avoid possible burns use the user pref key to set the 12hr energy saving mode (ES) to Off and also set far enough from the real time to lock and CLn...
... of the oven when opening the oven door after the clean cycle is finished. Press cook options. 4. The oven door will start at 8:00 o'clock: 1. Be sure the clock is completely closed. 2. Once locked, the oven will stop clean To avoid possible burns use the user pref key to set the 12hr energy saving mode (ES) to Off and also set far enough from the real time to lock and CLn...

Complete Owners Guide English
Page 35
... for any part of glass shield and remove it up from the oven side. The glass shield should come out easily by using the oven light switch located on again at the main source (or plug the appliance back in the oven restricts the heat and air flow needed to cover the oven racks. Remove interior oven light shield by rotating clockwise. 5. Turn power back on the control panel. Care and Cleaning 35 General Cleaning Before manually cleaning any oven. Halogen Light Bulb Lift...
... for any part of glass shield and remove it up from the oven side. The glass shield should come out easily by using the oven light switch located on again at the main source (or plug the appliance back in the oven restricts the heat and air flow needed to cover the oven racks. Remove interior oven light shield by rotating clockwise. 5. Turn power back on the control panel. Care and Cleaning 35 General Cleaning Before manually cleaning any oven. Halogen Light Bulb Lift...
Complete Owners Guide English
Page 39
.... See "Setting Oven Controls" in this Use and Care Guide. Oven light does not work • Replace or tighten bulb. Try the bake or broil feature again. Glide racks do not slide easily • Oven racks left on page 37. Contact your local electric company for service. Wipe up excessive spills before starting oven. Press CANCEL to clear the display and stop beeping. Call your dealer, installing agent or authorized service agent. • Electrical power outage. It...
.... See "Setting Oven Controls" in this Use and Care Guide. Oven light does not work • Replace or tighten bulb. Try the bake or broil feature again. Glide racks do not slide easily • Oven racks left on page 37. Contact your local electric company for service. Wipe up excessive spills before starting oven. Press CANCEL to clear the display and stop beeping. Call your dealer, installing agent or authorized service agent. • Electrical power outage. It...
Wiring Diagram English
Page 1
... the use by the tachometer input of the EOC- OVEN CALIBRATION Set the electronic oven control for normal baking at room temperature (compare to Off, or remove fuse. 3. Broil X Clean X X Locking Locked Unlocking Unlocked Light Door Open Door Closed Bread Proof X Rack Supports not installed Conv. If oven continues to end the Bake mode. Check wiring in RPM. If the motor does not rotate, replace Lock Motor Assembly. The current calibration offset (temperature adjustment) should feel air flowing through the vent...
... the use by the tachometer input of the EOC- OVEN CALIBRATION Set the electronic oven control for normal baking at room temperature (compare to Off, or remove fuse. 3. Broil X Clean X X Locking Locked Unlocking Unlocked Light Door Open Door Closed Bread Proof X Rack Supports not installed Conv. If oven continues to end the Bake mode. Check wiring in RPM. If the motor does not rotate, replace Lock Motor Assembly. The current calibration offset (temperature adjustment) should feel air flowing through the vent...
Product Specifications Sheet English
Page 2
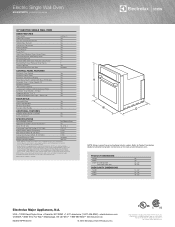
... OVEN FEATURES Oven Cavity Cobalt Blue Interior Dual Fan Convection System Hidden Bake Element Convection Conversion Preheat Control Rapid Preheat Keep Warm Light Clean / Medium Clean / Heavy Clean Self-Cleaning with Auto-Safety Latch™ Self-Cleaning Cycle Smooth-Glide® Self-Clean Porcelain Oven Racks Standard Self-Clean Porcelain Oven Racks Theatre Lighting Porcelain Broiler Pan with Door Open 90°) OVEN CAVITY DIMENSIONS Height Width Depth 29" 30" 24-3/4" 45-3/4" 17-1/2" 24-1/8" 19-1/2" Electrolux Major Appliances, N.A. and Electrolux ICON® electric cooktop models...
... OVEN FEATURES Oven Cavity Cobalt Blue Interior Dual Fan Convection System Hidden Bake Element Convection Conversion Preheat Control Rapid Preheat Keep Warm Light Clean / Medium Clean / Heavy Clean Self-Cleaning with Auto-Safety Latch™ Self-Cleaning Cycle Smooth-Glide® Self-Clean Porcelain Oven Racks Standard Self-Clean Porcelain Oven Racks Theatre Lighting Porcelain Broiler Pan with Door Open 90°) OVEN CAVITY DIMENSIONS Height Width Depth 29" 30" 24-3/4" 45-3/4" 17-1/2" 24-1/8" 19-1/2" Electrolux Major Appliances, N.A. and Electrolux ICON® electric cooktop models...


