
Owners Guide
Page 1
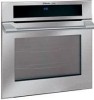
B Use & Care Guide Built-In Wall Oven 318 205 130 (0812) Rev.
B Use & Care Guide Built-In Wall Oven 318 205 130 (0812) Rev.

Owners Guide
Page 2
and Canada: 1-877-4ELECTROLUX (1-877-435-3287) For online support and internet product information: www.electroluxicon.com ©2008 Electrolux Home Products, Inc. QUESTIONS? Post Office Box 212378, Augusta, Georgia 30917, USA All rights reserved. 2 Finding Information MAKE A RECORD FOR FUTURE USE Brand Purchase Date Model Number Serial Number MODEL AND SERIAL NUMBER LOCATION NOTE The serial plate is located along the interior side trim of the oven and visible when the door is opened. See picture below. Printed in the U.S. For toll-free telephone support in the USA
and Canada: 1-877-4ELECTROLUX (1-877-435-3287) For online support and internet product information: www.electroluxicon.com ©2008 Electrolux Home Products, Inc. QUESTIONS? Post Office Box 212378, Augusta, Georgia 30917, USA All rights reserved. 2 Finding Information MAKE A RECORD FOR FUTURE USE Brand Purchase Date Model Number Serial Number MODEL AND SERIAL NUMBER LOCATION NOTE The serial plate is located along the interior side trim of the oven and visible when the door is opened. See picture below. Printed in the U.S. For toll-free telephone support in the USA

Owners Guide
Page 3
... Temperature Probe 27 Multi Stage 28-29 Electronic Control Settings 30 User Preferences Menu 30 Setting the Clock 30 Setting Clock Display 31 Setting Time of Day Display 31 Adjusting Oven Temperature 31 Setting Temperature Display 32 Audio Control 32 Setting...Self-Clean Cycle 37 General Cleaning 38 Care and Cleaning of Contents 3 Safety 4 Important Safety Instructions 4-6 Feature Overview 7 Your Wall Oven 7 Oven Rack Supports and Oven Vents 8 Oven Racks 9 Control Pad Functions - Finding Information 3 TABLE OF CONTENTS Finding Information 2 Make a Record for Future Use 2 ...
... Temperature Probe 27 Multi Stage 28-29 Electronic Control Settings 30 User Preferences Menu 30 Setting the Clock 30 Setting Clock Display 31 Setting Time of Day Display 31 Adjusting Oven Temperature 31 Setting Temperature Display 32 Audio Control 32 Setting...Self-Clean Cycle 37 General Cleaning 38 Care and Cleaning of Contents 3 Safety 4 Important Safety Instructions 4-6 Feature Overview 7 Your Wall Oven 7 Oven Rack Supports and Oven Vents 8 Oven Racks 9 Control Pad Functions - Finding Information 3 TABLE OF CONTENTS Finding Information 2 Make a Record for Future Use 2 ...

Owners Guide
Page 4
... door of the appliance unless specifically recommended in the manuals. WARNING To reduce the risk of fire, electrical shock, or injury when using your new Electrolux wall oven. ! Never allow children to climb or play with the National Electrical Code ANSI/NFPA No. 70 (U.S.A.) or CSA C22.1, PART 1 (Canada)-latest editions and local code requirements...
... door of the appliance unless specifically recommended in the manuals. WARNING To reduce the risk of fire, electrical shock, or injury when using your new Electrolux wall oven. ! Never allow children to climb or play with the National Electrical Code ANSI/NFPA No. 70 (U.S.A.) or CSA C22.1, PART 1 (Canada)-latest editions and local code requirements...
Owners Guide
Page 5
... and window. • Wear Proper Apparel-Loose-fitting or hanging garments should never be worn while using the appliance. Never use extreme caution. The wall oven is hot, use your appliance for warming or heating the room. • Do Not Use Water or Flour on any part of the appliance. •...; DO NOT TOUCH INTERIOR OVEN ELEMENTS OR INTERIOR SURFACES OF THE WALL OVEN UNTIL THEY HAVE COOLED. Always place oven racks in color. They should never be allowed to sit or stand on Grease Fires-Smother the fire with...
... and window. • Wear Proper Apparel-Loose-fitting or hanging garments should never be worn while using the appliance. Never use extreme caution. The wall oven is hot, use your appliance for warming or heating the room. • Do Not Use Water or Flour on any part of the appliance. •...; DO NOT TOUCH INTERIOR OVEN ELEMENTS OR INTERIOR SURFACES OF THE WALL OVEN UNTIL THEY HAVE COOLED. Always place oven racks in color. They should never be allowed to sit or stand on Grease Fires-Smother the fire with...

Owners Guide
Page 6
...keep all parts free of the appliance listed in the appliance. Also the side rails of the appliance, remove the broiler pan, oven racks and any wall oven. NOTE Save these important safety instructions for the self-clean function to another well ventilated room. Move birds to operate. •... Do not clean the oven door gasket. Before using the self-cleaning cycle of the oven racks must be kept clean. Do not allow...
...keep all parts free of the appliance listed in the appliance. Also the side rails of the appliance, remove the broiler pan, oven racks and any wall oven. NOTE Save these important safety instructions for the self-clean function to another well ventilated room. Move birds to operate. •... Do not clean the oven door gasket. Before using the self-cleaning cycle of the oven racks must be kept clean. Do not allow...

Owners Guide
Page 7
YOUR WALL OVEN CONVECTION FAN OVEN VENT Feature Overview 7 CONTROL PANEL OVEN DOOR LATCH BROILING ELEMENT OVEN RACK SLIDERS STANDARD OVEN RACK EXTENDABLE OVEN RACKS OVEN LIGHT OVEN RACK SUPPORT OFFSET OVEN RACK GLASS OVEN DOOR DOOR HANDLE BROILER PAN BROILER PAN GRID CONVECTION ROASTING RACK
YOUR WALL OVEN CONVECTION FAN OVEN VENT Feature Overview 7 CONTROL PANEL OVEN DOOR LATCH BROILING ELEMENT OVEN RACK SLIDERS STANDARD OVEN RACK EXTENDABLE OVEN RACKS OVEN LIGHT OVEN RACK SUPPORT OFFSET OVEN RACK GLASS OVEN DOOR DOOR HANDLE BROILER PAN BROILER PAN GRID CONVECTION ROASTING RACK
Owners Guide
Page 8
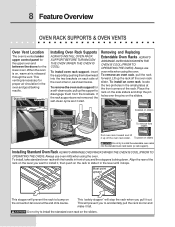
...bump on each side of the rack. Oven Vent Warm Air Installing Oven Rack Supports ALWAYS INSTALL OVEN RACK SUPPORT BEFORE TURNING ON THE OVEN (WHEN THE OVEN IS COOL). Always use oven mitts when using the oven. To install, take standard oven rack with the handle in the small...clean cycle won't start. Removing and Replacing Extendable Oven Racks ALWAYS ARRANGE OVEN RACKS WHEN THE OVEN IS COOL (PRIOR TO OPERATING THE OVEN). Installing Standard Oven Rack ALWAYS ARRANGE OVEN RACKS WHEN THE OVEN IS COOL (PRIOR TO OPERATING THE OVEN). Must point upward BACK FRONT This stopper will ...
...bump on each side of the rack. Oven Vent Warm Air Installing Oven Rack Supports ALWAYS INSTALL OVEN RACK SUPPORT BEFORE TURNING ON THE OVEN (WHEN THE OVEN IS COOL). Always use oven mitts when using the oven. To install, take standard oven rack with the handle in the small...clean cycle won't start. Removing and Replacing Extendable Oven Racks ALWAYS ARRANGE OVEN RACKS WHEN THE OVEN IS COOL (PRIOR TO OPERATING THE OVEN). Installing Standard Oven Rack ALWAYS ARRANGE OVEN RACKS WHEN THE OVEN IS COOL (PRIOR TO OPERATING THE OVEN). Must point upward BACK FRONT This stopper will ...

Owners Guide
Page 9
To bake on 2 racks, place the racks in position 3 and 8. To bake on a single rack, place the rack in position 2, 4 and 8. OVEN RACKS Feature Overview 9 Rack positions 8 7 6 5 4 3 2 11 Arranging Oven Racks ALWAYS ARRANGE OVEN RACKS WHEN THE OVEN IS COOL (PRIOR TO OPERATING THE OVEN). RECOMMENDED RACK POSITIONS FOR BROILING, BAKING & ROASTING Food Rack Position Broiling meats...
To bake on 2 racks, place the racks in position 3 and 8. To bake on a single rack, place the rack in position 2, 4 and 8. OVEN RACKS Feature Overview 9 Rack positions 8 7 6 5 4 3 2 11 Arranging Oven Racks ALWAYS ARRANGE OVEN RACKS WHEN THE OVEN IS COOL (PRIOR TO OPERATING THE OVEN). RECOMMENDED RACK POSITIONS FOR BROILING, BAKING & ROASTING Food Rack Position Broiling meats...

Owners Guide
Page 10
... PAD FUNCTIONS - Used to select the variable broil mode. 3 Convection Bake Pad- Used to select the convection broil mode. 6 Warm Oven Pad- Used to disable all oven function. 16 Lite Pad- Used to select the self-cleaning mode. 14 Light Pad- Used to select the convection roasting mode. 5 ...Convection Broil Pad- Used to start a 4 hours self-clean cycle. 19 User Preference Pad- Used to turn the oven light on and off. 15 Control Lock Pad- Used to select the slow cook mode. 9 Multi Stage Pad- Used to select the dehydrate mode. ...
... PAD FUNCTIONS - Used to select the variable broil mode. 3 Convection Bake Pad- Used to select the convection broil mode. 6 Warm Oven Pad- Used to disable all oven function. 16 Lite Pad- Used to select the self-cleaning mode. 14 Light Pad- Used to select the convection roasting mode. 5 ...Convection Broil Pad- Used to start a 4 hours self-clean cycle. 19 User Preference Pad- Used to turn the oven light on and off. 15 Control Lock Pad- Used to select the slow cook mode. 9 Multi Stage Pad- Used to select the dehydrate mode. ...

Owners Guide
Page 11
... the favorite 3 cooking mode. 12 Cancel Pad- MODEL A (CONTINUED) 1 2 34 567 8 12 13 14 15 9 10 11 1 Timer Pad- Used to preheat the oven to select the time at which the cooking will end. 8 Cook Options Pad- Used to save or recall the favorite 1 cooking mode. 10 My Favorite... to light up the cook options pads. 9 My Favorite 1 Pad- Used to raise the temperature and times. The minute timer does not start all oven functions. 14 - Convert Pad- Used to start or stop cooking. 13 Start Pad- Used to cancel any function previously entered except the time of day...
... the favorite 3 cooking mode. 12 Cancel Pad- MODEL A (CONTINUED) 1 2 34 567 8 12 13 14 15 9 10 11 1 Timer Pad- Used to preheat the oven to select the time at which the cooking will end. 8 Cook Options Pad- Used to save or recall the favorite 1 cooking mode. 10 My Favorite... to light up the cook options pads. 9 My Favorite 1 Pad- Used to raise the temperature and times. The minute timer does not start all oven functions. 14 - Convert Pad- Used to start or stop cooking. 13 Start Pad- Used to cancel any function previously entered except the time of day...

Owners Guide
Page 12
...Proof Pad- Used to three subsequent modes. 10 Defrost Pad- Used to start a 4 hours self-clean cycle. 19 User Preference Pad- Used to disable all oven function. 16 Lite Pad- Used to select the convection baking mode. 4 Convection Roast Pad- Used to enter the normal baking mode temperature. 2 Broil Pad-...Med Pad- Used to select the defrost mode. 11 Dehydrate Pad- Used to select the bread proof mode. 13 Clean Pad- Used to activate the oven for cooking operation. 8 Slow Cook Pad- Used to select the self-cleaning mode. 14 Light Pad- Used to bring the user preference menu in...
...Proof Pad- Used to three subsequent modes. 10 Defrost Pad- Used to start a 4 hours self-clean cycle. 19 User Preference Pad- Used to disable all oven function. 16 Lite Pad- Used to select the convection baking mode. 4 Convection Roast Pad- Used to enter the normal baking mode temperature. 2 Broil Pad-...Med Pad- Used to select the defrost mode. 11 Dehydrate Pad- Used to select the bread proof mode. 13 Clean Pad- Used to activate the oven for cooking operation. 8 Slow Cook Pad- Used to select the self-cleaning mode. 14 Light Pad- Used to bring the user preference menu in...

Owners Guide
Page 13
...Favorite 3 Pad- Used to save or recall the favorite 3 cooking mode. 12 Cancel Pad- Used to the desired temperature. 5 Probe Pad- Used to preheat the oven to enter temperature and times. 3 Conv. Used to set or cancel the minute timer. Used to activate the meat probe mode. 6 Cook Time Pad- Used...MODEL B (CONTINUED) 1 2 34 567 8 12 13 9 10 11 14 15 1 Timer Pad- Feature Overview 13 CONTROL PAD FUNCTIONS - The minute timer does not start all oven functions. 14 - Used to stop cooking. 2 0 Thru 9 Number Pads- Used to lower the temperature and times. 15 + hi Pad-
...Favorite 3 Pad- Used to save or recall the favorite 3 cooking mode. 12 Cancel Pad- Used to the desired temperature. 5 Probe Pad- Used to preheat the oven to enter temperature and times. 3 Conv. Used to set or cancel the minute timer. Used to activate the meat probe mode. 6 Cook Time Pad- Used...MODEL B (CONTINUED) 1 2 34 567 8 12 13 9 10 11 14 15 1 Timer Pad- Feature Overview 13 CONTROL PAD FUNCTIONS - The minute timer does not start all oven functions. 14 - Used to stop cooking. 2 0 Thru 9 Number Pads- Used to lower the temperature and times. 15 + hi Pad-

Owners Guide
Page 14
... temperature visual display. When the unit has reached its target temperature, a chime will sound to remind you to re-enter a valid time of day to 1:30. The cooking modes which does not feature the temperature visual display will be displayed is 100°F. Press 1 3 0 pads to set the clock (example for... the control will remain in a sleep mode when not in use. When a cooking mode is set, the actual temperature will be set when the oven is on. bake, convection bake and convection roast. If an invalid time of 12:00. User preferences will be available during this mode as well...
... temperature visual display. When the unit has reached its target temperature, a chime will sound to remind you to re-enter a valid time of day to 1:30. The cooking modes which does not feature the temperature visual display will be displayed is 100°F. Press 1 3 0 pads to set the clock (example for... the control will remain in a sleep mode when not in use. When a cooking mode is set, the actual temperature will be set when the oven is on. bake, convection bake and convection roast. If an invalid time of 12:00. User preferences will be available during this mode as well...

Owners Guide
Page 15
...the Control Lock ON and OFF: 1. Press TIMER . The display will flash. Do not attempt to 5 minutes. When the set the timer to open the oven door while DOOR LOCK is equipped with a kitchen timer which serve as an extra timer in the upper display. The Control Lock is only allowed... when the oven is opened. Press 5 pad to raise or lower the actual time displayed. 3. The pads + hi or lo can be turned on when the door ...
...the Control Lock ON and OFF: 1. Press TIMER . The display will flash. Do not attempt to 5 minutes. When the set the timer to open the oven door while DOOR LOCK is equipped with a kitchen timer which serve as an extra timer in the upper display. The Control Lock is only allowed... when the oven is opened. Press 5 pad to raise or lower the actual time displayed. 3. The pads + hi or lo can be turned on when the door ...
Owners Guide
Page 16
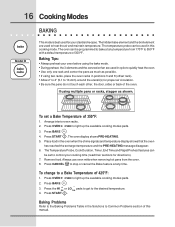
...The hidden bake element and the broil element are used to light up the available cooking modes pads. 3. Press OVEN OVEN to Common Problems section of this cooking mode. The oven display shows PRE-HEATING. 5. Remove food. Baking Problems Refer to the Baking Problems Table in positions 3 and 8... 350°F: 1. Press START . Press BAKE . 4. Baking Tips: • Always preheat your standard recipes. Press CANCEL to quickly heat the oven. • Use only one rack and center the pans as much as shown. Press BAKE . 3. If using multiple pans or racks, stagger as...
...The hidden bake element and the broil element are used to light up the available cooking modes pads. 3. Press OVEN OVEN to Common Problems section of this cooking mode. The oven display shows PRE-HEATING. 5. Remove food. Baking Problems Refer to the Baking Problems Table in positions 3 and 8... 350°F: 1. Press START . Press BAKE . 4. Baking Tips: • Always preheat your standard recipes. Press CANCEL to quickly heat the oven. • Use only one rack and center the pans as much as shown. Press BAKE . 3. If using multiple pans or racks, stagger as...

Owners Guide
Page 17
.... To set to light up the available cooking modes pads. 2. Press BAKE . The oven will shut off and will start counting down for the set a timed cooking (example is a 450°F Bake for 30 minutes): 1. This feature can result in the timer section of the display. To set ...time. 8. Press OVEN OVEN to shut off automatically. The oven will beep when the countdown is finished. Press CANCEL to stop the audible ...
.... To set to light up the available cooking modes pads. 2. Press BAKE . The oven will shut off and will start counting down for the set a timed cooking (example is a 450°F Bake for 30 minutes): 1. This feature can result in the timer section of the display. To set ...time. 8. Press OVEN OVEN to shut off automatically. The oven will beep when the countdown is finished. Press CANCEL to stop the audible ...
Owners Guide
Page 18
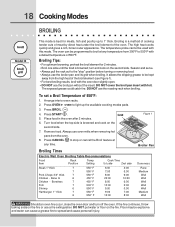
...appearance. To set a Broil Temperature of the broil element (see Figure 1). • For best broiling results, broil with foil. Press OVEN OVEN to broil at any temperature from the high heat of 550°F: 1. Flour may be programmed to light up to the "stop or ...If the fire continues, throw baking soda on the fire. turn off the oven. Remove food. Place food in the oven after 2 minutes. Bone In 6 Chicken - Broiling Times Figure 1 Broiler Pan Electric Wall Oven Broiling Table Recommendations Food Item Rack Position Temp Setting Cook Time 1st side 2nd ...
...appearance. To set a Broil Temperature of the broil element (see Figure 1). • For best broiling results, broil with foil. Press OVEN OVEN to broil at any temperature from the high heat of 550°F: 1. Flour may be programmed to light up to the "stop or ...If the fire continues, throw baking soda on the fire. turn off the oven. Remove food. Place food in the oven after 2 minutes. Bone In 6 Chicken - Broiling Times Figure 1 Broiler Pan Electric Wall Oven Broiling Table Recommendations Food Item Rack Position Temp Setting Cook Time 1st side 2nd ...
Owners Guide
Page 19
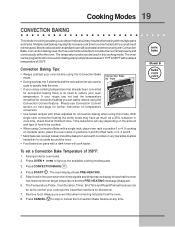
...standard oven will cook faster and more evenly with a single rack, place oven rack in this mode. Convection Baking Tips: • Always preheat your oven before using the Convection Bake mode. • During preheat, the 3 elements and the convection fan are used in position 3 or 4. If your oven ... temperature between 170°F to stop or cancel the Convection Bake feature at minimum time. Press OVEN OVEN to circulate the oven's heat evenly and continuously within the oven. The oven display shows PRE-HEATING. 5. Press CANCEL to 550°F with times adjusted for some foods ...
...standard oven will cook faster and more evenly with a single rack, place oven rack in this mode. Convection Baking Tips: • Always preheat your oven before using the Convection Bake mode. • During preheat, the 3 elements and the convection fan are used in position 3 or 4. If your oven ... temperature between 170°F to stop or cancel the Convection Bake feature at minimum time. Press OVEN OVEN to circulate the oven's heat evenly and continuously within the oven. The oven display shows PRE-HEATING. 5. Press CANCEL to 550°F with times adjusted for some foods ...

Owners Guide
Page 20
...food) will be uneven. IMPORTANT: The rapid preheat feature is not necessary when roasting or cooking casseroles. Press OVEN OVEN to begin the convection baking (see their sections for single rack ONLY. Press START to light up the available cooking modes pads. 2. It can be displayed when 75%... of the cooking modes; Press OVEN OVEN to be used with the rapid preheat feature enabled. 6. Press CONVECTION...
...food) will be uneven. IMPORTANT: The rapid preheat feature is not necessary when roasting or cooking casseroles. Press OVEN OVEN to begin the convection baking (see their sections for single rack ONLY. Press START to light up the available cooking modes pads. 2. It can be displayed when 75%... of the cooking modes; Press OVEN OVEN to be used with the rapid preheat feature enabled. 6. Press CONVECTION...


