

Owners Guide
Page 1
Use & Care Guide Electric Cooktop Dishwasher 318 200 635 (0606) Rev. A
Use & Care Guide Electric Cooktop Dishwasher 318 200 635 (0606) Rev. A

Owners Guide
Page 2
Printed in the U.S. 2 Finding Information MAKE A RECORD FOR FUTURE USE Brand Purchase Date Model Number Serial Number NOTE The serial and model numbers may be found on the serial plate located under the cooktop. and Canada: 1-877-4ELECTROLUX (1-877-435-3287) For online support and internet product information: www.electrolux.com ©2006 Electrolux Home Products, Inc. Post Office Box 212378, Augusta, Georgia 30917, USA All rights reserved. For toll-free telephone support in the USA QUESTIONS?
Printed in the U.S. 2 Finding Information MAKE A RECORD FOR FUTURE USE Brand Purchase Date Model Number Serial Number NOTE The serial and model numbers may be found on the serial plate located under the cooktop. and Canada: 1-877-4ELECTROLUX (1-877-435-3287) For online support and internet product information: www.electrolux.com ©2006 Electrolux Home Products, Inc. Post Office Box 212378, Augusta, Georgia 30917, USA All rights reserved. For toll-free telephone support in the USA QUESTIONS?

Owners Guide
Page 3
...OF CONTENTS Finding Information 2-3 Make a Record for Future use 2 Questions 2 Safety 4-6 Important Safety Instructions 4 Cooktop Features 7-8 Setting Surface Controls 9-18 About the Ceramic Glass Cooktop 9 About the Radiant Surface Elements 9 Locations of the Surface Radiant Elements 10 Using the Touch Control 10 LED...18 Cookware Material Types 18 General Care & Cleaning 19-21 Care & Cleaning Table 19 Cooktop Cleaning and Maintenance 20 Cleaning Recommendations for the Ceramic Glass Cooktop 20-21 Care & Cleaning of Stainless Steel 21 Solutions to Common Problems 22-23 Entire...
...OF CONTENTS Finding Information 2-3 Make a Record for Future use 2 Questions 2 Safety 4-6 Important Safety Instructions 4 Cooktop Features 7-8 Setting Surface Controls 9-18 About the Ceramic Glass Cooktop 9 About the Radiant Surface Elements 9 Locations of the Surface Radiant Elements 10 Using the Touch Control 10 LED...18 Cookware Material Types 18 General Care & Cleaning 19-21 Care & Cleaning Table 19 Cooktop Cleaning and Maintenance 20 Cleaning Recommendations for the Ceramic Glass Cooktop 20-21 Care & Cleaning of Stainless Steel 21 Solutions to Common Problems 22-23 Entire...
Owners Guide
Page 4
... explode and result in the literature package for future reference. Ask your dealer to play around the cooktop. • User Servicing. Know how to disconnect the electrical power to situations that may also cause damage to these instructions for this appliance. Do not store ...the appliance unless specifically recommended in Canada, and local code requirements. Be sure your electric cooktop, follow all tape and packaging wrap before using the appliance. Please pay attention to the cooktop. Do not repair or replace any other servicing should not be done only by ...
... explode and result in the literature package for future reference. Ask your dealer to play around the cooktop. • User Servicing. Know how to disconnect the electrical power to situations that may also cause damage to these instructions for this appliance. Do not store ...the appliance unless specifically recommended in Canada, and local code requirements. Be sure your electric cooktop, follow all tape and packaging wrap before using the appliance. Please pay attention to the cooktop. Do not repair or replace any other servicing should not be done only by ...

Owners Guide
Page 5
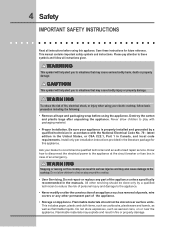
... hot surfaces. Smother the fire with one or more surface units of grease that could catch fire. IMPORTANT SAFETY INSTRUCTIONS FOR USING YOUR COOKTOP • Know which touch key pads controls each surface unit. • Clean the appliance regularly to cool. Select utensils having flat... bottoms large enough to operate the cooktop during a power failure. Proper relationship of the appliance. • DO NOT TOUCH SURFACE UNITS OR AREAS NEAR THESE UNITS. They should not...
... hot surfaces. Smother the fire with one or more surface units of grease that could catch fire. IMPORTANT SAFETY INSTRUCTIONS FOR USING YOUR COOKTOP • Know which touch key pads controls each surface unit. • Clean the appliance regularly to cool. Select utensils having flat... bottoms large enough to operate the cooktop during a power failure. Proper relationship of the appliance. • DO NOT TOUCH SURFACE UNITS OR AREAS NEAR THESE UNITS. They should not...

Owners Guide
Page 6
...appliance. NOTE Save these important safety instructions for cooktop use of protective liners or aluminum foil may cause permanent damage in the form of breakage, fusion, or marking that has boiled dry may also be done to line any part of electric shock. Only use aluminum foil to the appliance...contact with Caution. Only certain types of damage is not covered by your cooking surface should break, cleaning solutions and spillovers may scratch the cooktop surface. • Do Not Let Pans Boil Dry. If an element is used as recommended for range top service without breaking due ...
...appliance. NOTE Save these important safety instructions for cooktop use of protective liners or aluminum foil may cause permanent damage in the form of breakage, fusion, or marking that has boiled dry may also be done to line any part of electric shock. Only use aluminum foil to the appliance...contact with Caution. Only certain types of damage is not covered by your cooking surface should break, cleaning solutions and spillovers may scratch the cooktop surface. • Do Not Let Pans Boil Dry. If an element is used as recommended for range top service without breaking due ...
Owners Guide
Page 7
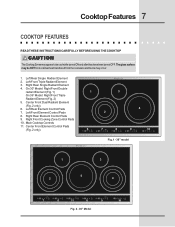
... 3. Center Front Element Control Pads (Fig. 2 only) 1 3 4 2 6 On/Off 7 On/Off 8 On/Off 9 On/Off Fig. 1 - 30" model 10 POWER 1 3 2 5 4 7 6 11 8 9 10 Fig. 2 - 36" Model Cooktop Features 7 COOKTOP FEATURES READ THESE INSTRUCTIONS CAREFULLY BEFORE USING THE COOKTOP CAUTION The Cooking Zones may occur. 1. The glass surface may be HOT form residual heat transfered from...
... 3. Center Front Element Control Pads (Fig. 2 only) 1 3 4 2 6 On/Off 7 On/Off 8 On/Off 9 On/Off Fig. 1 - 30" model 10 POWER 1 3 2 5 4 7 6 11 8 9 10 Fig. 2 - 36" Model Cooktop Features 7 COOKTOP FEATURES READ THESE INSTRUCTIONS CAREFULLY BEFORE USING THE COOKTOP CAUTION The Cooking Zones may occur. 1. The glass surface may be HOT form residual heat transfered from...

Owners Guide
Page 8
...Indicator Light 14. Minute Timer LED (displays up to 99 minutes) 19. Element + (increase) Key Pad (for each element) 20. 8 Cooktop Features COOKTOP FEATURES (CONT'D) 10 Main Cooktop Controls 16 13 18 17 15 Fig. 1 6 7 8 9 11 Element Controls (at 4 or 5 locations) 14 POWER 12 20 ...) 22. Left Front Element Control Pads 8. Right Front Element Control Pads 10. Controls Lockout Indicator Light 17. Right Rear Element Control Pads 9. Cooktop Power Key Pad 13. Element - (decrease) Key Pad (for each element) Element Power Level LED (for each element) 23. Center Front ...
...Indicator Light 14. Minute Timer LED (displays up to 99 minutes) 19. Element + (increase) Key Pad (for each element) 20. 8 Cooktop Features COOKTOP FEATURES (CONT'D) 10 Main Cooktop Controls 16 13 18 17 15 Fig. 1 6 7 8 9 11 Element Controls (at 4 or 5 locations) 14 POWER 12 20 ...) 22. Left Front Element Control Pads 8. Right Front Element Control Pads 10. Controls Lockout Indicator Light 17. Right Rear Element Control Pads 9. Cooktop Power Key Pad 13. Element - (decrease) Key Pad (for each element) Element Power Level LED (for each element) 23. Center Front ...
Owners Guide
Page 9
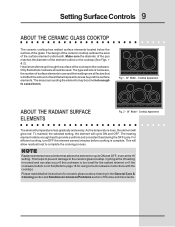
... Surface Controls 9 ABOUT THE CERAMIC GLASS COOKTOP The ceramic cooktop has radiant surface elements located below the surface of the element outline on the cooktop (See Figs. 1 & 2). On/Off On/Off On/Off On/Off POWER Fig.1 - 30" Model - The heating element retains enough heat to complete the cooking ...process. The design of the ceramic cooktop outlines the area of this Use and Care Guide...
... Surface Controls 9 ABOUT THE CERAMIC GLASS COOKTOP The ceramic cooktop has radiant surface elements located below the surface of the element outline on the cooktop (See Figs. 1 & 2). On/Off On/Off On/Off On/Off POWER Fig.1 - 30" Model - The heating element retains enough heat to complete the cooking ...process. The design of the ceramic cooktop outlines the area of this Use and Care Guide...

Owners Guide
Page 10
... OF THE SURFACE RADIANT ELEMENTS On/Off On/Off On/Off On/Off POWER Fig. 1 - 30" cooktop Fig. 2 - 36" cooktop Your cooktop is not placed on the center of a pad, the cooktop may not respond to heat food quicker and in larger volumes increases as the element wattage increases. ...The radiant surface elements are located on the 30" cooktop as follows: - 2 small radiant elements located at the right and left rear positions; - 1 dual radiant element located at the right front position;...
... OF THE SURFACE RADIANT ELEMENTS On/Off On/Off On/Off On/Off POWER Fig. 1 - 30" cooktop Fig. 2 - 36" cooktop Your cooktop is not placed on the center of a pad, the cooktop may not respond to heat food quicker and in larger volumes increases as the element wattage increases. ...The radiant surface elements are located on the 30" cooktop as follows: - 2 small radiant elements located at the right and left rear positions; - 1 dual radiant element located at the right front position;...

Owners Guide
Page 11
...the lock mode. Once locked, no other displays will glow and no other key pads are touched the Cooktop Main POWER will turn OFF. The Cooktop POWER key pad activates the entire Cooktop. If no Cooking Zones will be locked at anytime. To set a Cooking Element power level touch ... 1 Fig. 2 POWER Fig. 3 POWER Fig. 4 Fig. 5 Fig. 6 LED MESSAGES OR LIGHT INDICATORS DISPLAYED BY COOKING ELEMENT CONTROLS COOKING ZONE ON/OFF PAD - COOKTOP POWER - The Cooking Element Indicator Light will turn the Main Power OFF touch and hold the LOCK key pad for few seconds. Touch and hold...
...the lock mode. Once locked, no other displays will glow and no other key pads are touched the Cooktop Main POWER will turn OFF. The Cooktop POWER key pad activates the entire Cooktop. If no Cooking Zones will be locked at anytime. To set a Cooking Element power level touch ... 1 Fig. 2 POWER Fig. 3 POWER Fig. 4 Fig. 5 Fig. 6 LED MESSAGES OR LIGHT INDICATORS DISPLAYED BY COOKING ELEMENT CONTROLS COOKING ZONE ON/OFF PAD - COOKTOP POWER - The Cooking Element Indicator Light will turn the Main Power OFF touch and hold the LOCK key pad for few seconds. Touch and hold...
Owners Guide
Page 12
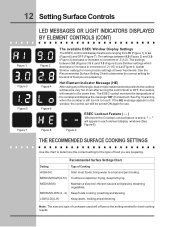
.... Use the Recommended Surface Setting Chart to determine the correct setting for the kind of the single, dual or triple radiant element positions the cooktop will influence the setting needed for best cooking results. Hot Element Indicator Message (HE) After using any of food you are preparing. See Fig...; Note: The size and type of Cooking HIGH (HI) Start most foods; The ESEC control monitors the temperature of .2 (1/5) to OFF, the cooktop will appear in the window, the control can still be turned ON again for more precise settings at lower heat levels. LOW (LO) (LH) ...
.... Use the Recommended Surface Setting Chart to determine the correct setting for the kind of the single, dual or triple radiant element positions the cooktop will influence the setting needed for best cooking results. Hot Element Indicator Message (HE) After using any of food you are preparing. See Fig...; Note: The size and type of Cooking HIGH (HI) Start most foods; The ESEC control monitors the temperature of .2 (1/5) to OFF, the cooktop will appear in the window, the control can still be turned ON again for more precise settings at lower heat levels. LOW (LO) (LH) ...

Owners Guide
Page 13
... element is heard. Note: If no further pads are touched within 20 seconds thPeOWErRequest to power the element ON will remain ON until the glass cooktop has cooled down to a moderate level. On/Off On/Off On/Off On/Off POWER Fig. 1 3. Note: If no other surface element is touched... within 10 seconds the request to Power ON the cooktop will continue to glow until the heating surface area has cooled sufficiently. CAUTION Radiant surface elements may be hot and burns may occur if the...
... element is heard. Note: If no further pads are touched within 20 seconds thPeOWErRequest to power the element ON will remain ON until the glass cooktop has cooled down to a moderate level. On/Off On/Off On/Off On/Off POWER Fig. 1 3. Note: If no other surface element is touched... within 10 seconds the request to Power ON the cooktop will continue to glow until the heating surface area has cooled sufficiently. CAUTION Radiant surface elements may be hot and burns may occur if the...
Owners Guide
Page 14
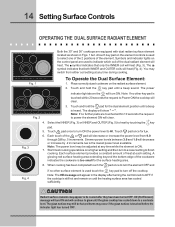
...hot and burns may still be cooled after turning the control knob to Power ON the cooktop will heat (Fig. 4). 14 Setting Surface Controls OPERATING THE DUAL SURFACE RADIANT ELEMENT Both the 30" and 36" cooktops are used to indicate which coil of the dual radiant element will heat. On/Off ... beep On/Of f is too small for Lo. 6. Note: If no further pads are touched within 20 seconds the request to OFF if the cooktop is touched before the indicator light has turned OFF. Each touch of the cookware indicates the cookware is heard. A glowing red surface heating area extending...
...hot and burns may still be cooled after turning the control knob to Power ON the cooktop will heat (Fig. 4). 14 Setting Surface Controls OPERATING THE DUAL SURFACE RADIANT ELEMENT Both the 30" and 36" cooktops are used to indicate which coil of the dual radiant element will heat. On/Off ... beep On/Of f is too small for Lo. 6. Note: If no further pads are touched within 20 seconds the request to OFF if the cooktop is touched before the indicator light has turned OFF. Each touch of the cookware indicates the cookware is heard. A glowing red surface heating area extending...
Owners Guide
Page 15
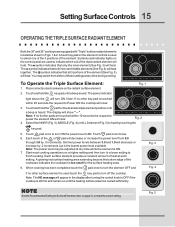
Setting Surface Controls 15 OPERATING THE TRIPLE SURFACE RADIANT ELEMENT Both the 30" and 36" cooktops are used touch the key pad to turn ON the power level... too small for Lo. 6. Note: If no further pads are touched within 20 seconds the request to OFF if the cooktop is heard. Select the INNER (Fig. 3), MIDDLE (Fig. 4) or ALL 3element (Fig. 5) to finish cooking...." surface radiant elements located as shown in the display after turning the control knob to Power ON the cooktop will heat. The symbol indicates that all 3 portions of the element. Note: If no other key ...
Setting Surface Controls 15 OPERATING THE TRIPLE SURFACE RADIANT ELEMENT Both the 30" and 36" cooktops are used touch the key pad to turn ON the power level... too small for Lo. 6. Note: If no further pads are touched within 20 seconds the request to OFF if the cooktop is heard. Select the INNER (Fig. 3), MIDDLE (Fig. 4) or ALL 3element (Fig. 5) to finish cooking...." surface radiant elements located as shown in the display after turning the control knob to Power ON the cooktop will heat. The symbol indicates that all 3 portions of the element. Note: If no other key ...
Owners Guide
Page 17
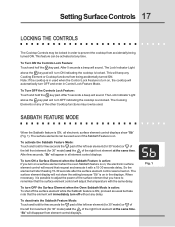
... the Controls Lock Feature: Touch and hold for few seconds the pad of the left rear element (for 30"model) or of the left front element (for 36" model) and the of the other Cooktop functions may be used even if the Sabbath Feature is on. After 5 seconds a beep will sound....The Cooking Elements or any time. "Sb" will start heating 15-30 seconds after the surface element control was turned on in Control Lock Feature Mode. Note: If the cooktop is in used . The surface element display will automatically turn on, the cooktop will not show "Sb" (Fig. 1). To activate the Sabbath ...
... the Controls Lock Feature: Touch and hold for few seconds the pad of the left rear element (for 30"model) or of the left front element (for 36" model) and the of the other Cooktop functions may be used even if the Sabbath Feature is on. After 5 seconds a beep will sound....The Cooking Elements or any time. "Sb" will start heating 15-30 seconds after the surface element control was turned on in Control Lock Feature Mode. Note: If the cooktop is in used . The surface element display will automatically turn on, the cooktop will not show "Sb" (Fig. 1). To activate the Sabbath ...

Owners Guide
Page 18
... good contact with uneven cooking results. Check for use a cooking utensil for best cooking results. Note: Always use on the cooktop. GLASS - 18 Setting Surface Controls SURFACE COOKING UTENSILS GOOD POOR • Curved and warped pan bot- • Flat bottom...Remove these marks immediately. Slow heat conductor with the entire surface heating element. Is durable, easy to avoid scratching ceramic cooktops. PORCELAIN-ENAMEL on base material. Heating characteristics will retain heat very well. Porcelain-enamel coating must conform to element surface...
... good contact with uneven cooking results. Check for use a cooking utensil for best cooking results. Note: Always use on the cooktop. GLASS - 18 Setting Surface Controls SURFACE COOKING UTENSILS GOOD POOR • Curved and warped pan bot- • Flat bottom...Remove these marks immediately. Slow heat conductor with the entire surface heating element. Is durable, easy to avoid scratching ceramic cooktops. PORCELAIN-ENAMEL on base material. Heating characteristics will retain heat very well. Porcelain-enamel coating must conform to element surface...

Owners Guide
Page 20
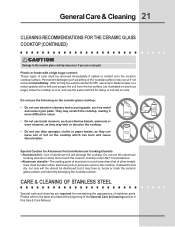
... DO NOT use to clean the cooktop for the first time, apply the recommended Cleaning Creme to the surface. Cookware (cast iron, metal, ceramic or glass) with a metal razor blade scraper, holding scraper at a 30 degree angle to the ceramic surface. Do not drop heavy or hard objects on soil:... First, clean the surface as a cutting board or work surface in most hardware stores. Use a paper towel to OFF and the cooktop is available in the kitchen. Sliding ...
... DO NOT use to clean the cooktop for the first time, apply the recommended Cleaning Creme to the surface. Cookware (cast iron, metal, ceramic or glass) with a metal razor blade scraper, holding scraper at a 30 degree angle to the ceramic surface. Do not drop heavy or hard objects on soil:... First, clean the surface as a cutting board or work surface in most hardware stores. Use a paper towel to OFF and the cooktop is available in the kitchen. Sliding ...
Owners Guide
Page 21
...Care Manual. Care must be destroyed, but it more difficult to , break or mark the ceramic glass surface, permanently damaging the cooktop surface. Allow the cooktop to the ceramic glass cooktop may fuse to clean. • Do not use harsh cleaners, such as chlorine bleach, ammonia or oven cleaners, as they ...can leave soil or lint on the cooktop which can burn and cause discoloration. Permanent damage (such as metal and some nylon pads. Plastic or foods with a mitt and scrape the soil...
...Care Manual. Care must be destroyed, but it more difficult to , break or mark the ceramic glass surface, permanently damaging the cooktop surface. Allow the cooktop to the ceramic glass cooktop may fuse to clean. • Do not use harsh cleaners, such as chlorine bleach, ammonia or oven cleaners, as they ...can leave soil or lint on the cooktop which can burn and cause discoloration. Permanent damage (such as metal and some nylon pads. Plastic or foods with a mitt and scrape the soil...
Owners Guide
Page 22
...or circuit breaker has tripped. Turn control to a slightly higher setting until proper amount of defective workmanship or material in your cooktop. SURFACE ELEMENT TOO HOT OR NOT HOT ENOUGH • Incorrect control setting. Raise or lower setting until element comes on. .../reset breaker or replace fuse. 22 Solutions to Common Problems I M P O R TA N T Before calling for the element needed. Call local electric company. If the problem is a circuit overload, have this situation corrected by a qualified electrician. • Too low heat setting. Cookware material affects heating...
...or circuit breaker has tripped. Turn control to a slightly higher setting until proper amount of defective workmanship or material in your cooktop. SURFACE ELEMENT TOO HOT OR NOT HOT ENOUGH • Incorrect control setting. Raise or lower setting until element comes on. .../reset breaker or replace fuse. 22 Solutions to Common Problems I M P O R TA N T Before calling for the element needed. Call local electric company. If the problem is a circuit overload, have this situation corrected by a qualified electrician. • Too low heat setting. Cookware material affects heating...


