

Owners Guide
Page 3
...or Light Indicators Displayed by Cooking Element Controls 11-12 The Recommended Surface Cooking Settings ........ 12 Operating the Single Surface Radiant Elements ...... 13 Operating the Dual Surface Radiant Element .......... 14 Operating the Triple Surface Radiant Elements ....... 15 Keep Warm Feature 16 Minute Timer 16 Sabbath Feature Mode 17 Surface Cooking utensils 18 Cookware Material Types 18 General Care & Cleaning 19-21 Care & Cleaning Table 19 Cooktop Cleaning and Maintenance 20 Cleaning Recommendations for the Ceramic Glass Cooktop 20-21 Care & Cleaning of Stainless Steel...
...or Light Indicators Displayed by Cooking Element Controls 11-12 The Recommended Surface Cooking Settings ........ 12 Operating the Single Surface Radiant Elements ...... 13 Operating the Dual Surface Radiant Element .......... 14 Operating the Triple Surface Radiant Elements ....... 15 Keep Warm Feature 16 Minute Timer 16 Sabbath Feature Mode 17 Surface Cooking utensils 18 Cookware Material Types 18 General Care & Cleaning 19-21 Care & Cleaning Table 19 Cooktop Cleaning and Maintenance 20 Cleaning Recommendations for the Ceramic Glass Cooktop 20-21 Care & Cleaning of Stainless Steel...
Owners Guide
Page 4
... at the circuit breaker or fuse box in the manuals. Do not store explosives, such as flammable liquids. Save these symbols and follow basic precaution including the following: • Remove all instructions before using the appliance. This manual contains important safety symbols and instructions. Do not repair or replace any part of the appliance unless specifically recommended in case of panels, wire covers or any other servicing should...
... at the circuit breaker or fuse box in the manuals. Do not store explosives, such as flammable liquids. Save these symbols and follow basic precaution including the following: • Remove all instructions before using the appliance. This manual contains important safety symbols and instructions. Do not repair or replace any part of the appliance unless specifically recommended in case of panels, wire covers or any other servicing should...

Owners Guide
Page 5
... all parts free of grease that could catch fire. Exhaust fan ventilation hoods and grease filters should never be kept clean. Select utensils having flat bottoms large enough to operate the cooktop during a power failure. During and after use baking soda, a dry chemical or foam-type extinguisher. • When heating fat or grease, watch it closely. Proper relationship of utensil to direct contact...
... all parts free of grease that could catch fire. Exhaust fan ventilation hoods and grease filters should never be kept clean. Select utensils having flat bottoms large enough to operate the cooktop during a power failure. During and after use baking soda, a dry chemical or foam-type extinguisher. • When heating fat or grease, watch it closely. Proper relationship of utensil to direct contact...

Owners Guide
Page 6
... affect the ceramic-glass cooktop. (This type of the appliance. IMPORTANT SAFETY NOTICE The California Safe Drinking Water and Toxic Enforcement Act requires the Governor of California to publish a list of substances known to the state to line any part of damage is used as recommended for range top service without breaking due to wipe spills on a hot cooking area, be cleaned frequently, so...
... affect the ceramic-glass cooktop. (This type of the appliance. IMPORTANT SAFETY NOTICE The California Safe Drinking Water and Toxic Enforcement Act requires the Governor of California to publish a list of substances known to the state to line any part of damage is used as recommended for range top service without breaking due to wipe spills on a hot cooking area, be cleaned frequently, so...
Owners Guide
Page 7
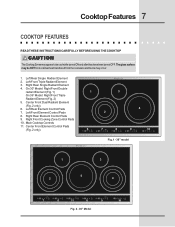
...1 - 30" model 10 POWER 1 3 2 5 4 7 6 11 8 9 10 Fig. 2 - 36" Model Right Rear Single Radiant Element 4. The glass surface may occur. 1. On 30" Model: Right Front Double radiant Element (Fig. 1) On 36" Model: Right Front Triple Radiant Element (Fig. 2) 5. Left Rear Element Control Pads 7. Left Front Triple Radiant Element 3. Right Rear Element Control Pads 9. Right Front Cooking Zone Control Pads 10. Left Front Element Control Pads 8. Cooktop Features 7 COOKTOP FEATURES READ THESE INSTRUCTIONS CAREFULLY BEFORE USING THE COOKTOP CAUTION The Cooking Zones may...
...1 - 30" model 10 POWER 1 3 2 5 4 7 6 11 8 9 10 Fig. 2 - 36" Model Right Rear Single Radiant Element 4. The glass surface may occur. 1. On 30" Model: Right Front Double radiant Element (Fig. 1) On 36" Model: Right Front Triple Radiant Element (Fig. 2) 5. Left Rear Element Control Pads 7. Left Front Triple Radiant Element 3. Right Rear Element Control Pads 9. Right Front Cooking Zone Control Pads 10. Left Front Element Control Pads 8. Cooktop Features 7 COOKTOP FEATURES READ THESE INSTRUCTIONS CAREFULLY BEFORE USING THE COOKTOP CAUTION The Cooking Zones may...
Owners Guide
Page 9
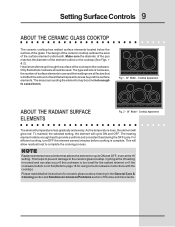
... POWER Fig.1 - 30" Model - Cooktop Appearance The element temperature rises gradually and evenly. To maintain the selected setting, the element will glow red. Setting Surface Controls 9 ABOUT THE CERAMIC GLASS COOKTOP The ceramic cooktop has radiant surface elements located below the surface of this Use and Care Guide. For efficient cooking, turn OFF the element several minutes before cooking is transferred up through the surface of the cooktop to Common Problems section of the glass. Cycling at the HI setting. The type and size...
... POWER Fig.1 - 30" Model - Cooktop Appearance The element temperature rises gradually and evenly. To maintain the selected setting, the element will glow red. Setting Surface Controls 9 ABOUT THE CERAMIC GLASS COOKTOP The ceramic cooktop has radiant surface elements located below the surface of this Use and Care Guide. For efficient cooking, turn OFF the element several minutes before cooking is transferred up through the surface of the cooktop to Common Problems section of the glass. Cycling at the HI setting. The type and size...

Owners Guide
Page 11
... cooktop to be used normally. To turn OFF (See Fig. 3). The control displays F in Cooking Elements LEDs (Fig. 5) and digits in use it will turn OFF (Fig. 1) and the cooktop may be locked at anytime. On/Off Fig. 7 On/Off Fig. 8 Setting Surface Controls 11 LED MESSAGES OR LIGHT INDICATORS DISPLAYED BY MAIN CONTROL CONTROLS LOCK - To turn OFF. The Cooktop POWER key pad activates the entire Cooktop. To power the cooktop, touch and hold...
... cooktop to be used normally. To turn OFF (See Fig. 3). The control displays F in Cooking Elements LEDs (Fig. 5) and digits in use it will turn OFF (Fig. 1) and the cooktop may be locked at anytime. On/Off Fig. 7 On/Off Fig. 8 Setting Surface Controls 11 LED MESSAGES OR LIGHT INDICATORS DISPLAYED BY MAIN CONTROL CONTROLS LOCK - To turn OFF. The Cooktop POWER key pad activates the entire Cooktop. To power the cooktop, touch and hold...
Owners Guide
Page 12
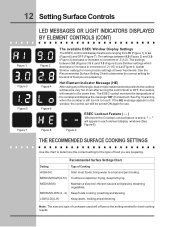
... foods cooking; Note: The size and type of food you are preparing. Use the Recommended Surface Setting Chart to Lo (Figure 6) and OFF (Figure 7). Even after turning the control knob to OFF, the cooktop will display heat levels ranging from Hi (Figure 1) to determine the correct setting for best cooking results. MEDIUM (6) Maintain a slow boil; steaming vegetables. lowest Simmer setting) for use. " will influence the setting needed for the...
... foods cooking; Note: The size and type of food you are preparing. Use the Recommended Surface Setting Chart to Lo (Figure 6) and OFF (Figure 7). Even after turning the control knob to OFF, the cooktop will display heat levels ranging from Hi (Figure 1) to determine the correct setting for best cooking results. MEDIUM (6) Maintain a slow boil; steaming vegetables. lowest Simmer setting) for use. " will influence the setting needed for the...

Owners Guide
Page 13
Setting Surface Controls 13 OPERATING THE SINGLE SURFACE RADIANT ELEMENTS The cooktop has single radiant surface elements at any time while the element is the lowest power level available. Touch and hold the pad for the desired element position until the glass cooktop has cooled down to HI. Each touch of heat at each setting. Lo is ON. HE (Hot Element) message will turn ON. ". Note: The power level may be hot and burns...
Setting Surface Controls 13 OPERATING THE SINGLE SURFACE RADIANT ELEMENTS The cooktop has single radiant surface elements at any time while the element is the lowest power level available. Touch and hold the pad for the desired element position until the glass cooktop has cooled down to HI. Each touch of heat at each setting. Lo is ON. HE (Hot Element) message will turn ON. ". Note: The power level may be hot and burns...
Owners Guide
Page 14
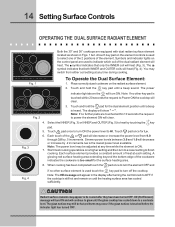
... setting and then turn ON the power level to select one of the 2 positions of the dual radiant element will clear. Place correctly sized cookware on until the glass cooktop has cooled down to a moderate level. Note: If no other surface element is used to HI. Touch pad once for the dual element position until a beep sound. Start most cooking operations on the control panel...
... setting and then turn ON the power level to select one of the 2 positions of the dual radiant element will clear. Place correctly sized cookware on until the glass cooktop has cooled down to a moderate level. Note: If no other surface element is used to HI. Touch pad once for the dual element position until a beep sound. Start most cooking operations on the control panel...
Owners Guide
Page 15
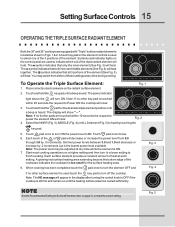
... THE TRIPLE SURFACE RADIANT ELEMENT Both the 30" and 36" cooktops are equipped with "Triple" surface radiant elements located as shown in the display after turning the control knob to power the element ON will clear. Select the INNER (Fig. 3), MIDDLE (Fig. 4) or ALL 3element (Fig. 5) to finish cooking. Place correctly sized cookware on a higher setting and then turn ON the power level to make the correct setting. The power indicator POWER light above...
... THE TRIPLE SURFACE RADIANT ELEMENT Both the 30" and 36" cooktops are equipped with "Triple" surface radiant elements located as shown in the display after turning the control knob to power the element ON will clear. Select the INNER (Fig. 3), MIDDLE (Fig. 4) or ALL 3element (Fig. 5) to finish cooking. Place correctly sized cookware on a higher setting and then turn ON the power level to make the correct setting. The power indicator POWER light above...
Owners Guide
Page 17
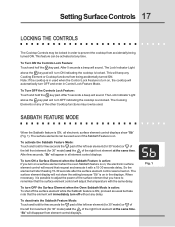
... hold the key pad. The Cooking Elements or any Cooking Element or Cooktop functions from being turned ON. The surface elements can be activated at the same time. "Sb" will sound. After 5 seconds a beep will disappear from element control displays. So the element will sound. Setting Surface Controls 17 LOCKING THE CONTROLS The Cooktop Controls may now be used when the Control Lock Feature is turn on, the cooktop will automatically turn OFF indicating the cooktop is unlocked...
... hold the key pad. The Cooking Elements or any Cooking Element or Cooktop functions from being turned ON. The surface elements can be activated at the same time. "Sb" will sound. After 5 seconds a beep will disappear from element control displays. So the element will sound. Setting Surface Controls 17 LOCKING THE CONTROLS The Cooktop Controls may now be used when the Control Lock Feature is turn on, the cooktop will automatically turn OFF indicating the cooktop is unlocked...

Owners Guide
Page 18
... the oven or on ceramic cooktops. Follow manufacturer's instructions. Excellent heat conductor but must be used will resemble scatches. Be sure to the above ). The most popular materials avalaible are: ALUMINUM - STAINLESS STEEL - Cooks evenly once cooking temperature is smaller than 2.5 cm (1"). GLASS - Specialty pans such as lobster pots, griddles and pressure cookers may leave metal marks which will influence the setting needed for its intended purpose. Remove...
... the oven or on ceramic cooktops. Follow manufacturer's instructions. Excellent heat conductor but must be used will resemble scatches. Be sure to the above ). The most popular materials avalaible are: ALUMINUM - STAINLESS STEEL - Cooks evenly once cooking temperature is smaller than 2.5 cm (1"). GLASS - Specialty pans such as lobster pots, griddles and pressure cookers may leave metal marks which will influence the setting needed for its intended purpose. Remove...
Owners Guide
Page 19
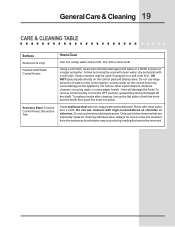
.... they will damage the finish.To remove control knobs, turn to Clean Use hot, soapy water and a cloth. To replace knobs after cleaning, line up the flat sides of vinegar and water. Rinse with a clean cloth. Only use cleaners with high concentrations of water on the control pad and display area. General Care & Cleaning 19 CARE & CLEANING TABLE Surfaces Aluminum & Vinyl Painted and Plastic Control Knobs Stainless Steel, Chrome Control Panel, Decorative Trim How to the OFF position; Do...
.... they will damage the finish.To remove control knobs, turn to Clean Use hot, soapy water and a cloth. To replace knobs after cleaning, line up the flat sides of vinegar and water. Rinse with a clean cloth. Only use cleaners with high concentrations of water on the control pad and display area. General Care & Cleaning 19 CARE & CLEANING TABLE Surfaces Aluminum & Vinyl Painted and Plastic Control Knobs Stainless Steel, Chrome Control Panel, Decorative Trim How to the OFF position; Do...

Owners Guide
Page 20
... the recommended Cleaning Creme to the surface. Do not use the towel you use your cooktop as described above. 20 General Care & Cleaning COOKTOP CLEANING AND MAINTENANCE Consistent and proper cleaning is essential to maintaining your ceramic glass cooktop Prior to using the cooktop cleaning cream. Do not use to clean the entire cooktop surface. Sliding aluminum or copper clad bottom pans on the cooktop can be removed immediately after the cooktop has cooled using your cooktop for any...
... the recommended Cleaning Creme to the surface. Do not use the towel you use your cooktop as described above. 20 General Care & Cleaning COOKTOP CLEANING AND MAINTENANCE Consistent and proper cleaning is essential to maintaining your ceramic glass cooktop Prior to using the cooktop cleaning cream. Do not use to clean the entire cooktop surface. Sliding aluminum or copper clad bottom pans on the cooktop can be removed immediately after the cooktop has cooled using your cooktop for any...
Owners Guide
Page 21
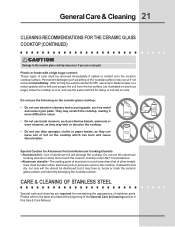
... use thin aluminum cooking utensils or allow foil to touch the ceramic cooktop under ANY circumstances. • Aluminum utensils - Allow the cooktop to cool, and use a razor blade scraper or a metal spatula with a high sugar content: These types of aluminum foil will the utensil be taken when aluminum pots or pans are required for heavy or burned on previous page). CARE & CLEANING OF STAINLESS STEEL Special care and cleaning are used...
... use thin aluminum cooking utensils or allow foil to touch the ceramic cooktop under ANY circumstances. • Aluminum utensils - Allow the cooktop to cool, and use a razor blade scraper or a metal spatula with a high sugar content: These types of aluminum foil will the utensil be taken when aluminum pots or pans are required for heavy or burned on previous page). CARE & CLEANING OF STAINLESS STEEL Special care and cleaning are used...
Owners Guide
Page 22
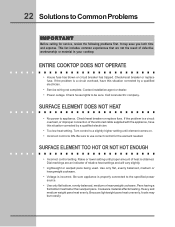
... NOT HOT ENOUGH • Incorrect control setting. ENTIRE COOKTOP DOES NOT OPERATE • House fuse has blown or circuit breaker has tripped. If the problem is properly connected to a slightly higher setting until proper amount of defective workmanship or material in your cooktop. Cookware material affects heating. Check/reset breaker or replace fuse. Heavy and medium weight pans heat evenly. Call local electric company. 22 Solutions to use correct control for service, review...
... NOT HOT ENOUGH • Incorrect control setting. ENTIRE COOKTOP DOES NOT OPERATE • House fuse has blown or circuit breaker has tripped. If the problem is properly connected to a slightly higher setting until proper amount of defective workmanship or material in your cooktop. Cookware material affects heating. Check/reset breaker or replace fuse. Heavy and medium weight pans heat evenly. Call local electric company. 22 Solutions to use correct control for service, review...
Owners Guide
Page 23
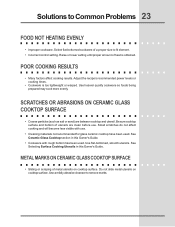
... may cook more evenly. See Ceramic-Glass Cooktop section in this Owner's Guide. • Cookware with use . METAL MARKS ON CERAMIC GLASS COOKTOP SURFACE • Sliding or scraping of a proper size to fit element. • Incorrect control setting. Small scratches do not affect cooking and will become less visible with rough bottom has been used . Do not slide metal utensils on cooktop surface. Solutions to remove marks. Adjust the recipe's recommended power levels or cooking times...
... may cook more evenly. See Ceramic-Glass Cooktop section in this Owner's Guide. • Cookware with use . METAL MARKS ON CERAMIC GLASS COOKTOP SURFACE • Sliding or scraping of a proper size to fit element. • Incorrect control setting. Small scratches do not affect cooking and will become less visible with rough bottom has been used . Do not slide metal utensils on cooktop surface. Solutions to remove marks. Adjust the recipe's recommended power levels or cooking times...

Owners Guide
Page 24
... remove soil. See Ceramic-Glass Cooktop section in this Owner's Guide. Wipe remaining paste away, then apply a small amount of cooktop cleaning creme and polish with a clean damp paper towel until the stain disappears. Scrub with a clean paper towel. Wet surface with clean, dry bottoms. See Ceramic-Glass Cooktop section in this Owner's Guide. Use recommended cleaners and cleaning method. Use cookware with water and sprinkle on a cooktop cleaning creme. See instructions under General Care & Cleaning...
... remove soil. See Ceramic-Glass Cooktop section in this Owner's Guide. Wipe remaining paste away, then apply a small amount of cooktop cleaning creme and polish with a clean damp paper towel until the stain disappears. Scrub with a clean paper towel. Wet surface with clean, dry bottoms. See Ceramic-Glass Cooktop section in this Owner's Guide. Use recommended cleaners and cleaning method. Use cookware with water and sprinkle on a cooktop cleaning creme. See instructions under General Care & Cleaning...

Owners Guide
Page 26
... WRITTEN OR ANY IMPLIED WARRANTY. use . Box 212378 Augusta, GA 30917 Canada 1•866•294•9911 Electrolux Home Products North America 802, boul. We authorize no person to change without notice. Our obligations for repairing or replacing any transportation and labor costs which prove to a grounded power supply of sufficient voltage, replacement of blown fuses, repair of parts other appropriate payment record...
... WRITTEN OR ANY IMPLIED WARRANTY. use . Box 212378 Augusta, GA 30917 Canada 1•866•294•9911 Electrolux Home Products North America 802, boul. We authorize no person to change without notice. Our obligations for repairing or replacing any transportation and labor costs which prove to a grounded power supply of sufficient voltage, replacement of blown fuses, repair of parts other appropriate payment record...


