Datasheet
Page 1
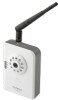
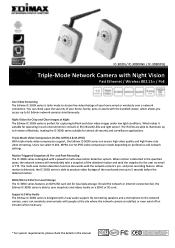
... 2-Way Audio The Edimax IC-3030i series is designed with a powerful multi-area motion detection system. When motion is detected in the manual When motion is detected, the IC-3030i series is able to produce video footage of the monitored area up to the user via email or FTP. IC-3030i / IC-3030iWn / IC-3030iPoE Triple-Mode Network...
... 2-Way Audio The Edimax IC-3030i series is designed with a powerful multi-area motion detection system. When motion is detected in the manual When motion is detected, the IC-3030i series is able to produce video footage of the monitored area up to the user via email or FTP. IC-3030i / IC-3030iWn / IC-3030iPoE Triple-Mode Network...
Datasheet
Page 2
...SDRAM Certifications FCC Class B, CE Mark RF Output Power 11b: 16dBm - 18dBm 11g: 14dBm - 16dBm 11n: 11dBm - 13dBm Power Adapter DC 12V LED LAN Wireless (IC-3030i & IC-3030iWn) Power Operating Conditions 0 - 40 Degrees Celsius 10 - 90% (Non-Condensing) Frequency Band 2.4000 - 2.4835GHz SOFTWARE FEATURES • H.264, MPEG-4, and M-...& post-recording upon detected motion • VGA video @ 30fps • High-speed video compression • Viewer can access 16 network cameras simultaneously • Manual/Scheduled/Cycle recording • Up to 16 login accounts for web-based camera access
...SDRAM Certifications FCC Class B, CE Mark RF Output Power 11b: 16dBm - 18dBm 11g: 14dBm - 16dBm 11n: 11dBm - 13dBm Power Adapter DC 12V LED LAN Wireless (IC-3030i & IC-3030iWn) Power Operating Conditions 0 - 40 Degrees Celsius 10 - 90% (Non-Condensing) Frequency Band 2.4000 - 2.4835GHz SOFTWARE FEATURES • H.264, MPEG-4, and M-...& post-recording upon detected motion • VGA video @ 30fps • High-speed video compression • Viewer can access 16 network cameras simultaneously • Manual/Scheduled/Cycle recording • Up to 16 login accounts for web-based camera access
Manual
Page 2
...magnetic, optical, chemical, manual or otherwise, without notice. reserves the right to revise this QIG. The GNU GPL and GNU LGPL software codes used in the contents hereof without any person of each license. Edimax Technology Co., Ltd. Please visit our website www.edimax.com for the terms ... of this publication may appear slightly different from those shown in this publication and to make changes from Edimax Technology Co., Ltd. For more information about this manual is sold or licensed as is. All brand and product names mentioned in the software. Linux Open Source...
...magnetic, optical, chemical, manual or otherwise, without notice. reserves the right to revise this QIG. The GNU GPL and GNU LGPL software codes used in the contents hereof without any person of each license. Edimax Technology Co., Ltd. Please visit our website www.edimax.com for the terms ... of this publication may appear slightly different from those shown in this publication and to make changes from Edimax Technology Co., Ltd. For more information about this manual is sold or licensed as is. All brand and product names mentioned in the software. Linux Open Source...
Manual
Page 5
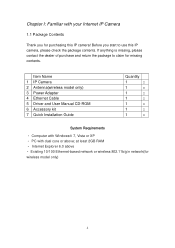
...-based network or wireless 802.11b/g/n network(for missing contents. Item Name 1 IP Camera 2 Antenna(wireless model only) 3 Power Adapter 4 Ethernet Cable 5 Driver and User Manual CD-ROM 6 Accessory kit 7 Quick Installation Guide Quantity 1 □ 1 □ 1 □ 1 □ 1 □ 1 □ 1 □ System Requirements • Computer with Windows® 7, Vista or XP...
...-based network or wireless 802.11b/g/n network(for missing contents. Item Name 1 IP Camera 2 Antenna(wireless model only) 3 Power Adapter 4 Ethernet Cable 5 Driver and User Manual CD-ROM 6 Accessory kit 7 Quick Installation Guide Quantity 1 □ 1 □ 1 □ 1 □ 1 □ 1 □ 1 □ System Requirements • Computer with Windows® 7, Vista or XP...

Manual
Page 18
... to guide you want to install or click „EXIT‟ to install the program later. Follow the simple steps below to run "Autorun.exe" manually from "Autorun" folder in Windows 2000/XP/Vista/7 are the demonstration of „Install Administrator Utility & Camera Viewer‟. 17 The following installation is also...
... to guide you want to install or click „EXIT‟ to install the program later. Follow the simple steps below to run "Autorun.exe" manually from "Autorun" folder in Windows 2000/XP/Vista/7 are the demonstration of „Install Administrator Utility & Camera Viewer‟. 17 The following installation is also...
Manual
Page 23
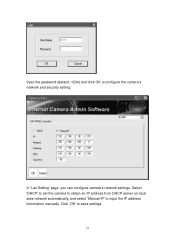
Click „OK‟ to configure the camera‟s network and security setting: In „Lan Setting‟ page, you can configure camera‟s network settings. Input the password (default: 1234) and click OK to save settings. 22 Select „DHCP‟ to set the camera to obtain an IP address from DHCP server on local area network automatically, and select „Manual IP‟ to input the IP address information manually.
Click „OK‟ to configure the camera‟s network and security setting: In „Lan Setting‟ page, you can configure camera‟s network settings. Input the password (default: 1234) and click OK to save settings. 22 Select „DHCP‟ to set the camera to obtain an IP address from DHCP server on local area network automatically, and select „Manual IP‟ to input the IP address information manually.
Manual
Page 64
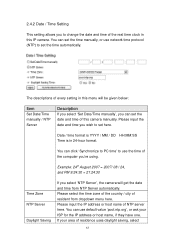
... of NTP server here. 2.4.2 Date / Time Setting This setting allows you to change the date and time of the real time clock in this camera manually. Date / time format is YYYY / MM / DD HH:MM:SS Time is in 24-hour format. Example: 24th August 2007 = 2007/ 08 / 24, and PM...;, you ‟re using. Please select the time zone of the country / city of resident from NTP Server automatically. You can set the time manually, or use the time of the computer you can use default value „pool.ntp.org‟, or ask your area of residence uses daylight ...
... of NTP server here. 2.4.2 Date / Time Setting This setting allows you to change the date and time of the real time clock in this camera manually. Date / time format is YYYY / MM / DD HH:MM:SS Time is in 24-hour format. Example: 24th August 2007 = 2007/ 08 / 24, and PM...;, you ‟re using. Please select the time zone of the country / city of resident from NTP Server automatically. You can set the time manually, or use the time of the computer you can use default value „pool.ntp.org‟, or ask your area of residence uses daylight ...

Manual
Page 65
If you wish to use the date and time setting of the computer which is connecting to the camera, click „Synchronize to date and time setting in this page. 64 The date and time setting of your computer to „Set Date / Time manually‟ field. Click „Apply‟ to PC time „Yes‟; otherwise select „No‟. Time Synchronize to save settings and make the new settings take effect. Click to input current time of the computer will be filled to PC time‟ button.
If you wish to use the date and time setting of the computer which is connecting to the camera, click „Synchronize to date and time setting in this page. 64 The date and time setting of your computer to „Set Date / Time manually‟ field. Click „Apply‟ to PC time „Yes‟; otherwise select „No‟. Time Synchronize to save settings and make the new settings take effect. Click to input current time of the computer will be filled to PC time‟ button.

Manual
Page 106
3-10 Recording You can start video recording of selected camera manually by clicking „Start Recording‟ button: When recording starts, you ‟ll see a message displayed in message displaying box like „1/1 10:00:00, Camera 2 Start Manual‟, which means camera 1 starts recording manually on 1/1 at 10:00:00. To stop recording, click „Start Recording‟ button again, and you ‟ll see a message displayed in message displaying box like „1/1 10:00:00, Camera 2 Stop Manual‟. 105
3-10 Recording You can start video recording of selected camera manually by clicking „Start Recording‟ button: When recording starts, you ‟ll see a message displayed in message displaying box like „1/1 10:00:00, Camera 2 Start Manual‟, which means camera 1 starts recording manually on 1/1 at 10:00:00. To stop recording, click „Start Recording‟ button again, and you ‟ll see a message displayed in message displaying box like „1/1 10:00:00, Camera 2 Stop Manual‟. 105