
User Manual
Page 5
780i 3-Way SLI Motherboard Connecting Serial ATA Cables 18 Connecting Internal Headers 19 Front Panel Header 19 IEEE 1394a ...20 USB Headers 21 Audio ...22 Fan Connections 23 COM1 ...24 FDD Connector 25 Expansion Slots 25 PCI Slots ...25 PCI Express x1 Slot 26 PCI Express x16 Slots 26 Jumper Settings ...27 Clear CMOS Jumper: CLR_CMOS 27 Configuring the BIOS 29 Enter BIOS Setup 30 Main Menu...30 Standard CMOS Features Menu 33 Date and Time...34 IDE Channel and SATA Channel 34 Drive A...37 Halt On ...37 Memory ...38 Advanced BIOS Features 39 Removable Device Priority 40 EVGA iv
780i 3-Way SLI Motherboard Connecting Serial ATA Cables 18 Connecting Internal Headers 19 Front Panel Header 19 IEEE 1394a ...20 USB Headers 21 Audio ...22 Fan Connections 23 COM1 ...24 FDD Connector 25 Expansion Slots 25 PCI Slots ...25 PCI Express x1 Slot 26 PCI Express x16 Slots 26 Jumper Settings ...27 Clear CMOS Jumper: CLR_CMOS 27 Configuring the BIOS 29 Enter BIOS Setup 30 Main Menu...30 Standard CMOS Features Menu 33 Date and Time...34 IDE Channel and SATA Channel 34 Drive A...37 Halt On ...37 Memory ...38 Advanced BIOS Features 39 Removable Device Priority 40 EVGA iv
User Manual
Page 7
780i 3-Way SLI Motherboard IEEE1394 controller 62 HD Audio ...62 IDE HDD Block Mode 62 Onboard FDC Controller 62 Onboard Serial Port 1 63 Power Management Setup Menu 63 ACPI ... 70 Installing Drivers and Software 72 Driver Installation 73 Using the NVIDIA Software 74 NVIDIA Performance Group of NVIDIA Control Panel 75 Device Settings 76 EVGA vi
780i 3-Way SLI Motherboard IEEE1394 controller 62 HD Audio ...62 IDE HDD Block Mode 62 Onboard FDC Controller 62 Onboard Serial Port 1 63 Power Management Setup Menu 63 ACPI ... 70 Installing Drivers and Software 72 Driver Installation 73 Using the NVIDIA Software 74 NVIDIA Performance Group of NVIDIA Control Panel 75 Device Settings 76 EVGA vi
User Manual
Page 11
When replacing a motherboard in a PC case, you will use most of the cables provided in the kit. EVGA x If however, you are building a PC, you will not need to install the motherboard into a PC case. 780i 3-Way SLI Motherboard Intentions of the Kit This kit provides you will need many of the cables. If you are replacing a motherboard, you with the motherboard and all connecting cables necessary to reinstall an operating system even though the current drives have an operating system.
When replacing a motherboard in a PC case, you will use most of the cables provided in the kit. EVGA x If however, you are building a PC, you will not need to install the motherboard into a PC case. 780i 3-Way SLI Motherboard Intentions of the Kit This kit provides you will need many of the cables. If you are replacing a motherboard, you with the motherboard and all connecting cables necessary to reinstall an operating system even though the current drives have an operating system.
User Manual
Page 13
...), S4 (Suspend to disk - off) ‰ Expansion Slots ¾ Two PCI slots ¾ One PCI Express x1 slot ¾ Three PCI Express x16 Graphics slots 780i 3-Way SLI Motherboard EVGA 2 ‰ Onboard Serial ATA II ¾ 300MBps data transfer rate ¾ Six Serial ATA II connectors ¾ NVIDIA MediaShield RAID with support for RAID 0, RAID...
...), S4 (Suspend to disk - off) ‰ Expansion Slots ¾ Two PCI slots ¾ One PCI Express x1 slot ¾ Three PCI Express x16 Graphics slots 780i 3-Way SLI Motherboard EVGA 2 ‰ Onboard Serial ATA II ¾ 300MBps data transfer rate ¾ Six Serial ATA II connectors ¾ NVIDIA MediaShield RAID with support for RAID 0, RAID...

User Manual
Page 17
... 29 MCP/SPP fan connector EVGA 6 Reset Button 19. PCI Express x16 slots (SLI) 24. 1394a connector 25. DDR DIMM Slots 0 - 3 5. 24-pin ATX Power Connector 6. Serial-ATA (SATA) connectors 8. Jumper 17. Azalia HD Audio Header 5 21. PCI slots 23. NVIDIA SPP with Active fan 3. IDE Connector 7. 780i 3-Way SLI Motherboard 22 22 25 23 24...
... 29 MCP/SPP fan connector EVGA 6 Reset Button 19. PCI Express x16 slots (SLI) 24. 1394a connector 25. DDR DIMM Slots 0 - 3 5. 24-pin ATX Power Connector 6. Serial-ATA (SATA) connectors 8. Jumper 17. Azalia HD Audio Header 5 21. PCI slots 23. NVIDIA SPP with Active fan 3. IDE Connector 7. 780i 3-Way SLI Motherboard 22 22 25 23 24...

User Manual
Page 19
780i 3-Way SLI Motherboard EVGA 8
780i 3-Way SLI Motherboard EVGA 8
User Manual
Page 21
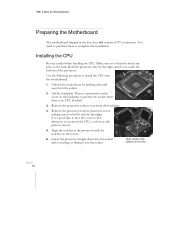
... place to store it. 5. Lower the processor straight down and away from the load plate. 4. There is a protective socket cover on the CPU EVGA 10 Remove the protective socket cover from the socket. 2. Align the notches in the box does not contain a CPU or memory. It is no...pushing down into the socket with out tilting or sliding it into the socket Align notches with the notches on the back. 780i 3-Way SLI Motherboard Preparing the Motherboard The motherboard shipped in the processor with notches on the load plate to protect the socket when there is a good idea to save ...
... place to store it. 5. Lower the processor straight down and away from the load plate. 4. There is a protective socket cover on the CPU EVGA 10 Remove the protective socket cover from the socket. 2. Align the notches in the box does not contain a CPU or memory. It is no...pushing down into the socket with out tilting or sliding it into the socket Align notches with the notches on the back. 780i 3-Way SLI Motherboard Preparing the Motherboard The motherboard shipped in the processor with notches on the load plate to protect the socket when there is a good idea to save ...
User Manual
Page 23
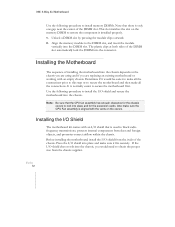
780i 3-Way SLI Motherboard Use the following procedure to install the I/O shield and secure the motherboard into the chassis. It is used to block radio frequency transmissions, protects internal components from dust and foreign objects, and promotes correct airflow within the ... you would be easier to make sure the CPU Fan assembly is installed properly. 1. EVGA 12 This slot matches the slot on the memory DIMM to ensure the component is aligned with an empty chassis. Installing the Motherboard The sequence of the chassis. Also make all the connections prior to this step...
780i 3-Way SLI Motherboard Use the following procedure to install the I/O shield and secure the motherboard into the chassis. It is used to block radio frequency transmissions, protects internal components from dust and foreign objects, and promotes correct airflow within the ... you would be easier to make sure the CPU Fan assembly is installed properly. 1. EVGA 12 This slot matches the slot on the memory DIMM to ensure the component is aligned with an empty chassis. Installing the Motherboard The sequence of the chassis. Also make all the connections prior to this step...

User Manual
Page 25
...; Four 6-pin (3x2) and two 8-pin (4x2) PCI-E power connectors or ¾ Six 6-pin (3x2) PCI-E power connectors EVGA 14 8-pin (4x2) PCT-E Connector 6-pin (3x2) PCI-E connector Figure 3. Power Supply Connectors 780i 3-Way SLI Motherboard ‰ IDE ‰ Serial ATA II ‰ Chassis Fans ‰ Rear panel USB 2.0 Adapter ‰ Expansion slots ‰ CMOS...
...; Four 6-pin (3x2) and two 8-pin (4x2) PCI-E power connectors or ¾ Six 6-pin (3x2) PCI-E power connectors EVGA 14 8-pin (4x2) PCT-E Connector 6-pin (3x2) PCI-E connector Figure 3. Power Supply Connectors 780i 3-Way SLI Motherboard ‰ IDE ‰ Serial ATA II ‰ Chassis Fans ‰ Rear panel USB 2.0 Adapter ‰ Expansion slots ‰ CMOS...

User Manual
Page 27
780i 3-Way SLI Motherboard 8-pin ATX 12V Power (PWR2) PWR2, the 8-pin ATX 12V power connection, is used to provide power to the connector and press firmly until seated. ... its jumper accordingly. Backpanel connector 5 1 12V GND 8 4 Connecting IDE Hard Disk Drives The IDE connector supports Ultra ATA 133/100/66 IDE hard disk drives. 1. EVGA 16 Connect the blue connector (the cable end with the two closely spaced black and gray connectors) to a slave device. Refer to the...
780i 3-Way SLI Motherboard 8-pin ATX 12V Power (PWR2) PWR2, the 8-pin ATX 12V power connection, is used to provide power to the connector and press firmly until seated. ... its jumper accordingly. Backpanel connector 5 1 12V GND 8 4 Connecting IDE Hard Disk Drives The IDE connector supports Ultra ATA 133/100/66 IDE hard disk drives. 1. EVGA 16 Connect the blue connector (the cable end with the two closely spaced black and gray connectors) to a slave device. Refer to the...

User Manual
Page 29
... locking cable end to the drive. EVGA 18 There are six serial ATA connectors on the motherboard that support RAID 0, RAID 1, RAID 5, RAID 0+1 and JBOD configurations. Connect the end without the lock to the motherboard connector. The current Serial ATA II interface allows up to the motherboard. 780i 3-Way SLI Motherboard Connecting Serial ATA Cables The Serial ATA...
... locking cable end to the drive. EVGA 18 There are six serial ATA connectors on the motherboard that support RAID 0, RAID 1, RAID 5, RAID 0+1 and JBOD configurations. Connect the end without the lock to the motherboard connector. The current Serial ATA II interface allows up to the motherboard. 780i 3-Way SLI Motherboard Connecting Serial ATA Cables The Serial ATA...

User Manual
Page 31
... provided in the box but if you do not require the additional external connections, you do not need to the IEEE 1394 connectors on the motherboard. Connect the two ends of your chassis (not all chassis are equipped with the front panel option). 2. Table 3. IEEE 1394a Connector Pins Connector Pin IEEE... 9 4 8 7 6 5 5 4 3 6 2 1 7 8 9 Signal TPA+ TPAGND GND TPB+ TPB+12V +12V Empty Secure the bracket to either the front or rear panel of the cables to install it. 1. 780i 3-Way SLI Motherboard EVGA 20 Table 2.
... provided in the box but if you do not require the additional external connections, you do not need to the IEEE 1394 connectors on the motherboard. Connect the two ends of your chassis (not all chassis are equipped with the front panel option). 2. Table 3. IEEE 1394a Connector Pins Connector Pin IEEE... 9 4 8 7 6 5 5 4 3 6 2 1 7 8 9 Signal TPA+ TPAGND GND TPB+ TPB+12V +12V Empty Secure the bracket to either the front or rear panel of the cables to install it. 1. 780i 3-Way SLI Motherboard EVGA 20 Table 2.

User Manual
Page 33
Table 5. Front Audio Connector Connector Front Audio Connector 1 2 3 4 5 6 7 8 9 10 Pin Signal 1 PORT1_L 2 AUD_GND 3 PORT1_R 4 PRECENCE_J 5 PORT2_R 6 SENSE1_RETURN 7 SENSE_SEND 8 Empty 9 PORT2_L 10 SENSE2_RETURN EVGA 22 The front Audio supports re-tasking function. 780i 3-Way SLI Motherboard Audio The audio connector supports HD audio standard and provides two kinds of audio output choices: the Front Audio, the Rear Audio.
Table 5. Front Audio Connector Connector Front Audio Connector 1 2 3 4 5 6 7 8 9 10 Pin Signal 1 PORT1_L 2 AUD_GND 3 PORT1_R 4 PRECENCE_J 5 PORT2_R 6 SENSE1_RETURN 7 SENSE_SEND 8 Empty 9 PORT2_L 10 SENSE2_RETURN EVGA 22 The front Audio supports re-tasking function. 780i 3-Way SLI Motherboard Audio The audio connector supports HD audio standard and provides two kinds of audio output choices: the Front Audio, the Rear Audio.

User Manual
Page 35
For this installation, these will not be used. Connect one side of a switching cable to the header and then attach the serial COM device to the other side of the cable. EVGA 24 Auxiliary fan connector Auxiliary fan connector Fan Connector 3 2 GND +12V SENSE Auxiliary fan connector System fan connector COM1 The motherboard kit provides an additional serial COM header for your machine. 780i 3-Way SLI Motherboard There are four more fan connectors on the motherboard.
For this installation, these will not be used. Connect one side of a switching cable to the header and then attach the serial COM device to the other side of the cable. EVGA 24 Auxiliary fan connector Auxiliary fan connector Fan Connector 3 2 GND +12V SENSE Auxiliary fan connector System fan connector COM1 The motherboard kit provides an additional serial COM header for your machine. 780i 3-Way SLI Motherboard There are four more fan connectors on the motherboard.

User Manual
Page 37
...installing a PCI Express x16 card, be sure the retention clip snaps and locks the card into place. To configure for graphics or video cards. 780i 3-Way SLI Motherboard PCI Express x1 Slot There is one PCI Express x1 slot that come with the screw used to accommodate less bandwidth-intensive cards, such as ...a modem or LAN card. The x1 slot provides 250 MB/sec bandwidth. EVGA 26 Secure the card's metal bracket to the chassis back panel with the SLI kit (the kit is not seated properly, it could cause a short across the pins.
...installing a PCI Express x16 card, be sure the retention clip snaps and locks the card into place. To configure for graphics or video cards. 780i 3-Way SLI Motherboard PCI Express x1 Slot There is one PCI Express x1 slot that come with the screw used to accommodate less bandwidth-intensive cards, such as ...a modem or LAN card. The x1 slot provides 250 MB/sec bandwidth. EVGA 26 Secure the card's metal bracket to the chassis back panel with the SLI kit (the kit is not seated properly, it could cause a short across the pins.

User Manual
Page 39
780i 3-Way SLI Motherboard EVGA 28
780i 3-Way SLI Motherboard EVGA 28

User Manual
Page 41
... keys to scroll through the options or press Enter to the previous menu, press Esc. To go back to display the associated submenu. EVGA 30 Use the following message briefly displays at the bottom of setup functions and two exit choices. Power on the BIOS screens all data ... arrow keys to maintain optimal system performance. Note: Note that you choose. Press F1 to continue, DEL to verify/change the default BIOS settings. 780i 3-Way SLI Motherboard Enter BIOS Setup The BIOS is highlighted for selection. Press the Del key when the following procedure to enter Setup.
... keys to scroll through the options or press Enter to the previous menu, press Esc. To go back to display the associated submenu. EVGA 30 Use the following message briefly displays at the bottom of setup functions and two exit choices. Power on the BIOS screens all data ... arrow keys to maintain optimal system performance. Note: Note that you choose. Press F1 to continue, DEL to verify/change the default BIOS settings. 780i 3-Way SLI Motherboard Enter BIOS Setup The BIOS is highlighted for selection. Press the Del key when the following procedure to enter Setup.

User Manual
Page 43
...menu to abandon all setting changes and exit setup. SLI-Ready Memory is not detected. 780i 3-Way SLI Motherboard ‰ System Monitor Use this command to monitor ...the real-time system status of the BIOS screen. The following items on the CMOS Setup Utility main menu are : ‰ Enabled: SLI-Ready memory is detected and enabled. ‰ Disabled: SLI...-Ready memory is detected but disabled. ‰ Not Detected: SLI-Ready memory is a ...
...menu to abandon all setting changes and exit setup. SLI-Ready Memory is not detected. 780i 3-Way SLI Motherboard ‰ System Monitor Use this command to monitor ...the real-time system status of the BIOS screen. The following items on the CMOS Setup Utility main menu are : ‰ Enabled: SLI-Ready memory is detected and enabled. ‰ Disabled: SLI...-Ready memory is detected but disabled. ‰ Not Detected: SLI-Ready memory is a ...
User Manual
Page 45
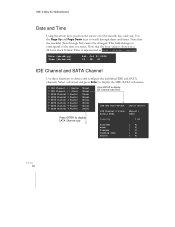
...] Capacity 0 MB Cylinder Head Precomp Landing Zone Sector [ 0] [ 0] [ 0] [ 0] [ 0] EVGA 34 Note that the weekday (Sun through dates and times. Press ENTER to detect and configure the individual IDE and SATA channels. Note that the hour value is represented as hour : minute : second. 780i 3-Way SLI Motherboard Date and Time Using the arrow keys, position the...
...] Capacity 0 MB Cylinder Head Precomp Landing Zone Sector [ 0] [ 0] [ 0] [ 0] [ 0] EVGA 34 Note that the weekday (Sun through dates and times. Press ENTER to detect and configure the individual IDE and SATA channels. Note that the hour value is represented as hour : minute : second. 780i 3-Way SLI Motherboard Date and Time Using the arrow keys, position the...

User Manual
Page 47
... can press Enter to display a window that tells you can then enter the number of cylinders, heads, Precomp, landing zone, and sector. ESC:Abort EVGA 36 780i 3-Way SLI Motherboard Press Enter to auto-detect IDE and SATA channels in a DEC number : For HDD less than 528 MB. ¾ LBA For HDD greater than 528...
... can press Enter to display a window that tells you can then enter the number of cylinders, heads, Precomp, landing zone, and sector. ESC:Abort EVGA 36 780i 3-Way SLI Motherboard Press Enter to auto-detect IDE and SATA channels in a DEC number : For HDD less than 528 MB. ¾ LBA For HDD greater than 528...


