
User Guide
Page 4
... RESET and POWER Button 33 Post Port Debug LED and LED Status Indicators 34 Post Port Debug LED 34 LED Status Indicators 34 Configuring the BIOS 35 Enter BIOS Setup 36 Main Menu ...36 Standard CMOS Features Menu 39 Date and Time ...40 SATA Channel ...40 Halt On ...42 Memory ...42 Advanced...
... RESET and POWER Button 33 Post Port Debug LED and LED Status Indicators 34 Post Port Debug LED 34 LED Status Indicators 34 Configuring the BIOS 35 Enter BIOS Setup 36 Main Menu ...36 Standard CMOS Features Menu 39 Date and Time ...40 SATA Channel ...40 Halt On ...42 Memory ...42 Advanced...

User Guide
Page 7
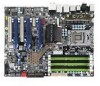
... 3. Figure 14. Figure 4. Figure 8. Figure 12. Figure 5. Figure 10. Figure 11. Figure 6. EVGA X58 SLI Motherboard List of Figures Figure 1. Figure 7. EVGA X58 SLI Motherboard Layout 14 Chassis Backpanel Connectors 15 PWR1 Motherboard Connector 22 BIOS CMOS Setup Utility Main Menu 36 Standard CMOS Features Menu 38 Advanced BIOS Features Menu 42 Integrated Peripherals Menu 44 Power Management Setup Menu 49...
... 3. Figure 14. Figure 4. Figure 8. Figure 12. Figure 5. Figure 10. Figure 11. Figure 6. EVGA X58 SLI Motherboard List of Figures Figure 1. Figure 7. EVGA X58 SLI Motherboard Layout 14 Chassis Backpanel Connectors 15 PWR1 Motherboard Connector 22 BIOS CMOS Setup Utility Main Menu 36 Standard CMOS Features Menu 38 Advanced BIOS Features Menu 42 Integrated Peripherals Menu 44 Power Management Setup Menu 49...
User Guide
Page 35
Descriptions of the BIOS parameters are also provided. This section includes the following information: Enter BIOS Setup Main Menu Standard CMOS Features Advanced BIOS Features Integrated Peripherals Power Management Setup PnP/PCI Configurations PC Health Status Frequency/Voltage Control Configuring the BIOS This section discusses how to change the system settings through the BIOS Setup menus.
Descriptions of the BIOS parameters are also provided. This section includes the following information: Enter BIOS Setup Main Menu Standard CMOS Features Advanced BIOS Features Integrated Peripherals Power Management Setup PnP/PCI Configurations PC Health Status Frequency/Voltage Control Configuring the BIOS This section discusses how to change the system settings through the BIOS Setup menus.

User Guide
Page 36
...for information only, data in yellow is changeable, data in blue is non-changeable, and data in the option you choose. Enter BIOS Setup The BIOS is strongly recommended that on the computer. 4. Note: It is the communication bridge between hardware and software. Press F1 to continue,... DEL to verify/change the default BIOS settings. Power on the BIOS screens all data in white is for selection. Use the following message briefly displays at the bottom of setup functions and ...
...for information only, data in yellow is changeable, data in blue is non-changeable, and data in the option you choose. Enter BIOS Setup The BIOS is strongly recommended that on the computer. 4. Note: It is the communication bridge between hardware and software. Press F1 to continue,... DEL to verify/change the default BIOS settings. Power on the BIOS screens all data in white is for selection. Use the following message briefly displays at the bottom of setup functions and ...

User Guide
Page 37
...set up the basic system configuration. PnP/PCI Configurations Use this menu to modify the system's Plug-and-Play and PCI configurations. BIOS CMOS Setup Utility Main Menu Standard CMOS Features Use this menu to set up onboard peripherals such as IDE, RAID, USB, LAN..., and MAC control. AwardBIOS CMOS Setup Utility Standard CMOS Features Advanced BIOS Features Integrated Peripherals Power Management Setup PnP/PCI Configurations PC Health Status Frequency/Voltage Control Load Defaults Set Supervisor Password Set User Password ...
...set up the basic system configuration. PnP/PCI Configurations Use this menu to modify the system's Plug-and-Play and PCI configurations. BIOS CMOS Setup Utility Main Menu Standard CMOS Features Use this menu to set up onboard peripherals such as IDE, RAID, USB, LAN..., and MAC control. AwardBIOS CMOS Setup Utility Standard CMOS Features Advanced BIOS Features Integrated Peripherals Power Management Setup PnP/PCI Configurations PC Health Status Frequency/Voltage Control Load Defaults Set Supervisor Password Set User Password ...

User Guide
Page 38
Save & Exit Setup Use this command to set, change, and disable the password used to access the BIOS menu. Load Optimized Defaults Load Optimized defaults system settings. Set Supervisor Password/Set User Password Use this command to save settings to CMOS and exit ...
Save & Exit Setup Use this command to set, change, and disable the password used to access the BIOS menu. Load Optimized Defaults Load Optimized defaults system settings. Set Supervisor Password/Set User Password Use this command to save settings to CMOS and exit ...

User Guide
Page 39
... model, and so on. Use the arrow keys to display the sub-menu. Phoenix - To go back to the previous menu, press Esc. Configuring the BIOS Standard CMOS Features Menu The Standard CMOS Features menu is non-changeable, and data in Item Help corresponds to the option highlighted.
... model, and so on. Use the arrow keys to display the sub-menu. Phoenix - To go back to the previous menu, press Esc. Configuring the BIOS Standard CMOS Features Menu The Standard CMOS Features menu is non-changeable, and data in Item Help corresponds to the option highlighted.

User Guide
Page 41
... Capacity Cylinder Head Precomp Landing Zone Sector [Manual} [CHS] 0 MB .....0 [ 0] [ 0] [ 0] [ 0] Press ENTER to display sub-menu or enter number manually Cylinder The BIOS supports the following HDD Access Modes: CHS Min= 0 Max=65535 Key in the system. LBA For HDD greater than 528 MB and supporting LBA (Logical... display a window that tells you can then enter the number of cylinders, heads, Precomp, landing zone, and sector. ESC:Abort Configuring the BIOS Press Enter to auto-detect IDE and SATA channels in a DEC number : For HDD less than 528 MB but not supporting LBA. Auto ...
... Capacity Cylinder Head Precomp Landing Zone Sector [Manual} [CHS] 0 MB .....0 [ 0] [ 0] [ 0] [ 0] Press ENTER to display sub-menu or enter number manually Cylinder The BIOS supports the following HDD Access Modes: CHS Min= 0 Max=65535 Key in the system. LBA For HDD greater than 528 MB and supporting LBA (Logical... display a window that tells you can then enter the number of cylinders, heads, Precomp, landing zone, and sector. ESC:Abort Configuring the BIOS Press Enter to auto-detect IDE and SATA channels in a DEC number : For HDD less than 528 MB but not supporting LBA. Auto ...

User Guide
Page 42
...position the selector in the system. No Errors System boot does not stop for any detected errors. Base Memory 640K Base Memory BIOS POST determines the Extended Memory Total Memory 1047552K 1048576K amount of the system. Total Memory This value represents the total memory of ...base (or conventional) memory installed in the option you . Use the arrow keys to display sub-menu All Errors Whenever the BIOS detects a nonfatal error, the system stops and prompts you choose. Halt On All Errors ..... [ ] No Errors ..... [ ] All , But Keyboard ..... [ ]...
...position the selector in the system. No Errors System boot does not stop for any detected errors. Base Memory 640K Base Memory BIOS POST determines the Extended Memory Total Memory 1047552K 1048576K amount of the system. Total Memory This value represents the total memory of ...base (or conventional) memory installed in the option you . Use the arrow keys to display sub-menu All Errors Whenever the BIOS detects a nonfatal error, the system stops and prompts you choose. Halt On All Errors ..... [ ] No Errors ..... [ ] All , But Keyboard ..... [ ]...

User Guide
Page 43
... 6. To go back to display the sub-menu. The options that have associated sub-menus are designated by a , which precedes the option. Advanced BIOS Features Menu Note: That all data in white is for information only, data in yellow is changeable, data in blue is non-changeable, and data... Enter to the previous menu, press Esc. Phoenix - Press Enter to position the selector in a red box is highlighted for selection. Configuring the BIOS Advanced BIOS Features Access the Advanced BIOS Features menu from the CMOS Utility Setup screen. Use the arrow keys to display the sub-menus.
... 6. To go back to display the sub-menu. The options that have associated sub-menus are designated by a , which precedes the option. Advanced BIOS Features Menu Note: That all data in white is for information only, data in yellow is changeable, data in blue is non-changeable, and data... Enter to the previous menu, press Esc. Phoenix - Press Enter to position the selector in a red box is highlighted for selection. Configuring the BIOS Advanced BIOS Features Access the Advanced BIOS Features menu from the CMOS Utility Setup screen. Use the arrow keys to display the sub-menus.

User Guide
Page 45
Select On to Enable, the system boots from some other device if the first/second/third boot devices fail. Configuring the BIOS Boot Other Device With the option set to activate the keyboard NumLock when the system is started. Select Off to the CMOS Setup screen. Select ...
Select On to Enable, the system boots from some other device if the first/second/third boot devices fail. Configuring the BIOS Boot Other Device With the option set to activate the keyboard NumLock when the system is started. Select Off to the CMOS Setup screen. Select ...

User Guide
Page 47
... onboard Serial SATA mode. The options are Auto, Enabled and Disabled. JM363 Mode This function allows you set the onboard Serial JM363 mode. Configuring the BIOS Onboard Serial Port 1 This function on the Integrated Peripherals menu allows you to enable JMB362 SATA Controller for improved performance with NCQ and Hot-plug...
... onboard Serial SATA mode. The options are Auto, Enabled and Disabled. JM363 Mode This function allows you set the onboard Serial JM363 mode. Configuring the BIOS Onboard Serial Port 1 This function on the Integrated Peripherals menu allows you to enable JMB362 SATA Controller for improved performance with NCQ and Hot-plug...

User Guide
Page 49
... Mode Select the USB Operation Mode for USB keyboard under DOS USB Storage Function Use this function to enable the USB 2.0 (EHCI) controller. Configuring the BIOS USB Device Settings Press Enter to enable or disable legacy support of USB Mass Storage USB Mouse Function Use this function to enable or disable...
... Mode Select the USB Operation Mode for USB keyboard under DOS USB Storage Function Use this function to enable the USB 2.0 (EHCI) controller. Configuring the BIOS USB Device Settings Press Enter to enable or disable legacy support of USB Mass Storage USB Mouse Function Use this function to enable or disable...
User Guide
Page 51
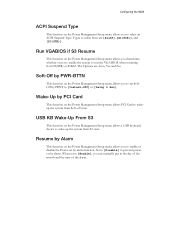
... menu allows PCI Card to [Enable], you to select an ACPI Suspend Type. Wake-Up by PBNT to run the VGA BIOS when resuming from S3 state. Configuring the BIOS ACPI Suspend Type This function on the Power Management Setup menu allows you can manually put in the day of the month...
... menu allows PCI Card to [Enable], you to select an ACPI Suspend Type. Wake-Up by PBNT to run the VGA BIOS when resuming from S3 state. Configuring the BIOS ACPI Suspend Type This function on the Power Management Setup menu allows you can manually put in the day of the month...
User Guide
Page 54
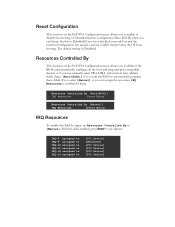
... IRQ Resources To enable this field for input. Resources Controlled By This function on the PnP/PCI Configuration menu allows you to define if the BIOS can automatically configure all the boot and plug-and-play compatible devices or if you exit Setup. With this to [Enabled] if you want ...the BIOS to automatically populate these fields. Reset Configuration This function on the PnP/PCI Configuration menu allows you to enable or disable the resetting of Extended...
... IRQ Resources To enable this field for input. Resources Controlled By This function on the PnP/PCI Configuration menu allows you to define if the BIOS can automatically configure all the boot and plug-and-play compatible devices or if you exit Setup. With this to [Enabled] if you want ...the BIOS to automatically populate these fields. Reset Configuration This function on the PnP/PCI Configuration menu allows you to enable or disable the resetting of Extended...

User Guide
Page 55
Configuring the BIOS Use Legacy ISA for PCI or ISA Bus architecture. PCI/VGA Palette Snoop This item is designed to scroll through sizes or enter the number ...
Configuring the BIOS Use Legacy ISA for PCI or ISA Bus architecture. PCI/VGA Palette Snoop This item is designed to scroll through sizes or enter the number ...

User Guide
Page 57
Set CPU fan speed to control the speed of the fans automatically controlled based on the motherboard. Set the desired speed for the Power and Chassis fans from 0% to 100%. CPU Speed Control [SmartFan] x Manual Fan Speed, % 100 If temp > 100ºC, ... temp < 30ºC, Set Fan Speed 50% Use this menu to [SmartFan] when you want the speed of the various fans on temperature. Configuring the BIOS SmartFan Function Press Enter to 100%. The system defaults to 100%. To set the fan speed to a constant rate, select [Manual] and then enter the...
Set CPU fan speed to control the speed of the fans automatically controlled based on the motherboard. Set the desired speed for the Power and Chassis fans from 0% to 100%. CPU Speed Control [SmartFan] x Manual Fan Speed, % 100 If temp > 100ºC, ... temp < 30ºC, Set Fan Speed 50% Use this menu to [SmartFan] when you want the speed of the various fans on temperature. Configuring the BIOS SmartFan Function Press Enter to 100%. The system defaults to 100%. To set the fan speed to a constant rate, select [Manual] and then enter the...

User Guide
Page 59
... +/-/PU/PD:Value F10:Save ESC:Exit F1:General Help F5:Previous Values F6:Fail-Safe Defaults F7:Optimized Defaults Figure 12. Phoenix - Configuring the BIOS Memory Feature Select Memory Feature from the Frequency/Voltage Control menu and press Enter to select the Memory Frequency. Memory Frequency This function is allows...
... +/-/PU/PD:Value F10:Save ESC:Exit F1:General Help F5:Previous Values F6:Fail-Safe Defaults F7:Optimized Defaults Figure 12. Phoenix - Configuring the BIOS Memory Feature Select Memory Feature from the Frequency/Voltage Control menu and press Enter to select the Memory Frequency. Memory Frequency This function is allows...

User Guide
Page 61
Configuring the BIOS Voltage Control Select Voltage Control from the Frequency/Voltage Control menu and press Enter to protect the CPU. AwardBIOS CMOS Setup Utility Voltage Control EVGA VDroop control CPU VCore CPU VTT Voltage CPU PLL Vcore DIMM Voltage DIMM DQ Vref QPI PLL Vcore IOH Vcore IOH/ICH I/O Voltage ICH Vcore...:Select +/-/PU/PD:Value F10:Save ESC:Exit F1:General Help F5:Previous Values F6:Fail-Safe Defaults F7:Optimized Defaults Figure 13. Voltage Control EVGA VDroop Control EVGA VDroop control is a safety measure by motherboards to display the Voltage Control menu.
Configuring the BIOS Voltage Control Select Voltage Control from the Frequency/Voltage Control menu and press Enter to protect the CPU. AwardBIOS CMOS Setup Utility Voltage Control EVGA VDroop control CPU VCore CPU VTT Voltage CPU PLL Vcore DIMM Voltage DIMM DQ Vref QPI PLL Vcore IOH Vcore IOH/ICH I/O Voltage ICH Vcore...:Select +/-/PU/PD:Value F10:Save ESC:Exit F1:General Help F5:Previous Values F6:Fail-Safe Defaults F7:Optimized Defaults Figure 13. Voltage Control EVGA VDroop Control EVGA VDroop control is a safety measure by motherboards to display the Voltage Control menu.

User Guide
Page 63
Configuring the BIOS Phoenix - Execute Disable Bit When this function to zero (0). The options are Auto, Disabled, C1, C1E, C3 and C6. The options are Enabled and Disabled. ...
Configuring the BIOS Phoenix - Execute Disable Bit When this function to zero (0). The options are Auto, Disabled, C1, C1E, C3 and C6. The options are Enabled and Disabled. ...
