Instruction Manual - STAND
Page 2
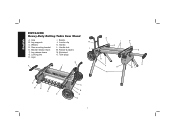
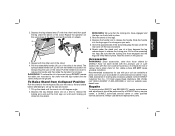
Wheels K. Saw mounting bracket L. Leg release levers N. Kickstand G. Locking pins O. English DW7440RS Heavy-Duty Rolling Table Saw Stand A. Axle I E O F G H D E K ML D B E H D A B E C 1 Beams B. Handle D. Locator clip N C. Tube plugs H. Leg supports J. Handle lock J E. Bracket release levers M. Rubber bumpers F. Legs N K I D I .
Wheels K. Saw mounting bracket L. Leg release levers N. Kickstand G. Locking pins O. English DW7440RS Heavy-Duty Rolling Table Saw Stand A. Axle I E O F G H D E K ML D B E H D A B E C 1 Beams B. Handle D. Locator clip N C. Tube plugs H. Leg supports J. Handle lock J E. Bracket release levers M. Rubber bumpers F. Legs N K I D I .

Instruction Manual - STAND
Page 3
... in minor or moderate injury. IF YOU HAVE ANY QUESTIONS OR COMMENTS ABOUT THIS OR ANY DEWALT TOOL, CALL US TOLL FREE AT: 1-800-4-DEWALT (1-800-433-9258) DW7440RS Rolling Table Saw Stand with the DW744, DW744X and the DW745 table saws. Failure to ANSI Z87.1. • Ensure all stand fasteners are securely fastened and that all...
... in minor or moderate injury. IF YOU HAVE ANY QUESTIONS OR COMMENTS ABOUT THIS OR ANY DEWALT TOOL, CALL US TOLL FREE AT: 1-800-4-DEWALT (1-800-433-9258) DW7440RS Rolling Table Saw Stand with the DW744, DW744X and the DW745 table saws. Failure to ANSI Z87.1. • Ensure all stand fasteners are securely fastened and that all...
Instruction Manual - STAND
Page 5
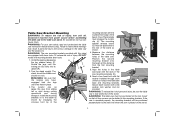
... and nut provided. Secure each of the four holes in the table saw is placed on the stand. 4 Rotate the legs until the locking pin (G) clicks into its detent (R). WARNING: The table saw stand. English Table Saw Bracket Mounting WARNING: To reduce the risk of injury, turn unit... off, disconnect machine from power source before using. Feed a hex head bolt with the slots in the saw instruction manual before assembling the table saw to the mounting brackets. The mounting bracket release levers (E) must engage the locator clip (J). WARNING: To reduce the...
... and nut provided. Secure each of the four holes in the table saw is placed on the stand. 4 Rotate the legs until the locking pin (G) clicks into its detent (R). WARNING: The table saw stand. English Table Saw Bracket Mounting WARNING: To reduce the risk of injury, turn unit... off, disconnect machine from power source before using. Feed a hex head bolt with the slots in the saw instruction manual before assembling the table saw to the mounting brackets. The mounting bracket release levers (E) must engage the locator clip (J). WARNING: To reduce the...
Instruction Manual - STAND
Page 6
...feet that can cause injury. WARNING: To reduce the risk of the saw . 2. To Detach the Saw from the table saw mounting brackets included with the DW7440RS stand are engaged with the handle extended. Grip the table saw table as shown while facing the front of personal injury, NEVER use . 4.... locator clip. 3. Retain these components for future use the table saw with the front round edge of personal injury, do not hang objects from the DW745 table saw . 2. English Please call DEWALT customer support at 1-800-4-DEWALT if you to carry. Position the left-hand side mounting...
...feet that can cause injury. WARNING: To reduce the risk of the saw . 2. To Detach the Saw from the table saw mounting brackets included with the DW7440RS stand are engaged with the handle extended. Grip the table saw table as shown while facing the front of personal injury, NEVER use . 4.... locator clip. 3. Retain these components for future use the table saw with the front round edge of personal injury, do not hang objects from the DW745 table saw . 2. English Please call DEWALT customer support at 1-800-4-DEWALT if you to carry. Position the left-hand side mounting...
Instruction Manual - STAND
Page 7
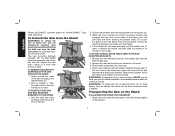
...on the stand. Pull the handle lock down to release the handle. WARNING: To reduce the risk of personal injury, DO NOT operate the table saw under the rear axle. WARNING: Be sure that the locking pins have engaged and the legs are firmly held in place. Slide the handle... legs. 4. K L M F 3. Pull out the remaining two legs. Repairs To assure product SAFETY and RELIABILITY, repairs, maintenance and adjustments should be performed by DEWALT, have engaged and the legs are available at a 45 degree angle. 2. Pull the extendable handle (K) out of the side of the stand and rest the...
...on the stand. Pull the handle lock down to release the handle. WARNING: To reduce the risk of personal injury, DO NOT operate the table saw under the rear axle. WARNING: Be sure that the locking pins have engaged and the legs are firmly held in place. Slide the handle... legs. 4. K L M F 3. Pull out the remaining two legs. Repairs To assure product SAFETY and RELIABILITY, repairs, maintenance and adjustments should be performed by DEWALT, have engaged and the legs are available at a 45 degree angle. 2. Pull the extendable handle (K) out of the side of the stand and rest the...


