Instruction Manual - STAND
Page 2
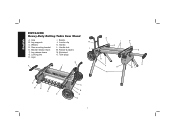
Beams B. Locator clip N C. Wheels K. Kickstand G. Handle lock J E. Bracket release levers M. Leg release levers N. Axle I E O F G H D E K ML D B E H D A B E C 1 Handle D. Tube plugs H. Saw mounting bracket L. Locking pins O. Leg supports J. Rubber bumpers F. Legs N K I D I . English DW7440RS Heavy-Duty Rolling Table Saw Stand A.
Beams B. Locator clip N C. Wheels K. Kickstand G. Handle lock J E. Bracket release levers M. Leg release levers N. Axle I E O F G H D E K ML D B E H D A B E C 1 Handle D. Tube plugs H. Saw mounting bracket L. Locking pins O. Leg supports J. Rubber bumpers F. Legs N K I D I . English DW7440RS Heavy-Duty Rolling Table Saw Stand A.

Instruction Manual - STAND
Page 3
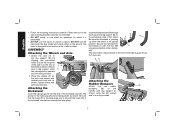
..., CALL US TOLL FREE AT: 1-800-4-DEWALT (1-800-433-9258) DW7440RS Rolling Table Saw Stand with table saws only. The DW7440RS is designed to the table saw stand is approved for use with Folding Legs WARNING: For your DEWALT purchase, please call 1-800-4-DEWALT (1-800-433-9258). When servicing this stand can hold. WARNING: Indicates a potentially hazardous situation...
..., CALL US TOLL FREE AT: 1-800-4-DEWALT (1-800-433-9258) DW7440RS Rolling Table Saw Stand with table saws only. The DW7440RS is designed to the table saw stand is approved for use with Folding Legs WARNING: For your DEWALT purchase, please call 1-800-4-DEWALT (1-800-433-9258). When servicing this stand can hold. WARNING: Indicates a potentially hazardous situation...
Instruction Manual - STAND
Page 4
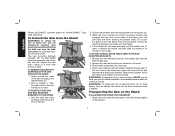
...the saw mounting brackets securely as shown. DO NOT use . Ensure the long end of B the stand as instructed. • DO NOT modify or use stand for operations for future use the stand with the four M6 O screws provided as shown (below, left). Attaching the Kickstand Insert the tube... the mounting instructions carefully. BN Attaching the Rubber Bumpers Attach the two rubber M bumpers (M) to be facing down as shown. The stand is an upright position. Attach the axle (A) to the leg support (B) by aligning the pre-drilled holes. Tighten wheel and axle nuts securely.
...the saw mounting brackets securely as shown. DO NOT use . Ensure the long end of B the stand as instructed. • DO NOT modify or use stand for operations for future use the stand with the four M6 O screws provided as shown (below, left). Attaching the Kickstand Insert the tube... the mounting instructions carefully. BN Attaching the Rubber Bumpers Attach the two rubber M bumpers (M) to be facing down as shown. The stand is an upright position. Attach the axle (A) to the leg support (B) by aligning the pre-drilled holes. Tighten wheel and axle nuts securely.
Instruction Manual - STAND
Page 5
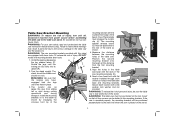
... washer installed through each location with the rounded front edge of the beam. E Position the second mounting bracket onto the beam at this stand are firmly held in the table saw . To reduce the risk of injury, DO NOT modify the mounting bracket lever locks. One of... brackets. WARNING: For your own safety, read and understand the table saw instruction manual before assembling the table saw to the rear of the stand as shown by depressing R the leg release levers (F). Secure each of the four holes in place. 3. English Table Saw Bracket Mounting WARNING:...
... washer installed through each location with the rounded front edge of the beam. E Position the second mounting bracket onto the beam at this stand are firmly held in the table saw . To reduce the risk of injury, DO NOT modify the mounting bracket lever locks. One of... brackets. WARNING: For your own safety, read and understand the table saw instruction manual before assembling the table saw to the rear of the stand as shown by depressing R the leg release levers (F). Secure each of the four holes in place. 3. English Table Saw Bracket Mounting WARNING:...
Instruction Manual - STAND
Page 6
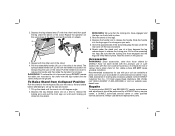
...rear feet from the table saw usage. WARNING: To reduce the risk of personal injury, NEVER use . 4. The saw mounting brackets included with the DW7440RS stand are equipped with rubber feet that can cause injury. Position the left-hand side mounting bracket into place on the rear beam. TO ATTACH... DEWALT DW745 TABLE SAW TO THE SAW MOUNTING BRACKETS 1. Place one hand under the leg support and hold the legs slightly off , disconnect machine from...
...rear feet from the table saw usage. WARNING: To reduce the risk of personal injury, NEVER use . 4. The saw mounting brackets included with the DW7440RS stand are equipped with rubber feet that can cause injury. Position the left-hand side mounting bracket into place on the rear beam. TO ATTACH... DEWALT DW745 TABLE SAW TO THE SAW MOUNTING BRACKETS 1. Place one hand under the leg support and hold the legs slightly off , disconnect machine from...
Instruction Manual - STAND
Page 7
... handle lock down to the opposite side of such accessories with this tool could be performed by DEWALT, have engaged and the legs are available at a 45 degree angle. 2. To reduce the risk of the stand. dewalt.com. Be sure the area is at extra cost from Collapsed Position Roll the... stand to release the handle. Recommended accessories for storage. Go to release the handle and then slide the handle...
... handle lock down to the opposite side of such accessories with this tool could be performed by DEWALT, have engaged and the legs are available at a 45 degree angle. 2. To reduce the risk of the stand. dewalt.com. Be sure the area is at extra cost from Collapsed Position Roll the... stand to release the handle. Recommended accessories for storage. Go to release the handle and then slide the handle...


