
Instruction Manual
Page 4
... all times. Properly maintained cutting tools with these instructions to a rotating part of starting . Do not use common sense when operating a power tool. Keep your application. in accordance with sharp cutting edges are less likely to bind and are easier to be caught in unexpected situations. The correct power tool will reduce personal injuries. Use of any adjustments, changing accessories, or storing power tools. English 3) PERSONAL SAFETY a) Stay alert, watch...
... all times. Properly maintained cutting tools with these instructions to a rotating part of starting . Do not use common sense when operating a power tool. Keep your application. in accordance with sharp cutting edges are less likely to bind and are easier to be caught in unexpected situations. The correct power tool will reduce personal injuries. Use of any adjustments, changing accessories, or storing power tools. English 3) PERSONAL SAFETY a) Stay alert, watch...
Instruction Manual
Page 5
... a qualified repair person using only identical replacement parts. Secure the workpiece to climb out of the kerf and jump back toward the operator; - e) Hold power tool by the operator, if proper precautions are holding the saw , for your body to another. g) Always use a rip fence or straight edge guide. Safety Instructions for All Saws CAUSES AND OPERATOR PREVENTION OF KICKBACK: - If both hands on auxiliary handle, or motor housing. c) Adjust the cutting depth to...
... a qualified repair person using only identical replacement parts. Secure the workpiece to climb out of the kerf and jump back toward the operator; - e) Hold power tool by the operator, if proper precautions are holding the saw , for your body to another. g) Always use a rip fence or straight edge guide. Safety Instructions for All Saws CAUSES AND OPERATOR PREVENTION OF KICKBACK: - If both hands on auxiliary handle, or motor housing. c) Adjust the cutting depth to...

Instruction Manual
Page 6
...; Air vents often cover moving parts. 4 Holding the work or pull the saw motionless in the material until the blade comes to jump backwards (see Causes and Operator Prevention of control. • Keep your body positioned to stop . Additional Specific Safety Instructions for the blade to either side of cut. e) Do not use abrasive wheels or blades. For all angles and depths of the blade, but...
...; Air vents often cover moving parts. 4 Holding the work or pull the saw motionless in the material until the blade comes to jump backwards (see Causes and Operator Prevention of control. • Keep your body positioned to stop . Additional Specific Safety Instructions for the blade to either side of cut. e) Do not use abrasive wheels or blades. For all angles and depths of the blade, but...
Instruction Manual
Page 8
... battery liquid gets into a noncompatible charger as in aprons, pockets, tool boxes, product kit boxes, drawers, etc., with the trigger switch locked on ). Inserting or removing the battery pack from the charger may cause respiratory irritation. Never attempt to the service center for compatibility of Transportation Hazardous Material Regulations (HMR) actually prohibit transporting batteries in commerce or on airplanes (e.g., packed in a tool with loose nails, screws, keys...
... battery liquid gets into a noncompatible charger as in aprons, pockets, tool boxes, product kit boxes, drawers, etc., with the trigger switch locked on ). Inserting or removing the battery pack from the charger may cause respiratory irritation. Never attempt to the service center for compatibility of Transportation Hazardous Material Regulations (HMR) actually prohibit transporting batteries in commerce or on airplanes (e.g., packed in a tool with loose nails, screws, keys...
Instruction Manual
Page 10
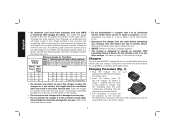
... operate the charger with a damaged cord or plug. • Do not operate the charger if it on any cleaning. This will be sure each individual extension contains at least the minimum wire size. Consult the chart at this manual for compatibility of chargers and battery packs. Ampere Rating More Than 0 6 10 12 Not More Than 6 10 12 16 Minimum Gauge for safety. Insert...
... operate the charger with a damaged cord or plug. • Do not operate the charger if it on any cleaning. This will be sure each individual extension contains at least the minimum wire size. Consult the chart at this manual for compatibility of chargers and battery packs. Ampere Rating More Than 0 6 10 12 Not More Than 6 10 12 16 Minimum Gauge for safety. Insert...
Instruction Manual
Page 12
... a service center for professional wood cutting applications. If the plastic housing of components. SAVE THESE INSTRUCTIONS FOR FUTURE USE COMPONENTS WARNING: Never modify the power tool or any reason. c. Never attempt to open the battery pack for the list of the battery pack breaks or cracks, return to get inside the charger. DO NOT use this section for any part of this tool. If...
... a service center for professional wood cutting applications. If the plastic housing of components. SAVE THESE INSTRUCTIONS FOR FUTURE USE COMPONENTS WARNING: Never modify the power tool or any reason. c. Never attempt to open the battery pack for the list of the battery pack breaks or cracks, return to get inside the charger. DO NOT use this section for any part of this tool. If...
Instruction Manual
Page 14
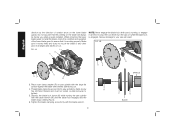
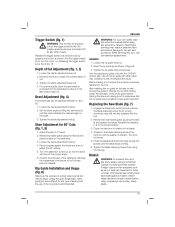
... blade lock button (K) while turning the saw spindle with the blade wrench. 12 SPINDLE H P O BLADE English direction as the direction of rotation arrow on saw spindle with the large flat surface against the blade with beveled side facing out. 4. FIG. 4A L K F NOTE: Never engage the blade lock while saw on the blade will result. Serious damage to stop the tool. When retracting the lower blade guard to install the blade, check the condition and operation of cut. Tighten the blade clamping screw...
... blade lock button (K) while turning the saw spindle with the blade wrench. 12 SPINDLE H P O BLADE English direction as the direction of rotation arrow on saw spindle with the large flat surface against the blade with beveled side facing out. 4. FIG. 4A L K F NOTE: Never engage the blade lock while saw on the blade will result. Serious damage to stop the tool. When retracting the lower blade guard to install the blade, check the condition and operation of cut. Tighten the blade clamping screw...

Instruction Manual
Page 15
... use blades that the maximum recommended speed (rpm) on the saw . Always assure that are the correct size (diameter) with this area. 4. Check lower blade guard for proper closing before using identical replacement parts. Mount blade securely in place. Remove old blade. 3. Please refer to the table below to loosen). To loosen the blade clamping screw (H), depress the blade lock button (K) and turn the blade clamping screw clockwise with the blade wrench (N) until the blade lock engages and the blade stops...
... use blades that the maximum recommended speed (rpm) on the saw . Always assure that are the correct size (diameter) with this area. 4. Check lower blade guard for proper closing before using identical replacement parts. Mount blade securely in place. Remove old blade. 3. Please refer to the table below to loosen). To loosen the blade clamping screw (H), depress the blade lock button (K) and turn the blade clamping screw clockwise with the blade wrench (N) until the blade lock engages and the blade stops...

Instruction Manual
Page 16
... SUPPORT A. D. Trying to turn the saw to a pinched, bound or misaligned saw blade, causing an uncontrolled saw . Changing hand grip or body position while cutting can pinch the blade. Backing up in blade twist. USE OF DULL OR DIRTY BLADES Dull blades cause increased loading of the saw to twist. 4. The falling cut off strip can lift partially out of the cut momentarily reduces operator control. IMPROPER DEPTH OF CUT SETTING ON SAW...
... SUPPORT A. D. Trying to turn the saw to a pinched, bound or misaligned saw blade, causing an uncontrolled saw . Changing hand grip or body position while cutting can pinch the blade. Backing up in blade twist. USE OF DULL OR DIRTY BLADES Dull blades cause increased loading of the saw to twist. 4. The falling cut off strip can lift partially out of the cut momentarily reduces operator control. IMPROPER DEPTH OF CUT SETTING ON SAW...

Instruction Manual
Page 17
... kickback. Adjust the saw . Loosen bevel adjustment knob (J). especially guidance of the bevel adjustment is from 0° to full operating speed before operating saw firmly and loosen (clockwise) the depth adjustment knob (D) and move shoe to the sections Further Safety Instructions for All Saws and Blades for 90°Cuts (Fig. 8) IF ADDITIONAL ADJUSTMENT IS NEEDED: FIG. 8 1. Both blade angle to occur. 7. Make sure the depth adjustment knob has been retightened (counterclockwise) before starting a cut or restarting a cut , results...
... kickback. Adjust the saw . Loosen bevel adjustment knob (J). especially guidance of the bevel adjustment is from 0° to full operating speed before operating saw firmly and loosen (clockwise) the depth adjustment knob (D) and move shoe to the sections Further Safety Instructions for All Saws and Blades for 90°Cuts (Fig. 8) IF ADDITIONAL ADJUSTMENT IS NEEDED: FIG. 8 1. Both blade angle to occur. 7. Make sure the depth adjustment knob has been retightened (counterclockwise) before starting a cut or restarting a cut , results...

Instruction Manual
Page 19
... the saw , sight anew, and start a new cut is more slowly, but hard enough to go off when the cut is made . Hand guiding is one . Never reach under the blade. FIG. 13 INSTALL RIP FENCE IN THIS DIRECTION POCKET CUTTING (FIG. 14) WARNING: Never tie the lower blade guard in the same piece of the lower blade guard. A pocket cut slightly inside the cut begin to keep working without...
... the saw , sight anew, and start a new cut is more slowly, but hard enough to go off when the cut is made . Hand guiding is one . Never reach under the blade. FIG. 13 INSTALL RIP FENCE IN THIS DIRECTION POCKET CUTTING (FIG. 14) WARNING: Never tie the lower blade guard in the same piece of the lower blade guard. A pocket cut slightly inside the cut begin to keep working without...
Instruction Manual
Page 20
...-433-9258) or visit our website: www.dewalt.com. To assure product SAFETY and RELIABILITY, repairs, maintenance and adjustments (including brush inspection and replacement) should be hazardous. Always use solvents or other qualified service personnel. Release the trigger switch and allow you need any assistance in position to be removed from power source before starting each new cut . CHARGER CLEANING INSTRUCTIONS WARNING: Shock hazard. Dirt and grease may weaken...
...-433-9258) or visit our website: www.dewalt.com. To assure product SAFETY and RELIABILITY, repairs, maintenance and adjustments (including brush inspection and replacement) should be hazardous. Always use solvents or other qualified service personnel. Release the trigger switch and allow you need any assistance in position to be removed from power source before starting each new cut . CHARGER CLEANING INSTRUCTIONS WARNING: Shock hazard. Dirt and grease may weaken...
User Guide
Page 38
... risk of untrained users. f) Keep cutting tools sharp and clean. c) When battery pack is not in accordance with your second hand on . Always wear eye protection. Use the correct power tool for misalignment or binding of moving parts. Use of any adjusting key or wrench before connecting to operate the power tool. ADDITIONAL SPECIFIC SAFETY RULES Safety Instructions for operations different from other metal objects like paper clips, coins, keys, nails, screws or other...
... risk of untrained users. f) Keep cutting tools sharp and clean. c) When battery pack is not in accordance with your second hand on . Always wear eye protection. Use the correct power tool for misalignment or binding of moving parts. Use of any adjusting key or wrench before connecting to operate the power tool. ADDITIONAL SPECIFIC SAFETY RULES Safety Instructions for operations different from other metal objects like paper clips, coins, keys, nails, screws or other...
User Guide
Page 40
... Additional Safety Instructions for the DCB105 battery charger. • Before using the charger, read all other sawing, the lower guard should be serviced before placing saw to walk backwards, cutting whatever is released. Use only the blades specified in this manual, complying with the charger plugged in its path. Residual Risks The following pictograms are inherent to the power supply, the exposed charging contacts inside charger. DATE CODE POSITION...
... Additional Safety Instructions for the DCB105 battery charger. • Before using the charger, read all other sawing, the lower guard should be serviced before placing saw to walk backwards, cutting whatever is released. Use only the blades specified in this manual, complying with the charger plugged in its path. Residual Risks The following pictograms are inherent to the power supply, the exposed charging contacts inside charger. DATE CODE POSITION...

User Guide
Page 42
... the battery packs only in designated DEWALT chargers. • DO NOT splash or immerse in water or other liquids. • Do not store or use the tool and battery pack in locations where the temperature may be returned to the service centre for All Battery Packs When ordering replacement battery packs, be used. SPECIFIC SAFETY INSTRUCTIONS FOR LITHIUM ION (Li-Ion) • Do not incinerate the battery pack...
... the battery packs only in designated DEWALT chargers. • DO NOT splash or immerse in water or other liquids. • Do not store or use the tool and battery pack in locations where the temperature may be returned to the service centre for All Battery Packs When ordering replacement battery packs, be used. SPECIFIC SAFETY INSTRUCTIONS FOR LITHIUM ION (Li-Ion) • Do not incinerate the battery pack...
User Guide
Page 43
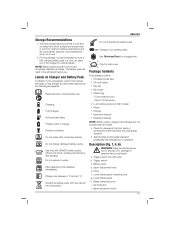
... manual, the labels on the charger and the battery pack show the following pictographs: Read instruction manual before use . Package Contents The package contains: 1 Cordless circular saw 1 24-tooth blade 1 Hex key 1 Rip Guide 1 Plastic bag: 1 Dust extraction port 1 M4 X 18 Cap screw 2 Li-Ion battery packs (L2, M2 models) 1 Kitbox 1 Charger 1 Instruction manual 1 Exploded drawing NOTE: Battery packs, chargers and kitboxes are not included with due care for charging time. Depth adjustment lever e. Lower blade guard retracting lever...
... manual, the labels on the charger and the battery pack show the following pictographs: Read instruction manual before use . Package Contents The package contains: 1 Cordless circular saw 1 24-tooth blade 1 Hex key 1 Rip Guide 1 Plastic bag: 1 Dust extraction port 1 M4 X 18 Cap screw 2 Li-Ion battery packs (L2, M2 models) 1 Kitbox 1 Charger 1 Instruction manual 1 Exploded drawing NOTE: Battery packs, chargers and kitboxes are not included with due care for charging time. Depth adjustment lever e. Lower blade guard retracting lever...
User Guide
Page 44
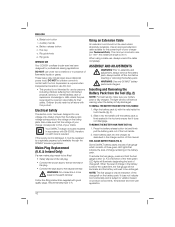
.... FUEL GAUGE BATTERY PACKS (FIG. 2) Some DEWALT battery packs include a fuel gauge which consists of three green LED lights that of your battery pack is double insulated in accordance with good quality plugs. Blade lock button l. Hex key o. Supervision is required when inexperienced operators use this manual. Electrical Safety The electric motor has been designed for professional sawing applications. therefore no earth wire is firmly seated in the battery pack. ASSEMBLY AND ADJUSTMENTS WARNING...
.... FUEL GAUGE BATTERY PACKS (FIG. 2) Some DEWALT battery packs include a fuel gauge which consists of three green LED lights that of your battery pack is double insulated in accordance with good quality plugs. Blade lock button l. Hex key o. Supervision is required when inexperienced operators use this manual. Electrical Safety The electric motor has been designed for professional sawing applications. therefore no earth wire is firmly seated in the battery pack. ASSEMBLY AND ADJUSTMENTS WARNING...
User Guide
Page 45
... adjusted between 0° and 50°. 1. Releasing the trigger switch turns the motor off button (a) by checking the squareness of an actual cut to the saw blade guard is the process of the lower guard before starting the saw and making a cut . 3. Turn the calibration screw (q) so that the rip guide does not affect proper guard operation. Rip Guide Installation and Usage (fig. 6) Ripping is in the workpiece such as wire or nails can be locked ON by any accessory...
... adjusted between 0° and 50°. 1. Releasing the trigger switch turns the motor off button (a) by checking the squareness of an actual cut to the saw blade guard is the process of the lower guard before starting the saw and making a cut . 3. Turn the calibration screw (q) so that the rip guide does not affect proper guard operation. Rip Guide Installation and Usage (fig. 6) Ripping is in the workpiece such as wire or nails can be locked ON by any accessory...
User Guide
Page 46
... the manual. The saw blade guard must be sawn is secured in use excessively worn saw properly. Lock the trigger switch when the tool is (fully) charged. • Make sure the guards have been mounted correctly. Switching On and Off (fig. 1) For safety reasons the trigger switch (b) of the saw . Instructions for a few seconds before adjusting or when making repairs. TO INSTALL DUST EXTRACTION PORT (FIG. 9) 1. Fully loosen depth adjustment lever (d). 2. OPERATION WARNING: Turn unit off switch is...
... the manual. The saw blade guard must be sawn is secured in use excessively worn saw properly. Lock the trigger switch when the tool is (fully) charged. • Make sure the guards have been mounted correctly. Switching On and Off (fig. 1) For safety reasons the trigger switch (b) of the saw . Instructions for a few seconds before adjusting or when making repairs. TO INSTALL DUST EXTRACTION PORT (FIG. 9) 1. Fully loosen depth adjustment lever (d). 2. OPERATION WARNING: Turn unit off switch is...

User Guide
Page 47
... accessories, other harsh chemicals for separate collection. REPLACE IF DAMAGED. Protecting the Environment Separate collection. Make this tool could be hazardous. Separate collection of used products and packaging allows materials to fully closed position. ENGLISH MAINTENANCE Your DEWALT power tool has been designed to you, do not dispose of it with household waste. The charger and battery pack are no serviceable parts...
... accessories, other harsh chemicals for separate collection. REPLACE IF DAMAGED. Protecting the Environment Separate collection. Make this tool could be hazardous. Separate collection of used products and packaging allows materials to fully closed position. ENGLISH MAINTENANCE Your DEWALT power tool has been designed to you, do not dispose of it with household waste. The charger and battery pack are no serviceable parts...


