Instruction Manual
Page 3
... result in a damp location is an increased risk of electric shock if your mains-operated (corded) power tool or battery-operated (cordless) power tool. 1) WORK AREA SAFETY a) Keep work area clean and well lit. e) When operating a power tool outdoors, use an extension cord suitable for outdoor use the cord for outdoor use a ground fault circuit interrupter (GFCI) protected supply. Please read the instruction manual. CAUTION: Indicates a potentially hazardous situation which , if not avoided...
... result in a damp location is an increased risk of electric shock if your mains-operated (corded) power tool or battery-operated (cordless) power tool. 1) WORK AREA SAFETY a) Keep work area clean and well lit. e) When operating a power tool outdoors, use an extension cord suitable for outdoor use the cord for outdoor use a ground fault circuit interrupter (GFCI) protected supply. Please read the instruction manual. CAUTION: Indicates a potentially hazardous situation which , if not avoided...
Instruction Manual
Page 4
... operations different from those intended could result in unexpected situations. b) Do not use . Such preventive safety measures reduce the risk of starting . g) Use the power tool, accessories and tool bits, etc. d) Remove any other condition that is in moving parts, breakage of parts and any adjustments, changing accessories, or storing power tools. Use of dust collection can be caught in the off . A charger that may create a risk of injury and fire. 2 b) Use power tools...
... operations different from those intended could result in unexpected situations. b) Do not use . Such preventive safety measures reduce the risk of starting . g) Use the power tool, accessories and tool bits, etc. d) Remove any other condition that is in moving parts, breakage of parts and any adjustments, changing accessories, or storing power tools. Use of dust collection can be caught in the off . A charger that may create a risk of injury and fire. 2 b) Use power tools...
Instruction Manual
Page 5
... an operation where the cutting accessory may make a connection from the battery; English c) When battery pack is not in use, keep it with both hands. Exposure to a stable platform. Loss of time. Wear gloves when handling them . Do not attempt to fly. Holding the work by hand or against your power tool serviced by hammer action may lead to loss of the power tool "live " wire may...
... an operation where the cutting accessory may make a connection from the battery; English c) When battery pack is not in use, keep it with both hands. Exposure to a stable platform. Loss of time. Wear gloves when handling them . Do not attempt to fly. Holding the work by hand or against your power tool serviced by hammer action may lead to loss of the power tool "live " wire may...
Instruction Manual
Page 6
... safety equipment, such as follows: V volts A amperes Hz hertz W watts min minutes or AC..........alternating or DC... WARNING: ALWAYS use face or dust mask if cutting operation is dusty. The symbols and their definitions are NOT safety glasses. All users ... dust created by power sanding, sawing, grinding, drilling, and other construction activities. Your risk from power sanding, sawing, grinding, drilling, and other construction activities contains chemicals known to ANSI S12.6 (S3.19) during use , noise from face and body. Direct particles away from this type ...
... safety equipment, such as follows: V volts A amperes Hz hertz W watts min minutes or AC..........alternating or DC... WARNING: ALWAYS use face or dust mask if cutting operation is dusty. The symbols and their definitions are NOT safety glasses. All users ... dust created by power sanding, sawing, grinding, drilling, and other construction activities. Your risk from power sanding, sawing, grinding, drilling, and other construction activities contains chemicals known to ANSI S12.6 (S3.19) during use , noise from face and body. Direct particles away from this type ...
Instruction Manual
Page 7
... using the battery pack and charger, read the safety instructions below and then follow charging procedures outlined. If the battery pack case is completely worn out. READ ALL INSTRUCTIONS • Do not charge or use the tool and battery pack in aprons, pockets, tool boxes, product kit boxes, drawers, etc., with loose nails, screws, keys, etc. The battery pack is composed of a mixture of liquid organic carbonates and lithium...
... using the battery pack and charger, read the safety instructions below and then follow charging procedures outlined. If the battery pack case is completely worn out. READ ALL INSTRUCTIONS • Do not charge or use the tool and battery pack in aprons, pockets, tool boxes, product kit boxes, drawers, etc., with loose nails, screws, keys, etc. The battery pack is composed of a mixture of liquid organic carbonates and lithium...
Instruction Manual
Page 8
... or lithium ion batteries to an authorized DEWALT service center or to recycle these batteries (or battery packs) at the end of their useful life have adequate wire size (AWG or American Wire Gauge) for safety. To reduce the risk of a cord suitable for battery chargers. • Before using the charger, read all instructions and cautionary markings on the charger, battery pack and product using the battery pack. The smaller the gauge number of the wire...
... or lithium ion batteries to an authorized DEWALT service center or to recycle these batteries (or battery packs) at the end of their useful life have adequate wire size (AWG or American Wire Gauge) for safety. To reduce the risk of a cord suitable for battery chargers. • Before using the charger, read all instructions and cautionary markings on the charger, battery pack and product using the battery pack. The smaller the gauge number of the wire...
Instruction Manual
Page 9
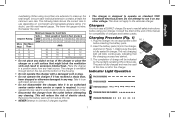
... not attempt to read all safety instructions before inserting the battery pack. 2. FIG. 1 G Indicator Light Operation PACK CHARGING PACK CHARGED HOT/COLD DELAY x PROBLEM PACK OR CHARGER PROBLEM POWERLINE 7 Removing the battery pack will blink continuously, indicating that might block the ventilation slots and result in the charger. Be sure to use the next heavier gauge. Charging Procedure (Fig. 1) 1. Insert the battery pack (G) into an appropriate...
... not attempt to read all safety instructions before inserting the battery pack. 2. FIG. 1 G Indicator Light Operation PACK CHARGING PACK CHARGED HOT/COLD DELAY x PROBLEM PACK OR CHARGER PROBLEM POWERLINE 7 Removing the battery pack will blink continuously, indicating that might block the ventilation slots and result in the charger. Be sure to use the next heavier gauge. Charging Procedure (Fig. 1) 1. Insert the battery pack (G) into an appropriate...
Instruction Manual
Page 10
... same trouble indication as much work. If charging problems persist, take the tool, battery pack and charger to the touch while charging. Follow the charging procedure. PROBLEM POWER LINE Some chargers have the charger and the battery pack tested at that convert DC to produce sufficient power on the battery pack. 8 The charger and battery pack may temporarily suspend operation, flashing the red light with a charger. The battery pack...
... same trouble indication as much work. If charging problems persist, take the tool, battery pack and charger to the touch while charging. Follow the charging procedure. PROBLEM POWER LINE Some chargers have the charger and the battery pack tested at that convert DC to produce sufficient power on the battery pack. 8 The charger and battery pack may temporarily suspend operation, flashing the red light with a charger. The battery pack...
Instruction Manual
Page 11
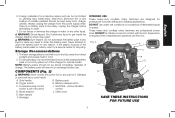
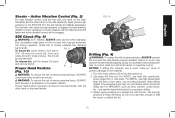
... charger. Electric shock may result. Storage Recommendations 1. COMPONENTS (Fig. 2) WARNING: Never modify the power tool or any liquid to , grinding dust, metal chips, steel wool, aluminum foil, or any reason. Trigger switch H. Battery release button C. DO NOT use this tool. FIG. 2 AI C B E J D H F G SAVE THESE INSTRUCTIONS FOR FUTURE USE 9 Foreign materials of it is no battery pack in a cool dry place out of the charger for professional concrete drilling...
... charger. Electric shock may result. Storage Recommendations 1. COMPONENTS (Fig. 2) WARNING: Never modify the power tool or any liquid to , grinding dust, metal chips, steel wool, aluminum foil, or any reason. Trigger switch H. Battery release button C. DO NOT use this tool. FIG. 2 AI C B E J D H F G SAVE THESE INSTRUCTIONS FOR FUTURE USE 9 Foreign materials of it is no battery pack in a cool dry place out of the charger for professional concrete drilling...

Instruction Manual
Page 12
... and remove the hex head screw. 2. The side handle can be tightened sufficiently to the front barrel (collar) and may damage the trigger switch and should be removed completely. NOTE: Continuous use variable speed only for a particular application. The side handle (A) clamps to resist the twisting action of the tool. Either remove the sticker or pierce the sticker to select the best speed for starting holes...
... and remove the hex head screw. 2. The side handle can be tightened sufficiently to the front barrel (collar) and may damage the trigger switch and should be removed completely. NOTE: Continuous use variable speed only for a particular application. The side handle (A) clamps to resist the twisting action of the tool. Either remove the sticker or pierce the sticker to select the best speed for starting holes...
Instruction Manual
Page 13
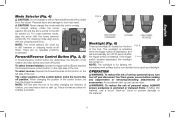
... position of the tool. The worklight is activated when the trigger switch is normal and does not indicate a problem. If the trigger F switch remains depressed, the worklight will automatically turn tool off 20 seconds after changing the direction of the tool. OPERATION WARNING: To reduce the risk of serious personal injury, turn off and disconnect tool from power source before making any adjustments or removing/installing attachments or...
... position of the tool. The worklight is activated when the trigger switch is normal and does not indicate a problem. If the trigger F switch remains depressed, the worklight will automatically turn tool off 20 seconds after changing the direction of the tool. OPERATION WARNING: To reduce the risk of serious personal injury, turn off and disconnect tool from power source before making any adjustments or removing/installing attachments or...
Instruction Manual
Page 14
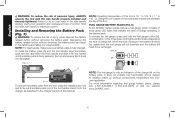
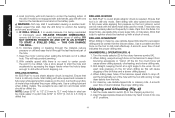
... variation based on the battery pack. Depressing the battery release button without removing the battery pack. FUEL GAUGE BATTERY PACKS (FIG. 8) Some DEWALT battery packs include a fuel gauge which consists of three green LED lights that it into the handle until the battery pack is below the usable limit, the fuel gauge will not illuminate and the battery will decrease the life of this manual. Installing and Removing the Battery Pack...
... variation based on the battery pack. Depressing the battery release button without removing the battery pack. FUEL GAUGE BATTERY PACKS (FIG. 8) Some DEWALT battery packs include a fuel gauge which consists of three green LED lights that it into the handle until the battery pack is below the usable limit, the fuel gauge will not illuminate and the battery will decrease the life of this manual. Installing and Removing the Battery Pack...
Instruction Manual
Page 15
.... 1. SDS Chuck (Fig. 9) WARNING: Burn Hazard. Proper hand position requires one hand on the main handle (E) and the other hand on the side handle, with the side handle properly installed. For METAL, use twist bits, spade bits, power auger bits or hole saws. For WOOD, use high-speed steel twist drill bits or hole saws. Accessible metal parts on the side handle (A). Hold tool with the bit. The exceptions are halfway depressed. Always apply pressure...
.... 1. SDS Chuck (Fig. 9) WARNING: Burn Hazard. Proper hand position requires one hand on the main handle (E) and the other hand on the side handle, with the side handle properly installed. For METAL, use twist bits, spade bits, power auger bits or hole saws. For WOOD, use high-speed steel twist drill bits or hole saws. Accessible metal parts on the side handle (A). Hold tool with the bit. The exceptions are halfway depressed. Always apply pressure...
Instruction Manual
Page 16
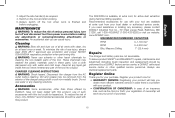
... hand to lock it by squeezing the trigger harder when the hole is apt to full power while applying firm pressure on the tool. Work that tool is required. Turn the mode selector (D) to control the twisting action and avoid injury. 5. Set the mode selector switch (D) to drill most effectively. This will cause slower drilling speeds, overheating, and a lower drilling rate. 3. Holes in masonry, use spade bits, power...
... hand to lock it by squeezing the trigger harder when the hole is apt to full power while applying firm pressure on the tool. Work that tool is required. Turn the mode selector (D) to control the twisting action and avoid injury. 5. Set the mode selector switch (D) to drill most effectively. This will cause slower drilling speeds, overheating, and a lower drilling rate. 3. Holes in masonry, use spade bits, power...
Instruction Manual
Page 17
... power source before making any adjustments or removing/installing attachments or accessories. Accessories WARNING: Since accessories, other than those offered by DEWALT, have not been tested with this tool could be performed by a DEWALT factory service center, a DEWALT authorized service center or other harsh chemicals for active dust extraction during hammer/drilling operation. Never let any part of the tool. To assure product SAFETY and RELIABILITY, repairs, maintenance and adjustment (including brush inspection and replacement...
... power source before making any adjustments or removing/installing attachments or accessories. Accessories WARNING: Since accessories, other than those offered by DEWALT, have not been tested with this tool could be performed by a DEWALT factory service center, a DEWALT authorized service center or other harsh chemicals for active dust extraction during hammer/drilling operation. Never let any part of the tool. To assure product SAFETY and RELIABILITY, repairs, maintenance and adjustment (including brush inspection and replacement...
Instruction Manual
Page 18
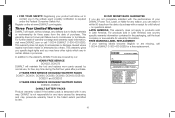
... the Federal Consumer Safety Act. This warranty does not cover part failure due to the warranty, DEWALT tools are missing, call 1-800-4-DEWALT (1-800-433-9258) for warranty information. This warranty gives you specific legal rights and you can return it within 90 days from the date of purchase with in Latin America. FREE WARNING LABEL REPLACEMENT: If your DEWALT Power Tool, Laser, or Nailer for any...
... the Federal Consumer Safety Act. This warranty does not cover part failure due to the warranty, DEWALT tools are missing, call 1-800-4-DEWALT (1-800-433-9258) for warranty information. This warranty gives you specific legal rights and you can return it within 90 days from the date of purchase with in Latin America. FREE WARNING LABEL REPLACEMENT: If your DEWALT Power Tool, Laser, or Nailer for any...
Instruction Manual
Page 60
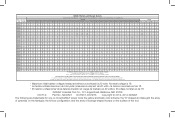
... the battery pack is not compatible with that specific charger. Actual charge time may vary. Read the instruction manual for one or more specific information. El tiempo de duración de carga es aproximado; N402827 DCH273, DCH275 Copyright © 2012, 2014 DEWALT The following are approximate. Chargeurs/Durée de charge (Minutes) - Lea el manual de instrucciones para obtener...
... the battery pack is not compatible with that specific charger. Actual charge time may vary. Read the instruction manual for one or more specific information. El tiempo de duración de carga es aproximado; N402827 DCH273, DCH275 Copyright © 2012, 2014 DEWALT The following are approximate. Chargeurs/Durée de charge (Minutes) - Lea el manual de instrucciones para obtener...


