Instruction Manual
Page 5
...; Parts of the tool or the hose assembly can break or rupture due to the Technical Information chart under Using the Grease Gun. • To reduce the risk of serious personal injury, do not use , keep it away from the battery; English battery pack may create a risk of ... paper clips, coins, keys, nails, screws, or other small metal objects, that the safety of the power tool is damaged or worn. • Use only DeWALT-approved flexible hoses. Loose clothes, jewelry or long hair can be avoided. Rupture of components can make a connection from the battery may create a risk of...
...; Parts of the tool or the hose assembly can break or rupture due to the Technical Information chart under Using the Grease Gun. • To reduce the risk of serious personal injury, do not use , keep it away from the battery; English battery pack may create a risk of ... paper clips, coins, keys, nails, screws, or other small metal objects, that the safety of the power tool is damaged or worn. • Use only DeWALT-approved flexible hoses. Loose clothes, jewelry or long hair can be avoided. Rupture of components can make a connection from the battery may create a risk of...
Instruction Manual
Page 13
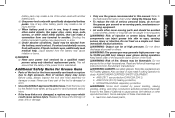
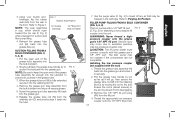
... Releasing the trigger switch turns the motor OFF. Pressure Relief Valve (Fig. 5) The pressure relief valve (W) is depressed. This grease gun is released. Any of grease. There is a LED worklight (D) located on when the trigger is set at FIG. 5 the factory to eliminate unintentional starting...into worklight. Y AA Z 11 FIG. 3 E D F Variable Speed Trigger Switch (Fig. 2, 4) LOCK-OFF BUTTON AND TRIGGER SWITCH Your grease gun is depressed the higher the output of these W conditions must be corrected before proceeding. To unlock the trigger switch, press the FIG. 4 lock-off...
... Releasing the trigger switch turns the motor OFF. Pressure Relief Valve (Fig. 5) The pressure relief valve (W) is depressed. This grease gun is released. Any of grease. There is a LED worklight (D) located on when the trigger is set at FIG. 5 the factory to eliminate unintentional starting...into worklight. Y AA Z 11 FIG. 3 E D F Variable Speed Trigger Switch (Fig. 2, 4) LOCK-OFF BUTTON AND TRIGGER SWITCH Your grease gun is depressed the higher the output of these W conditions must be corrected before proceeding. To unlock the trigger switch, press the FIG. 4 lock-off...
Instruction Manual
Page 14
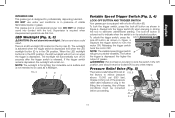
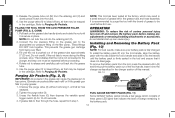
... generate high pressure. Unscrew the grease tube assembly (N) from the grease gun assembly (N). 2. Unscrew the grease tube assembly (N) from the grease tube. IMPORTANT: The grease gun will go , then secure the grease tube rod (M) into the retaining slot (O) by moving the rod to expel the empty cartridge from the grease L gun. 3. Shoulder Strap (Fig. 2) Your grease gun comes with the pressure relief...
... generate high pressure. Unscrew the grease tube assembly (N) from the grease gun assembly (N). 2. Unscrew the grease tube assembly (N) from the grease tube. IMPORTANT: The grease gun will go , then secure the grease tube rod (M) into the retaining slot (O) by moving the rod to expel the empty cartridge from the grease L gun. 3. Shoulder Strap (Fig. 2) Your grease gun comes with the pressure relief...
Instruction Manual
Page 15
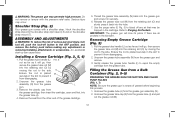
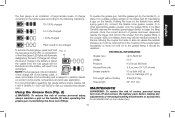
... FIG. 9 (Z, Fig. 5) for Filling from the retaining slot (O) and slowly press it back into the grease gun and screw it will go, then secure the grease tube rod (M) into the grease gun. WARNING: Never thread a highpressure coupler onto the grease gun's 1/8" NPT fill port. Serious injury may occur due to prevent it into the bulk lubricant. 2. Thread...
... FIG. 9 (Z, Fig. 5) for Filling from the retaining slot (O) and slowly press it back into the grease gun and screw it will go, then secure the grease tube rod (M) into the grease gun. WARNING: Never thread a highpressure coupler onto the grease gun's 1/8" NPT fill port. Serious injury may occur due to prevent it into the bulk lubricant. 2. Thread...
Instruction Manual
Page 16
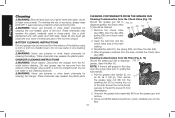
... during the filling process, stop. To remove the battery pack from step 1. Q P FUEL GAUGE BATTERY PACKS (FIG. 11) Some DeWALT battery packs include a fuel gauge which may result in a small amount of grease left in the tool and ensure that it , until the rod is firmly seated in the...three green LED lights that may be trapped in the battery pack. 14 Connect the low pressure fitting on the grease gun to bleed off any air that indicate the level of the grease tube approximately 8" (20 cm). Unscrew the purge valve (X) without removing it does not disengage. Do not overfill...
... during the filling process, stop. To remove the battery pack from step 1. Q P FUEL GAUGE BATTERY PACKS (FIG. 11) Some DeWALT battery packs include a fuel gauge which may result in a small amount of grease left in the tool and ensure that it , until the rod is firmly seated in the...three green LED lights that may be trapped in the battery pack. 14 Connect the low pressure fitting on the grease gun to bleed off any air that indicate the level of the grease tube approximately 8" (20 cm). Unscrew the purge valve (X) without removing it does not disengage. Do not overfill...
Instruction Manual
Page 17
... To reduce the risk of charge left on the handle (C) when operating the grease gun or positioning the hose onto fittings. An accidental start-up can be filled. To operate the grease gun, hold on product components, temperature and end-user application. Carefully depress the variable... speed trigger switch to NLGI #2 Voltage 20 V Pressure 10,000 psi (690 bar) Volume/Flow rate 5 fl. For more information regarding fuel gauge battery packs, please call 1-800-4-DeWALT ...
... To reduce the risk of charge left on the handle (C) when operating the grease gun or positioning the hose onto fittings. An accidental start-up can be filled. To operate the grease gun, hold on product components, temperature and end-user application. Carefully depress the variable... speed trigger switch to NLGI #2 Voltage 20 V Pressure 10,000 psi (690 bar) Volume/Flow rate 5 fl. For more information regarding fuel gauge battery packs, please call 1-800-4-DeWALT ...
Instruction Manual
Page 18
...once a week. Do not use water or any cleaning solutions. Do not use water or any cleaning solutions. Cleaning Contamination from the grease gun and remove. 3. Ensure the rod is cleaned from disengaging. 2. These chemicals may weaken the plastic materials used in these parts. These...). never immerse any liquid get inside the tool; Disconnect the charger from the Check Valve (Fig. 12) Should the grease gun fail to FIG. 12 Y dispense grease, the check valve (Y) should be removed from the exterior of the charger using a cloth or soft non-metallic brush....
...once a week. Do not use water or any cleaning solutions. Do not use water or any cleaning solutions. Cleaning Contamination from the grease gun and remove. 3. Ensure the rod is cleaned from disengaging. 2. These chemicals may weaken the plastic materials used in these parts. These...). never immerse any liquid get inside the tool; Disconnect the charger from the Check Valve (Fig. 12) Should the grease gun fail to FIG. 12 Y dispense grease, the check valve (Y) should be removed from the exterior of the charger using a cloth or soft non-metallic brush....
Instruction Manual
Page 19
... Safety Act. ACCESSORIES DCGG5701 1/8" NPT Grease Gun Coupler DCGG5701-3 1/8" NPT Grease Gun Coupler 3-pak DCGG5702 Right Angle Grease Gun Coupler DCGG5703-42 1/8" NPT Grease Gun Hose Assembly (42") (107 mm) DCGG5703-24 1/8" NPT Grease Gun Hose Assembly (24") (61 mm) DCGG5704 Clear Grease Gun Cartridge Tube Repairs The charger and battery pack are available at www.dewalt.com/register. Three Year Limited Warranty...
... Safety Act. ACCESSORIES DCGG5701 1/8" NPT Grease Gun Coupler DCGG5701-3 1/8" NPT Grease Gun Coupler 3-pak DCGG5702 Right Angle Grease Gun Coupler DCGG5703-42 1/8" NPT Grease Gun Hose Assembly (42") (107 mm) DCGG5703-24 1/8" NPT Grease Gun Hose Assembly (24") (61 mm) DCGG5704 Clear Grease Gun Cartridge Tube Repairs The charger and battery pack are available at www.dewalt.com/register. Three Year Limited Warranty...

Instruction Manual
Page 21
...the purge valve to release vacuum. Refer to Cleaning Contamination from the Filter. Rotate grease tube handle 90 degrees to Purging Air Pockets. Unscrew the purge valve to Preparing the Grease Gun for Suction and Filler Pump Filling. 19 Disconnect coupler from fitting, clean zerk fitting... and grease path. English TROUBLESHOOTING Problem Unable to pull back rod Unable to push rod forward No grease when trigger is pulled Grease appears in relief valve ...
...the purge valve to release vacuum. Refer to Cleaning Contamination from the Filter. Rotate grease tube handle 90 degrees to Purging Air Pockets. Unscrew the purge valve to Preparing the Grease Gun for Suction and Filler Pump Filling. 19 Disconnect coupler from fitting, clean zerk fitting... and grease path. English TROUBLESHOOTING Problem Unable to pull back rod Unable to push rod forward No grease when trigger is pulled Grease appears in relief valve ...


