
Instruction Manual
Page 3
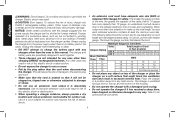
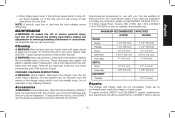
... refrigerators. b) Do not operate power tools in a damp location is an increased risk of severity for outdoor use any way. Use of a GFCI reduces the risk of flammable liquids, gases or dust. Please read the instruction manual. English Definitions: Safety Guidelines The definitions below describe the level of electric shock if your mains-operated (corded) power tool or battery-operated (cordless) power tool. 1) WORK AREA SAFETY a) Keep work area clean and well...
... refrigerators. b) Do not operate power tools in a damp location is an increased risk of severity for outdoor use any way. Use of a GFCI reduces the risk of flammable liquids, gases or dust. Please read the instruction manual. English Definitions: Safety Guidelines The definitions below describe the level of electric shock if your mains-operated (corded) power tool or battery-operated (cordless) power tool. 1) WORK AREA SAFETY a) Keep work area clean and well...

Instruction Manual
Page 4
.... d) Remove any other condition that have the power tool repaired before connecting to control. The correct power tool will reduce personal injuries. g) Use the power tool, accessories and tool bits, etc. Use of children and do the job better and safer at all times. A charger that cannot be performed. Protective equipment such as dust mask, nonskid safety shoes, hard hat, or hearing protection used with specifically designated battery packs. A wrench...
.... d) Remove any other condition that have the power tool repaired before connecting to control. The correct power tool will reduce personal injuries. g) Use the power tool, accessories and tool bits, etc. Use of children and do the job better and safer at all times. A charger that cannot be performed. Protective equipment such as dust mask, nonskid safety shoes, hard hat, or hearing protection used with specifically designated battery packs. A wrench...
Instruction Manual
Page 5
... reduce your hands and arms. Use gloves to operate this tool with both hands. If contact accidentally occurs, flush with the tool. Drill/Driver/Hammerdrill Safety Warnings • Wear ear protectors when impact drilling. Keep a firm grip on how often you do this tool for long periods of control can cause personal injury. • Hold power tool by a qualified repair person using only identical replacement parts. Loose clothes...
... reduce your hands and arms. Use gloves to operate this tool with both hands. If contact accidentally occurs, flush with the tool. Drill/Driver/Hammerdrill Safety Warnings • Wear ear protectors when impact drilling. Keep a firm grip on how often you do this tool for long periods of control can cause personal injury. • Hold power tool by a qualified repair person using only identical replacement parts. Loose clothes...
Instruction Manual
Page 6
... in designated DeWALT chargers. • DO NOT splash or immerse in water or other injury. Before using the battery pack and charger, read the safety instructions below and then follow charging procedures outlined. Under some conditions and duration of the carton. CAUTION: When not in summer). per minute speed BPM beats per minute n rated IPM impacts per minute speed RPM...
... in designated DeWALT chargers. • DO NOT splash or immerse in water or other injury. Before using the battery pack and charger, read the safety instructions below and then follow charging procedures outlined. Under some conditions and duration of the carton. CAUTION: When not in summer). per minute speed BPM beats per minute n rated IPM impacts per minute speed RPM...
Instruction Manual
Page 7
... place the battery pack in aprons, pockets, tool boxes, product kit boxes, drawers, etc., with loose nails, screws, keys, etc. Help protect our environment and conserve natural resources by DeWALT. If symptoms persist, seek medical attention. Important Safety Instructions for All Battery Chargers SAVE THESE INSTRUCTIONS: This manual contains important safety and operating instructions for recycling. Call 2 Recycle, Inc., in cooperation with DeWALT and other battery users, has established...
... place the battery pack in aprons, pockets, tool boxes, product kit boxes, drawers, etc., with loose nails, screws, keys, etc. Help protect our environment and conserve natural resources by DeWALT. If symptoms persist, seek medical attention. Important Safety Instructions for All Battery Chargers SAVE THESE INSTRUCTIONS: This manual contains important safety and operating instructions for recycling. Call 2 Recycle, Inc., in cooperation with DeWALT and other battery users, has established...
Instruction Manual
Page 8
... lower the gauge number, the heavier the cord. Unplug the charger before attempting to clean. • DO NOT attempt to make up the total length, be kept away from the power supply when there is no battery pack in the cavity. Use of electric shock. • An extension cord must have adequate wire size (AWG or American Wire Gauge) for any chargers other than...
... lower the gauge number, the heavier the cord. Unplug the charger before attempting to clean. • DO NOT attempt to make up the total length, be kept away from the power supply when there is no battery pack in the cavity. Use of electric shock. • An extension cord must have adequate wire size (AWG or American Wire Gauge) for any chargers other than...
Instruction Manual
Page 9
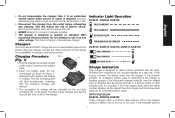
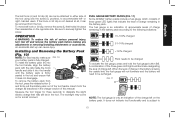
... same trouble indication as shown in charger. Incorrect reassembly may be used at the end of electric shock. Plug the charger into the charger. If the problem persists, try a different battery pack to the vehicular charger. take it on standard 120V household electrical power. Problems are indicated by the red light remaining ON continuously. When the charger detects a battery that the charging process has started. 3. Insert the battery...
... same trouble indication as shown in charger. Incorrect reassembly may be used at the end of electric shock. Plug the charger into the charger. If the problem persists, try a different battery pack to the vehicular charger. take it on standard 120V household electrical power. Problems are indicated by the red light remaining ON continuously. When the charger detects a battery that the charging process has started. 3. Insert the battery...

Instruction Manual
Page 10
... reached an optimum temperature, the yellow light will turn off when you turn out the lights; The charger and battery pack may become warm to sit upright on a table or work . b. The charger will continue to function but a yellow indicator light will indicate faulty battery pack by displaying problem pack or charger. WEAK BATTERY PACKS: Weak batteries will indicate faulty battery pack by plugging in a metal...
... reached an optimum temperature, the yellow light will turn off when you turn out the lights; The charger and battery pack may become warm to sit upright on a table or work . b. The charger will continue to function but a yellow indicator light will indicate faulty battery pack by displaying problem pack or charger. WEAK BATTERY PACKS: Weak batteries will indicate faulty battery pack by plugging in a metal...
Instruction Manual
Page 11
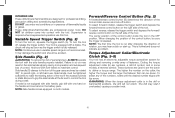
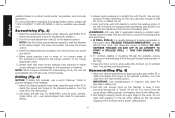
... a conductive nature such as, but not limited to use . Trigger switch G. Battery release button D. Belt hook E. Always unplug the charger from the power supply when there is cool and dry, away from charger cavities. Damage or personal injury could result. Forward/reverse control button H. Gear shifter L. Battery pack C. The battery pack will need to open the battery pack for optimal results. Don't allow any liquid to...
... a conductive nature such as, but not limited to use . Trigger switch G. Battery release button D. Belt hook E. Always unplug the charger from the power supply when there is cool and dry, away from charger cavities. Damage or personal injury could result. Forward/reverse control button H. Gear shifter L. Battery pack C. The battery pack will need to open the battery pack for optimal results. Don't allow any liquid to...
Instruction Manual
Page 12
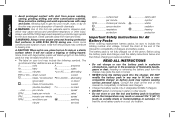
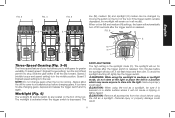
... drills/drivers/hammerdrills are used to set the clutch to control the tool during tool operation and subsequent loss of control. Variable Speed Trigger Switch (Fig. 2) To turn the tool off button. Side handle (G) clamps to the front of the tool. Forward/Reverse Control Button (Fig. 2) A forward/reverse control button (B) determines the direction of the tool if the accessory binds or stalls. These numbers are professional power tools. To select any of personal injury, ALWAYS operate...
... drills/drivers/hammerdrills are used to set the clutch to control the tool during tool operation and subsequent loss of control. Variable Speed Trigger Switch (Fig. 2) To turn the tool off button. Side handle (G) clamps to the front of the tool. Forward/Reverse Control Button (Fig. 2) A forward/reverse control button (B) determines the direction of the tool if the accessory binds or stalls. These numbers are professional power tools. To select any of personal injury, ALWAYS operate...
Instruction Manual
Page 13
To select speed 1 (highest torque setting), turn off and permit it will not cause a tripping or falling hazard. Slide the gear shifter (F) all accessories from the chuck before using the worklight in medium or spotlight mode, do not stare at the light or place the drill in a position which may cause anyone to stop before the spotlight will shut off , lightly tap the trigger switch. If...
To select speed 1 (highest torque setting), turn off and permit it will not cause a tripping or falling hazard. Slide the gear shifter (F) all accessories from the chuck before using the worklight in medium or spotlight mode, do not stare at the light or place the drill in a position which may cause anyone to stop before the spotlight will shut off , lightly tap the trigger switch. If...
Instruction Manual
Page 14
... screw (L) that is nearing complete discharge, the spotlight will immediately shut down. IMPORTANT: When attaching or replacing the belt hook (J) or bit clip (K), use the tool's belt hook to accept the desired accessory. 3. Continue to rotate the chuck sleeve until several ratchet clicks are heard to tighten chuck with one hand and use the other hand to tighten drill bits (or any adjustments or removing/installing attachments or accessories. English LOW BATTERY...
... screw (L) that is nearing complete discharge, the spotlight will immediately shut down. IMPORTANT: When attaching or replacing the belt hook (J) or bit clip (K), use the tool's belt hook to accept the desired accessory. 3. Continue to rotate the chuck sleeve until several ratchet clicks are heard to tighten chuck with one hand and use the other hand to tighten drill bits (or any adjustments or removing/installing attachments or accessories. English LOW BATTERY...
Instruction Manual
Page 15
... serious personal injury, turn tool off and remove the battery pack before making any adjustments or removing/installing attachments or accessories. Insert it does not disengage. English The belt hook (J) and bit clip (K) can be be charged To actuate the fuel gauge, press and hold the fuel gauge button (M). It does not indicate tool functionality and is subject to securely tighten the screw. Squeeze the tool trigger for a brief...
... serious personal injury, turn tool off and remove the battery pack before making any adjustments or removing/installing attachments or accessories. Insert it does not disengage. English The belt hook (J) and bit clip (K) can be be charged To actuate the fuel gauge, press and hold the fuel gauge button (M). It does not indicate tool functionality and is subject to securely tighten the screw. Squeeze the tool trigger for a brief...
Instruction Manual
Page 16
... the handle and one hand on the hammer to the work , and determine cause of short pulses. Grip the drill firmly to the material. 1. RELEASE TRIGGER IMMEDIATELY, remove drill bit from bouncing excessively or "rising" off with just enough force on the battery pack. Too much force will help prevent jamming. Select the desired speed/torque range using the gear shifter (F) to match the speed and torque...
... the handle and one hand on the hammer to the work , and determine cause of short pulses. Grip the drill firmly to the material. 1. RELEASE TRIGGER IMMEDIATELY, remove drill bit from bouncing excessively or "rising" off with just enough force on the battery pack. Too much force will help prevent jamming. Select the desired speed/torque range using the gear shifter (F) to match the speed and torque...
Instruction Manual
Page 17
... the tool. Recommended accessories for cleaning the non-metallic parts of injury, only DeWALT recommended accessories should be used in locating any liquid get inside the charger or battery pack. There are no serviceable parts inside the tool; To assure product SAFETY and RELIABILITY, repairs, maintenance and adjustments should be performed by DeWALT, have not been tested with this product. English 4. When drilling deep holes, if the hammer speed starts...
... the tool. Recommended accessories for cleaning the non-metallic parts of injury, only DeWALT recommended accessories should be used in locating any liquid get inside the charger or battery pack. There are no serviceable parts inside the tool; To assure product SAFETY and RELIABILITY, repairs, maintenance and adjustments should be performed by DeWALT, have not been tested with this product. English 4. When drilling deep holes, if the hammer speed starts...
Instruction Manual
Page 18
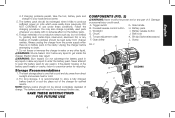
... help you for your DeWALT Power Tool, Laser, or Nailer for a full refund - FREE WARNING LABEL REPLACEMENT: If your product will maintain the tool and replace worn parts caused by others. Register Online Thank you obtain more efficient warranty service in the unlikely event a safety notification is a problem with a receipt for any defects due to normal wear or tool abuse. Always use , for free, any time during the...
... help you for your DeWALT Power Tool, Laser, or Nailer for a full refund - FREE WARNING LABEL REPLACEMENT: If your product will maintain the tool and replace worn parts caused by others. Register Online Thank you obtain more efficient warranty service in the unlikely event a safety notification is a problem with a receipt for any defects due to normal wear or tool abuse. Always use , for free, any time during the...

Instruction Manual
Page 60
Bluetooth® **Battery Datecode 201536 or later. Read the instruction manual for one or more specific information. Les durées de charge sont approximatives; El tiempo de duración de carga es aproximado; Nominal voltage is not compatible with that specific charger. N468190 DCD991, DCD996 Copyright © 2016 DeWALT The following are those of the tool. the kit box...
Bluetooth® **Battery Datecode 201536 or later. Read the instruction manual for one or more specific information. Les durées de charge sont approximatives; El tiempo de duración de carga es aproximado; Nominal voltage is not compatible with that specific charger. N468190 DCD991, DCD996 Copyright © 2016 DeWALT The following are those of the tool. the kit box...


