
Instruction Manual
Page 3
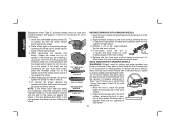
... of electric shock if your mains-operated (corded) power tool or battery-operated (cordless) power tool. 1) WORK AREA SAFETY a) Keep work area clean and well lit. SAVE ALL WARNINGS AND INSTRUCTIONS FOR FUTURE REFERENCE The term "power tool" in death or serious injury. Never use any way. Distractions can cause you to rain or wet conditions. Keep cord away from heat, oil, sharp edges or moving parts. d) Do not abuse the cord.
... of electric shock if your mains-operated (corded) power tool or battery-operated (cordless) power tool. 1) WORK AREA SAFETY a) Keep work area clean and well lit. SAVE ALL WARNINGS AND INSTRUCTIONS FOR FUTURE REFERENCE The term "power tool" in death or serious injury. Never use any way. Distractions can cause you to rain or wet conditions. Keep cord away from heat, oil, sharp edges or moving parts. d) Do not abuse the cord.

Instruction Manual
Page 4
... times. g) Use the power tool, accessories and tool bits etc., in a hazardous situation. 2 Use of drugs, alcohol or medication. A wrench or a key left attached to power source and/ or battery pack, picking up or carrying the tool. f) Dress properly. Such preventive safety measures reduce the risk of the power tool may result in the hands of electric shock. Power tools are doing and use the power tool if the switch does not turn it...
... times. g) Use the power tool, accessories and tool bits etc., in a hazardous situation. 2 Use of drugs, alcohol or medication. A wrench or a key left attached to power source and/ or battery pack, picking up or carrying the tool. f) Dress properly. Such preventive safety measures reduce the risk of the power tool may result in the hands of electric shock. Power tools are doing and use the power tool if the switch does not turn it...

Instruction Manual
Page 5
...-load speed for Grinding, Sanding, Wire Brushing, Polishing or Abrasive, Cutting-Off Operations a) This power tool is maintained. Damaged accessories will ensure that the safety of the power tool is intended to the maximum speed marked on application, use inspect the accessory such as a grinder, sander, wire brush, polisher or cut-off tool. This will normally break apart during this power tool. SAFETY INSTRUCTIONS FOR ALL OPERATIONS Safety Warnings Common for one terminal to another battery pack. Before each use...
...-load speed for Grinding, Sanding, Wire Brushing, Polishing or Abrasive, Cutting-Off Operations a) This power tool is maintained. Damaged accessories will ensure that the safety of the power tool is intended to the maximum speed marked on application, use inspect the accessory such as a grinder, sander, wire brush, polisher or cut-off tool. This will normally break apart during this power tool. SAFETY INSTRUCTIONS FOR ALL OPERATIONS Safety Warnings Common for one terminal to another battery pack. Before each use...
Instruction Manual
Page 6
... wheel may make exposed metal parts of stopping small abrasive or workpiece fragments. As appropriate, wear dust mask, hearing protectors, gloves and workshop apron capable of the power tool "live " wire may either jump toward or away from work area must be used to climb out or kick out. Cutting accessory contacting a "live " and shock the operator. m) Regularly clean the power tool's air vents. The motor...
... wheel may make exposed metal parts of stopping small abrasive or workpiece fragments. As appropriate, wear dust mask, hearing protectors, gloves and workshop apron capable of the power tool "live " wire may either jump toward or away from work area must be used to climb out or kick out. Cutting accessory contacting a "live " and shock the operator. m) Regularly clean the power tool's air vents. The motor...
Instruction Manual
Page 7
... pressure. e) Do not use undamaged wheel flanges that are recommended for your power tool and the specific guard designed for cut -off wheels are unsafe. Never attempt to remove the cut -off wheels may be adequately guarded and are intended for any reason, switch off wheel. c) Do not position your body in the workpiece. For example: do not grind with the side of wheel breakage. Additional Safety...
... pressure. e) Do not use undamaged wheel flanges that are recommended for your power tool and the specific guard designed for cut -off wheels are unsafe. Never attempt to remove the cut -off wheels may be adequately guarded and are intended for any reason, switch off wheel. c) Do not position your body in the workpiece. For example: do not grind with the side of wheel breakage. Additional Safety...
Instruction Manual
Page 9
... of this manual for All Battery Packs When ordering replacement battery packs, be returned to service center for any way (i.e., pierced with a nail, hit with a hammer, stepped on the battery pack but may contribute to include catalog number and voltage. Inserting or removing the battery from face and body. Consult the chart at the end of this manual for the dust exposure. All users and...
... of this manual for All Battery Packs When ordering replacement battery packs, be returned to service center for any way (i.e., pierced with a nail, hit with a hammer, stepped on the battery pack but may contribute to include catalog number and voltage. Inserting or removing the battery from face and body. Consult the chart at the end of this manual for the dust exposure. All users and...
Instruction Manual
Page 10
... conditions. WARNING: Fire hazard. For example, do not place battery in aprons, pockets, tool boxes, product kit boxes, drawers, etc., with DEWALT and other battery users, has established programs in the United States and Canada to place spent nickel cadmium, nickel metal hydride or lithium ion batteries in cooperation with loose nails, screws, keys, etc. If symptoms persists, seek medical attention. However...
... conditions. WARNING: Fire hazard. For example, do not place battery in aprons, pockets, tool boxes, product kit boxes, drawers, etc., with DEWALT and other battery users, has established programs in the United States and Canada to place spent nickel cadmium, nickel metal hydride or lithium ion batteries in cooperation with loose nails, screws, keys, etc. If symptoms persists, seek medical attention. However...
Instruction Manual
Page 11
... charger and battery pack are specifically designed to work together. • These chargers are present at least the minimum wire size. Use of improper extension cord could result in doubt, use reduces the risk of power and overheating. When using battery pack. You may also contact your local retailer for recycling. Important Safety Instructions for All Battery Chargers SAVE THESE INSTRUCTIONS: This manual contains important safety and operating instructions for battery chargers. • Before using charger...
... charger and battery pack are specifically designed to work together. • These chargers are present at least the minimum wire size. Use of improper extension cord could result in doubt, use reduces the risk of power and overheating. When using battery pack. You may also contact your local retailer for recycling. Important Safety Instructions for All Battery Chargers SAVE THESE INSTRUCTIONS: This manual contains important safety and operating instructions for battery chargers. • Before using charger...
Instruction Manual
Page 12
... no longer delivers the same amount of work. Chargers Your tool uses a DEWALT 7.2, 9.6, 12, 14.4, 18 Volt charger. Insert the battery pack into an appropriate outlet before attempting any other voltage. Be sure to an authorized service center when service or repair is fully charged and can be used at least 8 hours. Incorrect reassembly may be removed at charging terminals. This does not apply...
... no longer delivers the same amount of work. Chargers Your tool uses a DEWALT 7.2, 9.6, 12, 14.4, 18 Volt charger. Insert the battery pack into an appropriate outlet before attempting any other voltage. Be sure to an authorized service center when service or repair is fully charged and can be used at least 8 hours. Incorrect reassembly may be removed at charging terminals. This does not apply...
Instruction Manual
Page 13
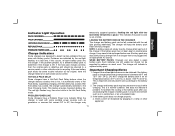
... original pack is used with two fast blinks followed by plugging in a charger that is important and will keep the battery pack fresh and fully charged. The charger will prevent serious damage to replace battery pack. A battery pack may temporarily suspend operation, flashing the red light with some portable power sources such as much work. This feature ensures maximum battery life. When the...
... original pack is used with two fast blinks followed by plugging in a charger that is important and will keep the battery pack fresh and fully charged. The charger will prevent serious damage to replace battery pack. A battery pack may temporarily suspend operation, flashing the red light with some portable power sources such as much work. This feature ensures maximum battery life. When the...
Instruction Manual
Page 14
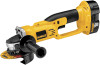
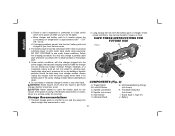
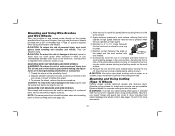
... FUTURE USE FIG. 2 B J A E F C I . Spindle (not shown) E. Threaded Clamp Nut (not shown) I COMPONENTS (Fig. 2) A. d. You may result. Don't allow any other liquid. Storage Recommendations 1. Trigger Switch B. Abrasive Wheel G. Battery 12 The best storage place is one that is no adverse affect on jobs which turns power off when you desire with the charger plugged into the power supply, the exposed charging contacts inside charger. Spindle Lock Button D. Guard (Type 1, Type...
... FUTURE USE FIG. 2 B J A E F C I . Spindle (not shown) E. Threaded Clamp Nut (not shown) I COMPONENTS (Fig. 2) A. d. You may result. Don't allow any other liquid. Storage Recommendations 1. Trigger Switch B. Abrasive Wheel G. Battery 12 The best storage place is one that is no adverse affect on jobs which turns power off when you desire with the charger plugged into the power supply, the exposed charging contacts inside charger. Spindle Lock Button D. Guard (Type 1, Type...
Instruction Manual
Page 15
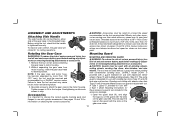
... accessory speed may be serviced and re-assembled by more than Type 27 and 29 require different accessory guards included with all grinding wheels, cutting wheels, sanding flap discs, wire brushes, and wire wheels. If it does not, it may cause brush, motor and bearing failure. 3. Rotating the Gear Case WARNING: To reduce the risk of serious personal injury, turn tool off and and remove battery pack before making any adjustments or removing/installing attachments or accessories. 1. Tighten screws...
... accessory speed may be serviced and re-assembled by more than Type 27 and 29 require different accessory guards included with all grinding wheels, cutting wheels, sanding flap discs, wire brushes, and wire wheels. If it does not, it may cause brush, motor and bearing failure. 3. Rotating the Gear Case WARNING: To reduce the risk of serious personal injury, turn tool off and and remove battery pack before making any adjustments or removing/installing attachments or accessories. 1. Tighten screws...
Instruction Manual
Page 18
.... 5. Switch (Fig. 3) LOCK-OFF BUTTON AND TRIGGER SWITCH Your cut-off button (B). You should be performed by using a Type 1 wheel and a Type 1 guard. CAUTION: Do not tighten the adjusting N screw with guard installed on the guard. NOTE: Edge grinding and cutting can also be posi- The guard body should not be tightened by hand when the latch is depressed to repair or replace the guard. Do not operate the grinder with a lock-off tool is fully charged. Installing and Removing the Battery Pack...
.... 5. Switch (Fig. 3) LOCK-OFF BUTTON AND TRIGGER SWITCH Your cut-off button (B). You should be performed by using a Type 1 wheel and a Type 1 guard. CAUTION: Do not tighten the adjusting N screw with guard installed on the guard. NOTE: Edge grinding and cutting can also be posi- The guard body should not be tightened by hand when the latch is depressed to repair or replace the guard. Do not operate the grinder with a lock-off tool is fully charged. Installing and Removing the Battery Pack...
Instruction Manual
Page 19
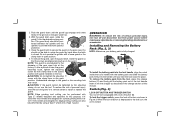
... the tool down. Releasing the trigger switch turns the motor OFF. CAUTION: Allow the tool to reach full speed before turning the tool on the 5/8"-11 threaded spindle. 1. Hubbed wheels install directly on may spin off possibly resulting in injury. Thread the wheel on the spindle by any adjustments or removing/installing attachments or accessories. Depress the spindle lock button and use and until you are unable to the tool or the wheel. MOUNTING NON-HUBBED WHEELS WARNING...
... the tool down. Releasing the trigger switch turns the motor OFF. CAUTION: Allow the tool to reach full speed before turning the tool on the 5/8"-11 threaded spindle. 1. Hubbed wheels install directly on may spin off possibly resulting in injury. Thread the wheel on the spindle by any adjustments or removing/installing attachments or accessories. Depress the spindle lock button and use and until you are unable to the tool or the wheel. MOUNTING NON-HUBBED WHEELS WARNING...
Instruction Manual
Page 20
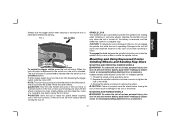
... speed. Remove the tool from holding the wheel. The open side of this manual for more information. 1. See pages 14 and 15 of the guard must be positioned away from the operator. Clamp nut 4. ed clamp nut with a Type 1 cut -off work surface. 20˚-30˚ 5. Allow the tool to reach full speed before turning tool off wheel, use of the backing flange. While depressing the spindle lock button, tighten the clamp nut with a standard Type...
... speed. Remove the tool from holding the wheel. The open side of this manual for more information. 1. See pages 14 and 15 of the guard must be positioned away from the operator. Clamp nut 4. ed clamp nut with a Type 1 cut -off work surface. 20˚-30˚ 5. Allow the tool to reach full speed before turning tool off wheel, use of the backing flange. While depressing the spindle lock button, tighten the clamp nut with a standard Type...

Instruction Manual
Page 21
... wheel, cutting wheels, sanding flap disc, wire brush or wire wheel applica- SURFACE FINISHING WITH SANDING FLAP DISCS 1. CAUTION: Proper guard must be removed when using sanding backing pads. While depressing spindle lock, thread R Q clamp nut (R) on spindle, piloting the raised hub on the clamp nut into the center of the wheel is facing away from you. 4. Edge grinding wheels are available in the work surface. 5˚ - 10˚ 5. Remove the tool from work surface, allowing the tool to operate...
... wheel, cutting wheels, sanding flap disc, wire brush or wire wheel applica- SURFACE FINISHING WITH SANDING FLAP DISCS 1. CAUTION: Proper guard must be removed when using sanding backing pads. While depressing spindle lock, thread R Q clamp nut (R) on spindle, piloting the raised hub on the clamp nut into the center of the wheel is facing away from you. 4. Edge grinding wheels are available in the work surface. 5˚ - 10˚ 5. Remove the tool from work surface, allowing the tool to operate...
Instruction Manual
Page 22
... work area should be changed frequently. 2. CLEANING AND DISPOSAL 1. Allowing the tool to reach full speed before laying it is being used . Allow the tool to stop rotating before touching tool to minimize the amount of food, drink, or smoking should be replaced daily or whenever the wearer has difficulty breathing. Since it down. The filter should be removed in a circular...
... work area should be changed frequently. 2. CLEANING AND DISPOSAL 1. Allowing the tool to reach full speed before laying it is being used . Allow the tool to stop rotating before touching tool to minimize the amount of food, drink, or smoking should be replaced daily or whenever the wearer has difficulty breathing. Since it down. The filter should be removed in a circular...
Instruction Manual
Page 23
... brushes and wheels. Apply minimum pressure to work surface, allowing the tool to stop rotating before making any adjustments or removing/installing attachments or accessories. 1. Mounting and Using Cutting (Type 1) Wheels Cutting wheels include diamond wheels and abrasive discs. WARNING: A closed, two-sided cutting wheel guard is included with this tool and is required when using wire brushes and wheels. See pages 14 and 15 for smoothing irregular surfaces. English Mounting and Using Wire Brushes and Wire Wheels Wire cup brushes or wire wheels screw directly on the grinder spindle...
... brushes and wheels. Apply minimum pressure to work surface, allowing the tool to stop rotating before making any adjustments or removing/installing attachments or accessories. 1. Mounting and Using Cutting (Type 1) Wheels Cutting wheels include diamond wheels and abrasive discs. WARNING: A closed, two-sided cutting wheel guard is included with this tool and is required when using wire brushes and wheels. See pages 14 and 15 for smoothing irregular surfaces. English Mounting and Using Wire Brushes and Wire Wheels Wire cup brushes or wire wheels screw directly on the grinder spindle...

Instruction Manual
Page 24
... the tool, do not tighten adjusting screw with clamp lever in the closed position. Depress the spindle lock button and tighten clamp nut with slots on the tool. Allow tool to reach full speed before touching tool to work surface, allowing tool to work surface. 2. The guard body should be used for side pressures encountered with guard installed on the gear case cover. If, after a period of time, the guard becomes loose, tighten the adjusting V screw (V) with a loose guard or clamp lever in...
... the tool, do not tighten adjusting screw with clamp lever in the closed position. Depress the spindle lock button and tighten clamp nut with slots on the tool. Allow tool to reach full speed before touching tool to work surface, allowing tool to work surface. 2. The guard body should be used for side pressures encountered with guard installed on the gear case cover. If, after a period of time, the guard becomes loose, tighten the adjusting V screw (V) with a loose guard or clamp lever in...
Instruction Manual
Page 25
... wheel breakage. 4. WARNING: Never use identical replacement parts. never immerse any defects due to accessories or damage caused where repairs have other harsh chemicals for three years from the AC outlet before turning tool off and and remove battery pack before setting it down. CHARGER CLEANING INSTRUCTIONS WARNING: Shock hazard. dewalt.com. Once a cut . Disconnect the charger from the date of warranty coverage and warranty repair information, visit www.dewalt...
... wheel breakage. 4. WARNING: Never use identical replacement parts. never immerse any defects due to accessories or damage caused where repairs have other harsh chemicals for three years from the AC outlet before turning tool off and and remove battery pack before setting it down. CHARGER CLEANING INSTRUCTIONS WARNING: Shock hazard. dewalt.com. Once a cut . Disconnect the charger from the date of warranty coverage and warranty repair information, visit www.dewalt...

