
Operating Instructions
Page 1
Lesen Sie diese Bedienungsanleitung vor lnbetriebnahme. Bewahren Sie diese Anleitung auf. Conservez-le de facon a pouvoir le consulter en cas d'ennui. Afin d'utiliser, lisez ce mode d'emploi. Note: Whenever the power switch is in the OFF-state, the apparatus is still connected on AC line voltage. Please be sure to unplug the cord when you leave home for future reference. DENON FULLY AUTOMATIC DIRECT DRIVE TURNTABLE DP-23F OPERATING INSTRUCTIONS MODE D'EMPLOI BEDIENUNGSANLEITUNG Read instructions before use and retain for , say, a vacation.
Lesen Sie diese Bedienungsanleitung vor lnbetriebnahme. Bewahren Sie diese Anleitung auf. Conservez-le de facon a pouvoir le consulter en cas d'ennui. Afin d'utiliser, lisez ce mode d'emploi. Note: Whenever the power switch is in the OFF-state, the apparatus is still connected on AC line voltage. Please be sure to unplug the cord when you leave home for future reference. DENON FULLY AUTOMATIC DIRECT DRIVE TURNTABLE DP-23F OPERATING INSTRUCTIONS MODE D'EMPLOI BEDIENUNGSANLEITUNG Read instructions before use and retain for , say, a vacation.

Operating Instructions
Page 2
... cover In order to remove by holding the plug attachment and not by pulling the cord. 2. If problems occur, contact your set shown on the rating label. Serial No Please, record and retain the Model name and serial number of your DENON dealer. 3. Afin d'eviter les incendies ou tout...Daher nicht selber 0ffnen, sondern bei St0rungen den DENON-Handler zu Rate ziehen. 4. Do not insert anything inside Do not insert metal objects or spill liquid inside the record player, Electric shock or malfunction may cause electric shock or malfunction when used. S'il est endommage ou deforms, it ne...
... cover In order to remove by holding the plug attachment and not by pulling the cord. 2. If problems occur, contact your set shown on the rating label. Serial No Please, record and retain the Model name and serial number of your DENON dealer. 3. Afin d'eviter les incendies ou tout...Daher nicht selber 0ffnen, sondern bei St0rungen den DENON-Handler zu Rate ziehen. 4. Do not insert anything inside Do not insert metal objects or spill liquid inside the record player, Electric shock or malfunction may cause electric shock or malfunction when used. S'il est endommage ou deforms, it ne...
Operating Instructions
Page 3
IMPORTANT (BRITISH MODEL ONLY) The wires in this mains lead are coloured in accordance with the following code: Blue: Neutral Brown: Live As the colours of the wires in the mains lead of this apparatus may not correspond with the letter L or coloured... identifying the terminals in your plug, proceed as follows. PART NAMES AND FUNCTIONS ASSEMBLY MOUNTING/REPLACEMENT OF CARTRIDGE STYLUS FORCE ADJUSTMENT CONNECTIONS HOW TO PLAY PARTS REPLACEMENT AND READJUSTMENT WHEN TROUBLES ARISE SPECIFICATIONS - INHALT - The wire which is coloured brown must be connected to the terminal which is ...
IMPORTANT (BRITISH MODEL ONLY) The wires in this mains lead are coloured in accordance with the following code: Blue: Neutral Brown: Live As the colours of the wires in the mains lead of this apparatus may not correspond with the letter L or coloured... identifying the terminals in your plug, proceed as follows. PART NAMES AND FUNCTIONS ASSEMBLY MOUNTING/REPLACEMENT OF CARTRIDGE STYLUS FORCE ADJUSTMENT CONNECTIONS HOW TO PLAY PARTS REPLACEMENT AND READJUSTMENT WHEN TROUBLES ARISE SPECIFICATIONS - INHALT - The wire which is coloured brown must be connected to the terminal which is ...
Operating Instructions
Page 4
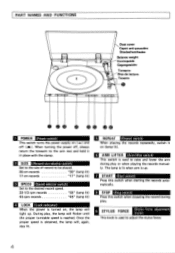
... . 7 START (Start switch) Press this switch when starting the records automatically. 8 STOP (Stop switch) Press this switch when stopping the record during play . 9 STYLUS FORCE (Stylus force adjustment knob) This knob is reached. Once the proper speed is used to .raise and lower the arm during play or when playing the records manually. When turning the power off (Z). The lamp is lit when arm is up . PART NAMES AND FUNCTIONS...
... . 7 START (Start switch) Press this switch when starting the records automatically. 8 STOP (Stop switch) Press this switch when stopping the record during play . 9 STYLUS FORCE (Stylus force adjustment knob) This knob is reached. Once the proper speed is used to .raise and lower the arm during play or when playing the records manually. When turning the power off (Z). The lamp is lit when arm is up . PART NAMES AND FUNCTIONS...

Operating Instructions
Page 6
...rpm record adaptor 2) Turntable mat 5) Alignment plate 3) Balance weight (DP-21F only) 6) Instruction manual 1. MOUNTING/REPLACEMENT OF CARTRIDGE The acceptable cartridge weight range for this turntable is approximately 4.0 ^ 9.0 g (including the nuts and screws). • Loosen the head shell fixing screw for about one turn. ...platter. 3. connections. ASSEMBLY Please check the following items, aside from the main unit, are as not to make any mis- Then, refer to page 19 to allow a slight movement. Install the turntable platter and the turntable mat. 1) Insert the turntable onto...
...rpm record adaptor 2) Turntable mat 5) Alignment plate 3) Balance weight (DP-21F only) 6) Instruction manual 1. MOUNTING/REPLACEMENT OF CARTRIDGE The acceptable cartridge weight range for this turntable is approximately 4.0 ^ 9.0 g (including the nuts and screws). • Loosen the head shell fixing screw for about one turn. ...platter. 3. connections. ASSEMBLY Please check the following items, aside from the main unit, are as not to make any mis- Then, refer to page 19 to allow a slight movement. Install the turntable platter and the turntable mat. 1) Insert the turntable onto...
Operating Instructions
Page 8
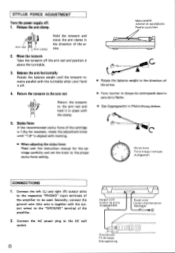
... place with the output wires) to the "GROUND" terminal of the cartridge is 1.8 g for example, rotate the adjustment knob until the tonearm remains parallel with marking. • When adjusting the stylus force Read over the instruction manual for the cartridge carefully and set the knob to the proper stylus force setting. STYLUS FORCE ADJUSTMENT Turn the power supply off the arm...
... place with the output wires) to the "GROUND" terminal of the cartridge is 1.8 g for example, rotate the adjustment knob until the tonearm remains parallel with marking. • When adjusting the stylus force Read over the instruction manual for the cartridge carefully and set the knob to the proper stylus force setting. STYLUS FORCE ADJUSTMENT Turn the power supply off the arm...

Operating Instructions
Page 10
... start to "up" (lamp lit). 2. By hand, place the tonearm over to "PHONO". 2. C I I Abb. Turn the power supply of record to the desired position. 33-1/3 rpm records "33" (lamp lit) 45 rpm records "45" (lamp lit) 4. D) The turntable will be played. 30 cm records "30" (lamp lit) 17 cm records "17" (lamp lit) 2. Set the arm lifter switch to "down ". 4. When the play mode...
... start to "up" (lamp lit). 2. By hand, place the tonearm over to "PHONO". 2. C I I Abb. Turn the power supply of record to the desired position. 33-1/3 rpm records "33" (lamp lit) 45 rpm records "45" (lamp lit) 4. D) The turntable will be played. 30 cm records "30" (lamp lit) 17 cm records "17" (lamp lit) 2. Set the arm lifter switch to "down ". 4. When the play mode...
Operating Instructions
Page 12
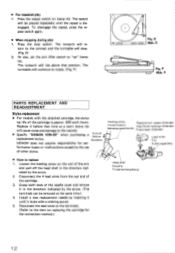
... at the same time.) 4. The record will stop switch. turn to the item on (lamp lit). To disengage the repeat, press the repeat switch again. • When stopping during play 1. formance losses or malfunctions caused by inserting it before that position. Install a new replacement needle by the use of the cartridge. 3. Disconnect the 4 lead wires from the rear end of other...
... at the same time.) 4. The record will stop switch. turn to the item on (lamp lit). To disengage the repeat, press the repeat switch again. • When stopping during play 1. formance losses or malfunctions caused by inserting it before that position. Install a new replacement needle by the use of the cartridge. 3. Disconnect the 4 lead wires from the rear end of other...

Operating Instructions
Page 14
...• Is the power switch on the head shell?...angeschlossen? The stylus does not lower onto the record. • Is the arm lifter switch set to page 8 DEPANNAGE En cas de derangement... start when the start switch is pressed. No sound. • Is the tonearm and the cartridge connected properly? • Are the output wires properly connected to the amplifier?... die Tonarm-Sicherungsklemme gelost? WHEN TROUBLES ARISE When troubles arise, check the following items before considering any malfunctions. Trotz gedruckten Start-Schalters funktioniert der Plattenspieler nicht. Siehe...
...• Is the power switch on the head shell?...angeschlossen? The stylus does not lower onto the record. • Is the arm lifter switch set to page 8 DEPANNAGE En cas de derangement... start when the start switch is pressed. No sound. • Is the tonearm and the cartridge connected properly? • Are the output wires properly connected to the amplifier?... die Tonarm-Sicherungsklemme gelost? WHEN TROUBLES ARISE When troubles arise, check the following items before considering any malfunctions. Trotz gedruckten Start-Schalters funktioniert der Plattenspieler nicht. Siehe...
Operating Instructions
Page 16
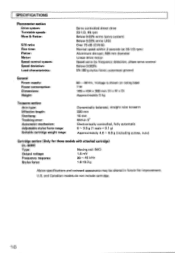
... Canadian models do not include cartridge. 16 SPECI FICATIONS Phonomotor section Drive system: Turntable speeds: Wow & flutter: S/N ratio: Rise time: Platter: Motor: Speed control system: Speed deviation: Load characteristics: Servo controlled direct drive...phase servo control Below 0.002% 0% (80 g stylus force; outermost groove) General Power supply: Power consumption: Dimensions: Weight: 50 - 60 Hz, Voltage is shown on rating label 7W 105 x 434 x 360 mm (H x W x D) Approximately 5 kg Tonearm section Arm type: Effective length: Overhang: Tracking error: Automatic mechanism: Adjustable...
... Canadian models do not include cartridge. 16 SPECI FICATIONS Phonomotor section Drive system: Turntable speeds: Wow & flutter: S/N ratio: Rise time: Platter: Motor: Speed control system: Speed deviation: Load characteristics: Servo controlled direct drive...phase servo control Below 0.002% 0% (80 g stylus force; outermost groove) General Power supply: Power consumption: Dimensions: Weight: 50 - 60 Hz, Voltage is shown on rating label 7W 105 x 434 x 360 mm (H x W x D) Approximately 5 kg Tonearm section Arm type: Effective length: Overhang: Tracking error: Automatic mechanism: Adjustable...


