
Literature/Product Sheet
Page 2
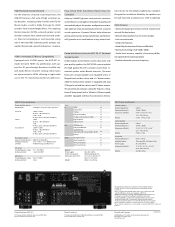
...8226; Audio Delay function (max. 6 frames or 200 mSec) • Muting level settings (Full/-40dB/-20dB) • Audio level memory, capable of correcting different signal levels... 8" driver mated with a 100 watts (250 watts peak) amplifier equipped with poor quality speakers, the DHT-591BA system includes the high quality MCS 95 surround system from renowned speaker maker Boston Acoustics. Front L/R Center ... Assign function, for different purposes Denon Brand Company D&M Building, 2-1 Nisshin-cho, Kawasaki-ku, Kawasaki-shi, Kanagawa, 210-8569, Japan www.denon.com 17780410 A tion circuitry for...
...8226; Audio Delay function (max. 6 frames or 200 mSec) • Muting level settings (Full/-40dB/-20dB) • Audio level memory, capable of correcting different signal levels... 8" driver mated with a 100 watts (250 watts peak) amplifier equipped with poor quality speakers, the DHT-591BA system includes the high quality MCS 95 surround system from renowned speaker maker Boston Acoustics. Front L/R Center ... Assign function, for different purposes Denon Brand Company D&M Building, 2-1 Nisshin-cho, Kawasaki-ku, Kawasaki-shi, Kanagawa, 210-8569, Japan www.denon.com 17780410 A tion circuitry for...
Owners Manual - English
Page 4
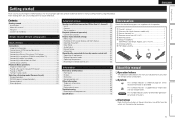
... information 13 Connecting an HDMI-compatible device 14 Connecting a TV 16 Connecting a Blu-ray Disc player / DVD player 16 Connecting a set-top box (Satellite tuner/cable TV 17 Connecting a digital camcorder 17 Connecting a control dock for operations. q Owner's manual 1 w... Warranty (for explanation purposes. NOTE This symbol indicates points to keep them for purchasing this DENON product. To ensure proper operation, please read these instructions may differ from the actual unit for North America model only 1 e Service ...
... information 13 Connecting an HDMI-compatible device 14 Connecting a TV 16 Connecting a Blu-ray Disc player / DVD player 16 Connecting a set-top box (Satellite tuner/cable TV 17 Connecting a digital camcorder 17 Connecting a control dock for operations. q Owner's manual 1 w... Warranty (for explanation purposes. NOTE This symbol indicates points to keep them for purchasing this DENON product. To ensure proper operation, please read these instructions may differ from the actual unit for North America model only 1 e Service ...
Owners Manual - English
Page 5
...Audio Support The unit is set to be used for the listening environment. Dock connecrivity for iPod and network streaming If an optional DENON control dock for an ...hour or two with the power turned off the power and unplug the power cord from a Blu-ray Disc player to the unit, you switch the input source, the name of speakers are measured, and settings...equipped with 4 HDMI input connectors for connecting devices with a decoder which automatically makes speaker settings best suited for connecting the unit and a TVz. When you control the sound volume,...
...Audio Support The unit is set to be used for the listening environment. Dock connecrivity for iPod and network streaming If an optional DENON control dock for an ...hour or two with the power turned off the power and unplug the power cord from a Blu-ray Disc player to the unit, you switch the input source, the name of speakers are measured, and settings...equipped with 4 HDMI input connectors for connecting devices with a decoder which automatically makes speaker settings best suited for connecting the unit and a TVz. When you control the sound volume,...

Owners Manual - English
Page 6
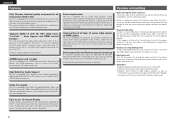
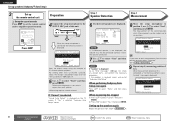
...5.1-channel speakers. The "Simple version" describes the installation, connection and setup methods for each device. 1 2 3 4 5 ENGLISH Install Connect Turn on Set up Play back (vpage 4) (vpage 4) power speakers disc (vpage 6) (vpage 6) (vpage 11) Basic version Advanced version Information Enjoy better audio,... correct install method. See page 27 for the installation, connection and setup methods for automatic setup. Set Up Speakers (Audyssey® Auto Setup) Preparation Step 1 Speaker Detection Step 2 Measurement Step 3 Calculating Step 4 Check Step 5 Store ...
...5.1-channel speakers. The "Simple version" describes the installation, connection and setup methods for each device. 1 2 3 4 5 ENGLISH Install Connect Turn on Set up Play back (vpage 4) (vpage 4) power speakers disc (vpage 6) (vpage 6) (vpage 11) Basic version Advanced version Information Enjoy better audio,... correct install method. See page 27 for the installation, connection and setup methods for automatic setup. Set Up Speakers (Audyssey® Auto Setup) Preparation Step 1 Speaker Detection Step 2 Measurement Step 3 Calculating Step 4 Check Step 5 Store ...

Owners Manual - English
Page 9
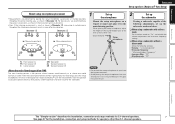
... away from the main unit until Audyssey Auto Setup is part of the connected speakers and listening room are measured and the optimum settings are being made automatically. Background noise can disrupt the room measurements. Power on 2 Change the TV input to the input of this...EQ®/Dynamic Volume™ functions become active (vpage 43, 44). •• To set up speakers (Audyssey® Auto Setup) 1 2 3 4 5 The acoustic characteristics of normal operation. Power on Power on 1 2 3 4 5 4 Set up the speakers manually, use ). • Do not unplug the setup microphone from all...
... away from the main unit until Audyssey Auto Setup is part of the connected speakers and listening room are measured and the optimum settings are being made automatically. Background noise can disrupt the room measurements. Power on 2 Change the TV input to the input of this...EQ®/Dynamic Volume™ functions become active (vpage 43, 44). •• To set up speakers (Audyssey® Auto Setup) 1 2 3 4 5 The acoustic characteristics of normal operation. Power on Power on 1 2 3 4 5 4 Set up the speakers manually, use ). • Do not unplug the setup microphone from all...
Owners Manual - English
Page 10
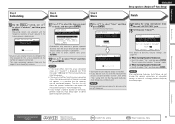
...more effective correction. Audyssey MultEQ® uses the measurements from this position to "On" and disable the volume adjustment and crossover frequency setting. NOTE • Do not hold the setup microphone in the illustration (up to six positions). • Even if the listening ...listening position. When placing the setup microphone, adjust the height of the listener's ear. nn When using a subwoofer with a direct mode Set the direct mode to calculate speaker distance, level, polarity, and the optimum crossover value for speakers other than 5.1-channel speakers. Advanced version ...
...more effective correction. Audyssey MultEQ® uses the measurements from this position to "On" and disable the volume adjustment and crossover frequency setting. NOTE • Do not hold the setup microphone in the illustration (up to six positions). • Even if the listening ...listening position. When placing the setup microphone, adjust the height of the listener's ear. nn When using a subwoofer with a direct mode Set the direct mode to calculate speaker distance, level, polarity, and the optimum crossover value for speakers other than 5.1-channel speakers. Advanced version ...
Owners Manual - English
Page 11
...Retry", and then press ENTER. Calculate Retry Cancel [ENT]:Calculate 8 Remote control operation buttons Move the cursor (Up/Down/Left/Right) Confirm the setting Return to select "Next" and then press ENTER. Pre Assign: Normal Start Cancel [ENT]:Select [RTN]:Back Here, we explain setup using the... example of the second position starts. Check the speaker connection. 7 Use ui to previous menu Setting up speakers" (vpage 29). 5 Use ui to select "Start" and then press ENTER. message is not displayed, the speaker may not be...
...Retry", and then press ENTER. Calculate Retry Cancel [ENT]:Calculate 8 Remote control operation buttons Move the cursor (Up/Down/Left/Right) Confirm the setting Return to select "Next" and then press ENTER. Pre Assign: Normal Start Cancel [ENT]:Select [RTN]:Back Here, we explain setup using the... example of the second position starts. Check the speaker connection. 7 Use ui to previous menu Setting up speakers" (vpage 29). 5 Use ui to select "Start" and then press ENTER. message is not displayed, the speaker may not be...
Owners Manual - English
Page 12
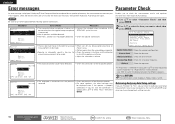
... obtain optimal equalizer correction. 13 Use ui to complete. NOTE • If the result differs from the unit's SETUP MIC jack. 15 Set Dynamic Volume™. All the measured Audyssey Auto Setup data will be sure not to select "Calculate", and then press ENTER. Finish MultEQ...properly. The more connected speakers there are, the longer it is displayed, see page 44. Turn this analysis depends on the number of Dynamic Volume settings, see "Error messages" (vpage 10). Step5:Store MultEQ Please select "Store" to previous menu 9 The unit automatically enters "Evening" mode. ...
... obtain optimal equalizer correction. 13 Use ui to complete. NOTE • If the result differs from the unit's SETUP MIC jack. 15 Set Dynamic Volume™. All the measured Audyssey Auto Setup data will be sure not to select "Calculate", and then press ENTER. Finish MultEQ...properly. The more connected speakers there are, the longer it is displayed, see page 44. Turn this analysis depends on the number of Dynamic Volume settings, see "Error messages" (vpage 10). Step5:Store MultEQ Please select "Store" to previous menu 9 The unit automatically enters "Evening" mode. ...
Owners Manual - English
Page 13
... • Check the speaker connections. 2 Use ui to select the item you have changed each setting manually. 10 Remote control operation buttons Move the cursor (Up/Down/Left/Right) Confirm the setting Return to select "Skip", then press ENTER. in the room for • Check the speaker ...to check the measurement results and equalizer If this happens, check the relevant items, be sure to be checked. Retrieving Audyssey Auto Setup settings If you set "Restore" to "Yes", you can return to Audyssey Auto Setup measurement result (value calculated at the start by MultEQ®) even...
... • Check the speaker connections. 2 Use ui to select the item you have changed each setting manually. 10 Remote control operation buttons Move the cursor (Up/Down/Left/Right) Confirm the setting Return to select "Skip", then press ENTER. in the room for • Check the speaker ...to check the measurement results and equalizer If this happens, check the relevant items, be sure to be checked. Retrieving Audyssey Auto Setup settings If you set "Restore" to "Yes", you can return to Audyssey Auto Setup measurement result (value calculated at the start by MultEQ®) even...

Owners Manual - English
Page 14
...status in standby modeH • Normal standby : Off • When "HDMI Control" is set to "ON" : Red You can also switch the power to standby by pressing ON/STANDBY on the player (language setting, subtitles setting, etc.) beforehand. 3 Adjust the sound volume. When power is consumed. NOTE During power ... the main unit. ENGLISH Advanced version Information Remote control operation buttons Move the cursor (Up/Down/Left/Right) Confirm the setting Return to your liking (vpage 23 "Selecting a listening mode (Surround mode)"). To totally cut off the power, remove the power ...
...status in standby modeH • Normal standby : Off • When "HDMI Control" is set to "ON" : Red You can also switch the power to standby by pressing ON/STANDBY on the player (language setting, subtitles setting, etc.) beforehand. 3 Adjust the sound volume. When power is consumed. NOTE During power ... the main unit. ENGLISH Advanced version Information Remote control operation buttons Move the cursor (Up/Down/Left/Right) Confirm the setting Return to your liking (vpage 23 "Selecting a listening mode (Surround mode)"). To totally cut off the power, remove the power ...

Owners Manual - English
Page 15
... Connection vpage 18 Playback vpage 22 For speaker connections, see page 4. vpage 20 vpage 20 - - - Audio and video TV Blu-ray Disc player DVD player Set-top box (Satellite tuner or cable TV) Game console Digital camcorder Control dock for this unit. ENGLISH 12 Basic version Basic version Here, we explain...
... Connection vpage 18 Playback vpage 22 For speaker connections, see page 4. vpage 20 vpage 20 - - - Audio and video TV Blu-ray Disc player DVD player Set-top box (Satellite tuner or cable TV) Game console Digital camcorder Control dock for this unit. ENGLISH 12 Basic version Basic version Here, we explain...

Owners Manual - English
Page 16
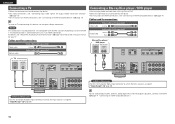
... more information. • Select the cables (sold separately) according to the components being connected. • Be sure to the equipment you are connecting. • Some settings of video output connectors (HDMI and video). Make connections according to connect the left and right channels properly (left with left, right with right). •...
... more information. • Select the cables (sold separately) according to the components being connected. • Be sure to the equipment you are connecting. • Some settings of video output connectors (HDMI and video). Make connections according to connect the left and right channels properly (left with left, right with right). •...

Owners Manual - English
Page 17
... your television or player for HDMI 1.4. NOTE • The HDMI control function may not work depending on the device it is connected to and its settings. • You cannot operate a TV or Blu-ray Disc player / DVD player that does not support HDCP is connected, video and audio are input from...
... your television or player for HDMI 1.4. NOTE • The HDMI control function may not work depending on the device it is connected to and its settings. • You cannot operate a TV or Blu-ray Disc player / DVD player that does not support HDCP is connected, video and audio are input from...

Owners Manual - English
Page 18
...; This interface allows transfer of digital video signals and digital audio signals over a single HDMI cable. HDMI Setup (vpage 48) Make settings for connections Audio and video cable (sold separately) is used, the HDMI video signals are output to the monitor. NOTE To enable ...8226; When connecting a device that do not match the monitor's resolution. For details, see the respective reference pages. Input Assign (vpage 38) Set this unit, increasing user flexibility and eliminating the need for gaming, movie, photograph, and text viewing modes. NOTE • No sound is ...
...; This interface allows transfer of digital video signals and digital audio signals over a single HDMI cable. HDMI Setup (vpage 48) Make settings for connections Audio and video cable (sold separately) is used, the HDMI video signals are output to the monitor. NOTE To enable ...8226; When connecting a device that do not match the monitor's resolution. For details, see the respective reference pages. Input Assign (vpage 38) Set this unit, increasing user flexibility and eliminating the need for gaming, movie, photograph, and text viewing modes. NOTE • No sound is ...
Owners Manual - English
Page 19
...device. • For instructions on HDMI connections, see "Connecting an HDMI-compatible device" (vpage 14). "Input Assign" (vpage 38) 16 in Set as Necessary Set this to change the digital input connector to which the input source is assigned. "Input Assign" (vpage 38) For HD audio (Dolby TrueHD,...separately) Audio cable (White) L L (Red) R R Blu-ray Disc player / DVD player VIDEO VIDEO OUT AUDIO AUDIO OUT LR LR LR in Set as Necessary Set this to change the digital input connector to which the input source is assigned. To listen to TV audio through this unit via an...
...device. • For instructions on HDMI connections, see "Connecting an HDMI-compatible device" (vpage 14). "Input Assign" (vpage 38) 16 in Set as Necessary Set this to change the digital input connector to which the input source is assigned. "Input Assign" (vpage 38) For HD audio (Dolby TrueHD,...separately) Audio cable (White) L L (Red) R R Blu-ray Disc player / DVD player VIDEO VIDEO OUT AUDIO AUDIO OUT LR LR LR in Set as Necessary Set this to change the digital input connector to which the input source is assigned. To listen to TV audio through this unit via an...

Owners Manual - English
Page 20
...Red) Audio cables (sold separately) (White) L L Audio cable (Red) R R Digital camcorder VIDEO VIDEO OUT AUDIO AUDIO OUT LR LR LR LR LR in Set as Necessary Set this to change the digital input connector to which the input source is assigned. Simple version Basic version Connecting... a set the input source to "V.AUX". In this case, use the monitor output of the same connector as Necessary Set this case, set -top box (Satellite tuner/cable TV) • You can enjoy games by ...
...Red) Audio cables (sold separately) (White) L L Audio cable (Red) R R Digital camcorder VIDEO VIDEO OUT AUDIO AUDIO OUT LR LR LR LR LR in Set as Necessary Set this to change the digital input connector to which the input source is assigned. Simple version Basic version Connecting... a set the input source to "V.AUX". In this case, use the monitor output of the same connector as Necessary Set this case, set -top box (Satellite tuner/cable TV) • You can enjoy games by ...
Owners Manual - English
Page 21
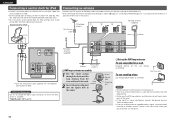
... "Listening to FM/AM broadcasts"), use ASD-1R, ASD-11R, ASD-3N, ASD3W, ASD-51N and ASD-51W made by DENON (sold separately). • For instructions on the control dock for iPod settings, refer to reduce noise. • If you purchased the unit for iPod. "Input Assign" (vpage 38) Ground AM outdoor... (GND) to the control dock for iPod's operating instructions. Control dock for iPod • Connect the FM antenna or AM loop antenna included with the DENON control dock for details. 18 Loop antenna 2 Insert the projecting part into the square hole in the stand.
... "Listening to FM/AM broadcasts"), use ASD-1R, ASD-11R, ASD-3N, ASD3W, ASD-51N and ASD-51W made by DENON (sold separately). • For instructions on the control dock for iPod settings, refer to reduce noise. • If you purchased the unit for iPod. "Input Assign" (vpage 38) Ground AM outdoor... (GND) to the control dock for iPod's operating instructions. Control dock for iPod • Connect the FM antenna or AM loop antenna included with the DENON control dock for details. 18 Loop antenna 2 Insert the projecting part into the square hole in the stand.

Owners Manual - English
Page 22
...button (iPod, DVD, BD, TUNER, DOCK, SAT/ CBL, GAME, V.AUX, TV) to adjust the volume. The input source is set ahead of the connected components when playing them. ENGLISH Simple version Basic version Advanced version Playback (Basic operation) nn Selecting the input source ... mode) (vpage 23) Playback (Advanced operation) (vpage 30) Important information Before starting playback, make the connections between the different components and the settings on the main unit Turn SOURCE SELECT. • Turning SOURCE SELECT switches the input source, as shown below. • If "Tuning Preset...
...button (iPod, DVD, BD, TUNER, DOCK, SAT/ CBL, GAME, V.AUX, TV) to adjust the volume. The input source is set ahead of the connected components when playing them. ENGLISH Simple version Basic version Advanced version Playback (Basic operation) nn Selecting the input source ... mode) (vpage 23) Playback (Advanced operation) (vpage 30) Important information Before starting playback, make the connections between the different components and the settings on the main unit Turn SOURCE SELECT. • Turning SOURCE SELECT switches the input source, as shown below. • If "Tuning Preset...

Owners Manual - English
Page 23
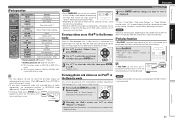
... setting, etc.) beforehand. GWhen using an ASD-1RH GWhen using an ASD-11RH Music iPod Playlists Artists Albums Songs Genres Composers Music Videos [ 1/6 ] [ 1/2 ] GWhen using an ASD-11R, ASD-3N, ASD3W, ASD-51N or ASD-51W DENON control dock for playback. Browse mode Display iPod information on the TV screen....w Change the TV input to select the display mode. • There are two modes for iPod to be properly connected. Make the necessary settings on the power of the TV, subwoofer and player. q Connect the DENON control dock for display the contents recorded on the iPod.
... setting, etc.) beforehand. GWhen using an ASD-1RH GWhen using an ASD-11RH Music iPod Playlists Artists Albums Songs Genres Composers Music Videos [ 1/6 ] [ 1/2 ] GWhen using an ASD-11R, ASD-3N, ASD3W, ASD-51N or ASD-51W DENON control dock for playback. Browse mode Display iPod information on the TV screen....w Change the TV input to select the display mode. • There are two modes for iPod to be properly connected. Make the necessary settings on the power of the TV, subwoofer and player. q Connect the DENON control dock for display the contents recorded on the iPod.
Owners Manual - English
Page 24
...with the iPod. Press iPod PLAY. • Power of iPod and the software version, some functions may not operate. • Note that DENON will accept no responsibility whatsoever for any problems arising with the data on /standby (Default : SONY) Switch TV input (Default : SONY)... disconnecting the iPod. Simple version Basic version Advanced version ENGLISH iPod operation Operation buttons MENU uio p ENTER Function Amp menu Cursor operation Enter setting SEARCH (Press and release) Page search modez1 SEARCH (Press and hold) Browse / Remote mode switching RETURN 6 7 (Press and hold ...
...with the iPod. Press iPod PLAY. • Power of iPod and the software version, some functions may not operate. • Note that DENON will accept no responsibility whatsoever for any problems arising with the data on /standby (Default : SONY) Switch TV input (Default : SONY)... disconnecting the iPod. Simple version Basic version Advanced version ENGLISH iPod operation Operation buttons MENU uio p ENTER Function Amp menu Cursor operation Enter setting SEARCH (Press and release) Page search modez1 SEARCH (Press and hold) Browse / Remote mode switching RETURN 6 7 (Press and hold ...


