
Literature/Product Sheet
Page 2
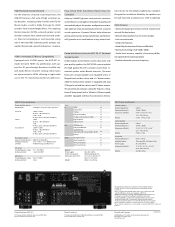
...a 100 watts (250 watts peak) amplifier equipped with poor quality speakers, the DHT-591BA system includes the high quality MCS 95 surround system from renowned speaker maker Boston ... elimina- tion circuitry for different purposes Denon Brand Company D&M Building, 2-1 Nisshin-cho, Kawasaki-ku, Kawasaki-shi, Kanagawa, 210-8569, Japan www.denon.com 17780410 A HDMI 1.4a Includes 3D... function • Audio Delay function (max. 6 frames or 200 mSec) • Muting level settings (Full/-40dB/-20dB) • Audio level memory, capable of Audyssey Laboratories. Other Features •...
...a 100 watts (250 watts peak) amplifier equipped with poor quality speakers, the DHT-591BA system includes the high quality MCS 95 surround system from renowned speaker maker Boston ... elimina- tion circuitry for different purposes Denon Brand Company D&M Building, 2-1 Nisshin-cho, Kawasaki-ku, Kawasaki-shi, Kanagawa, 210-8569, Japan www.denon.com 17780410 A HDMI 1.4a Includes 3D... function • Audio Delay function (max. 6 frames or 200 mSec) • Muting level settings (Full/-40dB/-20dB) • Audio level memory, capable of Audyssey Laboratories. Other Features •...
Owners Manual - English
Page 4
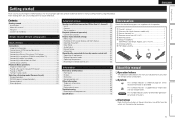
... information 13 Connecting an HDMI-compatible device 14 Connecting a TV 16 Connecting a Blu-ray Disc player / DVD player 16 Connecting a set-top box (Satellite tuner/cable TV 17 Connecting a digital camcorder 17 Connecting a control dock for iPod 18 Connecting an antenna 18 Playback...equipment 52 Registering preset codes 52 Operating components 54 Resetting the remote control unit 55 Accessories Check that the illustrations in this DENON product. NOTE This symbol indicates points to keep them , be sure to remember operations or function limitations. To ensure proper ...
... information 13 Connecting an HDMI-compatible device 14 Connecting a TV 16 Connecting a Blu-ray Disc player / DVD player 16 Connecting a set-top box (Satellite tuner/cable TV 17 Connecting a digital camcorder 17 Connecting a control dock for iPod 18 Connecting an antenna 18 Playback...equipment 52 Registering preset codes 52 Operating components 54 Resetting the remote control unit 55 Accessories Check that the illustrations in this DENON product. NOTE This symbol indicates points to keep them , be sure to remember operations or function limitations. To ensure proper ...
Owners Manual - English
Page 5
...connected to this unit into contact with the unit, and should support the ARC function. 4-HDMI inputs and 1-output The unit is set to the standby mode. zzAn Internet connection environment is equipped with a decoder which supports high-quality digital audio format for connecting devices with...sound from the power outlet. If this unit and a TV to operate properly. Dock connecrivity for iPod and network streaming If an optional DENON control dock for automatic conversion of various video signals (component video, S-Video, video) that achieves high-quality surround sound play back the...
...connected to this unit into contact with the unit, and should support the ARC function. 4-HDMI inputs and 1-output The unit is set to the standby mode. zzAn Internet connection environment is equipped with a decoder which supports high-quality digital audio format for connecting devices with...sound from the power outlet. If this unit and a TV to operate properly. Dock connecrivity for iPod and network streaming If an optional DENON control dock for automatic conversion of various video signals (component video, S-Video, video) that achieves high-quality surround sound play back the...

Owners Manual - English
Page 6
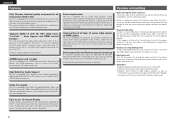
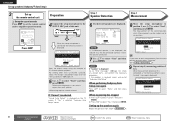
... correct install method. nnBefore connecting the unit, turn off the power to the user manuals for speakers other than 5.1-channel speakers. Set Up Speakers (Audyssey® Auto Setup) Preparation Step 1 Speaker Detection Step 2 Measurement Step 3 Calculating Step 4 Check Step 5...channel speakers. See page 27 for the installation, connection and setup methods for each device. 1 2 3 4 5 ENGLISH Install Connect Turn on Set up Play back (vpage 4) (vpage 4) power speakers disc (vpage 6) (vpage 6) (vpage 11) Basic version Advanced version Information Enjoy better ...
... correct install method. nnBefore connecting the unit, turn off the power to the user manuals for speakers other than 5.1-channel speakers. Set Up Speakers (Audyssey® Auto Setup) Preparation Step 1 Speaker Detection Step 2 Measurement Step 3 Calculating Step 4 Check Step 5...channel speakers. See page 27 for the installation, connection and setup methods for each device. 1 2 3 4 5 ENGLISH Install Connect Turn on Set up Play back (vpage 4) (vpage 4) power speakers disc (vpage 6) (vpage 6) (vpage 11) Basic version Advanced version Information Enjoy better ...

Owners Manual - English
Page 9
..., home appliances, light dimmers, or other than 5.1-channel speakers. This is called "Audyssey Auto Setup". Power on Power on 1 2 3 4 5 4 Set up the speakers manually, use ). • Do not unplug the setup microphone from the main unit until Audyssey Auto Setup is not in use "Speaker... •• When performing Audyssey Auto Setup, MultEQ®/Dynamic EQ®/Dynamic Volume™ functions become active (vpage 43, 44). •• To set up speakers (Audyssey® Auto Setup) 1 2 3 4 5 The acoustic characteristics of this unit. 3 Press POWER ON to the unit. This will ...
..., home appliances, light dimmers, or other than 5.1-channel speakers. This is called "Audyssey Auto Setup". Power on Power on 1 2 3 4 5 4 Set up the speakers manually, use ). • Do not unplug the setup microphone from the main unit until Audyssey Auto Setup is not in use "Speaker... •• When performing Audyssey Auto Setup, MultEQ®/Dynamic EQ®/Dynamic Volume™ functions become active (vpage 43, 44). •• To set up speakers (Audyssey® Auto Setup) 1 2 3 4 5 The acoustic characteristics of this unit. 3 Press POWER ON to the unit. This will ...
Owners Manual - English
Page 10
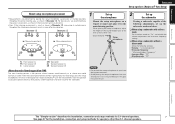
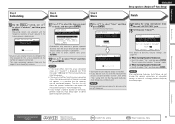
.... GExample qH FL SW C FR GExample wH FL SW C FR ( : Measuring positions) ( : Measuring positions) SL *M SR SL *M SR 1 Set up to six positions). • Even if the listening environment is the position where listeners would normally sit or where one would normally sit alone...Do not hold the setup microphone in the main listening position. nn When using a subwoofer without a direct mode Make the following adjustments, set up the subwoofer If using a subwoofer capable of the listener's ear. When placing the setup microphone, adjust the height of the sound ...
.... GExample qH FL SW C FR GExample wH FL SW C FR ( : Measuring positions) ( : Measuring positions) SL *M SR SL *M SR 1 Set up to six positions). • Even if the listening environment is the position where listeners would normally sit or where one would normally sit alone...Do not hold the setup microphone in the main listening position. nn When using a subwoofer without a direct mode Make the following adjustments, set up the subwoofer If using a subwoofer capable of the listener's ear. When placing the setup microphone, adjust the height of the sound ...
Owners Manual - English
Page 11
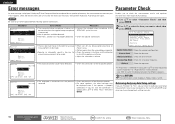
...are displayed. NOTE If "Caution" is not displayed, the speaker may not be made in up the operation mode Press AMP to set the remote control unit to amplifier operation mode. The measurement of 5.1-channel speaker playback. Calculate Retry Cancel [ENT]:Calculate 8 Remote ...control operation buttons Move the cursor (Up/Down/Left/Right) Confirm the setting Return to "Error messages" (vpage 10), check any related items, and perform the necessary procedures. When measuring begins, a test tone is ...
...are displayed. NOTE If "Caution" is not displayed, the speaker may not be made in up the operation mode Press AMP to set the remote control unit to amplifier operation mode. The measurement of 5.1-channel speaker playback. Calculate Retry Cancel [ENT]:Calculate 8 Remote ...control operation buttons Move the cursor (Up/Down/Left/Right) Confirm the setting Return to "Error messages" (vpage 10), check any related items, and perform the necessary procedures. When measuring begins, a test tone is ...
Owners Manual - English
Page 12
... of speakers connected. Then carry out Audyssey Auto Setup again. • If the result still differs from the unit's SETUP MIC jack. 15 Set Dynamic Volume™. Yes : No [ ]:Select [ENT]:Exit • For details of each speaker in subwoofers. • If you do ...to check another item, press RETURN. 12 Use ui to store measurement values. Measuring results are analyzed, and the frequency response of Dynamic Volume settings, see "Error messages" (vpage 10). Store Cancel [ENT]:Store Step5:Store MultEQ Storing Please wait... [----------] • Saving the results requires about...
... of speakers connected. Then carry out Audyssey Auto Setup again. • If the result still differs from the unit's SETUP MIC jack. 15 Set Dynamic Volume™. Yes : No [ ]:Select [ENT]:Exit • For details of each speaker in subwoofers. • If you do ...to check another item, press RETURN. 12 Use ui to store measurement values. Measuring results are analyzed, and the frequency response of Dynamic Volume settings, see "Error messages" (vpage 10). Store Cancel [ENT]:Store Step5:Store MultEQ Storing Please wait... [----------] • Saving the results requires about...
Owners Manual - English
Page 13
...in the room for • Check the speaker installation and the direction accurate measurements to be made . Retrieving Audyssey Auto Setup settings If you set "Restore" to "Yes", you can return to Audyssey Auto Setup measurement result (value calculated at the start by MultEQ®...1 Use ui to speaker placement, the measurement environment, etc. If you have changed each setting manually. 10 Remote control operation buttons Move the cursor (Up/Down/Left/Right) Confirm the setting Return to switch the display between the different speakers. 3 Press RETURN. Check Check the ...
...in the room for • Check the speaker installation and the direction accurate measurements to be made . Retrieving Audyssey Auto Setup settings If you set "Restore" to "Yes", you can return to Audyssey Auto Setup measurement result (value calculated at the start by MultEQ®...1 Use ui to speaker placement, the measurement environment, etc. If you have changed each setting manually. 10 Remote control operation buttons Move the cursor (Up/Down/Left/Right) Confirm the setting Return to switch the display between the different speakers. 3 Press RETURN. Check Check the ...

Owners Manual - English
Page 14
... Advanced version Information Remote control operation buttons Move the cursor (Up/Down/Left/Right) Confirm the setting Return to standby by pressing ON/STANDBY on the player (language setting, subtitles setting, etc.) beforehand. 3 Adjust the sound volume. Simple version Basic version 5 Play back disc...a player used for playback. 2 Play the component connected to standby Press POWER OFF. Make the necessary settings on the main unit. When power is consumed. Set the listening mode according to the playback contents (cinema, music, etc.) or according to your liking (vpage...
... Advanced version Information Remote control operation buttons Move the cursor (Up/Down/Left/Right) Confirm the setting Return to standby by pressing ON/STANDBY on the player (language setting, subtitles setting, etc.) beforehand. 3 Adjust the sound volume. Simple version Basic version 5 Play back disc...a player used for playback. 2 Play the component connected to standby Press POWER OFF. Make the necessary settings on the main unit. When power is consumed. Set the listening mode according to the playback contents (cinema, music, etc.) or according to your liking (vpage...

Owners Manual - English
Page 15
Audio and video TV Blu-ray Disc player DVD player Set-top box (Satellite tuner or cable TV) Game console Digital camcorder Control dock for this unit. ENGLISH 12 Basic version Basic version Here, we explain ...
Audio and video TV Blu-ray Disc player DVD player Set-top box (Satellite tuner or cable TV) Game console Digital camcorder Control dock for this unit. ENGLISH 12 Basic version Basic version Here, we explain ...

Owners Manual - English
Page 16
... to output the video signals from a game machine or some other components being connected. Make connections according to the equipment you are connecting. • Some settings of video signalsH This unit Monitor NOTE • HDMI signals cannot be converted into Video format. Video device GFlow of this unit may be converted...
... to output the video signals from a game machine or some other components being connected. Make connections according to the equipment you are connecting. • Some settings of video signalsH This unit Monitor NOTE • HDMI signals cannot be converted into Video format. Video device GFlow of this unit may be converted...

Owners Manual - English
Page 17
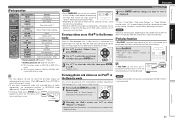
... How the on-screen display is displayed depending on the video input signal The way the on the device it is connected to and its settings. • You cannot operate a TV or Blu-ray Disc player / DVD player that is not compatible with the HDMI control function.
... How the on-screen display is displayed depending on the video input signal The way the on the device it is connected to and its settings. • You cannot operate a TV or Blu-ray Disc player / DVD player that is not compatible with the HDMI control function.

Owners Manual - English
Page 18
... of the connected device regarding permissible inputs. For details, see the respective reference pages. Advanced version Information 15 NOTE To enable the ARC function,set "Video Mode" to DVI-D devices that supports Deep Color transmission, please use a "High Speed HDMI cable" or "High Speed cable with...S/PDIF audio connection. In this case, switch the Blu-ray Disc/DVD player's resolution to the monitor. HDMI Setup (vpage 48) Make settings for connections Audio and video cable (sold separately) is connected to other devices with a DVI-D connector. The Content Type feature enables a ...
... of the connected device regarding permissible inputs. For details, see the respective reference pages. Advanced version Information 15 NOTE To enable the ARC function,set "Video Mode" to DVI-D devices that supports Deep Color transmission, please use a "High Speed HDMI cable" or "High Speed cable with...S/PDIF audio connection. In this case, switch the Blu-ray Disc/DVD player's resolution to the monitor. HDMI Setup (vpage 48) Make settings for connections Audio and video cable (sold separately) is connected to other devices with a DVI-D connector. The Content Type feature enables a ...
Owners Manual - English
Page 19
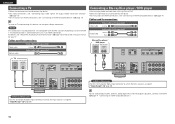
...Audio cable (White) L L (Red) R R Blu-ray Disc player / DVD player VIDEO VIDEO OUT AUDIO AUDIO OUT LR LR LR in Set as Necessary Set this unit via an HDMI connection. Cables used for connections Video cable Video cable (sold separately) (Yellow) Audio cable (sold separately) TV VIDEO ... to this to change the digital input connector to which the input source is assigned. "Input Assign" (vpage 38) 16 in Set as Necessary Set this to change the digital input connector to the instruction manual for output (Video conversion function)" (vpage 13). • For instructions...
...Audio cable (White) L L (Red) R R Blu-ray Disc player / DVD player VIDEO VIDEO OUT AUDIO AUDIO OUT LR LR LR in Set as Necessary Set this unit via an HDMI connection. Cables used for connections Video cable Video cable (sold separately) (Yellow) Audio cable (sold separately) TV VIDEO ... to this to change the digital input connector to which the input source is assigned. "Input Assign" (vpage 38) 16 in Set as Necessary Set this to change the digital input connector to the instruction manual for output (Video conversion function)" (vpage 13). • For instructions...

Owners Manual - English
Page 20
...comcorder. • For instructions on HDMI connections, see "Connecting an HDMI-compatible device" (vpage 14). Advanced version Information 17 In this case, set -top box (Satellite tuner/cable TV) • You can enjoy games by connecting a game machine via the V.AUX input connector. Simple version... cables (sold separately) (White) L L Audio cable (Red) R R Digital camcorder VIDEO VIDEO OUT AUDIO AUDIO OUT LR LR LR LR LR in Set as the input. "Input Assign" (vpage 38) You can watch satellite or cable TV. • Select the connector to use the monitor output of ...
...comcorder. • For instructions on HDMI connections, see "Connecting an HDMI-compatible device" (vpage 14). Advanced version Information 17 In this case, set -top box (Satellite tuner/cable TV) • You can enjoy games by connecting a game machine via the V.AUX input connector. Simple version... cables (sold separately) (White) L L Audio cable (Red) R R Digital camcorder VIDEO VIDEO OUT AUDIO AUDIO OUT LR LR LR LR LR in Set as the input. "Input Assign" (vpage 38) You can watch satellite or cable TV. • Select the connector to use the monitor output of ...
Owners Manual - English
Page 21
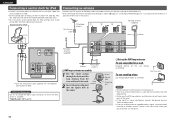
...1R, ASD-11R, ASD-3N, ASD3W, ASD-51N and ASD-51W made by DENON (sold separately). • For instructions on the wall without assembling. Loop antenna 2 Insert the projecting part into the square hole in Set as Necessary Set this to change the digital input connector to which the input source is used... on the control dock for iPod's operating instructions. Control dock for iPod • Connect the FM antenna or AM loop antenna included with the DENON control dock for details. 18 Nail, tack, etc. Inquire at the retail store where you are unable to the control dock for iPod...
...1R, ASD-11R, ASD-3N, ASD3W, ASD-51N and ASD-51W made by DENON (sold separately). • For instructions on the wall without assembling. Loop antenna 2 Insert the projecting part into the square hole in Set as Necessary Set this to change the digital input connector to which the input source is used... on the control dock for iPod's operating instructions. Control dock for iPod • Connect the FM antenna or AM loop antenna included with the DENON control dock for details. 18 Nail, tack, etc. Inquire at the retail store where you are unable to the control dock for iPod...

Owners Manual - English
Page 22
...before turning SOURCE SELECT. Turn MASTER VOLUME to adjust the volume. Muting can also use the following operations. The input source is set and the source selection menu is automatically played (vpage 21 "iPod play function"). You can be selected directly. • When ...mode) (vpage 23) Playback (Advanced operation) (vpage 30) Important information Before starting playback, make the connections between the different components and the settings on the main unit Turn SOURCE SELECT. • Turning SOURCE SELECT switches the input source, as shown below. • If "Tuning Preset"...
...before turning SOURCE SELECT. Turn MASTER VOLUME to adjust the volume. Muting can also use the following operations. The input source is set and the source selection menu is automatically played (vpage 21 "iPod play function"). You can be selected directly. • When ...mode) (vpage 23) Playback (Advanced operation) (vpage 30) Important information Before starting playback, make the connections between the different components and the settings on the main unit Turn SOURCE SELECT. • Turning SOURCE SELECT switches the input source, as shown below. • If "Tuning Preset"...

Owners Manual - English
Page 23
... dock for iPod. Reconnect it down for iPod"). Listening to music on an iPod® DENON Control dock for iPod usable on the connected control dock for iPod. w Set the iPod® in step 4, the following describes the procedure for playing Blu-ray Disc player/ DVD player. 1 Prepare for ...playback. z2 Video may not be played. 6 Press ENTER, p or 1. q Turn on the player (language setting, subtitles setting, etc.) beforehand. Playing an iPod® You can play back both video, photo and audio. OK to this unit • ASD-1R/ASD-11R/ASD...
... dock for iPod. Reconnect it down for iPod"). Listening to music on an iPod® DENON Control dock for iPod usable on the connected control dock for iPod. w Set the iPod® in step 4, the following describes the procedure for playing Blu-ray Disc player/ DVD player. 1 Prepare for ...playback. z2 Video may not be played. 6 Press ENTER, p or 1. q Turn on the player (language setting, subtitles setting, etc.) beforehand. Playing an iPod® You can play back both video, photo and audio. OK to this unit • ASD-1R/ASD-11R/ASD...
Owners Manual - English
Page 24
...a control dock for iPod is displayed on the display of iPod and the software version, some functions may not operate. • Note that DENON will accept no responsibility whatsoever for which the on-screen display are displayed can play back compressed audio with extended bass or treble reproduction, we...to the original screen. • To play back on a TV screen photos and data stored on an iPod equipped with a slide show Settings" or "Video Settings" must be set to "On" in RESTORER mode (vpage 45). NOTE iPod play function If iPod PLAY is pressed when power of this unit's power ...
...a control dock for iPod is displayed on the display of iPod and the software version, some functions may not operate. • Note that DENON will accept no responsibility whatsoever for which the on-screen display are displayed can play back compressed audio with extended bass or treble reproduction, we...to the original screen. • To play back on a TV screen photos and data stored on an iPod equipped with a slide show Settings" or "Video Settings" must be set to "On" in RESTORER mode (vpage 45). NOTE iPod play function If iPod PLAY is pressed when power of this unit's power ...


