
Operating Instructions
Page 1
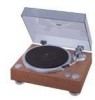
DIRECT DRIVE MANUAL TURNTABLE SYSTEM DP-500M OPERATING INSTRUCTIONS SERIAL NO. PLEASE RECORD UNIT SERIAL NUMBER ATTACHED TO THE REAR OF THE CABINET FOR FUTURE REFERENCE
DIRECT DRIVE MANUAL TURNTABLE SYSTEM DP-500M OPERATING INSTRUCTIONS SERIAL NO. PLEASE RECORD UNIT SERIAL NUMBER ATTACHED TO THE REAR OF THE CABINET FOR FUTURE REFERENCE
Operating Instructions
Page 2
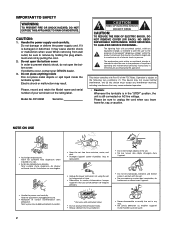
...symbol, within the product's enclosure that may cause undesired operation. • Caution: Whenever the turntable is intended to alert the user to remove by holding the plug attachment and not by ...risk of electric shock to unplug the cord when you leave home for long periods of your DENON dealer. 3. Do not open the bottom cover. Electric shock or malfunction may not cause ...8226; Ne jamais démonter ou modifier l'appareil d'une manière ou d'une autre. DP-500M Serial No. REFER SERVICING TO QUALIFIED SERVICE PERSONNEL. Operation is damaged or deformed, it is subject...
...symbol, within the product's enclosure that may cause undesired operation. • Caution: Whenever the turntable is intended to alert the user to remove by holding the plug attachment and not by ...risk of electric shock to unplug the cord when you leave home for long periods of your DENON dealer. 3. Do not open the bottom cover. Electric shock or malfunction may not cause ...8226; Ne jamais démonter ou modifier l'appareil d'une manière ou d'une autre. DP-500M Serial No. REFER SERVICING TO QUALIFIED SERVICE PERSONNEL. Operation is damaged or deformed, it is subject...
Operating Instructions
Page 3
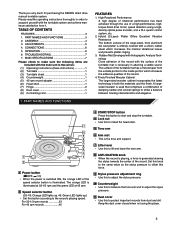
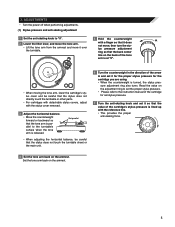
...vibrational losses and prevents platter ringing. 3. High Rotational Performance A high degree of rotational performance has been achieved through the use of the turntable mat has a minute taper from it. ADJUSTMENTS 5 4. v Lock nut • Use this force. . Keep the dust cover ...the player. 3 Thank you very much for purchasing the DENON direct drive manual turntable system. OPERATION 6 6. TROUBLESHOOTING 7 7. MAIN SPECIFICATIONS 7 Please check to make sure the following items are included with the turntable system and achieve maximum satisfaction from the outside portion to...
...vibrational losses and prevents platter ringing. 3. High Rotational Performance A high degree of rotational performance has been achieved through the use of the turntable mat has a minute taper from it. ADJUSTMENTS 5 4. v Lock nut • Use this force. . Keep the dust cover ...the player. 3 Thank you very much for purchasing the DENON direct drive manual turntable system. OPERATION 6 6. TROUBLESHOOTING 7 7. MAIN SPECIFICATIONS 7 Please check to make sure the following items are included with the turntable system and achieve maximum satisfaction from the outside portion to...
Operating Instructions
Page 4
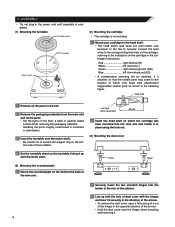
...the lead wires to the corresponding terminals on the cartridge, referring to scratch the magnet ring on the bottom side of the turntable. Handling the parts roughly could result in the box. 2 Remove the packaging materials from head shell attachement edge(rubber washer ...part) as shown in the power cord until assembly is completed. (1) Mounting the turntable Turntable sheet Turntable Motor shaft (3) Mounting the cartridge • The cartridge is not included. 1 Mount your cartridge on the floor, a table or...
...the lead wires to the corresponding terminals on the cartridge, referring to scratch the magnet ring on the bottom side of the turntable. Handling the parts roughly could result in the box. 2 Remove the packaging materials from head shell attachement edge(rubber washer ...part) as shown in the power cord until assembly is completed. (1) Mounting the turntable Turntable sheet Turntable Motor shaft (3) Mounting the cartridge • The cartridge is not included. 1 Mount your cartridge on the floor, a table or...
Operating Instructions
Page 5
...tone arm is parallel to the instruction manual of the arrow A and set the proper stylus pressure. • Please refer to the turntable's surface when the tone arm is turned, the stylus pressure adjustment ring also turns. ADJUSTMENTS • Turn the power off when performing...When the counterweight is released. Set parallel • When adjusting the horizontal balance, be careful that the stylus does not directly touch the turntable or other parts. • For cartridges with detachable stylus covers, adjust with the reference line. • This provides the proper anti-...
...tone arm is parallel to the instruction manual of the arrow A and set the proper stylus pressure. • Please refer to the turntable's surface when the tone arm is turned, the stylus pressure adjustment ring also turns. ADJUSTMENTS • Turn the power off when performing...When the counterweight is released. Set parallel • When adjusting the horizontal balance, be careful that the stylus does not directly touch the turntable or other parts. • For cartridges with detachable stylus covers, adjust with the reference line. • This provides the proper anti-...
Operating Instructions
Page 6
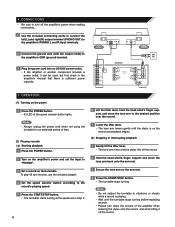
... over the record. 7 Lower the lifter lever. • The tone arm lowers gently until the stylus is playing. • Wait until the turntable stops turning before replacing records. • Please turn off the amplifier's power when making connections. 1 Use the included connecting cords to ... use the included adapter. 4 Set the speed selector button according to the record's playing speed. 5 Press the START/STOP button. • The turntable starts turning at the speed set the input to the amplifier's PHONO L and R input terminals. Note • Always unplug the power cord...
... over the record. 7 Lower the lifter lever. • The tone arm lowers gently until the stylus is playing. • Wait until the turntable stops turning before replacing records. • Please turn off the amplifier's power when making connections. 1 Use the included connecting cords to ... use the included adapter. 4 Set the speed selector button according to the record's playing speed. 5 Press the START/STOP button. • The turntable starts turning at the speed set the input to the amplifier's PHONO L and R input terminals. Note • Always unplug the power cord...
Operating Instructions
Page 7
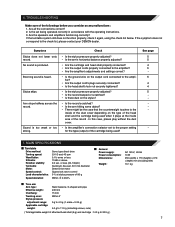
... correct? 2. See page 5 5 4 6 6 4 4 5 - - 7. Sound is heard. TROUBLESHOOTING Make sure of the cartridge being used ? If the turntable system still does not function properly, check it plays at stylus pressure of 80 g Within ʶ 0.003% ˙ General Power supply: Power consumption: Dimensions: ... counterweight touches to the inside area of attached head shell (9 g) and cartridge : 14.0 g to the check list, please contact your DENON dealer. 6. Check • Is the stylus pressure properly adjusted? • Is the arm's horizontal balance properly adjusted? • Are...
... correct? 2. See page 5 5 4 6 6 4 4 5 - - 7. Sound is heard. TROUBLESHOOTING Make sure of the cartridge being used ? If the turntable system still does not function properly, check it plays at stylus pressure of 80 g Within ʶ 0.003% ˙ General Power supply: Power consumption: Dimensions: ... counterweight touches to the inside area of attached head shell (9 g) and cartridge : 14.0 g to the check list, please contact your DENON dealer. 6. Check • Is the stylus pressure properly adjusted? • Is the arm's horizontal balance properly adjusted? • Are...


