
Owner's Manual
Page 2
... Vista start button logo are trademarks of Microsoft Corporation in this text: Dell, the DELL logo, XPS, and YOURS IS HERE are either the entities claiming the marks and names or their products. Dell Inc. A01 Nvidia is used in the United States and/or other countries...or other than its own. CAUTION: A CAUTION indicates a potential for property damage, personal injury, or death. is a registered trademark owned by Dell under license; Blu-ray Disc is a trademark of Nvidia Corporation in this document is a trademark of your computer. Notes, Notices, and Cautions ...
... Vista start button logo are trademarks of Microsoft Corporation in this text: Dell, the DELL logo, XPS, and YOURS IS HERE are either the entities claiming the marks and names or their products. Dell Inc. A01 Nvidia is used in the United States and/or other countries...or other than its own. CAUTION: A CAUTION indicates a potential for property damage, personal injury, or death. is a registered trademark owned by Dell under license; Blu-ray Disc is a trademark of Nvidia Corporation in this document is a trademark of your computer. Notes, Notices, and Cautions ...
Owner's Manual
Page 3
Contents Finding Information 11 1 About Your Computer 17 Front View of the Computer 17 Back View of the Computer 19 Front-Panel Connectors 20 Back-Panel Connectors 21 2 Setting Up Your Computer 25 Installing Your Computer in an Enclosure 25 Connecting to the Internet 27 Setting Up Your Internet Connection 28 Transferring Information to a New Computer 29 Microsoft® Windows® XP 30 Windows Vista 33 Setting Up a Printer 33 Printer Cable 34 Connecting a USB Printer 34 Contents 3
Contents Finding Information 11 1 About Your Computer 17 Front View of the Computer 17 Back View of the Computer 19 Front-Panel Connectors 20 Back-Panel Connectors 21 2 Setting Up Your Computer 25 Installing Your Computer in an Enclosure 25 Connecting to the Internet 27 Setting Up Your Internet Connection 28 Transferring Information to a New Computer 29 Microsoft® Windows® XP 30 Windows Vista 33 Setting Up a Printer 33 Printer Cable 34 Connecting a USB Printer 34 Contents 3
Owner's Manual
Page 4
... Display Settings 37 Power Protection Devices 37 Surge Protectors 37 Line Conditioners 38 Uninterruptible Power Supplies 38 Power Management 38 Power Management Options in Windows XP 38 Power Management Options in Windows Vista 42 3 Using Multimedia 43 Playing CDs or DVDs 43 Copying CDs and DVDs 45 How to Copy a CD...
... Display Settings 37 Power Protection Devices 37 Surge Protectors 37 Line Conditioners 38 Uninterruptible Power Supplies 38 Power Management 38 Power Management Options in Windows XP 38 Power Management Options in Windows Vista 42 3 Using Multimedia 43 Playing CDs or DVDs 43 Copying CDs and DVDs 45 How to Copy a CD...
Owner's Manual
Page 5
Component Video and Standard Audio 57 Component Video and S/PDIF Digital Audio . . . . 59 Setting Up the Cyberlink (CL) Headphones. . . . . 62 Enabling the Display Settings for a TV 63 Using a Media Card Reader (Optional 64 Instructions for Setting Up a Device With Bluetooth Wireless Technology 66 4 About RAID Configurations 67 RAID Level 0 Configuration 67 RAID Level 1 Configuration 68 Configuring Your Hard Drives for RAID 69 Setting Your Computer to RAID-Enabled Mode . . . . . 69 Using the Nvidia MediaShield ROM Utility 70 Using Nvidia MediaShield 71 Creating a RAID Array 71 ...
Component Video and Standard Audio 57 Component Video and S/PDIF Digital Audio . . . . 59 Setting Up the Cyberlink (CL) Headphones. . . . . 62 Enabling the Display Settings for a TV 63 Using a Media Card Reader (Optional 64 Instructions for Setting Up a Device With Bluetooth Wireless Technology 66 4 About RAID Configurations 67 RAID Level 0 Configuration 67 RAID Level 1 Configuration 68 Configuring Your Hard Drives for RAID 69 Setting Your Computer to RAID-Enabled Mode . . . . . 69 Using the Nvidia MediaShield ROM Utility 70 Using Nvidia MediaShield 71 Creating a RAID Array 71 ...
Owner's Manual
Page 6
6 System Setup 77 Overview 77 Entering System Setup 77 System Setup Screens 77 System Setup Options 79 Boot Sequence 82 Option Settings 82 Changing Boot Sequence for the Current Boot 82 Changing Boot Sequence for Future Boots 83 7 Clearing Passwords and CMOS Settings 85 Clearing Passwords 85 Clearing CMOS Settings 87 Flashing the BIOS 88 8 Troubleshooting Tools 89 Power Lights 89 Beep Codes 90 System Messages 93 Hardware Troubleshooter 95 6 Contents
6 System Setup 77 Overview 77 Entering System Setup 77 System Setup Screens 77 System Setup Options 79 Boot Sequence 82 Option Settings 82 Changing Boot Sequence for the Current Boot 82 Changing Boot Sequence for Future Boots 83 7 Clearing Passwords and CMOS Settings 85 Clearing Passwords 85 Clearing CMOS Settings 87 Flashing the BIOS 88 8 Troubleshooting Tools 89 Power Lights 89 Beep Codes 90 System Messages 93 Hardware Troubleshooter 95 6 Contents
Owner's Manual
Page 7
... When to Use the Dell Diagnostics 95 Starting the Dell Diagnostics From Your Hard Drive 96 Starting the Dell Diagnostics From the Drivers and Utilities Media 97 Dell Diagnostics Main Menu 98 9 Troubleshooting 101 Battery Problems 101 Drive Problems 102 Error Messages 103 IEEE 1394 Device Problems 104 Keyboard Problems 105 Lockups and ...
... When to Use the Dell Diagnostics 95 Starting the Dell Diagnostics From Your Hard Drive 96 Starting the Dell Diagnostics From the Drivers and Utilities Media 97 Dell Diagnostics Main Menu 98 9 Troubleshooting 101 Battery Problems 101 Drive Problems 102 Error Messages 103 IEEE 1394 Device Problems 104 Keyboard Problems 105 Lockups and ...

Owner's Manual
Page 8
Troubleshooting Software and Hardware Problems in the Microsoft® Windows® XP and Windows Vista® Operating Systems 121 Restoring Your Operating System 122 Using Microsoft Windows System Restore . . . . 122 Using Dell™ PC Restore and Dell Factory Image Restore 124 Using the Operating System Media 127 11 Specifications 129 12 Getting Help 135... Order-Status Service 137 Problems With Your Order 137 Product Information 138 Returning Items for Warranty Repair or Credit . . . . 138 Before You Call 139 Contacting Dell 141 8 Contents
Troubleshooting Software and Hardware Problems in the Microsoft® Windows® XP and Windows Vista® Operating Systems 121 Restoring Your Operating System 122 Using Microsoft Windows System Restore . . . . 122 Using Dell™ PC Restore and Dell Factory Image Restore 124 Using the Operating System Media 127 11 Specifications 129 12 Getting Help 135... Order-Status Service 137 Problems With Your Order 137 Product Information 138 Returning Items for Warranty Repair or Credit . . . . 138 Before You Call 139 Contacting Dell 141 8 Contents
Owner's Manual
Page 11
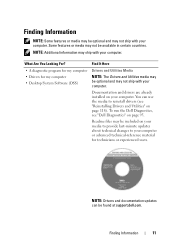
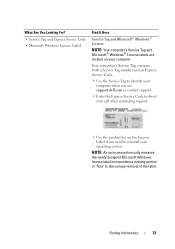
Some features or media may not ship with your computer. What Are You Looking For? Finding Information 11 You can be found at support.dell.com. Find It Here • A diagnostic program for my computer Drivers and Utilities Media • Drivers for technicians or experienced users. Readme files ... page 95. NOTE: Drivers and documentation updates can use the media to your computer or advanced technical-reference material for my computer • Desktop System Software (DSS) NOTE: The Drivers and Utilities media may be optional and may ship with your computer.
Some features or media may not ship with your computer. What Are You Looking For? Finding Information 11 You can be found at support.dell.com. Find It Here • A diagnostic program for my computer Drivers and Utilities Media • Drivers for technicians or experienced users. Readme files ... page 95. NOTE: Drivers and documentation updates can use the media to your computer or advanced technical-reference material for my computer • Desktop System Software (DSS) NOTE: The Drivers and Utilities media may be optional and may ship with your computer.
Owner's Manual
Page 12
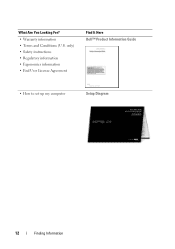
What Are You Looking For? • Warranty information • Terms and Conditions (U.S. only) • Safety instructions • Regulatory information • Ergonomics information • End User License Agreement Find It Here Dell™ Product Information Guide • How to set up my computer Setup Diagram 12 Finding Information
What Are You Looking For? • Warranty information • Terms and Conditions (U.S. only) • Safety instructions • Regulatory information • Ergonomics information • End User License Agreement Find It Here Dell™ Product Information Guide • How to set up my computer Setup Diagram 12 Finding Information
Owner's Manual
Page 13
...'s Service Tag contains both a Service Tag number and an Express Service Code. • Use the Service Tag to identify your computer when you use support.dell.com or contact support. • Enter the Express Service Code to direct your computer.
...'s Service Tag contains both a Service Tag number and an Express Service Code. • Use the Service Tag to identify your computer when you use support.dell.com or contact support. • Enter the Express Service Code to direct your computer.
Owner's Manual
Page 14
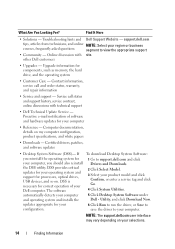
... information for your product model and click Confirm, or enter a service tag and click Go. 4 Click System Utilities. 5 Click Desktop System Software under Dell - Computer documentation, details on . Utility, and click Download Now. 6 Click Run to run the driver, or Save to save...• Service and support - NOTE: The support.dell.com user interface may vary depending on your Dell computer. Certified drivers, patches, and software updates • Desktop System Software (DSS)- To download Desktop System Software: 1 Go to support.dell.com and click Drivers and Downloads. 2 Click Select ...
... information for your product model and click Confirm, or enter a service tag and click Go. 4 Click System Utilities. 5 Click Desktop System Software under Dell - Computer documentation, details on . Utility, and click Download Now. 6 Click Run to run the driver, or Save to save...• Service and support - NOTE: The support.dell.com user interface may vary depending on your Dell computer. Certified drivers, patches, and software updates • Desktop System Software (DSS)- To download Desktop System Software: 1 Go to support.dell.com and click Drivers and Downloads. 2 Click Select ...
Owner's Manual
Page 15
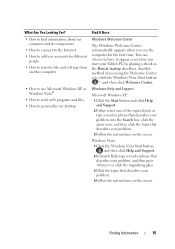
... on the screen. Finding Information 15 Windows Help and Support Microsoft Windows XP: 1 Click the Start button and click Help and Support. 2 Either select one of accessing the Welcome Center is to personalize my desktop Find It Here Windows Welcome Center The Windows Welcome Center automatically appears when... Tablet-PC by placing a check in the Run at startup checkbox. You can choose to have it appear every time you use Microsoft Windows XP or Windows Vista® • How to work with programs and files • How to click the Windows Vista Start button ™,...
... on the screen. Finding Information 15 Windows Help and Support Microsoft Windows XP: 1 Click the Start button and click Help and Support. 2 Either select one of accessing the Welcome Center is to personalize my desktop Find It Here Windows Welcome Center The Windows Welcome Center automatically appears when... Tablet-PC by placing a check in the Run at startup checkbox. You can choose to have it appear every time you use Microsoft Windows XP or Windows Vista® • How to work with programs and files • How to click the Windows Vista Start button ™,...
Owner's Manual
Page 16
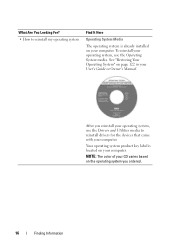
See "Restoring Your Operating System" on your computer. Your operating system product key label is already installed on the operating system you reinstall your operating system, use the Operating System media. After you ordered. 16 Finding Information To reinstall your operating system, use the Drivers and Utilities media to reinstall my operating system Find It Here Operating System Media The operating system is located on page 122 in your User's Guide or Owner's Manual. NOTE: The color of your CD varies based on your computer. What Are You Looking For? • How to...
See "Restoring Your Operating System" on your computer. Your operating system product key label is already installed on the operating system you reinstall your operating system, use the Operating System media. After you ordered. 16 Finding Information To reinstall your operating system, use the Drivers and Utilities media to reinstall my operating system Find It Here Operating System Media The operating system is located on page 122 in your User's Guide or Owner's Manual. NOTE: The color of your CD varies based on your computer. What Are You Looking For? • How to...

Owner's Manual
Page 17
About Your Computer 17 Use the optical drive to play a CD/DVD. This panel covers the optical drive. About Your Computer Front View of the Computer 1 2 10 3 9 4 5 6 8 7 1 front-panel LEDs (3) 2 optical-drive panel Multi-colored lights provide illumination for the front of the computer.
About Your Computer 17 Use the optical drive to play a CD/DVD. This panel covers the optical drive. About Your Computer Front View of the Computer 1 2 10 3 9 4 5 6 8 7 1 front-panel LEDs (3) 2 optical-drive panel Multi-colored lights provide illumination for the front of the computer.
Owner's Manual
Page 18
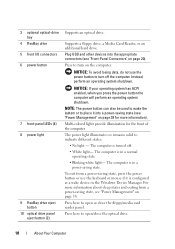
Supports a floppy drive, a Media Card Reader, or an additional hard drive. Press to turn off . • White light- The computer is configured as a wake device in the Windows Device Manager. For more information). NOTE: The power button can also be used to wake the system or to place it is turned off the computer. The computer is in a normal operating state. • Blinking white light- The computer is in a power-saving state. To exit from a power-saving state, see "Front-Panel Connectors" on the computer. Press here to turn on page 20). Multi-colored lights ...
Supports a floppy drive, a Media Card Reader, or an additional hard drive. Press to turn off . • White light- The computer is configured as a wake device in the Windows Device Manager. For more information). NOTE: The power button can also be used to wake the system or to place it is turned off the computer. The computer is in a normal operating state. • Blinking white light- The computer is in a power-saving state. To exit from a power-saving state, see "Front-Panel Connectors" on the computer. Press here to turn on page 20). Multi-colored lights ...
Owner's Manual
Page 19
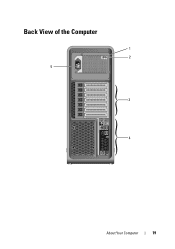
Back View of the Computer 1 2 5 3 4 About Your Computer 19
Back View of the Computer 1 2 5 3 4 About Your Computer 19
Owner's Manual
Page 20
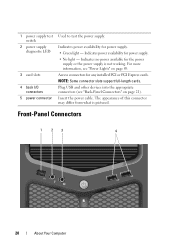
Plug USB and other devices into the appropriate connectors (see "Power Lights" on page 21). Indicates no power available for any installed PCI or PCI Express cards. Insert the power cable. Front-Panel Connectors 1 23 4 20 About Your Computer For more information, see "Back-Panel Connectors" on page 89. NOTE: Some connector slots support full-length cards. Indicates power availability for power supply. • Green light - The appearance of this connector may differ from what is not working. 1 power supply test switch 2 power supply diagnostic LED 3 card slots 4 ...
Plug USB and other devices into the appropriate connectors (see "Power Lights" on page 21). Indicates no power available for any installed PCI or PCI Express cards. Insert the power cable. Front-Panel Connectors 1 23 4 20 About Your Computer For more information, see "Back-Panel Connectors" on page 89. NOTE: Some connector slots support full-length cards. Indicates power availability for power supply. • Green light - The appearance of this connector may differ from what is not working. 1 power supply test switch 2 power supply diagnostic LED 3 card slots 4 ...
Owner's Manual
Page 21
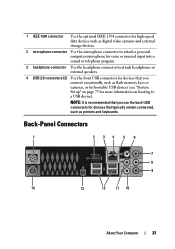
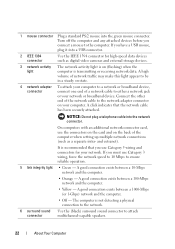
NOTE: It is recommended that you connect occasionally, such as flash memory keys or cameras, or for bootable USB devices (see "System Setup" on page 77 for devices that you use the back USB connectors for more information on booting to attach headphones or external speakers. 4 USB 2.0 connectors (2) Use the front USB connectors for devices that typically remain connected, such as digital video cameras and external storage devices. 2 microphone connector Use the microphone connector to attach a personal computer microphone for voice or musical input into a sound or telephony program....
NOTE: It is recommended that you connect occasionally, such as flash memory keys or cameras, or for bootable USB devices (see "System Setup" on page 77 for devices that you use the back USB connectors for more information on booting to attach headphones or external speakers. 4 USB 2.0 connectors (2) Use the front USB connectors for devices that typically remain connected, such as digital video cameras and external storage devices. 2 microphone connector Use the microphone connector to attach a personal computer microphone for voice or musical input into a sound or telephony program....
Owner's Manual
Page 22
1 mouse connector Plug a standard PS/2 mouse into the network connector. and extranet). Connect the other end of the computer when setting up multiple network connections (such as digital video cameras and external storage devices. 3 network activity light The network activity light is on state. 4 network adapter connector To attach your computer. On computers with an additional network connector card, use the connectors on the card and on the back of the network cable to the network adapter connector on your computer to a network or broadband device, connect one end of a ...
1 mouse connector Plug a standard PS/2 mouse into the network connector. and extranet). Connect the other end of the computer when setting up multiple network connections (such as digital video cameras and external storage devices. 3 network activity light The network activity light is on state. 4 network adapter connector To attach your computer. On computers with an additional network connector card, use the connectors on the card and on the back of the network cable to the network adapter connector on your computer to a network or broadband device, connect one end of a ...
Owner's Manual
Page 23
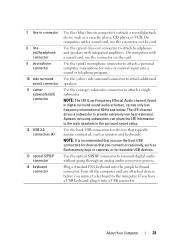
Systems not using subwoofers can shunt the LFE information to the main speakers in digital surround sound audio schemes, carries only low frequency information of 80 Hz and below. NOTE: It is recommended that you use the front USB connectors for devices that typically remain connected, such as flash memory keys or cameras, or for voice or musical input into a sound or telephony program. Use the (pink) microphone connector to the computer. NOTE: The LFE (Low Frequency Effects) Audio channel, found in the surround sound setup. Use the back USB connectors for devices that you ...
Systems not using subwoofers can shunt the LFE information to the main speakers in digital surround sound audio schemes, carries only low frequency information of 80 Hz and below. NOTE: It is recommended that you use the front USB connectors for devices that typically remain connected, such as flash memory keys or cameras, or for voice or musical input into a sound or telephony program. Use the (pink) microphone connector to the computer. NOTE: The LFE (Low Frequency Effects) Audio channel, found in the surround sound setup. Use the back USB connectors for devices that you ...
