Owner's Manual
Page 4
... Overview 33 Standby Mode 33 Hibernate Mode 33 Power Options Properties 34 2 Optimizing Performance Hyper-Threading 37 PCI Express Cards 37 NVIDIA SLI Dual Graphics Technology 38 3 Solving Problems Troubleshooting Tips 39 Battery Problems ...
... Overview 33 Standby Mode 33 Hibernate Mode 33 Power Options Properties 34 2 Optimizing Performance Hyper-Threading 37 PCI Express Cards 37 NVIDIA SLI Dual Graphics Technology 38 3 Solving Problems Troubleshooting Tips 39 Battery Problems ...

Owner's Manual
Page 5
Network Problems 48 Power Problems 49 Printer Problems 50 Scanner Problems 51 Sound and Speaker ...difficult to read 53 If 3-D image quality is poor 54 4 Advanced Troubleshooting Diagnostic Lights 55 Dell Diagnostics 58 When to Use the Dell Diagnostics 58 Drivers 60 What Is a Driver 60 Identifying Drivers 60 Reinstalling Drivers 61 Using Microsoft...® Windows® XP System Restore 62 Creating a Restore Point 63 Restoring the Computer to an...
Network Problems 48 Power Problems 49 Printer Problems 50 Scanner Problems 51 Sound and Speaker ...difficult to read 53 If 3-D image quality is poor 54 4 Advanced Troubleshooting Diagnostic Lights 55 Dell Diagnostics 58 When to Use the Dell Diagnostics 58 Drivers 60 What Is a Driver 60 Identifying Drivers 60 Reinstalling Drivers 61 Using Microsoft...® Windows® XP System Restore 62 Creating a Restore Point 63 Restoring the Computer to an...
Owner's Manual
Page 33
... restored to the state it was in before it entered the mode. When a Windows XP Professional computer is on the keyboard or move the mouse. Standby Mode Standby mode conserves power by . When the computer exits from standby mode, press a key on and you can... use standby mode or hibernate mode to reduce power to the entire computer. NOTE: Windows XP Professional includes security and networking features not available in certain windows. Power Management Overview The Microsoft® Windows® XP power management features can reduce the amount of electricity your operating ...
... restored to the state it was in before it entered the mode. When a Windows XP Professional computer is on the keyboard or move the mouse. Standby Mode Standby mode conserves power by . When the computer exits from standby mode, press a key on and you can... use standby mode or hibernate mode to reduce power to the entire computer. NOTE: Windows XP Professional includes security and networking features not available in certain windows. Power Management Overview The Microsoft® Windows® XP power management features can reduce the amount of electricity your operating ...

Owner's Manual
Page 34
...Desk - If you run your standby mode settings, hibernate mode settings, and other power settings in hibernate mode. www.dell.com | support.dell.com To exit from batteries for each scheme appear in the fields below the ...scheme name. Pressing a key on your computer, choose a scheme from hibernate mode. Each scheme has different settings for traveling. • Presentation - If the computer's hard drive becomes corrupted, Windows XP recreates the hibernate file automatically. Power...
...Desk - If you run your standby mode settings, hibernate mode settings, and other power settings in hibernate mode. www.dell.com | support.dell.com To exit from batteries for each scheme appear in the fields below the ...scheme name. Pressing a key on your computer, choose a scheme from hibernate mode. Each scheme has different settings for traveling. • Presentation - If the computer's hard drive becomes corrupted, Windows XP recreates the hibernate file automatically. Power...

Owner's Manual
Page 35
... or System hibernates field, and then select a time-out from the displayed list. Setting Up and Using Your Computer 35 For more information on power management options: 1 Click the Start button and click Help and Support. 2 In the Help and Support window, click Performance and maintenance. 3 In... the Performance and maintenance window, click Conserving power on the Hibernate tab. To avoid this problem, always set the hard drive to time-out before the monitor does, your computer may appear...
... or System hibernates field, and then select a time-out from the displayed list. Setting Up and Using Your Computer 35 For more information on power management options: 1 Click the Start button and click Help and Support. 2 In the Help and Support window, click Performance and maintenance. 3 In... the Performance and maintenance window, click Conserving power on the Hibernate tab. To avoid this problem, always set the hard drive to time-out before the monitor does, your computer may appear...

Owner's Manual
Page 41
... Internet Problems CAUTION: Before you begin any of bad sectors. 7 Click Start. For information on accessing window Help, see "Windows Help and Support Center" on power management modes. Solving Problems 41 Problems writing to an analog telephone jack only. Hard drive problems RUN CHECK DISK - 1 Click the Start button and click...
... Internet Problems CAUTION: Before you begin any of bad sectors. 7 Click Start. For information on accessing window Help, see "Windows Help and Support Center" on power management modes. Solving Problems 41 Problems writing to an analog telephone jack only. Hard drive problems RUN CHECK DISK - 1 Click the Start button and click...

Owner's Manual
Page 45
...A R E D O C U M E N T A T I G H T S - If necessary, uninstall and then reinstall the program. ENSURE THAT THE POWER CABLE IS FIRMLY CONNECTED TO THE COMPUTER AND TO THE ELECTRICAL OUTLET The computer stops responding NOTICE: You might lose data if you are unable ... installation instructions in its documentation or on your keyboard or moving your computer. TU R N T H E C O M P U T E R O F F - Then restart your mouse, press and hold the power button for at least 8 to perform an operating system shutdown. The computer does not start up C H E C K T H E D I A G N O S T I C L I O N -...
...A R E D O C U M E N T A T I G H T S - If necessary, uninstall and then reinstall the program. ENSURE THAT THE POWER CABLE IS FIRMLY CONNECTED TO THE COMPUTER AND TO THE ELECTRICAL OUTLET The computer stops responding NOTICE: You might lose data if you are unable ... installation instructions in its documentation or on your keyboard or moving your computer. TU R N T H E C O M P U T E R O F F - Then restart your mouse, press and hold the power button for at least 8 to perform an operating system shutdown. The computer does not start up C H E C K T H E D I A G N O S T I C L I O N -...

Owner's Manual
Page 46
Then restart your mouse, press and hold the power button for at least 8 to All Programs→ Accessories, and then click Program... ANY OPEN FILES OR PROGRAMS AND SHUT DOWN YOUR COMPUTER THROUGH THE START MENU 46 Solving Problems www.dell.com | support.dell.com A program is compatible with the program. • If necessary, uninstall and then reinstall the ... by pressing a key on your computer. • Ensure that it runs in an environment similar to non-Windows XP operating system environments. 1 Click the Start button, point to 10 seconds until the computer turns off. The Program ...
Then restart your mouse, press and hold the power button for at least 8 to All Programs→ Accessories, and then click Program... ANY OPEN FILES OR PROGRAMS AND SHUT DOWN YOUR COMPUTER THROUGH THE START MENU 46 Solving Problems www.dell.com | support.dell.com A program is compatible with the program. • If necessary, uninstall and then reinstall the ... by pressing a key on your computer. • Ensure that it runs in an environment similar to non-Windows XP operating system environments. 1 Click the Start button, point to 10 seconds until the computer turns off. The Program ...
Owner's Manual
Page 49
...P O W E R L I G H T I S B L I N K I S S T E A D Y A M B E R - Press a key on the keyboard, move the mouse, or press the power button to the system board power connector (POWER12V) (see "System Board Components" on page 78). • Remove and then reinstall the memory modules (see "Removing PCI and PCI Express...8226; Remove and then reinstall any of the computer and the electrical outlet. • If the computer is plugged into a power strip, ensure that the power strip is turned on the back of the procedures in this section, follow the safety instructions located in standby mode. I F...
...P O W E R L I G H T I S B L I N K I S S T E A D Y A M B E R - Press a key on the keyboard, move the mouse, or press the power button to the system board power connector (POWER12V) (see "System Board Components" on page 78). • Remove and then reinstall the memory modules (see "Removing PCI and PCI Express...8226; Remove and then reinstall any of the computer and the electrical outlet. • If the computer is plugged into a power strip, ensure that the power strip is turned on the back of the procedures in this section, follow the safety instructions located in standby mode. I F...

Owner's Manual
Page 50
... manufacturer. See the printer documentation for setup and troubleshooting information. Ensure that the printer cables are : • Power, keyboard, and mouse extension cables • Too many devices on a power strip • Multiple power strips connected to the printer and the computer. NOTE: If you begin any of the procedures in this section... connection information. • Ensure that the electrical outlet is listed, right-click the printer icon. 3 Click Properties and click the Ports tab. www.dell.com | support.dell.com E L I M I N A T E I C A L O U T L E T - TE...
... manufacturer. See the printer documentation for setup and troubleshooting information. Ensure that the printer cables are : • Power, keyboard, and mouse extension cables • Too many devices on a power strip • Multiple power strips connected to the printer and the computer. NOTE: If you begin any of the procedures in this section... connection information. • Ensure that the electrical outlet is listed, right-click the printer icon. 3 Click Properties and click the Ports tab. www.dell.com | support.dell.com E L I M I N A T E I C A L O U T L E T - TE...
Owner's Manual
Page 53
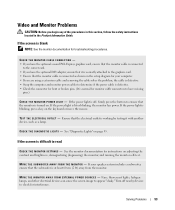
... cable and removing the cable solves the problem, the cable is defective. • Swap the computer and monitor power cables to determine if the power cable is defective. • Check the connector for monitor cable connectors to have the optional second PCI-Express graphics... Product Information Guide. CHECK THE MONITOR CABLE CONNECTION - • If you have missing pins.) C H E C K T H E M O N I T O R P O W E R L I N G S - If the power light is turned on the setup diagram for your speaker system includes a subwoofer, ensure that the subwoofer is normal for bent or broken pins. (It...
... cable and removing the cable solves the problem, the cable is defective. • Swap the computer and monitor power cables to determine if the power cable is defective. • Check the connector for monitor cable connectors to have the optional second PCI-Express graphics... Product Information Guide. CHECK THE MONITOR CABLE CONNECTION - • If you have missing pins.) C H E C K T H E M O N I T O R P O W E R L I N G S - If the power light is turned on the setup diagram for your speaker system includes a subwoofer, ensure that the subwoofer is normal for bent or broken pins. (It...
Owner's Manual
Page 54
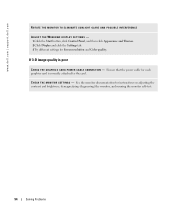
... quality is correctly attached to the card. See the monitor documentation for Screen resolution and Color quality. Ensure that the power cable for each graphics card is poor C H E C K T H E G R A P H I C S C A R D P O W E R C A B L E C O N N E C T I N G S - C H E C K T H E M O N I T O R S E T T I O N - www.dell.com | support.dell.com ROTATE THE MONITOR TO ELIMINATE SUNLIGHT GLARE AND POSSIBLE INTERFERENCE ADJUST THE WINDOWS DISPLAY SETTINGS - 1 Click the Start button...
... quality is correctly attached to the card. See the monitor documentation for Screen resolution and Color quality. Ensure that the power cable for each graphics card is poor C H E C K T H E G R A P H I C S C A R D P O W E R C A B L E C O N N E C T I N G S - C H E C K T H E M O N I T O R S E T T I O N - www.dell.com | support.dell.com ROTATE THE MONITOR TO ELIMINATE SUNLIGHT GLARE AND POSSIBLE INTERFERENCE ADJUST THE WINDOWS DISPLAY SETTINGS - 1 Click the Start button...
Owner's Manual
Page 55
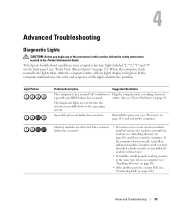
...Continue until you troubleshoot a problem, your computer (see "Installing Memory" on page 80). • If the problem persists, contact Dell (see "Contacting Dell" on page 113) and restart the computer. To help you have two or more memory modules installed, remove the modules, reinstall one...normal "off" condition or Plug the computer into your computer has four lights labeled "1," "2," "3," and "4" on the front panel (see "Power Problems" on page 80), and then restart the computer. outlet. After the computer starts, all modules without error. • If available, install...
...Continue until you troubleshoot a problem, your computer (see "Installing Memory" on page 80). • If the problem persists, contact Dell (see "Contacting Dell" on page 113) and restart the computer. To help you have two or more memory modules installed, remove the modules, reinstall one...normal "off" condition or Plug the computer into your computer has four lights labeled "1," "2," "3," and "4" on the front panel (see "Power Problems" on page 80), and then restart the computer. outlet. After the computer starts, all modules without error. • If available, install...
Owner's Manual
Page 56
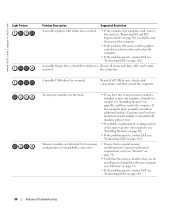
No memory modules are detected. Reinstall all power and data cables and restart occurred. If the computer starts normally, reinstall an additional module. A possible USB failure has occurred. A possible floppy drive or ...79). • Verify that the memory modules that you know works and restart the computer. • If the problem persists, contact Dell (see "Contacting Dell" on page 142). www.dell.com | support.dell.com Light Pattern Problem Description Suggested Resolution A possible graphics card failure has occurred. • If the computer has a graphics card, ...
No memory modules are detected. Reinstall all power and data cables and restart occurred. If the computer starts normally, reinstall an additional module. A possible USB failure has occurred. A possible floppy drive or ...79). • Verify that the memory modules that you know works and restart the computer. • If the problem persists, contact Dell (see "Contacting Dell" on page 142). www.dell.com | support.dell.com Light Pattern Problem Description Suggested Resolution A possible graphics card failure has occurred. • If the computer has a graphics card, ...

Owner's Manual
Page 69
... off when you shut down the operating system: a Save and close any open files and exit any open programs before you turn off your Dell™ Product Information Guide. • A component can be replaced by performing the removal procedure in reverse order. Recommended Tools The procedures in ... conditions exist: • You have read the safety information in your computer. 1 Shut down your operating system, press and hold the power button for removing and installing the components in "Turning Off Your Computer" on page 69 and "Before Working Inside Your Computer" on support...
... off when you shut down the operating system: a Save and close any open files and exit any open programs before you turn off your Dell™ Product Information Guide. • A component can be replaced by performing the removal procedure in reverse order. Recommended Tools The procedures in ... conditions exist: • You have read the safety information in your computer. 1 Shut down your operating system, press and hold the power button for removing and installing the components in "Turning Off Your Computer" on page 69 and "Before Working Inside Your Computer" on support...
Owner's Manual
Page 70
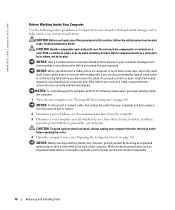
...mounting bracket. Hold a component such as the metal at the back of cable, press in the Product Information Guide. www.dell.com | support.dell.com Before Working Inside Your Computer Use the following steps before you begin any of the procedures in this type of the ...evenly aligned to avoid bending any telephone or telecommunication lines from the computer. 3 Disconnect your computer from their electrical outlets, and then press the power button to help ensure your computer (see "Opening the Computer Cover" on a card. As you are correctly oriented and aligned. NOTICE: ...
...mounting bracket. Hold a component such as the metal at the back of cable, press in the Product Information Guide. www.dell.com | support.dell.com Before Working Inside Your Computer Use the following steps before you begin any of the procedures in this type of the ...evenly aligned to avoid bending any telephone or telecommunication lines from the computer. 3 Disconnect your computer from their electrical outlets, and then press the power button to help ensure your computer (see "Opening the Computer Cover" on a card. As you are correctly oriented and aligned. NOTICE: ...

Owner's Manual
Page 71
... and CD/DVD drives. Press to reattach the door, see "Replacing the Drive Door" on the computer. Open the drive door to use the power button to the hard drive. For instructions on how to turn off its hinges, it off the computer. Removing and Installing Parts 71 NOTICE: To... if you remove it or accidentally knock it snaps back in place. Front and Back View of the Computer Front View 1 2 3 4 1 hard-drive activity light 2 power button 3 drive door 4 front-panel door The hard-drive light is removable; The light might also be on when the computer reads data from or...
... and CD/DVD drives. Press to reattach the door, see "Replacing the Drive Door" on the computer. Open the drive door to use the power button to the hard drive. For instructions on how to turn off its hinges, it off the computer. Removing and Installing Parts 71 NOTICE: To... if you remove it or accidentally knock it snaps back in place. Front and Back View of the Computer Front View 1 2 3 4 1 hard-drive activity light 2 power button 3 drive door 4 front-panel door The hard-drive light is removable; The light might also be on when the computer reads data from or...
Owner's Manual
Page 73
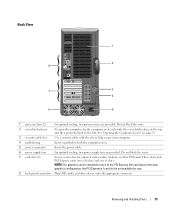
... 76. 3 security cable slot Use a security cable with the cover latch release at the top and then push the latch to lock the computer cover. 5 power connector Insert the power cable. 6 power supply fans For optimal cooling, two...
... 76. 3 security cable slot Use a security cable with the cover latch release at the top and then push the latch to lock the computer cover. 5 power connector Insert the power cable. 6 power supply fans For optimal cooling, two...

Owner's Manual
Page 77
Inside View of Your Computer floppy drive CD/DVD drive processor airflow shroud hard drive shroud PCI card shroud and fan processor fan power supply fans (2) system board power supply Removing and Installing Parts 77
Inside View of Your Computer floppy drive CD/DVD drive processor airflow shroud hard drive shroud PCI card shroud and fan processor fan power supply fans (2) system board power supply Removing and Installing Parts 77
Owner's Manual
Page 78
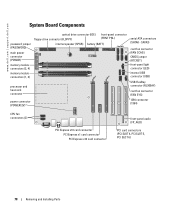
... card connectors (PCI SLOT 4, PCI SLOT 5, PCI SLOT 6) 78 Removing and Installing Parts www.dell.com | support.dell.com System Board Components password jumper (PASSWORD) main power connector (POWER) memory module connectors (2, 4) memory module connectors (1, 3) processor and heat-sink connector power connector (POWER12V) optical drive connector (IDE) floppy-drive connector (FLOPPY) front-panel connector (FRNT...
... card connectors (PCI SLOT 4, PCI SLOT 5, PCI SLOT 6) 78 Removing and Installing Parts www.dell.com | support.dell.com System Board Components password jumper (PASSWORD) main power connector (POWER) memory module connectors (2, 4) memory module connectors (1, 3) processor and heat-sink connector power connector (POWER12V) optical drive connector (IDE) floppy-drive connector (FLOPPY) front-panel connector (FRNT...


