Owner's Manual
Page 6
5 Removing and Installing Parts Before You Begin 69 Recommended Tools 69 Turning Off Your Computer 69 Before Working Inside Your Computer 70 Front and Back View of the Computer 71 Front View 71 Front View (Doors Open ...
5 Removing and Installing Parts Before You Begin 69 Recommended Tools 69 Turning Off Your Computer 69 Before Working Inside Your Computer 70 Front and Back View of the Computer 71 Front View 71 Front View (Doors Open ...
Owner's Manual
Page 15
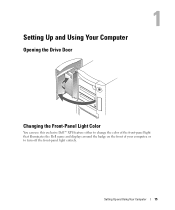
Setting Up and Using Your Computer 15 Setting Up and Using Your Computer Opening the Drive Door Changing the Front-Panel Light Color You can use this exclusive Dell™ XPS feature either to change the color of the front-panel light that illuminates the Dell name and displays around the badge on the front of your computer, or to turn off the front-panel light entirely.
Setting Up and Using Your Computer 15 Setting Up and Using Your Computer Opening the Drive Door Changing the Front-Panel Light Color You can use this exclusive Dell™ XPS feature either to change the color of the front-panel light that illuminates the Dell name and displays around the badge on the front of your computer, or to turn off the front-panel light entirely.

Owner's Manual
Page 16
arrow keys to save the new front-panel light color setting. 16 Setting Up and Using Your Computer www.dell.com | support.dell.com front-panel light You can choose from several color choices: •Off •Ruby •Emerald •Sapphire (default) •Amber •... options. 7 Select the color you begin any of the procedures in this section, follow the safety instructions located in "Before You Begin" on page 69. 2 Turn on (or restart) your computer. 3 Enter system setup by pressing . (See "Entering System Setup" on page 131 for diagnostic purposes. 1 Follow the procedures...
arrow keys to save the new front-panel light color setting. 16 Setting Up and Using Your Computer www.dell.com | support.dell.com front-panel light You can choose from several color choices: •Off •Ruby •Emerald •Sapphire (default) •Amber •... options. 7 Select the color you begin any of the procedures in this section, follow the safety instructions located in "Before You Begin" on page 69. 2 Turn on (or restart) your computer. 3 Enter system setup by pressing . (See "Entering System Setup" on page 131 for diagnostic purposes. 1 Follow the procedures...
Owner's Manual
Page 20
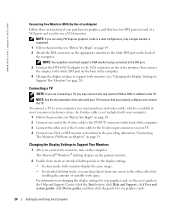
www.dell.com | support.dell.com Connecting Two Monitors (With the Use of an Adapter) Follow these instructions if you purchased a graphics card that you can drag objects from one ... connected to the DVI port. 3 Connect the DVI-to-VGA adapter to the white DVI port on page 20). NOTE: If you connect the monitors, turn on the other , effectively doubling the amount of the computer. NOTE: Your graphics card must purchase an S-video cable, which is supported. 1 Follow the procedures...
www.dell.com | support.dell.com Connecting Two Monitors (With the Use of an Adapter) Follow these instructions if you purchased a graphics card that you can drag objects from one ... connected to the DVI port. 3 Connect the DVI-to-VGA adapter to the white DVI port on page 20). NOTE: If you connect the monitors, turn on the other , effectively doubling the amount of the computer. NOTE: Your graphics card must purchase an S-video cable, which is supported. 1 Follow the procedures...
Owner's Manual
Page 33
When a Windows XP Professional computer is on the hard drive and then completely turning off the display and the hard drive after a defined period of inactivity: 1 Click the Start button and click Control Panel. 2 Under Pick a category, click Performance ... it entered hibernate mode. NOTE: Depending on your hibernate settings on the keyboard or move the mouse. Power Management Overview The Microsoft® Windows® XP power management features can reduce the amount of electricity your computer loses power while in standby mode, it may be different. You can reduce power...
When a Windows XP Professional computer is on the hard drive and then completely turning off the display and the hard drive after a defined period of inactivity: 1 Click the Start button and click Control Panel. 2 Under Pick a category, click Performance ... it entered hibernate mode. NOTE: Depending on your hibernate settings on the keyboard or move the mouse. Power Management Overview The Microsoft® Windows® XP power management features can reduce the amount of electricity your computer loses power while in standby mode, it may be different. You can reduce power...

Owner's Manual
Page 34
...conservation. • Max Battery - If you want your computer, choose a scheme from batteries for extended periods of the computer memory, Dell creates an appropriately sized hibernate mode file before shipping the computer to use for traveling. • Presentation - If the computer's hard ...drive becomes corrupted, Windows XP recreates the hibernate file automatically. The settings for starting standby mode or hibernate mode, turning off the monitor, and turning off the hard drive. If you want to you. Power Options Properties Define...
...conservation. • Max Battery - If you want your computer, choose a scheme from batteries for extended periods of the computer memory, Dell creates an appropriately sized hibernate mode file before shipping the computer to use for traveling. • Presentation - If the computer's hard ...drive becomes corrupted, Windows XP recreates the hibernate file automatically. The settings for starting standby mode or hibernate mode, turning off the monitor, and turning off the hard drive. If you want to you. Power Options Properties Define...

Owner's Manual
Page 35
If you want to enable hibernate mode. NOTICE: If you set the monitor to activate standby mode, activate hibernate mode, or turn off hard disks, System stand by, or System hibernates field, and then select a time-out from the displayed list. Advanced Tab The Advanced tab allows... you to: • Place the power options icon in the Turn off monitor, Turn off the computer. To program these functions, click an option from standby mode or hibernate mode. • Program the power button to time-out...
If you want to enable hibernate mode. NOTICE: If you set the monitor to activate standby mode, activate hibernate mode, or turn off hard disks, System stand by, or System hibernates field, and then select a time-out from the displayed list. Advanced Tab The Advanced tab allows... you to: • Place the power options icon in the Turn off monitor, Turn off the computer. To program these functions, click an option from standby mode or hibernate mode. • Program the power button to time-out...

Owner's Manual
Page 39
... appears on the screen, write down the exact message. Discard used batteries according to repeatedly reset time and date information after turning on the computer, or if an incorrect time or date displays during start-up, replace the battery (see "Replacing the Battery... before the problem started, review the installation procedures and ensure that the part is correctly installed. • If a peripheral device does not work properly, contact Dell (see the program's documentation. R E P L A C E T H E B A T T E R Y - If the battery still does not work , ensure that the device is incorrectly...
... appears on the screen, write down the exact message. Discard used batteries according to repeatedly reset time and date information after turning on the computer, or if an incorrect time or date displays during start-up, replace the battery (see "Replacing the Battery... before the problem started, review the installation procedures and ensure that the part is correctly installed. • If a peripheral device does not work properly, contact Dell (see the program's documentation. R E P L A C E T H E B A T T E R Y - If the battery still does not work , ensure that the device is incorrectly...

Owner's Manual
Page 40
... of different regions worldwide and different disc formats, not all DVD titles work in the drive or the CD or DVD. C H E C K T H E S P E A K E R S A N D S U B W O O F E R - See "Dell Diagnostics" on page 139. If the floppy, CD, or DVD drive, is normal and may cause noise, which does not indicate a defect in all DVD...NOTE: High-speed CD or DVD drive vibration is not listed, perform a full scan with your screen. • Ensure that the volume is turned up by clicking the slidebar and dragging it up. • Ensure that the sound is not muted by clicking any boxes that the original ...
... of different regions worldwide and different disc formats, not all DVD titles work in the drive or the CD or DVD. C H E C K T H E S P E A K E R S A N D S U B W O O F E R - See "Dell Diagnostics" on page 139. If the floppy, CD, or DVD drive, is normal and may cause noise, which does not indicate a defect in all DVD...NOTE: High-speed CD or DVD drive vibration is not listed, perform a full scan with your screen. • Ensure that the volume is turned up by clicking the slidebar and dragging it up. • Ensure that the sound is not muted by clicking any boxes that the original ...

Owner's Manual
Page 44
... THAT THE IEEE 1394 DEVICE IS RECOGNIZED BY WINDOWS - 1 Click the Start button and click Control Panel. 2 Click Printers and Other Hardware. TE S T T H E K E Y B O A R D - Contact Dell (see "Turning Off Your Computer" on page 69), reconnect the keyboard cable as shown on the setup diagram for your IEEE 1394 device is firmly connected to...
... THAT THE IEEE 1394 DEVICE IS RECOGNIZED BY WINDOWS - 1 Click the Start button and click Control Panel. 2 Click Printers and Other Hardware. TE S T T H E K E Y B O A R D - Contact Dell (see "Turning Off Your Computer" on page 69), reconnect the keyboard cable as shown on the setup diagram for your IEEE 1394 device is firmly connected to...

Owner's Manual
Page 45
... COMPUTER AND TO THE ELECTRICAL OUTLET The computer stops responding NOTICE: You might lose data if you are unable to 10 seconds until the computer turns off. See "Diagnostic Lights" on a floppy disk or CD. A program stops responding END THE PROGRAM - 1 Press simultaneously. 2 Click Applications. 3 Click the program that is no...
... COMPUTER AND TO THE ELECTRICAL OUTLET The computer stops responding NOTICE: You might lose data if you are unable to 10 seconds until the computer turns off. See "Diagnostic Lights" on a floppy disk or CD. A program stops responding END THE PROGRAM - 1 Press simultaneously. 2 Click Applications. 3 Click the program that is no...

Owner's Manual
Page 46
...PROGRAM COMPATIBILITY WIZARD - If you are unable to 10 seconds until the computer turns off. The Program Compatibility Wizard configures a program so that it runs in an environment similar to non-Windows XP operating system environments. 1 Click the Start button, point to run the software...instructions on your computer. • Ensure that the device drivers do not conflict with the operating system installed on the screen. www.dell.com | support.dell.com A program is designed for information. • Ensure that the program is compatible with the program. • If necessary, ...
...PROGRAM COMPATIBILITY WIZARD - If you are unable to 10 seconds until the computer turns off. The Program Compatibility Wizard configures a program so that it runs in an environment similar to non-Windows XP operating system environments. 1 Click the Start button, point to run the software...instructions on your computer. • Ensure that the device drivers do not conflict with the operating system installed on the screen. www.dell.com | support.dell.com A program is designed for information. • Ensure that the program is compatible with the program. • If necessary, ...
Owner's Manual
Page 47
... OTHER MEMORY PROBLEMS - • Reseat the memory modules (see "Memory" on page 79) to the computer. 3 Shut down the computer (see "Turning Off Your Computer" on page 69), reconnect the mouse cable as shown on page 79) to ensure that you are not using to see "Installing... your computer is successfully communicating with the memory. • Ensure that your computer, see "Memory" on page 127. • Run the Dell Diagnostics (see "Dell Diagnostics" on page 58). IF YOU RECEIVE AN INSUFFICIENT MEMORY MESSAGE - • Save and close any open programs you begin any of memory...
... OTHER MEMORY PROBLEMS - • Reseat the memory modules (see "Memory" on page 79) to the computer. 3 Shut down the computer (see "Turning Off Your Computer" on page 69), reconnect the mouse cable as shown on page 79) to ensure that you are not using to see "Installing... your computer is successfully communicating with the memory. • Ensure that your computer, see "Memory" on page 127. • Run the Dell Diagnostics (see "Dell Diagnostics" on page 58). IF YOU RECEIVE AN INSUFFICIENT MEMORY MESSAGE - • Save and close any open programs you begin any of memory...

Owner's Manual
Page 48
... E C K Y O U R N E T W O R K S E T T I V E R - www.dell.com | support.dell.com RESTART THE COMPUTER - 1 Simultaneously press to display the Start menu. 2 Type u, press the keyboard arrow keys to highlight Shut down... or Turn Off, and then press . 3 After the computer turns off , that indicates no network communication exists. R E I N S T A L L T H E M O U S E D R I N G S - C H E C K T H E N E T W O R K C A B L E C O N N E C T O R - C H...
... E C K Y O U R N E T W O R K S E T T I V E R - www.dell.com | support.dell.com RESTART THE COMPUTER - 1 Simultaneously press to display the Start menu. 2 Type u, press the keyboard arrow keys to highlight Shut down... or Turn Off, and then press . 3 After the computer turns off , that indicates no network communication exists. R E I N S T A L L T H E M O U S E D R I N G S - C H E C K T H E N E T W O R K C A B L E C O N N E C T O R - C H...
Owner's Manual
Page 49
... See "Diagnostic Lights" on . Also bypass power protection devices, power strips, and power extension cables to verify that the computer turns on properly. • Ensure that the electrical outlet is working by testing it with another device, such as a lamp. •...follow the safety instructions located in standby mode. R U N T H E H A R D W A R E TR O U B L E S H O O T E R - The computer is either turned off or is turned on page 55. The computer is receiving electrical power, but an internal power problem might be malfunctioning or incorrectly installed. • Ensure that the...
... See "Diagnostic Lights" on . Also bypass power protection devices, power strips, and power extension cables to verify that the computer turns on properly. • Ensure that the electrical outlet is working by testing it with another device, such as a lamp. •...follow the safety instructions located in standby mode. R U N T H E H A R D W A R E TR O U B L E S H O O T E R - The computer is either turned off or is turned on page 55. The computer is receiving electrical power, but an internal power problem might be malfunctioning or incorrectly installed. • Ensure that the...

Owner's Manual
Page 50
...R I N T E R D O C U M E N T A T I V E R - ENSURE THAT THE PRINTER IS TURNED ON CHECK THE PRINTER CABLE CONNECTIONS - • See the printer documentation for instructions. 50 Solving Problems VERIFY THAT THE PRINTER IS RECOGNIZED BY ...Problems CAUTION: Before you need technical assistance for setup and troubleshooting information. TE S T T H E E L E C T R I N T E R F E R E N C E - www.dell.com | support.dell.com E L I M I N A T E I C A L O U T L E T - See the printer documentation for cable connection information. • Ensure that the Print to the printer and the computer....
...R I N T E R D O C U M E N T A T I V E R - ENSURE THAT THE PRINTER IS TURNED ON CHECK THE PRINTER CABLE CONNECTIONS - • See the printer documentation for instructions. 50 Solving Problems VERIFY THAT THE PRINTER IS RECOGNIZED BY ...Problems CAUTION: Before you need technical assistance for setup and troubleshooting information. TE S T T H E E L E C T R I N T E R F E R E N C E - www.dell.com | support.dell.com E L I M I N A T E I C A L O U T L E T - See the printer documentation for cable connection information. • Ensure that the Print to the printer and the computer....

Owner's Manual
Page 51
... to MP3 songs, ensure that the speakers are connected to the scanner and the computer. If you purchased a sound card, ensure that you did not turn the player volume down or off. Ensure that your scanner is listed, Windows recognizes the scanner. R E I N S T A L L T H E S C A N N E R D R I O N S - C H E C K T H E S P E A K E R C A B L E C O N N E C T I V E R - U N L O C K T H E S C A N N E R - Solving Problems 51 VERIFY THAT THE SCANNER IS RECOGNIZED...
... to MP3 songs, ensure that the speakers are connected to the scanner and the computer. If you purchased a sound card, ensure that you did not turn the player volume down or off. Ensure that your scanner is listed, Windows recognizes the scanner. R E I N S T A L L T H E S C A N N E R D R I O N S - C H E C K T H E S P E A K E R C A B L E C O N N E C T I V E R - U N L O C K T H E S C A N N E R - Solving Problems 51 VERIFY THAT THE SCANNER IS RECOGNIZED...

Owner's Manual
Page 52
...-click the speaker icon in the lower-right corner of your screen. Ensure that the volume is turned up and that the sound is working by testing it with the speakers. www.dell.com | support.dell.com E N S U R E T H A T T H E S U B W O O F E R A N D T H E S P E A K E R S A R E T U R N E D O N - See "Drivers" on page 64. No sound from the speakers is securely inserted into the headphone...
...-click the speaker icon in the lower-right corner of your screen. Ensure that the volume is turned up and that the sound is working by testing it with the speakers. www.dell.com | support.dell.com E N S U R E T H A T T H E S U B W O O F E R A N D T H E S P E A K E R S A R E T U R N E D O N - See "Drivers" on page 64. No sound from the speakers is securely inserted into the headphone...
Owner's Manual
Page 53
...the mouse. TE S T T H E E L E C T R I G H T S - C H E C K T H E D I A G N O S T I C L I C A L O U T L E T - If your speaker system includes a subwoofer, ensure that the monitor is turned on the setup diagram for your computer. • If you have missing pins.) C H E C K T H E M O N I T O R P O W E R L I N G S - M O V E T H E M O N I T O R - See the monitor documentation for troubleshooting ...to have the optional DVI adapter, ensure that it with another device, such as shown on . Turn off , firmly press the button to the correct card. • If you are using a ...
...the mouse. TE S T T H E E L E C T R I G H T S - C H E C K T H E D I A G N O S T I C L I C A L O U T L E T - If your speaker system includes a subwoofer, ensure that the monitor is turned on the setup diagram for your computer. • If you have missing pins.) C H E C K T H E M O N I T O R P O W E R L I N G S - M O V E T H E M O N I T O R - See the monitor documentation for troubleshooting ...to have the optional DVI adapter, ensure that it with another device, such as shown on . Turn off , firmly press the button to the correct card. • If you are using a ...

Owner's Manual
Page 58
... the test you see the Microsoft® Windows® desktop. Starting the Dell Diagnostics From the ResourceCD 1 Insert the ResourceCD. 2 Shut down your computer (see "Turning Off Your Computer" on page 39 and run the Dell Diagnostics before you see the Windows desktop. Then shut down your computer. 2...CD-ROM option from the menu that no diagnostics utility partition has been found, run (see "Dell Diagnostics Main Menu" on page 69). Then shut down and restart the computer (see "Turning Off Your Computer" on page 59). NOTE: The next steps change the boot sequence for technical...
... the test you see the Microsoft® Windows® desktop. Starting the Dell Diagnostics From the ResourceCD 1 Insert the ResourceCD. 2 Shut down your computer (see "Turning Off Your Computer" on page 39 and run the Dell Diagnostics before you see the Windows desktop. Then shut down your computer. 2...CD-ROM option from the menu that no diagnostics utility partition has been found, run (see "Dell Diagnostics Main Menu" on page 69). Then shut down and restart the computer (see "Turning Off Your Computer" on page 59). NOTE: The next steps change the boot sequence for technical...

