Owners Manual
Page 1
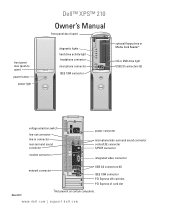
... front panel door (push to open) power button power light Dell™ XPS™ 210 Owner's Manual front panel door (open) diagnostic lights hard drive activity light headphone connector microphone connector IEEE 1394 connector optional floppy drive or Media Card Reader* CD or DVD drive light USB 2.0 connectors (2) voltage selection switch line-out connector line-in connector rear...
... front panel door (push to open) power button power light Dell™ XPS™ 210 Owner's Manual front panel door (open) diagnostic lights hard drive activity light headphone connector microphone connector IEEE 1394 connector optional floppy drive or Media Card Reader* CD or DVD drive light USB 2.0 connectors (2) voltage selection switch line-out connector line-in connector rear...
Owners Manual
Page 4
... feature in the Operating system 31 Hyper-Threading and Dual-Core Technology 31 2 Solving Problems 33 Troubleshooting Tips 33 Battery Problems 33 Drive Problems 34 CD and DVD drive problems 34 Hard drive problems 35 E-Mail, Modem, and Internet Problems 35 Error Messages 37 Media Card Reader Problems 38 IEEE 1394 Device Problems 38 Keyboard...
... feature in the Operating system 31 Hyper-Threading and Dual-Core Technology 31 2 Solving Problems 33 Troubleshooting Tips 33 Battery Problems 33 Drive Problems 34 CD and DVD drive problems 34 Hard drive problems 35 E-Mail, Modem, and Internet Problems 35 Error Messages 37 Media Card Reader Problems 38 IEEE 1394 Device Problems 38 Keyboard...
Owners Manual
Page 6
... Power Cable Connector 75 Connecting and Disconnecting Drive Cables 76 Hard Drive 76 Removing a Hard Drive 76 Installing a Hard Drive 78 CD/DVD Drive 81 Removing a CD/DVD Drive 81 Installing a CD/DVD Drive 83 Media Card Reader 85 Removing a Media Card Reader 85 Installing a Media Card Reader 87 Floppy Drive (Optional 89 Removing a Floppy Drive 89 Installing a Floppy Drive 91 Modem 93 Replacing the Modem...
... Power Cable Connector 75 Connecting and Disconnecting Drive Cables 76 Hard Drive 76 Removing a Hard Drive 76 Installing a Hard Drive 78 CD/DVD Drive 81 Removing a CD/DVD Drive 81 Installing a CD/DVD Drive 83 Media Card Reader 85 Removing a Media Card Reader 85 Installing a Media Card Reader 87 Floppy Drive (Optional 89 Removing a Floppy Drive 89 Installing a Floppy Drive 91 Modem 93 Replacing the Modem...
Owners Manual
Page 14
... USB connectors for voice or musical input into a sound or telephony program. The light might also be on when the computer reads data from the drive. 1 CD/DVD drive eject button 2 CD/DVD drive-activity light 3 USB 2.0 connectors (2) 4 IEEE 1394 connector 5 power button 6 power light 7 front-panel door release button 8 microphone connector 9 headphone connector 10 hard...
... USB connectors for voice or musical input into a sound or telephony program. The light might also be on when the computer reads data from the drive. 1 CD/DVD drive eject button 2 CD/DVD drive-activity light 3 USB 2.0 connectors (2) 4 IEEE 1394 connector 5 power button 6 power light 7 front-panel door release button 8 microphone connector 9 headphone connector 10 hard...
Owners Manual
Page 25
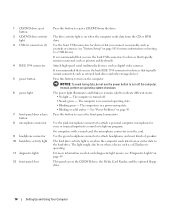
... to make an exact copy of CD or DVD drives offered by Dell may not read DVD+/-R, DVD+/-RW and DVD+R DL (dual layer) media, but cannot write to and may vary by 600 pixels. 5 Click the drop-down to increase or decrease the volume. NOTE: Most commercial DVDs have a CD-RW/DVD combo drive and you have copyright protection and...
... to make an exact copy of CD or DVD drives offered by Dell may not read DVD+/-R, DVD+/-RW and DVD+R DL (dual layer) media, but cannot write to and may vary by 600 pixels. 5 Click the drop-down to increase or decrease the volume. NOTE: Most commercial DVDs have a CD-RW/DVD combo drive and you have copyright protection and...

Owners Manual
Page 26
...source CD or DVD to both CD and DVD recording media. Using Blank CDs and DVDs CD-RW drives can write to CD recording media only (including high-speed CD-RW media) while DVD-writable drives can be able to write to that disc again if the disc is reached, you have one CD/DVD drive, ensure...have finished copying the source CD or DVD, the CD or DVD that you have created automatically ejects. When prompted, insert a blank CD or DVD into the drive and click OK. • If you have two CD/DVD drives, select the drive into which you have inserted your computer hard drive. 1 Click the Start ...
...source CD or DVD to both CD and DVD recording media. Using Blank CDs and DVDs CD-RW drives can write to CD recording media only (including high-speed CD-RW media) while DVD-writable drives can be able to write to that disc again if the disc is reached, you have one CD/DVD drive, ensure...have finished copying the source CD or DVD, the CD or DVD that you have created automatically ejects. When prompted, insert a blank CD or DVD into the drive and click OK. • If you have two CD/DVD drives, select the drive into which you have inserted your computer hard drive. 1 Click the Start ...

Owners Manual
Page 51
...a graphics card) and restarting the computer (see "Cards" on page 70). 2 If the problem persists, reinstall the card that all hard drive and CD/DVD drive cables are properly connected to the system board (see "System Board Components" on page 65). • If there is an error message on ...your computer. • If the problem persists, contact Dell (see "Contacting Dell" on page 112). For additional information see "Using Intel® Viiv™ ...
...a graphics card) and restarting the computer (see "Cards" on page 70). 2 If the problem persists, reinstall the card that all hard drive and CD/DVD drive cables are properly connected to the system board (see "System Board Components" on page 65). • If there is an error message on ...your computer. • If the problem persists, contact Dell (see "Contacting Dell" on page 112). For additional information see "Using Intel® Viiv™ ...

Owners Manual
Page 64
CAUTION: To guard against electrical shock, always unplug your computer from the electrical outlet before opening the cover. 2 1 3 4 7 6 5 1 drive release latch 4 hard drive 7 front-panel door 2 CD/DVD drive 5 heat sink assembly 3 power supply and fan 6 power button 64 Removing and Installing Parts Inside View of Your Computer CAUTION: Before you begin any of the procedures in this section, follow the safety instructions located in the Product Information Guide.
CAUTION: To guard against electrical shock, always unplug your computer from the electrical outlet before opening the cover. 2 1 3 4 7 6 5 1 drive release latch 4 hard drive 7 front-panel door 2 CD/DVD drive 5 heat sink assembly 3 power supply and fan 6 power button 64 Removing and Installing Parts Inside View of Your Computer CAUTION: Before you begin any of the procedures in this section, follow the safety instructions located in the Product Information Guide.
Owners Manual
Page 68
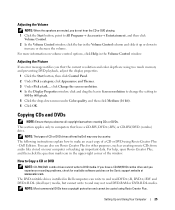
... in "Before You Begin" on page 61. 2 Remove the CD/DVD drive (see "Removing a CD/DVD Drive" on page 81). 3 Remove the optional Media Card Reader or optional floppy drive, (see "Removing a Media Card Reader" on page 85 or "Removing a Floppy Drive" on page 89) if installed. 4 Press out the securing clip...supports a maximum of 4 GB of memory when you use two 2-GB DIMMs. Current operating systems, such as Microsoft® Windows® XP, can do so by computer memory. however, the amount of memory available to components inside your computer, discharge static electricity from your computer...
... in "Before You Begin" on page 61. 2 Remove the CD/DVD drive (see "Removing a CD/DVD Drive" on page 81). 3 Remove the optional Media Card Reader or optional floppy drive, (see "Removing a Media Card Reader" on page 85 or "Removing a Floppy Drive" on page 89) if installed. 4 Press out the securing clip...supports a maximum of 4 GB of memory when you use two 2-GB DIMMs. Current operating systems, such as Microsoft® Windows® XP, can do so by computer memory. however, the amount of memory available to components inside your computer, discharge static electricity from your computer...

Owners Manual
Page 74
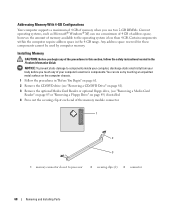
... then ease it out of these devices: • One SATA (serial ATA) drive • One FlexBay drive (optional floppy drive or Media Card Reader) • One CD or DVD drive 2 3 1 1 FlexBay for optional floppy drive or Media Card Reader (under CD/DVD drive) 2 CD/DVD drive 3 hard drive Connect a SATA optical drive to the connector labeled "SATA1" on the system board. 74 Removing and Installing...
... then ease it out of these devices: • One SATA (serial ATA) drive • One FlexBay drive (optional floppy drive or Media Card Reader) • One CD or DVD drive 2 3 1 1 FlexBay for optional floppy drive or Media Card Reader (under CD/DVD drive) 2 CD/DVD drive 3 hard drive Connect a SATA optical drive to the connector labeled "SATA1" on the system board. 74 Removing and Installing...

Owners Manual
Page 81
... on its side so that the system board is on the drive release latch and slide the drive towards the back of the computer. CD/DVD Drive CAUTION: Before you begin any of the computer by the drive cables. Doing so may cause damage to cables and the cable...the attached interface cable, lift the drive away from the electrical outlet before removing the computer cover. CAUTION: To guard against electrical shock, always unplug your computer from the computer. 2 1 1 drive release latch 2 CD/DVD drive Removing and Installing Parts 81 Removing a CD/DVD Drive 1 Follow the procedures in the...
... on its side so that the system board is on the drive release latch and slide the drive towards the back of the computer. CD/DVD Drive CAUTION: Before you begin any of the computer by the drive cables. Doing so may cause damage to cables and the cable...the attached interface cable, lift the drive away from the electrical outlet before removing the computer cover. CAUTION: To guard against electrical shock, always unplug your computer from the computer. 2 1 1 drive release latch 2 CD/DVD drive Removing and Installing Parts 81 Removing a CD/DVD Drive 1 Follow the procedures in the...

Owners Manual
Page 82
5 Disconnect the data cable from the system board connector. 6 Disconnect the power cable and data cable from the back of the drive. 5 1 4 2 3 1 data cable 2 power cable 4 CD/DVD drive 5 CD/DVD drive bracket 3 system board connector 82 Removing and Installing Parts
5 Disconnect the data cable from the system board connector. 6 Disconnect the power cable and data cable from the back of the drive. 5 1 4 2 3 1 data cable 2 power cable 4 CD/DVD drive 5 CD/DVD drive bracket 3 system board connector 82 Removing and Installing Parts

Owners Manual
Page 83
Installing a CD/DVD Drive 1 Unpack the drive and prepare it for your computer. 2 Connect the power and data cables to the drive. 1 2 3 1 data cable 2 power cable 3 system board connector 3 Connect the data cable to verify that the drive is configured for installation. Removing and Installing Parts 83 Check the documentation that accompanied the drive to the system board connector on the system board.
Installing a CD/DVD Drive 1 Unpack the drive and prepare it for your computer. 2 Connect the power and data cables to the drive. 1 2 3 1 data cable 2 power cable 3 system board connector 3 Connect the data cable to verify that the drive is configured for installation. Removing and Installing Parts 83 Check the documentation that accompanied the drive to the system board connector on the system board.

Owners Manual
Page 84
4 Gently position the drive until it clicks into place. 2 1 1 CD/DVD drive 2 CD/DVD drive bracket 5 Check all cable connections, and fold cables out of the way to provide airflow for the fan and cooling vents. 6 Replace the computer cover ... 8 See the documentation that came with the drive for instructions on installing any software required for drive operation. 9 Enter system setup (see "System Setup" on page 101) and select the appropriate Drive option. 10 Verify that your computer works correctly by running the Dell Diagnostics (see "Dell Diagnostics" on page 52). 84 Removing and ...
4 Gently position the drive until it clicks into place. 2 1 1 CD/DVD drive 2 CD/DVD drive bracket 5 Check all cable connections, and fold cables out of the way to provide airflow for the fan and cooling vents. 6 Replace the computer cover ... 8 See the documentation that came with the drive for instructions on installing any software required for drive operation. 9 Enter system setup (see "System Setup" on page 101) and select the appropriate Drive option. 10 Verify that your computer works correctly by running the Dell Diagnostics (see "Dell Diagnostics" on page 52). 84 Removing and ...
Owners Manual
Page 85
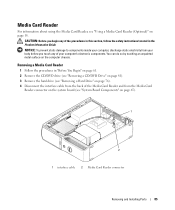
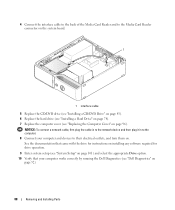
... of the procedures in this section, follow the safety instructions located in "Before You Begin" on page 61. 2 Remove the CD/DVD drive (see "Removing a CD/DVD Drive" on page 81). 3 Remove the hard drive (see "Removing a Hard Drive" on page 65). 1 2 1 interface cable 2 Media Card Reader connector Removing and Installing Parts 85 Media Card Reader For information...
... of the procedures in this section, follow the safety instructions located in "Before You Begin" on page 61. 2 Remove the CD/DVD drive (see "Removing a CD/DVD Drive" on page 81). 3 Remove the hard drive (see "Removing a Hard Drive" on page 65). 1 2 1 interface cable 2 Media Card Reader connector Removing and Installing Parts 85 Media Card Reader For information...
Owners Manual
Page 88
.... 8 Connect your computer works correctly by running the Dell Diagnostics (see "Replacing the Computer Cover" on page 96). See the documentation that came with the drive for instructions on installing any software required for drive operation. 9 Enter system setup (see "System Setup"... Card Reader connector on the system board. 1 1 interface cable 5 Replace the CD/DVD drive (see "Installing a CD/DVD Drive" on page 83). 6 Replace the hard drive (see "Installing a Hard Drive" on page 78). 7 Replace the computer cover (see "Dell Diagnostics" on page 52). 88 Removing and Installing Parts
.... 8 Connect your computer works correctly by running the Dell Diagnostics (see "Replacing the Computer Cover" on page 96). See the documentation that came with the drive for instructions on installing any software required for drive operation. 9 Enter system setup (see "System Setup"... Card Reader connector on the system board. 1 1 interface cable 5 Replace the CD/DVD drive (see "Installing a CD/DVD Drive" on page 83). 6 Replace the hard drive (see "Installing a Hard Drive" on page 78). 7 Replace the computer cover (see "Dell Diagnostics" on page 52). 88 Removing and Installing Parts

Owners Manual
Page 89
... procedures in this section, follow the safety instructions located in "Before You Begin" on page 61. 2 Remove the CD/DVD drive (see "Removing a CD/DVD Drive" on page 81). 3 Pull up on the drive release latch and slide the drive toward the back of the computer. 4 Carefully, so as not to damage the attached interface cable, lift the...
... procedures in this section, follow the safety instructions located in "Before You Begin" on page 61. 2 Remove the CD/DVD drive (see "Removing a CD/DVD Drive" on page 81). 3 Pull up on the drive release latch and slide the drive toward the back of the computer. 4 Carefully, so as not to damage the attached interface cable, lift the...

Owners Manual
Page 92
.... 8 Enter system setup (see "System Setup" on page 101) and select the appropriate Diskette Drive option. 9 Verify that came with the drive for instructions on installing any software required for the fan and cooling vents. 5 Replace the CD/DVD drive (see "Installing a CD/DVD Drive" on page 83). 6 Replace the computer cover (see "Replacing the Computer Cover" on..., first plug the cable in to the network device and then plug it in to the computer. 7 Connect your computer works correctly by running the Dell Diagnostics (see "Dell Diagnostics" on page 96).
.... 8 Enter system setup (see "System Setup" on page 101) and select the appropriate Diskette Drive option. 9 Verify that came with the drive for instructions on installing any software required for the fan and cooling vents. 5 Replace the CD/DVD drive (see "Installing a CD/DVD Drive" on page 83). 6 Replace the computer cover (see "Replacing the Computer Cover" on..., first plug the cable in to the network device and then plug it in to the computer. 7 Connect your computer works correctly by running the Dell Diagnostics (see "Dell Diagnostics" on page 96).

Owners Manual
Page 110
... screen-cleaning tissue or solution suitable for restoration of the computer and all Dell-installed hardware. If you notice problems, such as shipped from the center to clean the lens in the drive. Never touch the lens in the CD/DVD drive, and follow the instructions that come with the playback quality of water and...
... screen-cleaning tissue or solution suitable for restoration of the computer and all Dell-installed hardware. If you notice problems, such as shipped from the center to clean the lens in the drive. Never touch the lens in the CD/DVD drive, and follow the instructions that come with the playback quality of water and...

Owners Manual
Page 133
... C cards installing, 71 removing, 74 slots, 70 types supported, 70 CD/DVD drive problems, 34 CD/DVD-RW drive problems, 35 CDs, 25 operating system, 12 playing, 23 Check Disk, 35 CMOS settings ...Dell, 52 lights, 49 display. Index A audio. See monitor documentation End User License Agreement, 9 ergonomics, 9 online, 11 Product Information Guide, 9 regulatory, 9 safety, 9 warranty, 9 drivers about, 54 identifying, 54 Drivers and Utilities CD, 9 drives hard drive, 76 installing floppy, 91 installing hard drive, 78 problems, 34 removing floppy, 89 removing hard drive, 76 serial ATA, 76 DVD drive...
... C cards installing, 71 removing, 74 slots, 70 types supported, 70 CD/DVD drive problems, 34 CD/DVD-RW drive problems, 35 CDs, 25 operating system, 12 playing, 23 Check Disk, 35 CMOS settings ...Dell, 52 lights, 49 display. Index A audio. See monitor documentation End User License Agreement, 9 ergonomics, 9 online, 11 Product Information Guide, 9 regulatory, 9 safety, 9 warranty, 9 drivers about, 54 identifying, 54 Drivers and Utilities CD, 9 drives hard drive, 76 installing floppy, 91 installing hard drive, 78 problems, 34 removing floppy, 89 removing hard drive, 76 serial ATA, 76 DVD drive...


