

Service Manual
Page 12
..."Installing a PCI Express Card." If you begin any of the procedures in this section, follow the procedures in the Product Information Guide. Your Dell™ computer provides the following slots for the card from the operating system. Right-click the My Computer icon and click Properties. 9. Grasp ...you are installing or replacing a card, follow the safety instructions located in the next section. If you are replacing a card, remove the current driver for PCI and PCI Express cards: l Four PCI card slots l One PCI Express x16 card slot l One PCI Express x1 card slot ...
..."Installing a PCI Express Card." If you begin any of the procedures in this section, follow the procedures in the Product Information Guide. Your Dell™ computer provides the following slots for the card from the operating system. Right-click the My Computer icon and click Properties. 9. Grasp ...you are installing or replacing a card, follow the safety instructions located in the next section. If you are replacing a card, remove the current driver for PCI and PCI Express cards: l Four PCI card slots l One PCI Express x16 card slot l One PCI Express x1 card slot ...

Service Manual
Page 14
...Interface Card to the integrated connector on . 11. Follow the procedures in the empty card-slot opening. If you need a filler bracket, contact Dell. NOTE: Installing filler brackets over empty card-slot openings is necessary to electrical outlets, and turn them on. 8. Close the computer cover, ...the network wall jack and then plug it out of your computer. 6. Press the lever on the back panel. 12. Remove the card's driver from closing properly or cause damage to the integrated connector on the card retention arm and raise the retention arm. 3. Removing a PCI Card 1....
...Interface Card to the integrated connector on . 11. Follow the procedures in the empty card-slot opening. If you need a filler bracket, contact Dell. NOTE: Installing filler brackets over empty card-slot openings is necessary to electrical outlets, and turn them on. 8. Close the computer cover, ...the network wall jack and then plug it out of your computer. 6. Press the lever on the back panel. 12. Remove the card's driver from closing properly or cause damage to the integrated connector on the card retention arm and raise the retention arm. 3. Removing a PCI Card 1....

Service Manual
Page 15
... cables connected to create a card-slot opening. Prepare the card for the card from the operating system. If you are replacing a card, remove the current driver for installation. Gently pull the securing tab, grasp the card by pressing the tab and pulling up on the card retention arm and raise the...
... cables connected to create a card-slot opening. Prepare the card for the card from the operating system. If you are replacing a card, remove the current driver for installation. Gently pull the securing tab, grasp the card by pressing the tab and pulling up on the card retention arm and raise the...

Service Manual
Page 17
...and then plug it into place, securing the card(s) in the card documentation. Press the lever on the computer back panel. 11. Remove the card's driver from the operating system. 10. Drives Your computer supports a combination of its top corners, and then ease it into the computer. 8. Do not ... pull back the securing tab, grasp the card by pressing the tab and pulling up on the top. 5. If you need a filler bracket, contact Dell. NOTE: Installing filler brackets over empty card-slot openings is necessary to the add-in network connector: a. The brackets also keep dust and dirt out...
...and then plug it into place, securing the card(s) in the card documentation. Press the lever on the computer back panel. 11. Remove the card's driver from the operating system. 10. Drives Your computer supports a combination of its top corners, and then ease it into the computer. 8. Do not ... pull back the securing tab, grasp the card by pressing the tab and pulling up on the top. 5. If you need a filler bracket, contact Dell. NOTE: Installing filler brackets over empty card-slot openings is necessary to the add-in network connector: a. The brackets also keep dust and dirt out...

Owner's Manual
Page 5
4 Advanced Troubleshooting Diagnostic Lights 47 Dell Diagnostics 50 When to Use the Dell Diagnostics 50 Drivers 53 What Is a Driver 53 Identifying Drivers 53 Reinstalling Drivers 54 Using Microsoft® Windows® XP System Restore 55 Creating a Restore Point 56 Restoring the Computer to an Earlier Operating State 56 Undoing the Last System Restore 56 Resolving Software and...
4 Advanced Troubleshooting Diagnostic Lights 47 Dell Diagnostics 50 When to Use the Dell Diagnostics 50 Drivers 53 What Is a Driver 53 Identifying Drivers 53 Reinstalling Drivers 54 Using Microsoft® Windows® XP System Restore 55 Creating a Restore Point 56 Restoring the Computer to an Earlier Operating State 56 Undoing the Last System Restore 56 Resolving Software and...

Owner's Manual
Page 9
...• How to remove and install parts • Technical specifications • How to contact Dell Dimension Owner's Manual NOTE: This document is available as a PDF at support.dell.com. only) • Additional documentation, tools, troubleshooting information, and links to online support ...resources • A diagnostic program for my computer • Drivers for technicians or experienced users. • Additional ...
...• How to remove and install parts • Technical specifications • How to contact Dell Dimension Owner's Manual NOTE: This document is available as a PDF at support.dell.com. only) • Additional documentation, tools, troubleshooting information, and links to online support ...resources • A diagnostic program for my computer • Drivers for technicians or experienced users. • Additional ...
Owner's Manual
Page 11
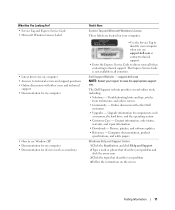
What Are You Looking For? • Service Tag and Express Service Code • Microsoft Windows License Label • Latest drivers for my computer • Answers to technical service and support questions • Online discussions with other users and technical support • ... instructions on your computer. •Use the Service Tag to identify your computer when you use support.dell.com or contact technical support. • Enter the Express Service Code to use Windows XP • Documentation for my computer • Documentation for my computer • How to direct your...
What Are You Looking For? • Service Tag and Express Service Code • Microsoft Windows License Label • Latest drivers for my computer • Answers to technical service and support questions • Online discussions with other users and technical support • ... instructions on your computer. •Use the Service Tag to identify your computer when you use support.dell.com or contact technical support. • Enter the Express Service Code to use Windows XP • Documentation for my computer • Documentation for my computer • How to direct your...

Owner's Manual
Page 12
See "Reinstalling Microsoft® Windows® XP" on the operating system you reinstall your operating system, use the Operating System CD. After you ordered. 12 Finding Information NOTE: The color of your CD varies based on page 57. To reinstall your operating system, use the ResourceCD to reinstall my operating system Find it Here Operating System CD The operating system is already installed on your computer. www.dell.com | support.dell.com What Are You Looking For? • How to reinstall drivers for the devices that came with your computer.
See "Reinstalling Microsoft® Windows® XP" on the operating system you reinstall your operating system, use the Operating System CD. After you ordered. 12 Finding Information NOTE: The color of your CD varies based on page 57. To reinstall your operating system, use the ResourceCD to reinstall my operating system Find it Here Operating System CD The operating system is already installed on your computer. www.dell.com | support.dell.com What Are You Looking For? • How to reinstall drivers for the devices that came with your computer.

Owner's Manual
Page 37
A program crashes repeatedly NOTE: Software usually includes installation instructions in an environment similar to nonWindows XP operating system environments. 1 Click the Start button, point to 10 seconds until the computer turns off. Other software problems CHECK ... INFORMATION - • Ensure that your computer. • Ensure that the program is installed and configured properly. • Verify that the device drivers do not conflict with the operating system installed on a floppy disk or CD. The Program Compatibility Wizard configures a program so it runs in its...
A program crashes repeatedly NOTE: Software usually includes installation instructions in an environment similar to nonWindows XP operating system environments. 1 Click the Start button, point to 10 seconds until the computer turns off. Other software problems CHECK ... INFORMATION - • Ensure that your computer. • Ensure that the program is installed and configured properly. • Verify that the device drivers do not conflict with the operating system installed on a floppy disk or CD. The Program Compatibility Wizard configures a program so it runs in its...

Owner's Manual
Page 39
... the link integrity light is firmly inserted into both the network connector on the back of the computer and the network jack. REINSTALL THE MOUSE DRIVER - RUN THE HARDWARE TROUBLESHOOTER - See page 57. Network Problems CAUTION: Before you begin any of network lights, see "Connectors" on the setup diagram for your...
... the link integrity light is firmly inserted into both the network connector on the back of the computer and the network jack. REINSTALL THE MOUSE DRIVER - RUN THE HARDWARE TROUBLESHOOTER - See page 57. Network Problems CAUTION: Before you begin any of network lights, see "Connectors" on the setup diagram for your...

Owner's Manual
Page 41
... the Product Information Guide. For a parallel printer, ensure that the printer cables are securely connected to the following port(s): setting is USB. REINSTALL THE PRINTER DRIVER - CHECK THE SCANNER DOCUMENTATION - See the printer documentation for instructions. Solving Problems 41 Printer Problems CAUTION: Before you begin any of the procedures in this...
... the Product Information Guide. For a parallel printer, ensure that the printer cables are securely connected to the following port(s): setting is USB. REINSTALL THE PRINTER DRIVER - CHECK THE SCANNER DOCUMENTATION - See the printer documentation for instructions. Solving Problems 41 Printer Problems CAUTION: Before you begin any of the procedures in this...

Owner's Manual
Page 42
... Click the Start button, click Control Panel, and then click Printers and Other Hardware. 2 Click Scanners and Cameras. REINSTALL THE SCANNER DRIVER - See the scanner documentation for cable connection information. • Ensure that your speakers have been listening to MP3 songs, ensure that the... the sound is automatically disabled when headphones are connected to the computer's front-panel headphone connector. 42 Solving Problems www.dell.com | support.dell.com UNLOCK THE SCANNER - If you begin any of your scanner is turned up and that the speakers are connected ...
... Click the Start button, click Control Panel, and then click Printers and Other Hardware. 2 Click Scanners and Cameras. REINSTALL THE SCANNER DRIVER - See the scanner documentation for cable connection information. • Ensure that your speakers have been listening to MP3 songs, ensure that the... the sound is automatically disabled when headphones are connected to the computer's front-panel headphone connector. 42 Solving Problems www.dell.com | support.dell.com UNLOCK THE SCANNER - If you begin any of your scanner is turned up and that the speakers are connected ...

Owner's Manual
Page 43
See page 53. See page 57. Solving Problems 43 RUN THE SPEAKER DIAGNOSTICS REINSTALL THE SOUND DRIVER - Turn off nearby fans, fluorescent lights, or halogen lamps to check for interference. RUN THE HARDWARE TROUBLESHOOTER - Ensure that the sound is not muted. ADJUST ...
See page 53. See page 57. Solving Problems 43 RUN THE SPEAKER DIAGNOSTICS REINSTALL THE SOUND DRIVER - Turn off nearby fans, fluorescent lights, or halogen lamps to check for interference. RUN THE HARDWARE TROUBLESHOOTER - Ensure that the sound is not muted. ADJUST ...

Owner's Manual
Page 53
... are not on your computer or all devices attached to the Main Menu screen. All devices require a driver program. Each device has its driver recognizes. NOTICE: The Dell Dimension ResourceCD may need to you experience a problem with required drivers already installed-no further installation or configuration is the source of the screen. You may contain...
... are not on your computer or all devices attached to the Main Menu screen. All devices require a driver program. Each device has its driver recognizes. NOTICE: The Dell Dimension ResourceCD may need to you experience a problem with required drivers already installed-no further installation or configuration is the source of the screen. You may contain...
Owner's Manual
Page 54
... the device for Dell™ computers. Using Windows XP Device Driver Rollback If a problem occurs on your computer after you install or update a driver, use System Restore to return your Dell Dimension ResourceCD provide approved drivers for which the new driver was installed and click Properties. 7 Click the Drivers tab. 8 Click Roll Back Driver. Reinstalling Drivers NOTICE: The Dell Support website at...
... the device for Dell™ computers. Using Windows XP Device Driver Rollback If a problem occurs on your computer after you install or update a driver, use System Restore to return your Dell Dimension ResourceCD provide approved drivers for which the new driver was installed and click Properties. 7 Click the Drivers tab. 8 Click Roll Back Driver. Reinstalling Drivers NOTICE: The Dell Support website at...

Owner's Manual
Page 55
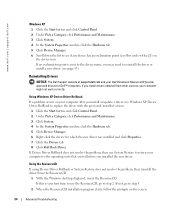
...174; Windows® XP System Restore The Microsoft® Windows® XP operating system provides System Restore to allow you to return your system window. 6 Click the driver that you previously extracted the driver files. 9 When the name of the appropriate driver appears, click Next. ... reinsert the ResourceCD. 5 At the Welcome Dell System Owner screen, click Next. Manually Reinstalling Drivers 1 After extracting the driver files to your hard drive as described in your operating system. If a particular driver is not listed, then that driver is detecting hardware in the previous section,...
...174; Windows® XP System Restore The Microsoft® Windows® XP operating system provides System Restore to allow you to return your system window. 6 Click the driver that you previously extracted the driver files. 9 When the name of the appropriate driver appears, click Next. ... reinsert the ResourceCD. 5 At the Welcome Dell System Owner screen, click Next. Manually Reinstalling Drivers 1 After extracting the driver files to your hard drive as described in your operating system. If a particular driver is not listed, then that driver is detecting hardware in the previous section,...

Owner's Manual
Page 56
www.dell.com | support.dell.com Creating a Restore Point 1 Click the Start button and click Help and Support. 2 Click...that is automatically selected. Restoring the Computer to restore your computer. If that allows you install a device driver, use System Restore. If two or more restore points are available, click the restore point that restore point is unsuccessful,... then use Device Driver Rollback (see page 54) to see and select restore points. To change the restore point, you can undo...
www.dell.com | support.dell.com Creating a Restore Point 1 Click the Start button and click Help and Support. 2 Click...that is automatically selected. Restoring the Computer to restore your computer. If that allows you install a device driver, use System Restore. If two or more restore points are available, click the restore point that restore point is unsuccessful,... then use Device Driver Rollback (see page 54) to see and select restore points. To change the restore point, you can undo...

Owner's Manual
Page 57
... Hardware Troubleshooter list, click I need to correct a problem with a newly installed driver, first try using Windows XP Device Driver Rollback (see page 54). Enabling System Restore If you reinstall Windows XP with less than 200 MB of free hard-disk space available, System Restore is ...detected but incorrectly configured, you reinstall Windows XP. For conventional hard drive configurations...
... Hardware Troubleshooter list, click I need to correct a problem with a newly installed driver, first try using Windows XP Device Driver Rollback (see page 54). Enabling System Restore If you reinstall Windows XP with less than 200 MB of free hard-disk space available, System Restore is ...detected but incorrectly configured, you reinstall Windows XP. For conventional hard drive configurations...

Owner's Manual
Page 58
... that were installed during assembly of Windows XP, press to select that option. 58 Advanced Troubleshooting Reinstalling Windows XP To reinstall Windows XP, perform all the steps in the following items: • Dell™ Operating System CD • Dell ResourceCD NOTE: The ResourceCD contains drivers that came with Windows XP, disable any open programs. 2 Insert the Operating...
... that were installed during assembly of Windows XP, press to select that option. 58 Advanced Troubleshooting Reinstalling Windows XP To reinstall Windows XP, perform all the steps in the following items: • Dell™ Operating System CD • Dell ResourceCD NOTE: The ResourceCD contains drivers that came with Windows XP, disable any open programs. 2 Insert the Operating...

Owner's Manual
Page 60
www.dell.com | support.dell.com 19 Reinstall the appropriate drivers with the ResourceCD (see page 54). 20 Reinstall your virus protection software. 21 Reinstall your programs. NOTE: To reinstall and activate your Microsoft Office or Microsoft Works Suite programs, you need the Product Key number located on the back of the Microsoft Office or Microsoft Works Suite CD sleeve. 60 Advanced Troubleshooting
www.dell.com | support.dell.com 19 Reinstall the appropriate drivers with the ResourceCD (see page 54). 20 Reinstall your virus protection software. 21 Reinstall your programs. NOTE: To reinstall and activate your Microsoft Office or Microsoft Works Suite programs, you need the Product Key number located on the back of the Microsoft Office or Microsoft Works Suite CD sleeve. 60 Advanced Troubleshooting


