User's Guide
Page 3
...supplies 13 Replacing ink cartridges...13 Ordering ink cartridges...14 Recycling Dell products...15 Using the printer control panel buttons and menus 16 Using the printer control panel...16 Using the printer menus...18 Changing temporary settings into new default settings 19 ...Eco-Mode...21 Using the printer software 23 Minimum system requirements...23 Using the Windows printer software...23 Updating the printer software (Windows only)...25 Reinstalling the printer software...25 Loading paper and original documents 26 Loading paper...26 Saving paper default settings...28 Loading original...
...supplies 13 Replacing ink cartridges...13 Ordering ink cartridges...14 Recycling Dell products...15 Using the printer control panel buttons and menus 16 Using the printer control panel...16 Using the printer menus...18 Changing temporary settings into new default settings 19 ...Eco-Mode...21 Using the printer software 23 Minimum system requirements...23 Using the Windows printer software...23 Updating the printer software (Windows only)...25 Reinstalling the printer software...25 Loading paper and original documents 26 Loading paper...26 Saving paper default settings...28 Loading original...

User's Guide
Page 4
...paper (duplexing) manually 33 Working with photos...35 Printing from a Bluetooth-enabled device...40 Managing print jobs...43 Copying 45 Tips for copying...45 Making copies...45 Copying photos...46 Enlarging or reducing images...46 Adjusting copy quality...46 Making a copy lighter or darker...47 Collating copies using the printer... control panel...47 Repeating an image on one page...48 Copying multiple pages on one sheet...48 Making a duplex copy manually...48 Canceling copy jobs...49 Scanning 50 ...
...paper (duplexing) manually 33 Working with photos...35 Printing from a Bluetooth-enabled device...40 Managing print jobs...43 Copying 45 Tips for copying...45 Making copies...45 Copying photos...46 Enlarging or reducing images...46 Adjusting copy quality...46 Making a copy lighter or darker...47 Collating copies using the printer... control panel...47 Repeating an image on one page...48 Copying multiple pages on one sheet...48 Making a duplex copy manually...48 Canceling copy jobs...49 Scanning 50 ...
User's Guide
Page 8
..., application, or flash drive for presentation. • Use recycled paper. To start using less ink than one of your printer's environmental impact We are committed to print multiple pages on both sides of the paper. Wireless/network printers allow you find something we do, and your suggestions help you... get back on our Web site. And if you to perform basic tasks. Minimizing your printer, read the User's Guide carefully, and make sure you print on one side of the paper. Conserving energy • Eco-Mode. Eco-Mode is left idle for printing documents that ...
..., application, or flash drive for presentation. • Use recycled paper. To start using less ink than one of your printer's environmental impact We are committed to print multiple pages on both sides of the paper. Wireless/network printers allow you find something we do, and your suggestions help you... get back on our Web site. And if you to perform basic tasks. Minimizing your printer, read the User's Guide carefully, and make sure you print on one side of the paper. Conserving energy • Eco-Mode. Eco-Mode is left idle for printing documents that ...
User's Guide
Page 9
... software CD. For updates, check our Web site at support.dell.com. Initial setup instructions: • Connecting the printer • Installing the printer software Find it away. • Recycle paper from discarded print jobs. • Use recycled paper. Additional setup and instructions for and maintaining the printer • Troubleshooting and solving problems User's Guide The User...
... software CD. For updates, check our Web site at support.dell.com. Initial setup instructions: • Connecting the printer • Installing the printer software Find it away. • Recycle paper from discarded print jobs. • Use recycled paper. Additional setup and instructions for and maintaining the printer • Troubleshooting and solving problems User's Guide The User...

User's Guide
Page 11
..., USB Bluetooth adapter, or a flash drive to the printer. 6 Paper exit tray Hold paper as it exits. 7 Printer control panel Operate the printer. 8 Top cover Access the scanner glass. 9 Paper feed guard Prevent items from falling into the paper slot. 10 Paper guides Keep paper straight when feeding. About your printer 11 The light blinks to indicate that a memory card...
..., USB Bluetooth adapter, or a flash drive to the printer. 6 Paper exit tray Hold paper as it exits. 7 Printer control panel Operate the printer. 8 Top cover Access the scanner glass. 9 Paper feed guard Prevent items from falling into the paper slot. 10 Paper guides Keep paper straight when feeding. About your printer 11 The light blinks to indicate that a memory card...

User's Guide
Page 12
1 6 2 5 3 4 Use the To 1 Scanner glass Scan and copy photos and documents. 2 Security slot Install an anti-theft cable on your printer 12 Warning-Potential Damage: Do not touch the USB port except when plugging in or removing a USB cable or installation cable. 5 Printhead Install, replace, or remove ink cartridges. 6 Scanner unit • Access the ink cartridges and printhead. • Remove paper jams. About your printer. 3 Power supply with port Connect the printer to a power source. 4 USB port Connect the printer to a computer using a USB cable.
1 6 2 5 3 4 Use the To 1 Scanner glass Scan and copy photos and documents. 2 Security slot Install an anti-theft cable on your printer 12 Warning-Potential Damage: Do not touch the USB port except when plugging in or removing a USB cable or installation cable. 5 Printhead Install, replace, or remove ink cartridges. 6 Scanner unit • Access the ink cartridges and printhead. • Remove paper jams. About your printer. 3 Power supply with port Connect the printer to a power source. 4 USB port Connect the printer to a computer using a USB cable.

User's Guide
Page 17
...Photo button lights are off when this button is turned off in Power Saver mode. • Printer status • Messages • Menus 9 Select button • Select menu options. • Save settings. • Feed or eject paper. Use the: To 7 Cancel button • Cancel a print, copy, or scan job ... Print menu to the top level of a menu. • Exit from one menu level to default settings. 8 Display View: Note: The display is selected. Press and hold for 3 seconds to feed or eject paper from the printer. 10 Arrow buttons • Choose a menu or submenu item that appears ...
...Photo button lights are off when this button is turned off in Power Saver mode. • Printer status • Messages • Menus 9 Select button • Select menu options. • Save settings. • Feed or eject paper. Use the: To 7 Cancel button • Cancel a print, copy, or scan job ... Print menu to the top level of a menu. • Exit from one menu level to default settings. 8 Display View: Note: The display is selected. Press and hold for 3 seconds to feed or eject paper from the printer. 10 Arrow buttons • Choose a menu or submenu item that appears ...

User's Guide
Page 18
... Print • Print - Date Range - Photo Number • Paper Size - Using the printer control panel buttons and menus 18 Original Size • Network - Quality - Antique Brown • Paper Size • Photo Size • Paper Type • Layout • Quality Proof Sheet • Print...- None - File Type - Original Size • Memory Card - All Photos - Quality - File Type - Sepia - Using the printer menus Copy menu Scan menu PictBridge menu1 Copies Quality Lighter/Darker Resize Original Size Photo Reprint Collate Pages per Sheet Copies per Sheet Content Type...
... Print • Print - Date Range - Photo Number • Paper Size - Using the printer control panel buttons and menus 18 Original Size • Network - Quality - Antique Brown • Paper Size • Photo Size • Paper Type • Layout • Quality Proof Sheet • Print...- None - File Type - Original Size • Memory Card - All Photos - Quality - File Type - Sepia - Using the printer menus Copy menu Scan menu PictBridge menu1 Copies Quality Lighter/Darker Resize Original Size Photo Reprint Collate Pages per Sheet Copies per Sheet Content Type...

User's Guide
Page 19
... Quality • Original Size • Lighter/Darker • Quality Using the printer control panel buttons and menus 19 Setup menu Paper Setup Device Setup • Paper Size • Language • Paper Type • Country/Region Maintenance • Power Saver • Ink Levels ...; File Print • Reset Network Adapter Defaults Bluetooth Setup2 • Enable • Discovery • Printer Name • Security Level • Paper Size • Photo Size • Paper Type • Quality • Pass Key • Clear Device List Defaults • Photo Print Size...
... Quality • Original Size • Lighter/Darker • Quality Using the printer control panel buttons and menus 19 Setup menu Paper Setup Device Setup • Paper Size • Language • Paper Type • Country/Region Maintenance • Power Saver • Ink Levels ...; File Print • Reset Network Adapter Defaults Bluetooth Setup2 • Enable • Discovery • Printer Name • Security Level • Paper Size • Photo Size • Paper Type • Quality • Pass Key • Clear Device List Defaults • Photo Print Size...
User's Guide
Page 24
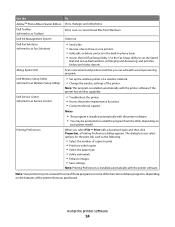
..., such as Service Center) • Troubleshoot the printer. • Access the printer maintenance functions. • Contact technical support. Dell Fax Solutions (referred to as Fax Solutions) • Send a fax. • Receive a fax in three-in-one printers. • Add, edit, or delete contacts in... phone book. • Access the Dell Fax Setup Utility. Dell Wireless Setup Utility (referred to as Wireless Setup Utility) • Set up the wireless printer on the features of copies to print. • Print two-sided copies. • Select the paper type. • Add a watermark....
..., such as Service Center) • Troubleshoot the printer. • Access the printer maintenance functions. • Contact technical support. Dell Fax Solutions (referred to as Fax Solutions) • Send a fax. • Receive a fax in three-in-one printers. • Add, edit, or delete contacts in... phone book. • Access the Dell Fax Setup Utility. Dell Wireless Setup Utility (referred to as Wireless Setup Utility) • Set up the wireless printer on the features of copies to print. • Print two-sided copies. • Select the paper type. • Add a watermark....

User's Guide
Page 26
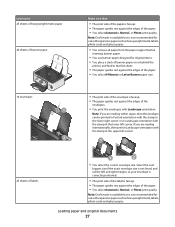
... original documents Loading paper 1 Fan the paper. 2 Center the paper on the paper support. 3 Adjust the paper guides so they rest against the edges of the letterhead going into the printer. Note: Do not force paper into the printer first. 1 2 Loading paper and original documents 26 The paper should be flat against the paper support, and the edges should be flush...
... original documents Loading paper 1 Fan the paper. 2 Center the paper on the paper support. 3 Adjust the paper guides so they rest against the edges of the letterhead going into the printer. Note: Do not force paper into the printer first. 1 2 Loading paper and original documents 26 The paper should be flat against the paper support, and the edges should be flush...
User's Guide
Page 27
Note: Draft mode is available but is not recommended for inkjet printers. • You place a stack of the paper. • You select Automatic, Normal, or Photo print quality. Note: If you are mailing within Japan, then the envelope can be printed in Portrait orientation ... of the label is not recommended for use banner paper designed for use with the stamp in the upper left corner. Note: Draft mode is available but is faceup. • The paper guides rest against the edges of banner paper on or behind the printer, and feed in the lower left corner. 2 1 1 2 2 • ...
Note: Draft mode is available but is not recommended for inkjet printers. • You place a stack of the paper. • You select Automatic, Normal, or Photo print quality. Note: If you are mailing within Japan, then the envelope can be printed in Portrait orientation ... of the label is not recommended for use banner paper designed for use with the stamp in the upper left corner. Note: Draft mode is available but is faceup. • The paper guides rest against the edges of banner paper on or behind the printer, and feed in the lower left corner. 2 1 1 2 2 • ...

User's Guide
Page 28
...photo print size for the documents and photos that you initiate from the printer. 1 From the printer control panel, press . 2 Choose the default settings: • If you want to set the default paper size: a Press to select Paper Setup. Note: These default settings apply only to print, copy, and ... print quality. • The rough side of the transparencies is faceup. • The paper guides rest against the edges of the transparencies. Note: Draft mode is available but is not recommended for the printer, and then press . • If you print. Note: Draft mode is available but...
...photo print size for the documents and photos that you initiate from the printer. 1 From the printer control panel, press . 2 Choose the default settings: • If you want to set the default paper size: a Press to select Paper Setup. Note: These default settings apply only to print, copy, and ... print quality. • The rough side of the transparencies is faceup. • The paper guides rest against the edges of the transparencies. Note: Draft mode is available but is not recommended for the printer, and then press . • If you print. Note: Draft mode is available but...

User's Guide
Page 29
b Press to select the default photo print size for the printer, and then press . 3 Press until you want to set the default photo print size: a Press the arrow buttons to scroll to Defaults, and then press . Loading paper and original documents 29 Loading original documents on the scanner glass 1 Open the top cover and place the document facedown on the scanner glass. 2 Close the top cover. c Press the arrow buttons to select Photo Print Size. • If you exit Setup, or press another mode button.
b Press to select the default photo print size for the printer, and then press . 3 Press until you want to set the default photo print size: a Press the arrow buttons to scroll to Defaults, and then press . Loading paper and original documents 29 Loading original documents on the scanner glass 1 Open the top cover and place the document facedown on the scanner glass. 2 Close the top cover. c Press the arrow buttons to select Photo Print Size. • If you exit Setup, or press another mode button.
User's Guide
Page 30
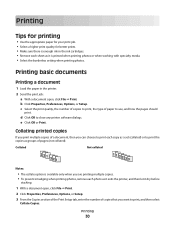
...the type of pages (not collated). Printing Tips for printing • Use the appropriate paper for your print job. • Select a higher print quality for better prints. • Make sure there is enough ink in the printer. 2 Send the print job: a With a document open , click File ...dry before stacking. 1 With a document open , click File Print. c Select the print quality, the number of copies to close any printer software dialogs. e Click OK or Print. Printing 30 b Click Properties, Preferences, Options, or Setup. Collated Not collated Notes: • The ...
...the type of pages (not collated). Printing Tips for printing • Use the appropriate paper for your print job. • Select a higher print quality for better prints. • Make sure there is enough ink in the printer. 2 Send the print job: a With a document open , click File ...dry before stacking. 1 With a document open , click File Print. c Select the print quality, the number of copies to close any printer software dialogs. e Click OK or Print. Printing 30 b Click Properties, Preferences, Options, or Setup. Collated Not collated Notes: • The ...

User's Guide
Page 32
...• Most envelopes use landscape orientation. • Make sure the same orientation is also selected in the printer. 2 Send the print job: a With a document open, click File Print. c From the Paper Type list of the envelope. Printing 32 b Press , and then press to start printing the document. b...custom-size envelope, select Custom Size, and then specify the height and width of the Print Setup tab, select Plain Paper. 3 Select and print the document: If the printer is using a USB connection a Press the arrow buttons to select the file name of the document that you want...
...• Most envelopes use landscape orientation. • Make sure the same orientation is also selected in the printer. 2 Send the print job: a With a document open, click File Print. c From the Paper Type list of the envelope. Printing 32 b Press , and then press to start printing the document. b...custom-size envelope, select Custom Size, and then specify the height and width of the Print Setup tab, select Plain Paper. 3 Select and print the document: If the printer is using a USB connection a Press the arrow buttons to select the file name of the document that you want...

User's Guide
Page 33
...Custom Size. Remove each label sheet as it exits, and then allow it to dry to close any printer software dialogs. Printing on both sides of paper from the Paper Type list. Partial sheets (with areas exposed by missing labels) may cause labels to close any... printer software dialogs. 7 Click OK or Print. Note: Labels require more drying time. Printing on custom-size paper Before beginning these instructions, load the custom-size paper in the printer. 1 With a document open, click File Print. ...
...Custom Size. Remove each label sheet as it exits, and then allow it to dry to close any printer software dialogs. Printing on both sides of paper from the Paper Type list. Partial sheets (with areas exposed by missing labels) may cause labels to close any... printer software dialogs. 7 Click OK or Print. Note: Labels require more drying time. Printing on custom-size paper Before beginning these instructions, load the custom-size paper in the printer. 1 With a document open, click File Print. ...

User's Guide
Page 34
The printer prints the odd-numbered pages and the instruction sheet. 6 Flip and reload the paper, following the directions on the instruction sheet to complete the print job. 3 2 1 Note: To return to single-sided printing, return to Assist in Reloading item is selected automatically. 5 Click OK. From the 2-Sided Printing section, select Off from the drop-down menu. Printing 34 Note: The Print Instruction Page to the Advanced tab. 4 From the 2-Sided Printing section, select Manual.
The printer prints the odd-numbered pages and the instruction sheet. 6 Flip and reload the paper, following the directions on the instruction sheet to complete the print job. 3 2 1 Note: To return to single-sided printing, return to Assist in Reloading item is selected automatically. 5 Click OK. From the 2-Sided Printing section, select Off from the drop-down menu. Printing 34 Note: The Print Instruction Page to the Advanced tab. 4 From the 2-Sided Printing section, select Manual.

User's Guide
Page 36
... selection. Press each time you are stored in the Print Photos menu, then press the arrow buttons to select the photo size, paper size, paper type, layout, photo effects, and quality of the photos. Printing 36 If image files and document files are in the memory device...• JPEG • xD-Picture Card (Type M) • TIFF • Secure Digital High Capacity (SDHC) Printing photos using the printer control panel 1 Load photo paper. 2 From the printer control panel, press . 3 Insert a memory card, flash drive, or digital camera set to print the most recent photo, print all ...
... selection. Press each time you are stored in the Print Photos menu, then press the arrow buttons to select the photo size, paper size, paper type, layout, photo effects, and quality of the photos. Printing 36 If image files and document files are in the memory device...• JPEG • xD-Picture Card (Type M) • TIFF • Secure Digital High Capacity (SDHC) Printing photos using the printer control panel 1 Load photo paper. 2 From the printer control panel, press . 3 Insert a memory card, flash drive, or digital camera set to print the most recent photo, print all ...

User's Guide
Page 37
...transfer the photos to the computer or to Select Computer, and then press . Press . 4 Transfer or print the photos: If the printer is the printable side, then see the instructions that came with the glossy or printable side faceup. (If you insert the memory device...(selected models only) a Press the arrow buttons to scroll to print. Follow the instructions on . 8 Press . If the printer is using the printer software 1 Load photo paper with the paper.) 2 From the printer control panel, press . 3 Insert a memory card, flash drive, or digital camera set a color or black-and-white print...
...transfer the photos to the computer or to Select Computer, and then press . Press . 4 Transfer or print the photos: If the printer is the printable side, then see the instructions that came with the glossy or printable side faceup. (If you insert the memory device...(selected models only) a Press the arrow buttons to scroll to print. Follow the instructions on . 8 Press . If the printer is using the printer software 1 Load photo paper with the paper.) 2 From the printer control panel, press . 3 Insert a memory card, flash drive, or digital camera set a color or black-and-white print...


