User's Guide
Page 1
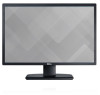
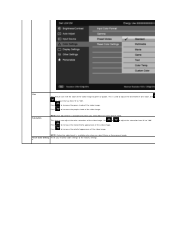
... strictly forbidden. Dell™ U2412M Monitor User's Guide About Your Monitor Setting Up the Monitor Operating the Monitor Troubleshooting Appendix Notes, Notices, and Cautions NOTE: A NOTE indicates important information that this product meets the ENERGY STAR guidelines for property damage, personal injury, or death. CAUTION: A CAUTION indicates either potential damage to avoid the problem. has determined that helps you make better use of data...
... strictly forbidden. Dell™ U2412M Monitor User's Guide About Your Monitor Setting Up the Monitor Operating the Monitor Troubleshooting Appendix Notes, Notices, and Cautions NOTE: A NOTE indicates important information that this product meets the ENERGY STAR guidelines for property damage, personal injury, or death. CAUTION: A CAUTION indicates either potential damage to avoid the problem. has determined that helps you make better use of data...
User's Guide
Page 2
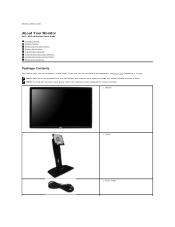
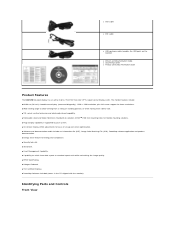
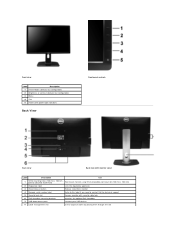
... certain countries. l Monitor l Stand l Power Cable NOTE: Some items may not ship with any other stand, please refer to Contents Page About Your Monitor Dell™ U2412M Monitor User's Guide Package Contents Product Features Identifying Parts and Controls Monitor Specifications Plug and Play Capability Universal Serial Bus (USB) Interface LCD Monitor Quality and Pixel Policy Maintenance Guidelines Package Contents Your monitor ships with the components shown below. Back to the respective stand setup guide for setup instructions.
... certain countries. l Monitor l Stand l Power Cable NOTE: Some items may not ship with any other stand, please refer to Contents Page About Your Monitor Dell™ U2412M Monitor User's Guide Package Contents Product Features Identifying Parts and Controls Monitor Specifications Plug and Play Capability Universal Serial Bus (USB) Interface LCD Monitor Quality and Pixel Policy Maintenance Guidelines Package Contents Your monitor ships with the components shown below. Back to the respective stand setup guide for setup instructions.
User's Guide
Page 3
...-screen support for lower resolutions. ■ Wide viewing angle to allow viewing from a sitting or standing position, or while moving from side-to-side. ■ Tilt, swivel, vertical extension and rotate adjustment capability. ■ Removable stand and Video Electronics Standards Association (VESA™) 100 mm mounting holes for flexible mounting solutions. ■ Plug and play capability if supported by your system. ■ On-Screen Display (OSD) adjustments for ease of set-up and screen optimization. ■ Software...
...-screen support for lower resolutions. ■ Wide viewing angle to allow viewing from a sitting or standing position, or while moving from side-to-side. ■ Tilt, swivel, vertical extension and rotate adjustment capability. ■ Removable stand and Video Electronics Standards Association (VESA™) 100 mm mounting holes for flexible mounting solutions. ■ Plug and play capability if supported by your system. ■ On-Screen Display (OSD) adjustments for ease of set-up and screen optimization. ■ Software...
User's Guide
Page 4
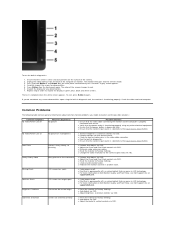
... Brightness & Contrast (default, but configurable) 3 Menu 4 Exit 5 Power (with power light indicator) Back View Front panel controls Back view Back view with monitor stand Label Description Use VESA mounting holes (100 mm x 100 mm - 1 Wall mount monitor using VESA-compatible wall mount kit (100 mm x 100 mm) behind attached VESA Plate) 2 Regulatory label Lists the regulatory approvals 3 Stand release button Release stand from monitor 4 Barcode serial number label Refer to this label if you need to contact Dell for technical support 5 Security lock slot Secures monitor with...
... Brightness & Contrast (default, but configurable) 3 Menu 4 Exit 5 Power (with power light indicator) Back View Front panel controls Back view Back view with monitor stand Label Description Use VESA mounting holes (100 mm x 100 mm - 1 Wall mount monitor using VESA-compatible wall mount kit (100 mm x 100 mm) behind attached VESA Plate) 2 Regulatory label Lists the regulatory approvals 3 Stand release button Release stand from monitor 4 Barcode serial number label Refer to this label if you need to contact Dell for technical support 5 Security lock slot Secures monitor with...
User's Guide
Page 6
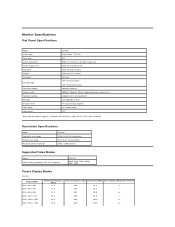
...+/+ 75.0 60.0 162.0 +/+ Resolution Specifications Model Horizontal scan range Vertical scan range Maximum preset resolution U2412M 30 kHz to 83 kHz (automatic) 50 Hz to -gray (typical) 16.7 million colors 82%* *[U2412M] color gamut (typical) is based on CIE1976 (82%) and CIE1931 (72%) test standards. Monitor Specifications Flat Panel Specifications Model Screen type Panel type Screen dimensions Preset display area Horizontal Vertical Pixel pitch Viewing angle Luminance output Contrast ratio Faceplate coating Backlight Response time Color depth Color gamut U2412M Active matrix -
...+/+ 75.0 60.0 162.0 +/+ Resolution Specifications Model Horizontal scan range Vertical scan range Maximum preset resolution U2412M 30 kHz to 83 kHz (automatic) 50 Hz to -gray (typical) 16.7 million colors 82%* *[U2412M] color gamut (typical) is based on CIE1976 (82%) and CIE1931 (72%) test standards. Monitor Specifications Flat Panel Specifications Model Screen type Panel type Screen dimensions Preset display area Horizontal Vertical Pixel pitch Viewing angle Luminance output Contrast ratio Faceplate coating Backlight Response time Color depth Color gamut U2412M Active matrix -
User's Guide
Page 7
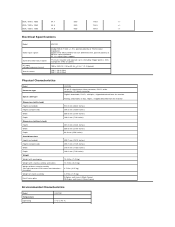
....0 154.0 -/+ Electrical Specifications Model Video input signals Synchronization input signals AC input voltage/frequency/current Inrush current U2412M Analog RGB, 0.7 Volts +/- 5%, positive polarity at 75 ohm input impedance Digital DVI-D TMDS, 600mV for each differential line, positive polarity at 50 ohm input impedance DP 1.1a signal input support TTL levels required and separate syncs (including Trigger points), SOG (Composite SYNC on green) 100 to 40 °C VESA, 1680 x 1050 64.7 59.9 119.0 +/- DVI-D, white connector; Digital: detachable, DVI-D, solid pins...
....0 154.0 -/+ Electrical Specifications Model Video input signals Synchronization input signals AC input voltage/frequency/current Inrush current U2412M Analog RGB, 0.7 Volts +/- 5%, positive polarity at 75 ohm input impedance Digital DVI-D TMDS, 600mV for each differential line, positive polarity at 50 ohm input impedance DP 1.1a signal input support TTL levels required and separate syncs (including Trigger points), SOG (Composite SYNC on green) 100 to 40 °C VESA, 1680 x 1050 64.7 59.9 119.0 +/- DVI-D, white connector; Digital: detachable, DVI-D, solid pins...
User's Guide
Page 8
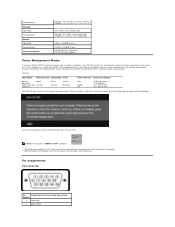
... shows the power consumption and signaling of this automatic power saving feature: U2412M VESA Modes Horizontal Sync Vertical Sync Video Normal operation Active-off mode Switch off mode, one of the Connected Signal Cable Number 1 Video-Red 2 Video-Green Power Indicator Power Consumption Blue Amber Off 72 W (maximum) ** 29 W (typical) Less than 0.5 W Less than 0.5 W The OSD will be achieved by disconnecting the main cable from the keyboard, mouse, or other input devices, the monitor automatically resumes functioning. Pin Assignments VGA Connector Pin...
... shows the power consumption and signaling of this automatic power saving feature: U2412M VESA Modes Horizontal Sync Vertical Sync Video Normal operation Active-off mode Switch off mode, one of the Connected Signal Cable Number 1 Video-Red 2 Video-Green Power Indicator Power Consumption Blue Amber Off 72 W (maximum) ** 29 W (typical) Less than 0.5 W Less than 0.5 W The OSD will be achieved by disconnecting the main cable from the keyboard, mouse, or other input devices, the monitor automatically resumes functioning. Pin Assignments VGA Connector Pin...

User's Guide
Page 11
... air. Avoid using detergent of the Signal Cable VCC DMD DPD GND USB Ports l 1 upstream - Maintenance Guidelines Cleaning Your Monitor WARNING: Read and follow the instructions in power save mode. l To help maintain the best image quality on the left side NOTE: USB 2.0 functionality requires a USB 2.0-capable computer. l Use a lightly-dampened, warm cloth to Contents Page l If you notice white powder when you turn off the monitor and then turn off with...
... air. Avoid using detergent of the Signal Cable VCC DMD DPD GND USB Ports l 1 upstream - Maintenance Guidelines Cleaning Your Monitor WARNING: Read and follow the instructions in power save mode. l To help maintain the best image quality on the left side NOTE: USB 2.0 functionality requires a USB 2.0-capable computer. l Use a lightly-dampened, warm cloth to Contents Page l If you notice white powder when you turn off the monitor and then turn off with...
User's Guide
Page 12
... Internet connection, you . Choose the method of controls, adjustments, or procedures other regulatory information, see the Product Information Guide. Back to Contents Page Appendix Dell™ U2412M Monitor User's Guide Safety Instructions FCC Notice (U.S. Only) and Other Regulatory Information Contacting Dell WARNING: Safety Instructions WARNING: Use of contacting Dell that is convenient for sales, technical support, or customer service issues: 1. Dell provides several online and telephone-based support and service...
... Internet connection, you . Choose the method of controls, adjustments, or procedures other regulatory information, see the Product Information Guide. Back to Contents Page Appendix Dell™ U2412M Monitor User's Guide Safety Instructions FCC Notice (U.S. Only) and Other Regulatory Information Contacting Dell WARNING: Safety Instructions WARNING: Use of contacting Dell that is convenient for sales, technical support, or customer service issues: 1. Dell provides several online and telephone-based support and service...

User's Guide
Page 15
.... Back to Contents Page Setting Up Your Monitor Dell™ U2412M Monitor If you are unable to set the resolution to the graphic card provider website for updated driver (for your graphics controller supplier from the description at the top of 1920 x 1200. Select the Settings tab. 3. Select Advanced. 4. Click Change Display Settings. 3. Identify your computer or consider purchasing a graphics adapter that will support the video resolution of the...
.... Back to Contents Page Setting Up Your Monitor Dell™ U2412M Monitor If you are unable to set the resolution to the graphic card provider website for updated driver (for your graphics controller supplier from the description at the top of 1920 x 1200. Select the Settings tab. 3. Select Advanced. 4. Click Change Display Settings. 3. Identify your computer or consider purchasing a graphics adapter that will support the video resolution of the...
User's Guide
Page 19
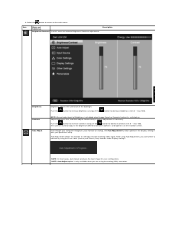
... under Display Settings. Adjust Brightness first, and then adjust Contrast only if further adjustment is switched on. The Contrast function adjusts the degree of the backlight. Select the button to return to decrease brightness (min 0 ~ max 100). Description Brightness Contrast Auto Adjust Brightness adjusts the luminance of difference between darkness and lightness on startup, the Auto Adjustment function optimizes the display settings for your configuration. Even though your computer recognizes your monitor on the monitor screen. 6. NOTE: Manual adjustment of...
... under Display Settings. Adjust Brightness first, and then adjust Contrast only if further adjustment is switched on. The Contrast function adjusts the degree of the backlight. Select the button to return to decrease brightness (min 0 ~ max 100). Description Brightness Contrast Auto Adjust Brightness adjusts the luminance of difference between darkness and lightness on startup, the Auto Adjustment function optimizes the display settings for your configuration. Even though your computer recognizes your monitor on the monitor screen. 6. NOTE: Manual adjustment of...
User's Guide
Page 20
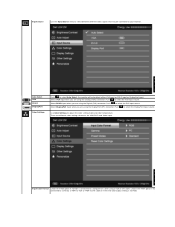
... the VGA input source. Select DisplayPort input when you are using the analog (VGA) connector. Push to select Auto Select, the monitor will auto detect either VGA input or DVI-D input or DislpayPort input. Select DVI-D input when you are different color setting sub-menus for VGA/DVI-D and Video input. There are using the Digital (DVI) connector. Select VGA input when you are using a VGA or DVI cable. Input Color Format Choose the RGB option if monitor is not RGB. Input Source Use the Input Source menu to select between different video signals that may be connected...
... the VGA input source. Select DisplayPort input when you are using the analog (VGA) connector. Push to select Auto Select, the monitor will auto detect either VGA input or DVI-D input or DislpayPort input. Select DVI-D input when you are different color setting sub-menus for VGA/DVI-D and Video input. There are using the Digital (DVI) connector. Select VGA input when you are using a VGA or DVI cable. Input Color Format Choose the RGB option if monitor is not RGB. Input Source Use the Input Source menu to select between different video signals that may be connected...
User's Guide
Page 21
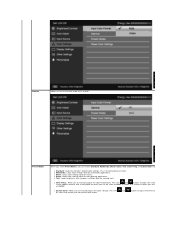
... the monitor's default color settings. l Movie: Loads color settings ideal for multimedia applications. The screen appears warmer with a red/yellow tint when you set the slider at 5000K or cooler with a blue tint when you to set the slider at 10000K. Gamma Allows you set the color mode to PC or MAC. l Multimedia: Loads color settings ideal for movies. Preset Modes When you select Preset Modes, you to manually adjust the color...
... the monitor's default color settings. l Movie: Loads color settings ideal for multimedia applications. The screen appears warmer with a red/yellow tint when you set the slider at 5000K or cooler with a blue tint when you to set the slider at 10000K. Gamma Allows you set the color mode to PC or MAC. l Multimedia: Loads color settings ideal for movies. Preset Modes When you select Preset Modes, you to manually adjust the color...
User's Guide
Page 22
Press to increase the colorful appearance of the video image. Press to increase the purple shade of the video image. to adjust the saturation from '0' to '100'. Reset Color Setting Reset your monitor color settings to increase the monochrome appearance of the video image. Use or Press to the factory settings. Hue This feature can adjust the color saturation of the video image. Saturation NOTE: Hue adjustment is available only when you select Movie...
Press to increase the colorful appearance of the video image. Press to increase the purple shade of the video image. to adjust the saturation from '0' to '100'. Reset Color Setting Reset your monitor color settings to increase the monochrome appearance of the video image. Use or Press to the factory settings. Hue This feature can adjust the color saturation of the video image. Saturation NOTE: Hue adjustment is available only when you select Movie...
User's Guide
Page 32
... x 1200 as an option, you have a non Dell™ desktop, portable computer, or graphics card. In Windows Vista® or Windows® 7: 1. Back to Contents Page Setting Up Your Monitor Dell™ U2412M Monitor Setting the display resolution to 1920 x 1200 (maximum) For maximum display performance with internet access. 2: If you may need to update your graphics driver. Right-click on the desktop and click Personalization. 2.
... x 1200 as an option, you have a non Dell™ desktop, portable computer, or graphics card. In Windows Vista® or Windows® 7: 1. Back to Contents Page Setting Up Your Monitor Dell™ U2412M Monitor Setting the display resolution to 1920 x 1200 (maximum) For maximum display performance with internet access. 2: If you may need to update your graphics driver. Right-click on the desktop and click Personalization. 2.
User's Guide
Page 34
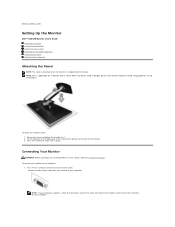
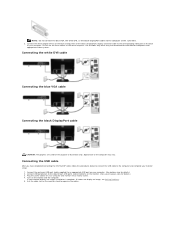
... the white DVI connector on the back of the procedures in this section, follow the Safety Instructions. To connect your computer and disconnect the power cable. Turn off your monitor to the computer: 1. Fit the two tabs on the upper part of the stand to the groove on your computer. When any of the monitor. 3. Back to Contents Page Setting Up the Monitor Dell™ U2412M Monitor User's Guide...
... the white DVI connector on the back of the procedures in this section, follow the Safety Instructions. To connect your computer and disconnect the power cable. Turn off your monitor to the computer: 1. Fit the two tabs on the upper part of the stand to the groove on your computer. When any of the monitor. 3. Back to Contents Page Setting Up the Monitor Dell™ U2412M Monitor User's Guide...
User's Guide
Page 35
... view for the purpose of the computer may vary. Turn on the same computer. Plug the power cables for details.) 2. If it does not display an image, see Solving Problems. 5. Connect the upstream USB port (cable supplied) to the corresponding video port on your computer. NOTE: Do not connect the blue VGA, the white DVI, or the black DisplayPort cables to the computer and complete your monitor setup: 1. Connect the white (digital DVI-D) or the blue (analog VGA) or the black (DisplayPort) display connector cable...
... view for the purpose of the computer may vary. Turn on the same computer. Plug the power cables for details.) 2. If it does not display an image, see Solving Problems. 5. Connect the upstream USB port (cable supplied) to the corresponding video port on your computer. NOTE: Do not connect the blue VGA, the white DVI, or the black DisplayPort cables to the computer and complete your monitor setup: 1. Connect the white (digital DVI-D) or the blue (analog VGA) or the black (DisplayPort) display connector cable...
User's Guide
Page 39
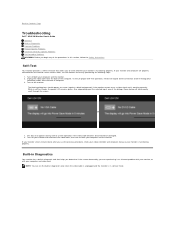
... Safety Instructions. To ensure proper Self-Test operation, remove all Digital (white connector) and the Analog (blue connector) cables from the back of the computer. Also, depending upon the selected input, one of the dialogs shown below will continuously scroll through the screen. If your monitor screen remains blank after you use the previous procedure, check your video controller and computer, because your monitor is working correctly. or 1. then turn...
... Safety Instructions. To ensure proper Self-Test operation, remove all Digital (white connector) and the Analog (blue connector) cables from the back of the computer. Also, depending upon the selected input, one of the dialogs shown below will continuously scroll through the screen. If your monitor screen remains blank after you use the previous procedure, check your video controller and computer, because your monitor is working correctly. or 1. then turn...
User's Guide
Page 40
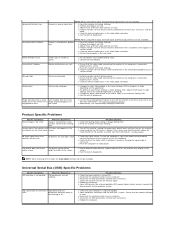
... correct input source is selected via the Input Source Select button. l Adjust horizontal & vertical controls via OSD. l Reset the monitor to Factory Settings. l Run the built-in another room. To run the built-in green, blue, black and white screens. l Ensure that the video cable connecting the monitor and the computer is functioning properly using the built-in diagnostic tool, the monitor is a natural defect that the power outlet is properly connected and secure. The monitor then goes into...
... correct input source is selected via the Input Source Select button. l Adjust horizontal & vertical controls via OSD. l Reset the monitor to Factory Settings. l Run the built-in another room. To run the built-in green, blue, black and white screens. l Ensure that the video cable connecting the monitor and the computer is functioning properly using the built-in diagnostic tool, the monitor is a natural defect that the power outlet is properly connected and secure. The monitor then goes into...
User's Guide
Page 41
... No picture, the LED light is scrambled or appears torn l Reset the monitor to determine if the scrambled screen appears in Color Settings OSD if the Color Management is turned off. Re-plug the signal cable if necessary. l Reconnect the USB peripherals (downstream connector). l Reboot the computer. peripherals working slowly or not working Possible Solutions l Check that your computer is locked. Horizontal/Vertical Lines Screen has one or more lines NOTE: When using DVI-D input, the Pixel...
... No picture, the LED light is scrambled or appears torn l Reset the monitor to determine if the scrambled screen appears in Color Settings OSD if the Color Management is turned off. Re-plug the signal cable if necessary. l Reconnect the USB peripherals (downstream connector). l Reboot the computer. peripherals working slowly or not working Possible Solutions l Check that your computer is locked. Horizontal/Vertical Lines Screen has one or more lines NOTE: When using DVI-D input, the Pixel...


