Microsoft Windows 7: Getting Started Guide
Page 1
.... October 2009 CAUTION: Do not interrupt the operating system's setup process. NOTE: For optimal performance of your computer available at support.dell.com. Doing so may take you through several procedures including accepting license agreements, setting preferences, and setting up Windows for your computer,... it at www.dell.com. If an external USB modem or WLAN adapter is recommended that you download and install the latest BIOS and drivers for the first time, follow the instructions on the screen. These...
.... October 2009 CAUTION: Do not interrupt the operating system's setup process. NOTE: For optimal performance of your computer available at support.dell.com. Doing so may take you through several procedures including accepting license agreements, setting preferences, and setting up Windows for your computer,... it at www.dell.com. If an external USB modem or WLAN adapter is recommended that you download and install the latest BIOS and drivers for the first time, follow the instructions on the screen. These...

Service Manual
Page 30
Back to an electrical outlet and turn them on. 17. Flash the system BIOS as needed. Replace the memory modules (see Replacing the Computer Cover). 16. Connect your computer and devices to Contents Page Replace the computer cover (see Replacing Memory Module(s)). 14. NOTE: For information on the system board (see Flashing the BIOS. 13. Replace any expansion cards on flashing the system BIOS, see Replacing PCI/PCI Express Card(s)). 15.
Back to an electrical outlet and turn them on. 17. Flash the system BIOS as needed. Replace the memory modules (see Replacing the Computer Cover). 16. Connect your computer and devices to Contents Page Replace the computer cover (see Replacing Memory Module(s)). 14. NOTE: For information on the system board (see Flashing the BIOS. 13. Replace any expansion cards on flashing the system BIOS, see Replacing PCI/PCI Express Card(s)). 15.
Service Manual
Page 31
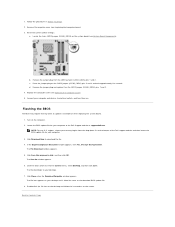
...Appears below the Options Field and lists keys and their functions within the active system setup field. SATA port not present. Lists the BIOS version, system name, asset tag, and service tag. This field provides a menu to access to the Options List. Appears on... recommended that define the configuration of the System Setup window. Back to Contents Page System Setup Dell Studio™ Slim 540s Service Manual Overview Clearing Forgotten Passwords Clearing CMOS Settings Flashing the BIOS Overview Use system setup to: l Change the system configuration information after you add, change,...
...Appears below the Options Field and lists keys and their functions within the active system setup field. SATA port not present. Lists the BIOS version, system name, asset tag, and service tag. This field provides a menu to access to the Options List. Appears on... recommended that define the configuration of the System Setup window. Back to Contents Page System Setup Dell Studio™ Slim 540s Service Manual Overview Clearing Forgotten Passwords Clearing CMOS Settings Flashing the BIOS Overview Use system setup to: l Change the system configuration information after you add, change,...
Service Manual
Page 32
... you to set the date to boot from the primary hard drive. l CD/DVD Drive - Auto Power On Time Enables you to run the Dell Diagnostics on the drive, the computer generates an error message. Boot Settings Configuration Configure Fast Boot, Numlock, and Keyboard errors. Boot Options l Hard ... F12 = Boot Menu appears in the upper-right corner of the screen, press . Advanced Chipset Features Indicates amount of CPU L2 cache. The BIOS detects the device and adds the USB flash option to a USB connector. 2. Boot Boot Device Priority Sets the boot device sequence. Then shut down...
... you to set the date to boot from the primary hard drive. l CD/DVD Drive - Auto Power On Time Enables you to run the Dell Diagnostics on the drive, the computer generates an error message. Boot Settings Configuration Configure Fast Boot, Numlock, and Keyboard errors. Boot Options l Hard ... F12 = Boot Menu appears in the upper-right corner of the screen, press . Advanced Chipset Features Indicates amount of CPU L2 cache. The BIOS detects the device and adds the USB flash option to a USB connector. 2. Boot Boot Device Priority Sets the boot device sequence. Then shut down...
Service Manual
Page 34
...devices to view the Save In menu, select Desktop, and then click Save. Click the down list at the bottom of the Dell support website and then locate the BIOS update file for your country/region from the CMOS jumper (CLEAR_CMOS) pins 1 and 2. Place the jumper plug on . Turn ...on the screen. regions, choose your computer at the Dell Support website at support.dell.com. The file downloads to Contents Page Double-click the...
...devices to view the Save In menu, select Desktop, and then click Save. Click the down list at the bottom of the Dell support website and then locate the BIOS update file for your country/region from the CMOS jumper (CLEAR_CMOS) pins 1 and 2. Place the jumper plug on . Turn ...on the screen. regions, choose your computer at the Dell Support website at support.dell.com. The file downloads to Contents Page Double-click the...

Setup Guide
Page 32
... source to function properly. Hardware Troubleshooter If a device is either not detected during the operating system setup or is correct (see "Contacting Dell" on the system board might be enabled or disabled in the search field and press to start the Hardware Troubleshooter: 1. Click Start &#...8594; Help and Support. 2. A parameter out of them. 30 NOTICE - Type hardware troubleshooter in the BIOS setup (see the Service Manual on page 42). Your USB device needs more power for assistance). A chip on page 42 for it to connect...
... source to function properly. Hardware Troubleshooter If a device is either not detected during the operating system setup or is correct (see "Contacting Dell" on the system board might be enabled or disabled in the search field and press to start the Hardware Troubleshooter: 1. Click Start &#...8594; Help and Support. 2. A parameter out of them. 30 NOTICE - Type hardware troubleshooter in the BIOS setup (see the Service Manual on page 42). Your USB device needs more power for assistance). A chip on page 42 for it to connect...

Setup Guide
Page 50
Specifications Computer Information RAID support RAID 0 (striping) RAID 1 (mirroring) BIOS chip (NVRAM) 8 MB Expansion Bus Bus types Bus speeds PCI PCI 2.3 PCI Express 1.0 A (x1), 2.0 (x16) SATA 1.0, 2.0, and USB 2.0 133 MB/s Expansion Bus PCI Express SATA • x1 slot bi-directional speed - 500 MB/s • x16 slot bi-directional speed - 8 GB/s 1.5 Gbps and 3.0 Gbps USB 480 Mbps high speed, 12 Mbps full speed, and 1.2 Mbps low speed PCI Connectors one Connector size 124 pins Connector data width (maximum) 32 bits 48
Specifications Computer Information RAID support RAID 0 (striping) RAID 1 (mirroring) BIOS chip (NVRAM) 8 MB Expansion Bus Bus types Bus speeds PCI PCI 2.3 PCI Express 1.0 A (x1), 2.0 (x16) SATA 1.0, 2.0, and USB 2.0 133 MB/s Expansion Bus PCI Express SATA • x1 slot bi-directional speed - 500 MB/s • x16 slot bi-directional speed - 8 GB/s 1.5 Gbps and 3.0 Gbps USB 480 Mbps high speed, 12 Mbps full speed, and 1.2 Mbps low speed PCI Connectors one Connector size 124 pins Connector data width (maximum) 32 bits 48


