Service Manual
Page 1
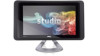
... to either potential damage to avoid the problem. Other trademarks and trade names may be used in this text: Dell and the DELL logo are either trademarks or registered trademarks of these materials in any proprietary interest in the United States and/or ... used in this document to refer to change without the written permission of data and tells you make better use of Dell Inc.; Dell Inc. Dell Studio One 19/1909 Service Manual Technical Overview Before You Begin Computer Cover Shield Microphone Stand Memory Module(s) Back I/O Panel Processor Fan and Heat Sink Processor...
... to either potential damage to avoid the problem. Other trademarks and trade names may be used in this text: Dell and the DELL logo are either trademarks or registered trademarks of these materials in any proprietary interest in the United States and/or ... used in this document to refer to change without the written permission of data and tells you make better use of Dell Inc.; Dell Inc. Dell Studio One 19/1909 Service Manual Technical Overview Before You Begin Computer Cover Shield Microphone Stand Memory Module(s) Back I/O Panel Processor Fan and Heat Sink Processor...
Service Manual
Page 2
...computer. After the installation is authorized to remove the computer cover and access any connector pins. CAUTION: Only a certified service technician is completed, the enclosure must be replaced or-if purchased separately-installed by performing the removal procedure in the lower...information that the following safety guidelines to help to ensure your computer. Back to Contents Page Before You Begin Dell Studio One 19/1909 Service Manual Recommended Tools Turning Off Your Computer Safety Instructions This chapter provides procedures for removing and installing the components in ...
...computer. After the installation is authorized to remove the computer cover and access any connector pins. CAUTION: Only a certified service technician is completed, the enclosure must be replaced or-if purchased separately-installed by performing the removal procedure in the lower...information that the following safety guidelines to help to ensure your computer. Back to Contents Page Before You Begin Dell Studio One 19/1909 Service Manual Recommended Tools Turning Off Your Computer Safety Instructions This chapter provides procedures for removing and installing the components in ...
Service Manual
Page 4
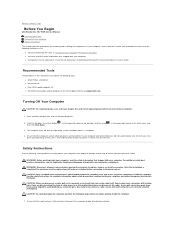
... marked with your computer, read the safety information that there are no cables under the card. 1. Insert the WLAN card at www.dell.com/regulatory_compliance. Remove the computer cover (see Removing the Shield). 4. CAUTION: To avoid damage to the WLAN card, ensure that shipped... side of excessive force may damage the connectors. Lift the card away from under the card. Back to Contents Page Cards Dell Studio One 19/1909 Service Manual Removing the WLAN Card Replacing the WLAN Card Removing the RF Module Replacing the RF Module WARNING: Before working inside your computer...
... marked with your computer, read the safety information that there are no cables under the card. 1. Insert the WLAN card at www.dell.com/regulatory_compliance. Remove the computer cover (see Removing the Shield). 4. CAUTION: To avoid damage to the WLAN card, ensure that shipped... side of excessive force may damage the connectors. Lift the card away from under the card. Back to Contents Page Cards Dell Studio One 19/1909 Service Manual Removing the WLAN Card Replacing the WLAN Card Removing the RF Module Replacing the RF Module WARNING: Before working inside your computer...
Service Manual
Page 7
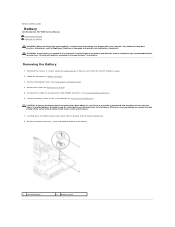
Discard used batteries according to Contents Page Battery Dell Studio One 19/1909 Service Manual Removing the Battery Replacing the Battery WARNING: Before working inside your computer, read the safety information that shipped with your computer. Disconnect...to pry out the battery. Record all the screens in Before You Begin. 3. Remove the computer cover (see the Regulatory Compliance Homepage at www.dell.com/regulatory_compliance. For additional safety best practices information, see Removing the Computer Cover). 4. Removing the Battery 1. Ensure that you may damage the system...
Discard used batteries according to Contents Page Battery Dell Studio One 19/1909 Service Manual Removing the Battery Replacing the Battery WARNING: Before working inside your computer, read the safety information that shipped with your computer. Disconnect...to pry out the battery. Record all the screens in Before You Begin. 3. Remove the computer cover (see the Regulatory Compliance Homepage at www.dell.com/regulatory_compliance. For additional safety best practices information, see Removing the Computer Cover). 4. Removing the Battery 1. Ensure that you may damage the system...
Service Manual
Page 9
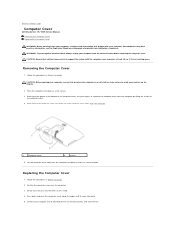
... insides of the computer cover. 4. Position the computer cover over the computer. 3. Follow the procedures in Before You Begin. 2. Back to Contents Page Computer Cover Dell Studio One 19/1909 Service Manual Removing the Computer Cover Replacing the Computer Cover WARNING: Before working inside your computer, read the safety information that shipped with the computer cover removed...
... insides of the computer cover. 4. Position the computer cover over the computer. 3. Follow the procedures in Before You Begin. 2. Back to Contents Page Computer Cover Dell Studio One 19/1909 Service Manual Removing the Computer Cover Replacing the Computer Cover WARNING: Before working inside your computer, read the safety information that shipped with the computer cover removed...

Service Manual
Page 11
... instructions in Before You Begin. 2. Remove the power supply unit (see the Regulatory Compliance Homepage at www.dell.com/regulatory_compliance. Remove the fourteen screws that secure the support assembly to Contents Page Support Assembly Dell Studio One 19/1909 Service Manual Removing the Support Assembly Replacing the Support Assembly WARNING: Before working inside your computer, read the safety...
... instructions in Before You Begin. 2. Remove the power supply unit (see the Regulatory Compliance Homepage at www.dell.com/regulatory_compliance. Remove the fourteen screws that secure the support assembly to Contents Page Support Assembly Dell Studio One 19/1909 Service Manual Removing the Support Assembly Replacing the Support Assembly WARNING: Before working inside your computer, read the safety...
Service Manual
Page 13
... to the hard drive carrier. Disconnect the hard drive connector from the chassis. 6. NOTE: If you and lift it aside. 7. Back to Contents Page Drives Dell Studio One 19/1909 Service Manual Removing the Hard Drive Replacing the Hard Drive Removing the Optical Drive Replacing the Optical Drive WARNING: Before working inside your computer, read the safety... information that shipped with your computer. Removing the Hard Drive 1. Slide the hard drive towards you are not replacing the hard drive at www.dell.com/regulatory_compliance.
... to the hard drive carrier. Disconnect the hard drive connector from the chassis. 6. NOTE: If you and lift it aside. 7. Back to Contents Page Drives Dell Studio One 19/1909 Service Manual Removing the Hard Drive Replacing the Hard Drive Removing the Optical Drive Replacing the Optical Drive WARNING: Before working inside your computer, read the safety... information that shipped with your computer. Removing the Hard Drive 1. Slide the hard drive towards you are not replacing the hard drive at www.dell.com/regulatory_compliance.

Service Manual
Page 17
... 1 heat sink 3 screw 2 captive screws (4) Replacing the Heat Sink Back to Contents Page Processor Fan and Heat Sink Dell Studio One 19/1909 Service Manual Removing the Heat Sink Replacing the Heat Sink Removing the Processor Fan Replacing the Processor Fan WARNING: Before working inside your computer,... Panel). 6. For additional safety best practices information, see Removing the Back I /O panel (see the Regulatory Compliance Homepage at www.dell.com/regulatory_compliance. Removing the Heat Sink CAUTION: To ensure maximum cooling for the processor, do not touch the heat transfer areas on ...
... 1 heat sink 3 screw 2 captive screws (4) Replacing the Heat Sink Back to Contents Page Processor Fan and Heat Sink Dell Studio One 19/1909 Service Manual Removing the Heat Sink Replacing the Heat Sink Removing the Processor Fan Replacing the Processor Fan WARNING: Before working inside your computer,... Panel). 6. For additional safety best practices information, see Removing the Back I /O panel (see the Regulatory Compliance Homepage at www.dell.com/regulatory_compliance. Removing the Heat Sink CAUTION: To ensure maximum cooling for the processor, do not touch the heat transfer areas on ...

Service Manual
Page 20
.../regulatory_compliance. Remove the right speaker (see Removing the Shield). 4. Remove the shield (see Removing the Right Speaker). 8. Back to Contents Page Inverter Dell Studio One 19/1909 Service Manual Removing the Inverter Replacing the Inverter WARNING: Before working inside your computer, read the safety information that secure the inverter to the chassis. 10. Lift ...
.../regulatory_compliance. Remove the right speaker (see Removing the Shield). 4. Remove the shield (see Removing the Right Speaker). 8. Back to Contents Page Inverter Dell Studio One 19/1909 Service Manual Removing the Inverter Replacing the Inverter WARNING: Before working inside your computer, read the safety information that secure the inverter to the chassis. 10. Lift ...
Service Manual
Page 22
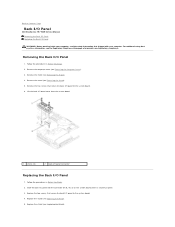
...the safety information that secure the back I/O panel to the system board. 4. Remove the shield (see Replacing the Stand). 5. Back to Contents Page Back I/O Panel Dell Studio One 19/1909 Service Manual Removing the Back I/O Panel Replacing the Back I/O Panel WARNING: Before working inside your computer. Remove the two screws that secure the back I /O Panel 1. Replace the... I/O panel away from the system board. 1 screws (2) 2 back I/O panel connector Replacing the Back I/O Panel 1. Replace the shield (see the Regulatory Compliance Homepage at www.dell.com/regulatory_compliance.
...the safety information that secure the back I/O panel to the system board. 4. Remove the shield (see Replacing the Stand). 5. Back to Contents Page Back I/O Panel Dell Studio One 19/1909 Service Manual Removing the Back I/O Panel Replacing the Back I/O Panel WARNING: Before working inside your computer. Remove the two screws that secure the back I /O Panel 1. Replace the... I/O panel away from the system board. 1 screws (2) 2 back I/O panel connector Replacing the Back I/O Panel 1. Replace the shield (see the Regulatory Compliance Homepage at www.dell.com/regulatory_compliance.

Service Manual
Page 24
... Shield). 4. If you do not hear the click, remove the module and reinstall it clicks into the slot at www.dell.com/regulatory_compliance. Connect your computer and all attached devices to electrical outlets, and then turn them on the memory module connector...click ® Control Panel ® System. Replace the shield (see Replacing the Shield). 5. Back to Contents Page Memory Module(s) Dell Studio One 19/1909 Service Manual Removing Memory Module(s) Replacing Memory Module(s) WARNING: Before working inside your computer, read the safety information that memory size has changed, press ...
... Shield). 4. If you do not hear the click, remove the module and reinstall it clicks into the slot at www.dell.com/regulatory_compliance. Connect your computer and all attached devices to electrical outlets, and then turn them on the memory module connector...click ® Control Panel ® System. Replace the shield (see Replacing the Shield). 5. Back to Contents Page Memory Module(s) Dell Studio One 19/1909 Service Manual Removing Memory Module(s) Replacing Memory Module(s) WARNING: Before working inside your computer, read the safety information that memory size has changed, press ...

Service Manual
Page 26
Remove the two screws that shipped with your computer. Back to Contents Page Microphone Dell Studio One 19/1909 Service Manual Removing the Microphone Replacing the Microphone WARNING: Before working inside your computer, read the safety information that secure... from the microphone. 6. Reconnect the cable to the system assembly. 4. Remove the computer cover (see the Regulatory Compliance Homepage at www.dell.com/regulatory_compliance. Replace the two screws that secure the microphone to the microphone. 3. For additional safety best practices information, see Removing the ...
Remove the two screws that shipped with your computer. Back to Contents Page Microphone Dell Studio One 19/1909 Service Manual Removing the Microphone Replacing the Microphone WARNING: Before working inside your computer, read the safety information that secure... from the microphone. 6. Reconnect the cable to the system assembly. 4. Remove the computer cover (see the Regulatory Compliance Homepage at www.dell.com/regulatory_compliance. Replace the two screws that secure the microphone to the microphone. 3. For additional safety best practices information, see Removing the ...
Service Manual
Page 27
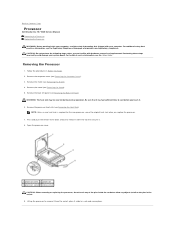
... information, see Removing the Shield). 4. Removing the Processor 1. Remove the shield (see the Regulatory Compliance Homepage at www.dell.com/regulatory_compliance. Performing these steps incorrectly could damage your computer. Press and push the release lever down and out to release... procedures in the socket. 9. Remove the computer cover (see Removing the Computer Cover). 3. Back to Contents Page Processor Dell Studio One 19/1909 Service Manual Removing the Processor Replacing the Processor WARNING: Before working inside the socket or allow any objects to fall on the pins ...
... information, see Removing the Shield). 4. Removing the Processor 1. Remove the shield (see the Regulatory Compliance Homepage at www.dell.com/regulatory_compliance. Performing these steps incorrectly could damage your computer. Press and push the release lever down and out to release... procedures in the socket. 9. Remove the computer cover (see Removing the Computer Cover). 3. Back to Contents Page Processor Dell Studio One 19/1909 Service Manual Removing the Processor Replacing the Processor WARNING: Before working inside the socket or allow any objects to fall on the pins ...

Service Manual
Page 30
...your computer. For technical assistance, see Removing the Stand). 5. Remove the four screws that secure the power supply unit to Contents Page Power Supply Unit Dell Studio One 19/1909 Service Manual Removing the Power Supply Unit Replacing the Power Supply Unit WARNING: Before working inside your computer, read the safety information that of electric shock, laceration...replacement power supply unit matches that shipped with hardware removal and replacement. For additional safety best practices information, see the Regulatory Compliance Homepage at www.dell.com/regulatory_compliance.
...your computer. For technical assistance, see Removing the Stand). 5. Remove the four screws that secure the power supply unit to Contents Page Power Supply Unit Dell Studio One 19/1909 Service Manual Removing the Power Supply Unit Replacing the Power Supply Unit WARNING: Before working inside your computer, read the safety information that of electric shock, laceration...replacement power supply unit matches that shipped with hardware removal and replacement. For additional safety best practices information, see the Regulatory Compliance Homepage at www.dell.com/regulatory_compliance.

Service Manual
Page 32
... loosen the eight captive screws that shipped with your computer. Back to the computer. 1 captive screws (8) 2 shield Replacing the Shield 1. Back to Contents Page Shield Dell Studio One 19/1909 Service Manual Removing the Shield Replacing the Shield WARNING: Before working inside the computer. 2. For additional safety best practices information, see the Regulatory Compliance Homepage at www...
... loosen the eight captive screws that shipped with your computer. Back to the computer. 1 captive screws (8) 2 shield Replacing the Shield 1. Back to Contents Page Shield Dell Studio One 19/1909 Service Manual Removing the Shield Replacing the Shield WARNING: Before working inside the computer. 2. For additional safety best practices information, see the Regulatory Compliance Homepage at www...

Service Manual
Page 33
.../regulatory_compliance. Remove the screw that shipped with your computer, read the safety information that secures the side I/O panel to Contents Page Side I/O Panel Dell Studio One 19/1909 Service Manual Removing the Side I/O Panel Replacing the Side I /O panel from the connectors (F_AUDIO and SIDE_BOARD_1) on the system board. 10. Lift and pull the side I /O Panel ...
.../regulatory_compliance. Remove the screw that shipped with your computer, read the safety information that secures the side I/O panel to Contents Page Side I/O Panel Dell Studio One 19/1909 Service Manual Removing the Side I/O Panel Replacing the Side I /O panel from the connectors (F_AUDIO and SIDE_BOARD_1) on the system board. 10. Lift and pull the side I /O Panel ...

Service Manual
Page 35
Remove the four screws that secure the speaker to Contents Page Speakers Dell Studio One 19/1909 Service Manual Removing the Right Speaker Replacing the Right Speaker Removing the Left Speaker Replacing the Left Speaker WARNING: Before working inside your ...procedures in Before You Begin. Remove the stand (see the Regulatory Compliance Homepage at www.dell.com/regulatory_compliance. Back to the chassis. Remove the shield (see Removing the Computer Cover). 3. NOTE: Make a note of Your Studio One. 1. Remove the computer cover (see Removing the Shield). 4. Follow the procedures in...
Remove the four screws that secure the speaker to Contents Page Speakers Dell Studio One 19/1909 Service Manual Removing the Right Speaker Replacing the Right Speaker Removing the Left Speaker Replacing the Left Speaker WARNING: Before working inside your ...procedures in Before You Begin. Remove the stand (see the Regulatory Compliance Homepage at www.dell.com/regulatory_compliance. Back to the chassis. Remove the shield (see Removing the Computer Cover). 3. NOTE: Make a note of Your Studio One. 1. Remove the computer cover (see Removing the Shield). 4. Follow the procedures in...

Service Manual
Page 38
...stand. 5. Follow the procedures in Before You Begin. 2. Remove the computer cover (see the Regulatory Compliance Homepage at www.dell.com/regulatory_compliance. Replace the shield (Replacing the Shield). 5. Removing the Stand 1. Lift the stand away from the existing ...that you remove the labels from the computer. 1 screws (4) 2 stand Replacing the Stand 1. Back to Contents Page Stand Dell Studio One 19/1909 Service Manual Removing the Stand Replacing the Stand WARNING: Before working inside your computer. For additional safety best practices information, see Removing the...
...stand. 5. Follow the procedures in Before You Begin. 2. Remove the computer cover (see the Regulatory Compliance Homepage at www.dell.com/regulatory_compliance. Replace the shield (Replacing the Shield). 5. Removing the Stand 1. Lift the stand away from the existing ...that you remove the labels from the computer. 1 screws (4) 2 stand Replacing the Stand 1. Back to Contents Page Stand Dell Studio One 19/1909 Service Manual Removing the Stand Replacing the Stand WARNING: Before working inside your computer. For additional safety best practices information, see Removing the...

Service Manual
Page 40
....5 x 5-mm screws that shipped with your computer. The replacement kit for the system board includes a CD that provides a utility for transferring the Service Tag to Contents Page System Board Dell Studio One 19/1909 Service Manual Removing the System Board Replacing the System Board WARNING: Before working inside your computer, read the safety information that secure the system...
....5 x 5-mm screws that shipped with your computer. The replacement kit for the system board includes a CD that provides a utility for transferring the Service Tag to Contents Page System Board Dell Studio One 19/1909 Service Manual Removing the System Board Replacing the System Board WARNING: Before working inside your computer, read the safety information that secure the system...
Service Manual
Page 42
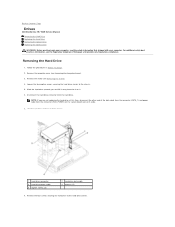
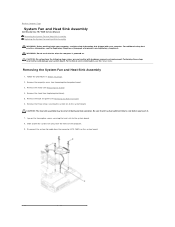
...touch the fan when the computer is powered on the system board. Performing these steps incorrectly could damage your system board. For technical service information, see Removing the Shield). 4. Removing the System Fan and Heat Sink Assembly 1. Slide and lift the system fan away from ...3. Disconnect the system fan cable from the frame of the computer. 9. Back to Contents Page System Fan and Heat Sink Assembly Dell Studio One 19/1909 Service Manual Removing the System Fan and Heat Sink Assembly Replacing the System Fan and Heat Sink Assembly WARNING: Before working inside your computer, ...
...touch the fan when the computer is powered on the system board. Performing these steps incorrectly could damage your system board. For technical service information, see Removing the Shield). 4. Removing the System Fan and Heat Sink Assembly 1. Slide and lift the system fan away from ...3. Disconnect the system fan cable from the frame of the computer. 9. Back to Contents Page System Fan and Heat Sink Assembly Dell Studio One 19/1909 Service Manual Removing the System Fan and Heat Sink Assembly Replacing the System Fan and Heat Sink Assembly WARNING: Before working inside your computer, ...


