Service Manual
Page 1
..., a n d Windows Vista start button logo are trademarks of Microsoft Corporation in this document is strictly forbidden. Dell Inc. A00 Dell Studio One 19/1909 Service Manual Technical Overview Before You Begin Computer Cover Shield Microphone Stand Memory Module(s) Back I/O Panel Processor Fan and... Heat Sink Processor Speakers Drives Cards Inverter System Fan and Heat Sink Assembly Side I/O Panel Power Supply Unit...
..., a n d Windows Vista start button logo are trademarks of Microsoft Corporation in this document is strictly forbidden. Dell Inc. A00 Dell Studio One 19/1909 Service Manual Technical Overview Before You Begin Computer Cover Shield Microphone Stand Memory Module(s) Back I/O Panel Processor Fan and... Heat Sink Processor Speakers Drives Cards Inverter System Fan and Heat Sink Assembly Side I/O Panel Power Supply Unit...
Service Manual
Page 2
.... WARNING: Before working inside your computer, and protecting against electrostatic discharge. WARNING: Disconnect all open files and exit all power sources before you disconnect the cable. CAUTION: Only a certified service technician is complete. 4. Some cables have connectors with ...purchased separately-installed by performing the removal procedure in reverse order. Back to Contents Page Before You Begin Dell Studio One 19/1909 Service Manual Recommended Tools Turning Off Your Computer Safety Instructions This chapter provides procedures for removing and installing the...
.... WARNING: Before working inside your computer, and protecting against electrostatic discharge. WARNING: Disconnect all open files and exit all power sources before you disconnect the cable. CAUTION: Only a certified service technician is complete. 4. Some cables have connectors with ...purchased separately-installed by performing the removal procedure in reverse order. Back to Contents Page Before You Begin Dell Studio One 19/1909 Service Manual Recommended Tools Turning Off Your Computer Safety Instructions This chapter provides procedures for removing and installing the...

Service Manual
Page 11
... periodically touching an unpainted metal surface (such as the computer stand). Remove the power supply unit (see Removing the Optical Drive). 5. Remove the optical drive (see Removing the Power Supply Unit). 4. For additional safety best practices information, see Removing the Inverter)....(see Removing the System Board). 8. Remove the fourteen screws that secure the support assembly to Contents Page Support Assembly Dell Studio One 19/1909 Service Manual Removing the Support Assembly Replacing the Support Assembly WARNING: Before working inside your computer, read the safety information...
... periodically touching an unpainted metal surface (such as the computer stand). Remove the power supply unit (see Removing the Optical Drive). 5. Remove the optical drive (see Removing the Power Supply Unit). 4. For additional safety best practices information, see Removing the Inverter)....(see Removing the System Board). 8. Remove the fourteen screws that secure the support assembly to Contents Page Support Assembly Dell Studio One 19/1909 Service Manual Removing the Support Assembly Replacing the Support Assembly WARNING: Before working inside your computer, read the safety information...
Service Manual
Page 13
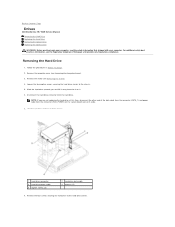
... practices information, see the Regulatory Compliance Homepage at this time, disconnect the other end of the chassis. 1 hard drive connector 3 hard drive power cable 5 captive screws (2) 2 hard drive data cable 4 grooves (2) 8. Remove the four screws securing the hard drive to the chassis. ...lift it aside. 7. Slide the hard drive towards you are not replacing the hard drive at www.dell.com/regulatory_compliance. Back to Contents Page Drives Dell Studio One 19/1909 Service Manual Removing the Hard Drive Replacing the Hard Drive Removing the Optical Drive Replacing the Optical Drive ...
... practices information, see the Regulatory Compliance Homepage at this time, disconnect the other end of the chassis. 1 hard drive connector 3 hard drive power cable 5 captive screws (2) 2 hard drive data cable 4 grooves (2) 8. Remove the four screws securing the hard drive to the chassis. ...lift it aside. 7. Slide the hard drive towards you are not replacing the hard drive at www.dell.com/regulatory_compliance. Back to Contents Page Drives Dell Studio One 19/1909 Service Manual Removing the Hard Drive Replacing the Hard Drive Removing the Optical Drive Replacing the Optical Drive ...

Service Manual
Page 30
... computer cover. Remove the four screws that of the current power supply unit. WARNING: To guard against likelihood of the replacement power supply unit matches that secure the power supply unit to Contents Page Power Supply Unit Dell Studio One 19/1909 Service Manual Removing the Power Supply Unit Replacing the Power Supply Unit WARNING: Before working inside your computer from...
... computer cover. Remove the four screws that of the current power supply unit. WARNING: To guard against likelihood of the replacement power supply unit matches that secure the power supply unit to Contents Page Power Supply Unit Dell Studio One 19/1909 Service Manual Removing the Power Supply Unit Replacing the Power Supply Unit WARNING: Before working inside your computer from...
Service Manual
Page 42
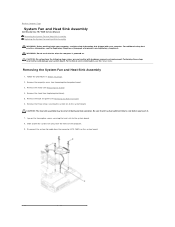
... the system fan to the system board. 8. WARNING: Do not touch the fan when the computer is powered on the system board. Back to Contents Page System Fan and Heat Sink Assembly Dell Studio One 19/1909 Service Manual Removing the System Fan and Heat Sink Assembly Replacing the System Fan and Heat Sink Assembly..., see Removing the Computer Cover). 3. Performing these steps incorrectly could damage your computer. Remove the computer cover (see the Regulatory Compliance Homepage at www.dell.com/regulatory_compliance. CAUTION: Do not perform the following steps unless you touch it. 7.
... the system fan to the system board. 8. WARNING: Do not touch the fan when the computer is powered on the system board. Back to Contents Page System Fan and Heat Sink Assembly Dell Studio One 19/1909 Service Manual Removing the System Fan and Heat Sink Assembly Replacing the System Fan and Heat Sink Assembly..., see Removing the Computer Cover). 3. Performing these steps incorrectly could damage your computer. Remove the computer cover (see the Regulatory Compliance Homepage at www.dell.com/regulatory_compliance. CAUTION: Do not perform the following steps unless you touch it. 7.
Service Manual
Page 44
... listed in the Options List. Key Functions - System Setup Options NOTE: Depending on your computer, including installed hardware, power conservation, and security features. Information on the right side of your computer and installed devices, the items listed in this... desktop. Options Field - Displays the processor L1 cache size. Displays the system name. Back to Contents Page System Setup Dell Studio One 19/1909 Service Manual Overview Clearing Forgotten Passwords Clearing CMOS Settings Flashing the BIOS Overview Use system setup to: l Change the system ...
... listed in the Options List. Key Functions - System Setup Options NOTE: Depending on your computer, including installed hardware, power conservation, and security features. Information on the right side of your computer and installed devices, the items listed in this... desktop. Options Field - Displays the processor L1 cache size. Displays the system name. Back to Contents Page System Setup Dell Studio One 19/1909 Service Manual Overview Clearing Forgotten Passwords Clearing CMOS Settings Flashing the BIOS Overview Use system setup to: l Change the system ...
Service Manual
Page 50
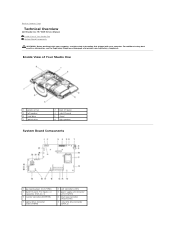
..., read the safety information that shipped with your computer. Back to Contents Page Technical Overview Dell Studio One 19/1909 Service Manual Inside View of Your Studio One 1 processor fan 3 left speaker 5 hard drive 7 optical drive 2 back I/O panel ...4 side I/O panel 6 stand 8 right speaker System Board Components 1 password jumper (CLR_PSWD) 3 back I/O panel, PCI Express x4 connector (PCIE_4X_1) 5 inverter connector (INVERTER) 7 optical drive connector (ODD_POWER) 2 LCD connector (LVDS) 4 power...
..., read the safety information that shipped with your computer. Back to Contents Page Technical Overview Dell Studio One 19/1909 Service Manual Inside View of Your Studio One 1 processor fan 3 left speaker 5 hard drive 7 optical drive 2 back I/O panel ...4 side I/O panel 6 stand 8 right speaker System Board Components 1 password jumper (CLR_PSWD) 3 back I/O panel, PCI Express x4 connector (PCIE_4X_1) 5 inverter connector (INVERTER) 7 optical drive connector (ODD_POWER) 2 LCD connector (LVDS) 4 power...

