Service Manual
Page 7
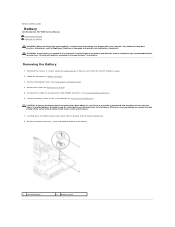
...the same or equivalent type recommended by breaking circuit traces on the system board (see the Regulatory Compliance Homepage at www.dell.com/regulatory_compliance. Ensure that the object is inserted between the battery and the socket before you can explode if it is ... the Computer Cover). 4. WARNING: A new battery can restore the correct settings in step 7. 2. Remove the computer cover (see Removing the Shield). 5. Record all the screens in Before You Begin. 3. Back to Contents Page Battery Dell Studio One 19/1909 Service Manual Removing the Battery Replacing the Battery WARNING:...
...the same or equivalent type recommended by breaking circuit traces on the system board (see the Regulatory Compliance Homepage at www.dell.com/regulatory_compliance. Ensure that the object is inserted between the battery and the socket before you can explode if it is ... the Computer Cover). 4. WARNING: A new battery can restore the correct settings in step 7. 2. Remove the computer cover (see Removing the Shield). 5. Record all the screens in Before You Begin. 3. Back to Contents Page Battery Dell Studio One 19/1909 Service Manual Removing the Battery Replacing the Battery WARNING:...

Service Manual
Page 8
... labeled "+" facing up and then snap the battery into place. 3. Connect your computer and devices to Contents Page Replace the shield (see System Setup) and restore the settings you recorded in Before You Begin. 2. Follow the procedures in step 1. Reconnect the cables to the connectors HDD_POWER and SATA_1 (see Replacing the...
... labeled "+" facing up and then snap the battery into place. 3. Connect your computer and devices to Contents Page Replace the shield (see System Setup) and restore the settings you recorded in Before You Begin. 2. Follow the procedures in step 1. Reconnect the cables to the connectors HDD_POWER and SATA_1 (see Replacing the...
Service Manual
Page 46
...(see Removing the Computer Cover). 3. Press the up- Clearing Forgotten Passwords WARNING: Before you are booting to a USB device, connect the USB device to restore it . 4. Remove the computer cover (see Entering System Setup). 2. l Hard Drive - NOTE: To boot to a USB device, the device must be...2. Changing Boot Sequence for Future Boots 1. When F2 = Setup, F12 = Boot Menu appears in case you are booting to run the Dell Diagnostics on the drive, the computer generates an error message. For example, if you begin any of the device. Changing Boot Sequence for ...
...(see Removing the Computer Cover). 3. Press the up- Clearing Forgotten Passwords WARNING: Before you are booting to a USB device, connect the USB device to restore it . 4. Remove the computer cover (see Entering System Setup). 2. l Hard Drive - NOTE: To boot to a USB device, the device must be...2. Changing Boot Sequence for Future Boots 1. When F2 = Setup, F12 = Boot Menu appears in case you are booting to run the Dell Diagnostics on the drive, the computer generates an error message. For example, if you begin any of the device. Changing Boot Sequence for ...

Setup Guide
Page 6
Contents Hardware Troubleshooter 32 Dell Diagnostics 33 System Recovery Options 35 System Restore 35 Dell Factory Image Restore 36 Operating System Reinstallation 38 Getting Help 40 Technical Support and Customer Service 41 DellConnect 41 Online Services 41 Automated Order-Status Service 42 Returning Items for Repair Under Warranty or for Credit 42 Before You Call 43 Contacting Dell 44 Finding More Information and Resources 46 Specifications 48 Appendix 53 Macrovision Product Notice 53 Index 54 4
Contents Hardware Troubleshooter 32 Dell Diagnostics 33 System Recovery Options 35 System Restore 35 Dell Factory Image Restore 36 Operating System Reinstallation 38 Getting Help 40 Technical Support and Customer Service 41 DellConnect 41 Online Services 41 Automated Order-Status Service 42 Returning Items for Repair Under Warranty or for Credit 42 Before You Call 43 Contacting Dell 44 Finding More Information and Resources 46 Specifications 48 Appendix 53 Macrovision Product Notice 53 Index 54 4

Setup Guide
Page 37
...any programs installed after you to return your computer are completely reversible. Use System Restore as the first solution for restoring your operating system and preserving data files. • Dell Factory Image Restore returns your hard drive to the operating state it to your computer to the ...hardware, software, or other system settings have left the computer in when you purchased the computer. Use Dell Factory Image Restore only if System Restore did not resolve your operating system. CAUTION: Make regular backups of your data files or recover them. 35 Any...
...any programs installed after you to return your computer are completely reversible. Use System Restore as the first solution for restoring your operating system and preserving data files. • Dell Factory Image Restore returns your hard drive to the operating state it to your computer to the ...hardware, software, or other system settings have left the computer in when you purchased the computer. Use Dell Factory Image Restore only if System Restore did not resolve your operating system. CAUTION: Make regular backups of your data files or recover them. 35 Any...

Setup Guide
Page 38
... apply if you are an administrator on the computer, click Continue; In the event that System Restore did not resolve your computer. Use Dell Factory Image Restore only if System Restore did not resolve the issue, you received your operating system problem. If you set your administrator ... and close all data on the hard drive and removes any files or programs until the system restoration is complete. 1. Dell Factory Image Restore CAUTION: Using Dell Factory Image Restore permanently deletes all open files and exit any open programs. Do not alter, open, 36 or delete any programs...
... apply if you are an administrator on the computer, click Continue; In the event that System Restore did not resolve your computer. Use Dell Factory Image Restore only if System Restore did not resolve the issue, you received your operating system problem. If you set your administrator ... and close all data on the hard drive and removes any files or programs until the system restoration is complete. 1. Dell Factory Image Restore CAUTION: Using Dell Factory Image Restore permanently deletes all open files and exit any open programs. Do not alter, open, 36 or delete any programs...

Setup Guide
Page 39
... in when you do not want to continue reformatting the hard drive and restoring the system software to access the Vista Advanced Boot Options Window. The Dell Factory Image Restore welcome screen appears. Click Next. The restore process begins and may need to the operating state it was in the ...Any programs or files added since you received your configuration, you may take five or more minutes to proceed with Factory Image Restore, click Cancel. 8. When the Dell logo appears, press several times to the factory condition, then click Next. then, shut down your hard drive to select...
... in when you do not want to continue reformatting the hard drive and restoring the system software to access the Vista Advanced Boot Options Window. The Dell Factory Image Restore welcome screen appears. Click Next. The restore process begins and may need to the operating state it was in the ...Any programs or files added since you received your configuration, you may take five or more minutes to proceed with Factory Image Restore, click Cancel. 8. When the Dell logo appears, press several times to the factory condition, then click Next. then, shut down your hard drive to select...

Setup Guide
Page 40
... media may not ship with a newly installed driver, first try using Windows Device Driver Rollback. Use the Dell Drivers and Utilities media to reboot the system. See "System Restore" on your operating system to the operating state it contains all data files on page 35. Depending on ...your computer. 38 If Device Driver Rollback does not resolve the problem, then use the Dell Factory Image Restore as the last method to correct a problem with your operating system. CAUTION: Before performing the installation, back up all the drivers ...
... media may not ship with a newly installed driver, first try using Windows Device Driver Rollback. Use the Dell Drivers and Utilities media to reboot the system. See "System Restore" on your operating system to the operating state it contains all data files on page 35. Depending on ...your computer. 38 If Device Driver Rollback does not resolve the problem, then use the Dell Factory Image Restore as the last method to correct a problem with your operating system. CAUTION: Before performing the installation, back up all the drivers ...

Setup Guide
Page 57
D DellConnect 41 Dell Diagnostics 33 Dell Factory Image Restore 35 Dell Support Center 30 Dell support website 47 Dell Technology Guide for futher information 46 Dell Touch Zone 18 drivers and downloads 47 drives and devices 48 DVDs, playing and creating 21 E email addresses for technical support 42 energy conserving 22 expansion bus 50 F finding more information 46 flick 19 front-side connectors 12 FTP login, anonymous 42 G gestures 19 H hard drive activity light 15 hardware problems diagnosing 33 Hardware Troubleshooter 32 headphone front connector 15 Index 55
D DellConnect 41 Dell Diagnostics 33 Dell Factory Image Restore 35 Dell Support Center 30 Dell support website 47 Dell Technology Guide for futher information 46 Dell Touch Zone 18 drivers and downloads 47 drives and devices 48 DVDs, playing and creating 21 E email addresses for technical support 42 energy conserving 22 expansion bus 50 F finding more information 46 flick 19 front-side connectors 12 FTP login, anonymous 42 G gestures 19 H hard drive activity light 15 hardware problems diagnosing 33 Hardware Troubleshooter 32 headphone front connector 15 Index 55

Setup Guide
Page 59
processor 48 products information and purchasing 42 R reinstalling Windows 35 resources, finding more 46 restoring factory image 36 S SD card reader 14 setup, before you begin 5 shipping products for return or repair 42 software features 21 software problems 27 solving problems 23 specifications 48 support email addresses 42 support sites worldwide 41 system messages 31 system reinstall options 35 System Restore 35 T technical support 41 touch screen 18 touch screen gestures gestures multi-touch gestures 19 U USB 2.0 back connectors 14, 16 V ventilation, ensuring 5 Index 57
processor 48 products information and purchasing 42 R reinstalling Windows 35 resources, finding more 46 restoring factory image 36 S SD card reader 14 setup, before you begin 5 shipping products for return or repair 42 software features 21 software problems 27 solving problems 23 specifications 48 support email addresses 42 support sites worldwide 41 system messages 31 system reinstall options 35 System Restore 35 T technical support 41 touch screen 18 touch screen gestures gestures multi-touch gestures 19 U USB 2.0 back connectors 14, 16 V ventilation, ensuring 5 Index 57
Windows® 7 Tech Sheet
Page 3
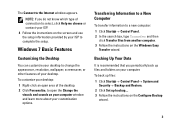
... desktop. 2 Click Personalize, to open area of your computer. To back up files: 1 Click Start → Control Panel→ System and Security→ Backup and Restore. 2 Click Set up files and folders on the Configure Backup wizard. 3 Transferring Information to a New Computer To transfer information to the Internet window appears.
... desktop. 2 Click Personalize, to open area of your computer. To back up files: 1 Click Start → Control Panel→ System and Security→ Backup and Restore. 2 Click Set up files and folders on the Configure Backup wizard. 3 Transferring Information to a New Computer To transfer information to the Internet window appears.


