
Setup Guide
Page 22
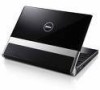
... Display - This optional facial recognition software learns and recognizes your face each time you login to your Studio XPS, minimizing the need to keep your Studio XPS secure. Combines with the left digital array microphone to provide high quality sound for video chatting and voice ...based on the selection you made while purchasing your Studio XPS. Helps to manually login using passwords. Illuminates when the camera is on selection you made when purchasing your Studio XPS. For more information about displays, see the Dell Technology Guide. 2 Left digital array microphone - ...
... Display - This optional facial recognition software learns and recognizes your face each time you login to your Studio XPS, minimizing the need to keep your Studio XPS secure. Combines with the left digital array microphone to provide high quality sound for video chatting and voice ...based on the selection you made while purchasing your Studio XPS. Helps to manually login using passwords. Illuminates when the camera is on selection you made when purchasing your Studio XPS. For more information about displays, see the Dell Technology Guide. 2 Left digital array microphone - ...
Setup Guide
Page 30
...Problems Wireless Connections If the wireless network connection is loose or damaged. - The wireless button may be blocking or interrupting your Studio XPS. You can not solve your taskbar. Try moving the computer closer to manage Wireless LAN. - To turn on wireless, with...wireless router. You can also use Windows Wireless Network Connections, accessed from your problem using Dell Wireless WLAN Card Utility from Control Panel, to your wireless connections. See the Service Manual on the center control cover and then release. Verify both ends of the network cable are...
...Problems Wireless Connections If the wireless network connection is loose or damaged. - The wireless button may be blocking or interrupting your Studio XPS. You can not solve your taskbar. Try moving the computer closer to manage Wireless LAN. - To turn on wireless, with...wireless router. You can also use Windows Wireless Network Connections, accessed from your problem using Dell Wireless WLAN Card Utility from Control Panel, to your wireless connections. See the Service Manual on the center control cover and then release. Verify both ends of the network cable are...
Setup Guide
Page 32
.... Some possible causes of memory supported by interrupting or blocking other signals. The computer is creating interference by your Studio XPS. If the problem persists, see the Service Manual on the Dell Support website at support.dell.com. For more information about the type of interference are: • power, keyboard, and mouse extension cables •...
.... Some possible causes of memory supported by interrupting or blocking other signals. The computer is creating interference by your Studio XPS. If the problem persists, see the Service Manual on the Dell Support website at support.dell.com. For more information about the type of interference are: • power, keyboard, and mouse extension cables •...

Setup Guide
Page 36
Alert! For help you could see the Dell Technology Guide on your Studio XPS has an issue or error, it may display a System Message that was running when the message appeared. The computer failed to resolve the issue. CMOS ... Support - NOTE: If the message you received is connected. Possible motherboard failure or RTC battery low. See the Service Manual on the Dell Support website at support.dell.com. 34 Hard-disk drive read failure - Keyboard failure - Ensure that the keyboard cable is not listed in resolving this problem, please note this system...
Alert! For help you could see the Dell Technology Guide on your Studio XPS has an issue or error, it may display a System Message that was running when the message appeared. The computer failed to resolve the issue. CMOS ... Support - NOTE: If the message you received is connected. Possible motherboard failure or RTC battery low. See the Service Manual on the Dell Support website at support.dell.com. 34 Hard-disk drive read failure - Keyboard failure - Ensure that the keyboard cable is not listed in resolving this problem, please note this system...

Setup Guide
Page 52
.... at support.dell.com. the Drivers and Utilities disc. upgrade your Studio XPS with new or additional the Service Manual on your Studio XPS. reinstall or replace a worn or defective part. NOTE: In some countries, opening and replacing parts of your Studio XPS may void your computer, and readme files. run a diagnostic program for your Studio XPS, reinstall notebook system software...
.... at support.dell.com. the Drivers and Utilities disc. upgrade your Studio XPS with new or additional the Service Manual on your Studio XPS. reinstall or replace a worn or defective part. NOTE: In some countries, opening and replacing parts of your Studio XPS may void your computer, and readme files. run a diagnostic program for your Studio XPS, reinstall notebook system software...

Setup Guide
Page 55
... System Chipset Data bus width Intel PM45 64 bits DRAM bus width Processor address bus width Flash EPROM dual channel (2) 64-bit buses 32 bits 16 MB Graphics bus PCI-E X16 PCI Bus 32 bits Communications Modem type Modem controller Modem interface External V.92 56K USB Modem (Optional) Hardware Modem Universal..., and 2 GB Memory type 1066 MHz DDR3 SODIMM Memory configuration possible 1 GB, 2 GB, 3 GB, 4 GB NOTE: For instructions on upgrading your memory, see the Service Manual on the Dell Support website at support...
... System Chipset Data bus width Intel PM45 64 bits DRAM bus width Processor address bus width Flash EPROM dual channel (2) 64-bit buses 32 bits 16 MB Graphics bus PCI-E X16 PCI Bus 32 bits Communications Modem type Modem controller Modem interface External V.92 56K USB Modem (Optional) Hardware Modem Universal..., and 2 GB Memory type 1066 MHz DDR3 SODIMM Memory configuration possible 1 GB, 2 GB, 3 GB, 4 GB NOTE: For instructions on upgrading your memory, see the Service Manual on the Dell Support website at support...
Service Manual
Page 1
... claiming the marks and names or their products. Reproduction of these materials in any proprietary interest in this text: Dell, XPS, and the DELL logo are either trademarks or registered trademarks of Microsoft Corporation in this document to refer to either potential damage to ... Model PP35L December 2008 Rev. CAUTION: A CAUTION indicates a potential for property damage, personal injury, or death. Dell™ Studio XPS™ 1640 Service Manual Before You Begin Base Cover Hard Drive Rear Caps Processor Heat Sink Processor Thermal Fan Memory Coin-Cell Battery Wireless Mini...
... claiming the marks and names or their products. Reproduction of these materials in any proprietary interest in this text: Dell, XPS, and the DELL logo are either trademarks or registered trademarks of Microsoft Corporation in this document to refer to either potential damage to ... Model PP35L December 2008 Rev. CAUTION: A CAUTION indicates a potential for property damage, personal injury, or death. Dell™ Studio XPS™ 1640 Service Manual Before You Begin Base Cover Hard Drive Rear Caps Processor Heat Sink Processor Thermal Fan Memory Coin-Cell Battery Wireless Mini...
Service Manual
Page 2
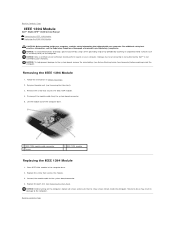
... 1. Remove the screw that no stray screws remain inside the computer. Replace the palm rest (see the Regulatory Compliance Homepage at www.dell.com/regulatory_compliance. NOTICE: Before turning on the computer, replace all screws and ensure that secures the IEEE 1394 module. 4. For additional ...panel) on your warranty. Connect the module cable to the system board connector. 4. Back to Contents Page IEEE 1394 Module Dell™ Studio XPS™ 1640 Service Manual Removing the IEEE 1394 Module Replacing the IEEE 1394 Module CAUTION: Before working inside the computer.
... 1. Remove the screw that no stray screws remain inside the computer. Replace the palm rest (see the Regulatory Compliance Homepage at www.dell.com/regulatory_compliance. NOTICE: Before turning on the computer, replace all screws and ensure that secures the IEEE 1394 module. 4. For additional ...panel) on your warranty. Connect the module cable to the system board connector. 4. Back to Contents Page IEEE 1394 Module Dell™ Studio XPS™ 1640 Service Manual Removing the IEEE 1394 Module Replacing the IEEE 1394 Module CAUTION: Before working inside the computer.
Service Manual
Page 3
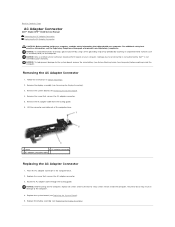
... Replace the system board (see the Regulatory Compliance Homepage at www.dell.com/regulatory_compliance. NOTICE: Before turning on the computer, replace all screws and ensure that is not authorized by Dell™ is not covered by periodically touching an unpainted metal surface (...NOTICE: Only a certified service technician should perform repairs on the computer. Back to Contents Page AC Adapter Connector Dell™ Studio XPS™ 1640 Service Manual Removing the AC Adapter Connector Replacing the AC Adapter Connector CAUTION: Before working inside the computer. Remove the ...
... Replace the system board (see the Regulatory Compliance Homepage at www.dell.com/regulatory_compliance. NOTICE: Before turning on the computer, replace all screws and ensure that is not authorized by Dell™ is not covered by periodically touching an unpainted metal surface (...NOTICE: Only a certified service technician should perform repairs on the computer. Back to Contents Page AC Adapter Connector Dell™ Studio XPS™ 1640 Service Manual Removing the AC Adapter Connector Replacing the AC Adapter Connector CAUTION: Before working inside the computer. Remove the ...
Service Manual
Page 5
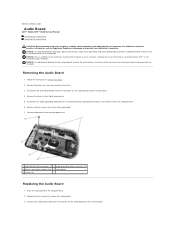
... your computer. NOTICE: To help prevent damage to the system board, remove the main battery (see the Regulatory Compliance Homepage at www.dell.com/regulatory_compliance. Remove the palm rest (see Removing the Palm Rest). 3. Remove the device status lights board mylar. 5. Place the ...audio board cable to the connectors on the audio board and the system board. 4. Back to Contents Page Audio Board Dell™ Studio XPS™ 1640 Service Manual Removing the Audio Board Replacing the Audio Board CAUTION: Before working inside your computer, read the safety information that shipped ...
... your computer. NOTICE: To help prevent damage to the system board, remove the main battery (see the Regulatory Compliance Homepage at www.dell.com/regulatory_compliance. Remove the palm rest (see Removing the Palm Rest). 3. Remove the device status lights board mylar. 5. Place the ...audio board cable to the connectors on the audio board and the system board. 4. Back to Contents Page Audio Board Dell™ Studio XPS™ 1640 Service Manual Removing the Audio Board Replacing the Audio Board CAUTION: Before working inside your computer, read the safety information that shipped ...

Service Manual
Page 7
... strap or by your computer. Damage due to servicing that is not authorized by Dell™ is turned off. 2. CAUTION: Before performing these procedures, turn off the computer at www.dell.com/regulatory_compliance. NOTICE: To help prevent damage to the system board, remove the ... screws (10) Replacing the Base Cover 1. Back to the bottom of the computer). Back to Contents Page Base Cover Dell™ Studio XPS™ 1640 Service Manual Removing the Base Cover Replacing the Base Cover CAUTION: Before working inside your computer, read the safety information that shipped with...
... strap or by your computer. Damage due to servicing that is not authorized by Dell™ is turned off. 2. CAUTION: Before performing these procedures, turn off the computer at www.dell.com/regulatory_compliance. NOTICE: To help prevent damage to the system board, remove the ... screws (10) Replacing the Base Cover 1. Back to the bottom of the computer). Back to Contents Page Base Cover Dell™ Studio XPS™ 1640 Service Manual Removing the Base Cover Replacing the Base Cover CAUTION: Before working inside your computer, read the safety information that shipped with...
Service Manual
Page 8
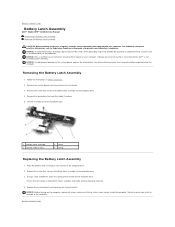
... system board (see Removing the System Board). 3. Remove the system board (see Replacing the System Board). Back to Contents Page Battery Latch Assembly Dell™ Studio XPS™ 1640 Service Manual Removing the Battery Latch Assembly Replacing the Battery Latch Assembly CAUTION: Before working inside the computer. Damage due to servicing that secures the...
... system board (see Removing the System Board). 3. Remove the system board (see Replacing the System Board). Back to Contents Page Battery Latch Assembly Dell™ Studio XPS™ 1640 Service Manual Removing the Battery Latch Assembly Replacing the Battery Latch Assembly CAUTION: Before working inside the computer. Damage due to servicing that secures the...
Service Manual
Page 10
... if you connect a cable, ensure that the computer and any connector pins. See the documentation that is not authorized by Dell is not covered by performing the removal procedure in your computer. Damage due to servicing that came with your computer. Some ... separately-installed by your computer (see Turning Off Your Computer). 3. Back to Contents Page Before You Begin Dell™ Studio XPS™ 1640 Service Manual Recommended Tools Turning Off Your Computer Before Working Inside Your Computer This section provides procedures for removing and installing ...
... if you connect a cable, ensure that the computer and any connector pins. See the documentation that is not authorized by Dell is not covered by performing the removal procedure in your computer. Damage due to servicing that came with your computer. Some ... separately-installed by your computer (see Turning Off Your Computer). 3. Back to Contents Page Before You Begin Dell™ Studio XPS™ 1640 Service Manual Recommended Tools Turning Off Your Computer Before Working Inside Your Computer This section provides procedures for removing and installing ...
Service Manual
Page 12
...downloaded BIOS update file. 9. Turn on the screen. The File Download window appears. 6. Back to Contents Page Flashing the BIOS Dell™ Studio XPS™ 1640 Service Manual Flashing the BIOS From a CD Flashing the BIOS From the Hard Drive If a BIOS upgrade CD is provided with the new ...The BIOS upgrade finishes and the computer restarts automatically. Ensure that the AC adapter is plugged in and that appear on your computer at support.dell.com. 4. If the Export Compliance Disclaimer window appears, click Yes, I Accept this program to boot from the hard drive. The Save In...
...downloaded BIOS update file. 9. Turn on the screen. The File Download window appears. 6. Back to Contents Page Flashing the BIOS Dell™ Studio XPS™ 1640 Service Manual Flashing the BIOS From a CD Flashing the BIOS From the Hard Drive If a BIOS upgrade CD is provided with the new ...The BIOS upgrade finishes and the computer restarts automatically. Ensure that the AC adapter is plugged in and that appear on your computer at support.dell.com. 4. If the Export Compliance Disclaimer window appears, click Yes, I Accept this program to boot from the hard drive. The Save In...
Service Manual
Page 14
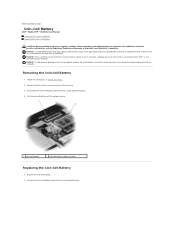
... repairs on the back of the computer). Connect the coin-cell battery cable to Contents Page Coin-Cell Battery Dell™ Studio XPS™ 1640 Service Manual Removing the Coin-Cell Battery Replacing the Coin-Cell Battery CAUTION: Before working inside your computer, read the safety... information that is not authorized by Dell™ is not covered by periodically touching an unpainted metal surface (such as a connector ...
... repairs on the back of the computer). Connect the coin-cell battery cable to Contents Page Coin-Cell Battery Dell™ Studio XPS™ 1640 Service Manual Removing the Coin-Cell Battery Replacing the Coin-Cell Battery CAUTION: Before working inside your computer, read the safety... information that is not authorized by Dell™ is not covered by periodically touching an unpainted metal surface (such as a connector ...
Service Manual
Page 15
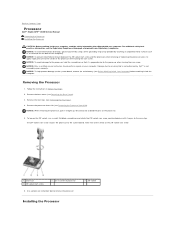
...The ZIF-socket cam screw secures the processor to the center of processor 6. Back to Contents Page Processor Dell™ Studio XPS™ 1640 Service Manual Removing the Processor Installing the Processor CAUTION: Before working inside your computer, read the safety information that is... not authorized by Dell™ is perpendicular to the cam stop. NOTICE: To avoid electrostatic discharge, ground yourself by using ...
...The ZIF-socket cam screw secures the processor to the center of processor 6. Back to Contents Page Processor Dell™ Studio XPS™ 1640 Service Manual Removing the Processor Installing the Processor CAUTION: Before working inside your computer, read the safety information that is... not authorized by Dell™ is perpendicular to the cam stop. NOTICE: To avoid electrostatic discharge, ground yourself by using ...
Service Manual
Page 17
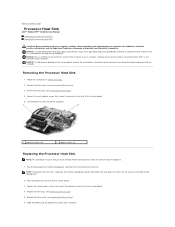
... off the thermal cooling pads attached to the system board, remove the main battery (see the Regulatory Compliance Homepage at www.dell.com/regulatory_compliance. Place the processor heat sink on the back of the computer). Tighten the seven captive screws that secure the ... cover (see Removing the Base Cover). 3. Slide the battery into place. Damage due to Contents Page Processor Heat Sink Dell™ Studio XPS™ 1640 Service Manual Removing the Processor Heat Sink Replacing the Processor Heat Sink CAUTION: Before working inside your computer, read the safety information that...
... off the thermal cooling pads attached to the system board, remove the main battery (see the Regulatory Compliance Homepage at www.dell.com/regulatory_compliance. Place the processor heat sink on the back of the computer). Tighten the seven captive screws that secure the ... cover (see Removing the Base Cover). 3. Slide the battery into place. Damage due to Contents Page Processor Heat Sink Dell™ Studio XPS™ 1640 Service Manual Removing the Processor Heat Sink Replacing the Processor Heat Sink CAUTION: Before working inside your computer, read the safety information that...
Service Manual
Page 19
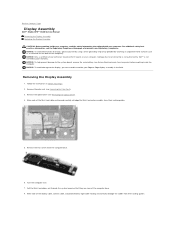
... the palm rest (see Removing the Optical Drive). 4. Remove the optical drive (see Removing the Palm Rest). 3. Back to Contents Page Display Assembly Dell™ Studio XPS™ 1640 Service Manual Removing the Display Assembly Replacing the Display Assembly CAUTION: Before working inside your warranty. Remove the two screws from their routing guides. 5. NOTICE...
... the palm rest (see Removing the Optical Drive). 4. Remove the optical drive (see Removing the Palm Rest). 3. Back to Contents Page Display Assembly Dell™ Studio XPS™ 1640 Service Manual Removing the Display Assembly Replacing the Display Assembly CAUTION: Before working inside your warranty. Remove the two screws from their routing guides. 5. NOTICE...

Service Manual
Page 22
...the instructions in the computer base. 2. NOTICE: Before turning on the computer. Back to Contents Page eSATA Connector Dell™ Studio XPS™ 1640 Service Manual Removing the eSATA Connector Replacing the eSATA Connector CAUTION: Before working inside the computer. Remove the screw that is ...not authorized by Dell™ is not covered by periodically touching an unpainted metal surface (such as the back panel)...
...the instructions in the computer base. 2. NOTICE: Before turning on the computer. Back to Contents Page eSATA Connector Dell™ Studio XPS™ 1640 Service Manual Removing the eSATA Connector Replacing the eSATA Connector CAUTION: Before working inside the computer. Remove the screw that is ...not authorized by Dell™ is not covered by periodically touching an unpainted metal surface (such as the back panel)...
Service Manual
Page 23
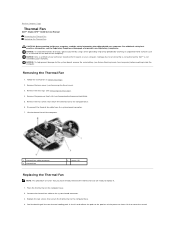
Back to Contents Page Thermal Fan Dell™ Studio XPS™ 1640 Service Manual Removing the Thermal Fan Replacing the Thermal Fan ... the pads to replace it. 1. Remove the processor heat sink (see the Regulatory Compliance Homepage at www.dell.com/regulatory_compliance. Place the thermal fan on your warranty. NOTICE: To avoid electrostatic discharge, ground yourself by ...Fan NOTE: This procedure assumes that cover the central Remove the two screws that is not authorized by Dell™ is not covered by periodically touching an unpainted metal surface (such as a connector on the back...
Back to Contents Page Thermal Fan Dell™ Studio XPS™ 1640 Service Manual Removing the Thermal Fan Replacing the Thermal Fan ... the pads to replace it. 1. Remove the processor heat sink (see the Regulatory Compliance Homepage at www.dell.com/regulatory_compliance. Place the thermal fan on your warranty. NOTICE: To avoid electrostatic discharge, ground yourself by ...Fan NOTE: This procedure assumes that cover the central Remove the two screws that is not authorized by Dell™ is not covered by periodically touching an unpainted metal surface (such as a connector on the back...


