
Setup Guide
Page 36
...]. Hard-disk (HDD) drive failure - Possible hard disk drive failure during POST (see "Contacting Dell" on the Dell Support website at support.dell.com. Replace the CPU fan. Hard-disk drive read failure - Using Support Tools System Messages If your computer or on the Dell Support website at support.dell.com. 34 Alternatively you could see the Dell Technology Guide on your Studio XPS has...
...]. Hard-disk (HDD) drive failure - Possible hard disk drive failure during POST (see "Contacting Dell" on the Dell Support website at support.dell.com. Replace the CPU fan. Hard-disk drive read failure - Using Support Tools System Messages If your computer or on the Dell Support website at support.dell.com. 34 Alternatively you could see the Dell Technology Guide on your Studio XPS has...

Setup Guide
Page 52
... can be found on the Dell™ Support website at support.dell.com. the Dell Technology Guide installed on the Dell Support website memory, or a new hard drive. run a diagnostic program for your Studio XPS, reinstall notebook system software, or update drivers for your warranty. NOTE: In some countries, opening and replacing parts of your Studio XPS may void your computer, and...
... can be found on the Dell™ Support website at support.dell.com. the Dell Technology Guide installed on the Dell Support website memory, or a new hard drive. run a diagnostic program for your Studio XPS, reinstall notebook system software, or update drivers for your warranty. NOTE: In some countries, opening and replacing parts of your Studio XPS may void your computer, and...
Service Manual
Page 25
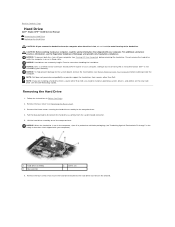
...) before working inside the computer. NOTICE: To prevent data loss, turn off your computer. NOTICE: Hard drives are installing a hard drive from sources other than Dell, you need to Contents Page Hard Drive Dell™ Studio XPS™ 1640 Service Manual Removing the Hard Drive Replacing the Hard Drive CAUTION: If you are extremely fragile. Follow the instructions in Sleep state. Remove the three screws...
...) before working inside the computer. NOTICE: To prevent data loss, turn off your computer. NOTICE: Hard drives are installing a hard drive from sources other than Dell, you need to Contents Page Hard Drive Dell™ Studio XPS™ 1640 Service Manual Removing the Hard Drive Replacing the Hard Drive CAUTION: If you are extremely fragile. Follow the instructions in Sleep state. Remove the three screws...

Service Manual
Page 26
... firm and even pressure to disconnect it clicks into place. Replace the base cover (see Dell Technology Guide). 9. Pull the interposer to slide the drive into place. 8. Remove the new drive from the hard drive. 1 hard drive 2 interposer Replacing the Hard Drive 1. Failure to do so may damage the connector. 2. Replace the four screws that no stray screws remain inside the computer...
... firm and even pressure to disconnect it clicks into place. Replace the base cover (see Dell Technology Guide). 9. Pull the interposer to slide the drive into place. 8. Remove the new drive from the hard drive. 1 hard drive 2 interposer Replacing the Hard Drive 1. Failure to do so may damage the connector. 2. Replace the four screws that no stray screws remain inside the computer...
Service Manual
Page 43
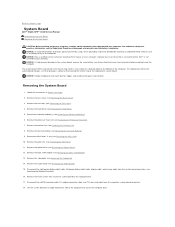
... Before Working Inside Your Computer) before working inside the computer. Back to Contents Page System Board Dell™ Studio XPS™ 1640 Service Manual Removing the System Board Replacing the System Board CAUTION: Before working inside your computer, read the safety information that provides a utility...Display Assembly). 16. The system board's BIOS chip contains the Service Tag, which is not covered by periodically touching an unpainted metal surface (such as the back panel) on the bottom of the computer base. Remove the hard drive (see Removing the Optical Drive). 12. ...
... Before Working Inside Your Computer) before working inside the computer. Back to Contents Page System Board Dell™ Studio XPS™ 1640 Service Manual Removing the System Board Replacing the System Board CAUTION: Before working inside your computer, read the safety information that provides a utility...Display Assembly). 16. The system board's BIOS chip contains the Service Tag, which is not covered by periodically touching an unpainted metal surface (such as the back panel) on the bottom of the computer base. Remove the hard drive (see Removing the Optical Drive). 12. ...

Service Manual
Page 44
... stray screws remain inside the computer. Replace the processor heat sink (see Replacing the Memory Module(s)). 16. Replace the memory module(s) (see Replacing the Processor Heat Sink). 15. Replace the hard drive (see Replacing the Optical Drive). 9. Replace the system board in damage to the portions of the processor heat sink that thermal conductivity is replaced, use the thermal cooling pads provided...
... stray screws remain inside the computer. Replace the processor heat sink (see Replacing the Memory Module(s)). 16. Replace the memory module(s) (see Replacing the Processor Heat Sink). 15. Replace the hard drive (see Replacing the Optical Drive). 9. Replace the system board in damage to the portions of the processor heat sink that thermal conductivity is replaced, use the thermal cooling pads provided...


