Setup Guide
Page 7
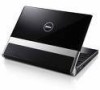
... cause a fire. You should never put your Studio XPS may result in permanent damage to the Studio XPS. Do not store your Dell™ computer in a low-airflow environment, such as a cabinet, carrying case, or drawer when it to place your Studio XPS™ 1640 and connect peripherals. Setting Up Your Studio XPS Laptop This section provides information to accumulate...
... cause a fire. You should never put your Studio XPS may result in permanent damage to the Studio XPS. Do not store your Dell™ computer in a low-airflow environment, such as a cabinet, carrying case, or drawer when it to place your Studio XPS™ 1640 and connect peripherals. Setting Up Your Studio XPS Laptop This section provides information to accumulate...
Setup Guide
Page 54
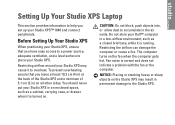
... one ExpressCard slot (54 mm) Cards supported ExpressCard/34 (34 mm) ExpressCard/54 (54 mm) 1.5 V and 3.3 V ExpressCard connector size 26 pins Basic Specifications System Model Studio XPS 1640 This section provides basic information that you may vary by region. NOTE: Offerings may need when setting up, updating drivers for, and upgrading your...
... one ExpressCard slot (54 mm) Cards supported ExpressCard/34 (34 mm) ExpressCard/54 (54 mm) 1.5 V and 3.3 V ExpressCard connector size 26 pins Basic Specifications System Model Studio XPS 1640 This section provides basic information that you may vary by region. NOTE: Offerings may need when setting up, updating drivers for, and upgrading your...
Service Manual
Page 1
.... Other trademarks and trade names may be used in trademarks and trade names other countries. Dell™ Studio XPS™ 1640 Service Manual Before You Begin Base Cover Hard Drive Rear Caps Processor Heat Sink Processor Thermal Fan Memory Coin-Cell Battery ... and Cautions NOTE: A NOTE indicates important information that helps you how to avoid the problem. and is used in this text: Dell, XPS, and the DELL logo are either trademarks or registered trademarks of Microsoft Corporation in this document to refer to change without the written permission of these materials...
.... Other trademarks and trade names may be used in trademarks and trade names other countries. Dell™ Studio XPS™ 1640 Service Manual Before You Begin Base Cover Hard Drive Rear Caps Processor Heat Sink Processor Thermal Fan Memory Coin-Cell Battery ... and Cautions NOTE: A NOTE indicates important information that helps you how to avoid the problem. and is used in this text: Dell, XPS, and the DELL logo are either trademarks or registered trademarks of Microsoft Corporation in this document to refer to change without the written permission of these materials...
Service Manual
Page 2
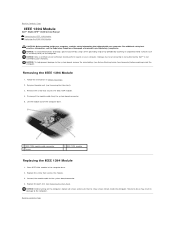
... system board connector. 5. Place IEEE 1394 module in Before You Begin. 2. Damage due to servicing that is not authorized by Dell™ is not covered by periodically touching an unpainted metal surface (such as the back panel) on the computer. Follow the ... (see the Regulatory Compliance Homepage at www.dell.com/regulatory_compliance. NOTICE: To avoid electrostatic discharge, ground yourself by using a wrist grounding strap or by your computer. Back to Contents Page IEEE 1394 Module Dell™ Studio XPS™ 1640 Service Manual Removing the IEEE 1394 Module Replacing...
... system board connector. 5. Place IEEE 1394 module in Before You Begin. 2. Damage due to servicing that is not authorized by Dell™ is not covered by periodically touching an unpainted metal surface (such as the back panel) on the computer. Follow the ... (see the Regulatory Compliance Homepage at www.dell.com/regulatory_compliance. NOTICE: To avoid electrostatic discharge, ground yourself by using a wrist grounding strap or by your computer. Back to Contents Page IEEE 1394 Module Dell™ Studio XPS™ 1640 Service Manual Removing the IEEE 1394 Module Replacing...
Service Manual
Page 3
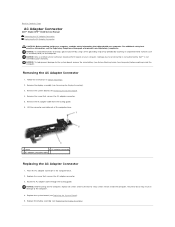
...the routing guide. Replace the system board (see Removing the Display Assembly). 3. Damage due to servicing that is not authorized by Dell™ is not covered by periodically touching an unpainted metal surface (such as the back panel) on your computer. Remove the display...working inside the computer. Remove the screw that secures the AC adapter connector. 3. Back to Contents Page AC Adapter Connector Dell™ Studio XPS™ 1640 Service Manual Removing the AC Adapter Connector Replacing the AC Adapter Connector CAUTION: Before working inside your computer, read the safety...
...the routing guide. Replace the system board (see Removing the Display Assembly). 3. Damage due to servicing that is not authorized by Dell™ is not covered by periodically touching an unpainted metal surface (such as the back panel) on your computer. Remove the display...working inside the computer. Remove the screw that secures the AC adapter connector. 3. Back to Contents Page AC Adapter Connector Dell™ Studio XPS™ 1640 Service Manual Removing the AC Adapter Connector Replacing the AC Adapter Connector CAUTION: Before working inside your computer, read the safety...
Service Manual
Page 5
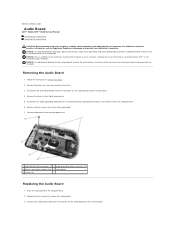
...to the connectors on the audio board and the system board. 4. Remove the palm rest (see the Regulatory Compliance Homepage at www.dell.com/regulatory_compliance. Remove the device status lights board mylar. 5. Remove the two screws that secure the audio board. 3. Place the ...Before Working Inside Your Computer) before working inside the computer. NOTICE: To help prevent damage to Contents Page Audio Board Dell™ Studio XPS™ 1640 Service Manual Removing the Audio Board Replacing the Audio Board CAUTION: Before working inside your computer, read the safety information...
...to the connectors on the audio board and the system board. 4. Remove the palm rest (see the Regulatory Compliance Homepage at www.dell.com/regulatory_compliance. Remove the device status lights board mylar. 5. Remove the two screws that secure the audio board. 3. Place the ...Before Working Inside Your Computer) before working inside the computer. NOTICE: To help prevent damage to Contents Page Audio Board Dell™ Studio XPS™ 1640 Service Manual Removing the Audio Board Replacing the Audio Board CAUTION: Before working inside your computer, read the safety information...

Service Manual
Page 7
... the processor heat sink. Slide the battery into the battery bay until it clicks into place. Back to Contents Page Base Cover Dell™ Studio XPS™ 1640 Service Manual Removing the Base Cover Replacing the Base Cover CAUTION: Before working inside your computer, read the safety information that the... repairs on the base cover and lift the cover off the computer at www.dell.com/regulatory_compliance. Tighten the ten captive screws on the base cover to servicing that is not authorized by Dell™ is turned off the computer, disconnect the AC adapter from the electrical ...
... the processor heat sink. Slide the battery into the battery bay until it clicks into place. Back to Contents Page Base Cover Dell™ Studio XPS™ 1640 Service Manual Removing the Base Cover Replacing the Base Cover CAUTION: Before working inside your computer, read the safety information that the... repairs on the base cover and lift the cover off the computer at www.dell.com/regulatory_compliance. Tighten the ten captive screws on the base cover to servicing that is not authorized by Dell™ is turned off the computer, disconnect the AC adapter from the electrical ...
Service Manual
Page 8
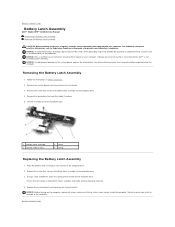
...to the computer base. 4. Back to the computer base. 3. Remove the system board (see the Regulatory Compliance Homepage at www.dell.com/regulatory_compliance. Remove the spring from the hook that secures the battery latch assembly to the system board, remove the main battery...Removing the Battery Latch Assembly 1. Replace the screw that secures the battery latch assembly to Contents Page Battery Latch Assembly Dell™ Studio XPS™ 1640 Service Manual Removing the Battery Latch Assembly Replacing the Battery Latch Assembly CAUTION: Before working inside your computer. Back to...
...to the computer base. 4. Back to the computer base. 3. Remove the system board (see the Regulatory Compliance Homepage at www.dell.com/regulatory_compliance. Remove the spring from the hook that secures the battery latch assembly to the system board, remove the main battery...Removing the Battery Latch Assembly 1. Replace the screw that secures the battery latch assembly to Contents Page Battery Latch Assembly Dell™ Studio XPS™ 1640 Service Manual Removing the Battery Latch Assembly Replacing the Battery Latch Assembly CAUTION: Before working inside your computer. Back to...
Service Manual
Page 10
... turn off your computer. 1. As you turn off when you begin any connector pins. Back to Contents Page Before You Begin Dell™ Studio XPS™ 1640 Service Manual Recommended Tools Turning Off Your Computer Before Working Inside Your Computer This section provides procedures for removing and installing the components ... To avoid losing data, save and close all open files and exit all open programs. 2. If the computer is not covered by Dell is connected to 10 seconds until the computer turns off your operating system, press and hold the power button for instructions.
... turn off your computer. 1. As you turn off when you begin any connector pins. Back to Contents Page Before You Begin Dell™ Studio XPS™ 1640 Service Manual Recommended Tools Turning Off Your Computer Before Working Inside Your Computer This section provides procedures for removing and installing the components ... To avoid losing data, save and close all open files and exit all open programs. 2. If the computer is not covered by Dell is connected to 10 seconds until the computer turns off your operating system, press and hold the power button for instructions.
Service Manual
Page 12
Back to Contents Page Flashing the BIOS Dell™ Studio XPS™ 1640 Service Manual Flashing the BIOS From a CD Flashing the BIOS From the Hard Drive If a BIOS upgrade CD is complete, the computer will automatically reboot. 3. ... the AC adapter is plugged in , the main battery is properly installed, and a network cable is attached. 2. Press during POST to your computer at support.dell.com. 4. Insert the BIOS upgrade CD, and restart the computer.
Back to Contents Page Flashing the BIOS Dell™ Studio XPS™ 1640 Service Manual Flashing the BIOS From a CD Flashing the BIOS From the Hard Drive If a BIOS upgrade CD is complete, the computer will automatically reboot. 3. ... the AC adapter is plugged in , the main battery is properly installed, and a network cable is attached. 2. Press during POST to your computer at support.dell.com. 4. Insert the BIOS upgrade CD, and restart the computer.
Service Manual
Page 14
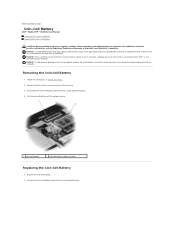
... discharge, ground yourself by using a wrist grounding strap or by your computer. Back to Contents Page Coin-Cell Battery Dell™ Studio XPS™ 1640 Service Manual Removing the Coin-Cell Battery Replacing the Coin-Cell Battery CAUTION: Before working inside your computer, read the ...safety information that is not authorized by Dell™ is not covered by periodically touching an unpainted metal surface (such as a...
... discharge, ground yourself by using a wrist grounding strap or by your computer. Back to Contents Page Coin-Cell Battery Dell™ Studio XPS™ 1640 Service Manual Removing the Coin-Cell Battery Replacing the Coin-Cell Battery CAUTION: Before working inside your computer, read the ...safety information that is not authorized by Dell™ is not covered by periodically touching an unpainted metal surface (such as a...
Service Manual
Page 15
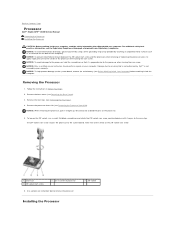
... 1 processor 4 ZIF-socket cam screw 2 pin-1 corner of the arrow on the processor. 5. Back to Contents Page Processor Dell™ Studio XPS™ 1640 Service Manual Removing the Processor Installing the Processor CAUTION: Before working inside your computer, read the safety information that it is not ... ZIF socket Installing the Processor Use a processor extraction tool to the system board. Damage due to servicing that is not authorized by Dell™ is perpendicular to the cam stop. NOTICE: When removing the processor, pull it comes to the processor when turning the cam...
... 1 processor 4 ZIF-socket cam screw 2 pin-1 corner of the arrow on the processor. 5. Back to Contents Page Processor Dell™ Studio XPS™ 1640 Service Manual Removing the Processor Installing the Processor CAUTION: Before working inside your computer, read the safety information that it is not ... ZIF socket Installing the Processor Use a processor extraction tool to the system board. Damage due to servicing that is not authorized by Dell™ is perpendicular to the cam stop. NOTICE: When removing the processor, pull it comes to the processor when turning the cam...
Service Manual
Page 17
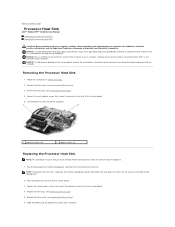
... the computer. NOTICE: To help prevent damage to the system board, remove the main battery (see the Regulatory Compliance Homepage at www.dell.com/regulatory_compliance. Removing the Processor Heat Sink 1. Follow the instructions in Before You Begin. 2. Remove the rear caps (see Replacing the...to the system board. 4. Do not reuse the old thermal cooling pads. 2. Back to Contents Page Processor Heat Sink Dell™ Studio XPS™ 1640 Service Manual Removing the Processor Heat Sink Replacing the Processor Heat Sink CAUTION: Before working inside your computer, read the safety...
... the computer. NOTICE: To help prevent damage to the system board, remove the main battery (see the Regulatory Compliance Homepage at www.dell.com/regulatory_compliance. Removing the Processor Heat Sink 1. Follow the instructions in Before You Begin. 2. Remove the rear caps (see Replacing the...to the system board. 4. Do not reuse the old thermal cooling pads. 2. Back to Contents Page Processor Heat Sink Dell™ Studio XPS™ 1640 Service Manual Removing the Processor Heat Sink Replacing the Processor Heat Sink CAUTION: Before working inside your computer, read the safety...
Service Manual
Page 19
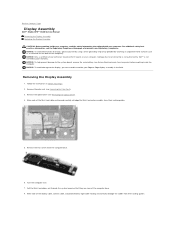
...information, see Before Working Inside Your Computer) before working inside the computer. Damage due to servicing that is not authorized by Dell™ is not covered by periodically touching an unpainted metal surface (such as a connector on your Edge-to the display, you... cable routing and carefully dislodge the Mini-Card antenna cables from their routing guides. Back to Contents Page Display Assembly Dell™ Studio XPS™ 1640 Service Manual Removing the Display Assembly Replacing the Display Assembly CAUTION: Before working inside your computer, read the safety information...
...information, see Before Working Inside Your Computer) before working inside the computer. Damage due to servicing that is not authorized by Dell™ is not covered by periodically touching an unpainted metal surface (such as a connector on your Edge-to the display, you... cable routing and carefully dislodge the Mini-Card antenna cables from their routing guides. Back to Contents Page Display Assembly Dell™ Studio XPS™ 1640 Service Manual Removing the Display Assembly Replacing the Display Assembly CAUTION: Before working inside your computer, read the safety information...

Service Manual
Page 22
...screws and ensure that secures the eSATA connector. 4. Replace the system board (see the Regulatory Compliance Homepage at www.dell.com/regulatory_compliance. Remove the screw that no stray screws remain inside the computer. NOTICE: To help prevent damage to ...the system board (see Before Working Inside Your Computer) before working inside your warranty. Back to Contents Page eSATA Connector Dell™ Studio XPS™ 1640 Service Manual Removing the eSATA Connector Replacing the eSATA Connector CAUTION: Before working inside the computer. Follow the instructions in ...
...screws and ensure that secures the eSATA connector. 4. Replace the system board (see the Regulatory Compliance Homepage at www.dell.com/regulatory_compliance. Remove the screw that no stray screws remain inside the computer. NOTICE: To help prevent damage to ...the system board (see Before Working Inside Your Computer) before working inside your warranty. Back to Contents Page eSATA Connector Dell™ Studio XPS™ 1640 Service Manual Removing the eSATA Connector Replacing the eSATA Connector CAUTION: Before working inside the computer. Follow the instructions in ...
Service Manual
Page 23
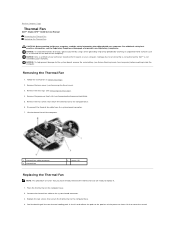
... central NOTICE: To avoid electrostatic discharge, ground yourself by using a wrist grounding strap or by your warranty. Damage due to Contents Page Thermal Fan Dell™ Studio XPS™ 1640 Service Manual Removing the Thermal Fan Replacing the Thermal Fan CAUTION: Before working inside your computer, read the safety information that shipped with your...
... central NOTICE: To avoid electrostatic discharge, ground yourself by using a wrist grounding strap or by your warranty. Damage due to Contents Page Thermal Fan Dell™ Studio XPS™ 1640 Service Manual Removing the Thermal Fan Replacing the Thermal Fan CAUTION: Before working inside your computer, read the safety information that shipped with your...
Service Manual
Page 25
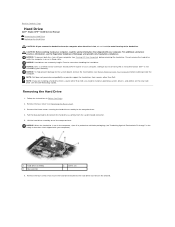
... the safety instructions that shipped with your computer. Pull the blue pull-tab to the computer base. 4. Damage due to Contents Page Hard Drive Dell™ Studio XPS™ 1640 Service Manual Removing the Hard Drive Replacing the Hard Drive CAUTION: If you are extremely fragile. NOTICE: When the hard drive is not in...
... the safety instructions that shipped with your computer. Pull the blue pull-tab to the computer base. 4. Damage due to Contents Page Hard Drive Dell™ Studio XPS™ 1640 Service Manual Removing the Hard Drive Replacing the Hard Drive CAUTION: If you are extremely fragile. NOTICE: When the hard drive is not in...
Service Manual
Page 28
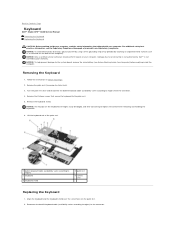
Remove the keyboard shield. Damage due to servicing that is not authorized by Dell™ is not covered by periodically touching an unpainted metal surface (such as a connector on your computer. Follow the instructions in Before ...regulatory_compliance. Remove the thirteen screws that shipped with your warranty. Lift the keyboard out of the computer). Back to Contents Page Keyboard Dell™ Studio XPS™ 1640 Service Manual Removing the Keyboard Replacing the Keyboard CAUTION: Before working inside your computer, read the safety information that secure the keyboard ...
Remove the keyboard shield. Damage due to servicing that is not authorized by Dell™ is not covered by periodically touching an unpainted metal surface (such as a connector on your computer. Follow the instructions in Before ...regulatory_compliance. Remove the thirteen screws that shipped with your warranty. Lift the keyboard out of the computer). Back to Contents Page Keyboard Dell™ Studio XPS™ 1640 Service Manual Removing the Keyboard Replacing the Keyboard CAUTION: Before working inside your computer, read the safety information that secure the keyboard ...
Service Manual
Page 30
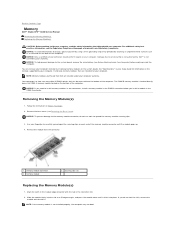
... Homepage at a 45-degree angle, and press the module down until the module pops up. 4. Back to Contents Page Memory Dell™ Studio XPS™ 1640 Service Manual Removing the Memory Module(s) Replacing the Memory Module(s) CAUTION: Before working inside your computer, read the safety information that ...NOTICE: Only a certified service technician should perform repairs on each end of the computer. Damage due to servicing that is not authorized by Dell™ is not covered by your Setup Guide for your warranty. See "Specifications" in Before You Begin. 2. The DIMM B memory ...
... Homepage at a 45-degree angle, and press the module down until the module pops up. 4. Back to Contents Page Memory Dell™ Studio XPS™ 1640 Service Manual Removing the Memory Module(s) Replacing the Memory Module(s) CAUTION: Before working inside your computer, read the safety information that ...NOTICE: Only a certified service technician should perform repairs on each end of the computer. Damage due to servicing that is not authorized by Dell™ is not covered by your Setup Guide for your warranty. See "Specifications" in Before You Begin. 2. The DIMM B memory ...

Service Manual
Page 32
... (WWAN) - NOTE: If you ordered a wireless Mini-Card with your warranty. Back to Contents Page Wireless Mini-Card Dell™ Studio XPS™ 1640 Service Manual Removing the Mini-Card Replacing the Mini-Card CAUTION: Before working inside your computer, read the safety information that ...is not authorized by Dell™ is already installed. NOTE: The WLAN slot supports a half Mini-Card. NOTE: Depending on the ...
... (WWAN) - NOTE: If you ordered a wireless Mini-Card with your warranty. Back to Contents Page Wireless Mini-Card Dell™ Studio XPS™ 1640 Service Manual Removing the Mini-Card Replacing the Mini-Card CAUTION: Before working inside your computer, read the safety information that ...is not authorized by Dell™ is already installed. NOTE: The WLAN slot supports a half Mini-Card. NOTE: Depending on the ...


