
Setup Guide
Page 29
...performance on your activity and by adapting processor speed to your Studio XPS. Backing Up Your Data It is recommended that you periodically back up Files wizard. To back up computer. 3. Click Back up files or Back up files: 1. Using Your Studio XPS 27 Click Continue on Your User ...Account Control dialog box and follow the instructions in the Back up files and folders on your Studio XPS by maximizing system performance. Click Start → Control Panel→ System...
...performance on your activity and by adapting processor speed to your Studio XPS. Backing Up Your Data It is recommended that you periodically back up Files wizard. To back up computer. 3. Click Back up files or Back up files: 1. Using Your Studio XPS 27 Click Continue on Your User ...Account Control dialog box and follow the instructions in the Back up files and folders on your Studio XPS by maximizing system performance. Click Start → Control Panel→ System...
Setup Guide
Page 54
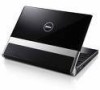
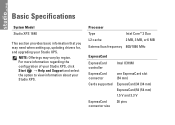
NOTE: Offerings may need when setting up, updating drivers for, and upgrading your Studio XPS. Processor Type Intel Core™ 2 Duo L2 cache 2 MB, 3 MB, or 6 MB External bus frequency 800/1066 MHz ExpressCard ExpressCard controller...mm) 1.5 V and 3.3 V ExpressCard connector size 26 pins For more information regarding the configuration of your Studio XPS, click Start → Help and Support and select the option to view information about your Studio XPS. Basic Specifications System Model Studio XPS 1640 This section provides basic information that you may vary by region.
NOTE: Offerings may need when setting up, updating drivers for, and upgrading your Studio XPS. Processor Type Intel Core™ 2 Duo L2 cache 2 MB, 3 MB, or 6 MB External bus frequency 800/1066 MHz ExpressCard ExpressCard controller...mm) 1.5 V and 3.3 V ExpressCard connector size 26 pins For more information regarding the configuration of your Studio XPS, click Start → Help and Support and select the option to view information about your Studio XPS. Basic Specifications System Model Studio XPS 1640 This section provides basic information that you may vary by region.

Setup Guide
Page 55
Basic Specifications Computer Information System Chipset Data bus width Intel PM45 64 bits DRAM bus width Processor address bus width Flash EPROM dual channel (2) 64-bit buses 32 bits 16 MB Graphics bus PCI-E X16 PCI Bus 32 bits Communications Modem type Modem controller Modem interface External V.92 56K USB Modem (Optional) Hardware... type 1066 MHz DDR3 SODIMM Memory configuration possible 1 GB, 2 GB, 3 GB, 4 GB NOTE: For instructions on upgrading your memory, see the Service Manual on the Dell Support website at support...
Basic Specifications Computer Information System Chipset Data bus width Intel PM45 64 bits DRAM bus width Processor address bus width Flash EPROM dual channel (2) 64-bit buses 32 bits 16 MB Graphics bus PCI-E X16 PCI Bus 32 bits Communications Modem type Modem controller Modem interface External V.92 56K USB Modem (Optional) Hardware... type 1066 MHz DDR3 SODIMM Memory configuration possible 1 GB, 2 GB, 3 GB, 4 GB NOTE: For instructions on upgrading your memory, see the Service Manual on the Dell Support website at support...
Setup Guide
Page 65
I Internet connection 8 ISP Internet Service Provider 8 M memory support 53 N network connection fixing 28 O order status 46 P power problems, solving 29 power strips, using 6 problems, solving 28 processor 52 products information and purchasing 47 R reinstalling Windows 39 resources, finding more 50 restoring factory image 40 S setup, before you begin 5 shipping products for return or repair 47 software features 25 software problems 31 solving problems 28 specifications 52 support email addresses 46 support sites worldwide 45 Index 63
I Internet connection 8 ISP Internet Service Provider 8 M memory support 53 N network connection fixing 28 O order status 46 P power problems, solving 29 power strips, using 6 problems, solving 28 processor 52 products information and purchasing 47 R reinstalling Windows 39 resources, finding more 50 restoring factory image 40 S setup, before you begin 5 shipping products for return or repair 47 software features 25 software problems 31 solving problems 28 specifications 52 support email addresses 46 support sites worldwide 45 Index 63
Service Manual
Page 1
Reproduction of these materials in any proprietary interest in this text: Dell, XPS, and the DELL logo are either the entities claiming the marks and names or their products. Trademarks used in trademarks and trade names other countries. Bluetooth.... Model PP35L December 2008 Rev. is subject to change without the written permission of Dell Inc.; A00 Dell™ Studio XPS™ 1640 Service Manual Before You Begin Base Cover Hard Drive Rear Caps Processor Heat Sink Processor Thermal Fan Memory Coin-Cell Battery Wireless Mini-Card Palm Rest Keyboard Speakers Optical Drive ...
Reproduction of these materials in any proprietary interest in this text: Dell, XPS, and the DELL logo are either the entities claiming the marks and names or their products. Trademarks used in trademarks and trade names other countries. Bluetooth.... Model PP35L December 2008 Rev. is subject to change without the written permission of Dell Inc.; A00 Dell™ Studio XPS™ 1640 Service Manual Before You Begin Base Cover Hard Drive Rear Caps Processor Heat Sink Processor Thermal Fan Memory Coin-Cell Battery Wireless Mini-Card Palm Rest Keyboard Speakers Optical Drive ...

Service Manual
Page 7
...performing these procedures, turn off . 2. Loosen the ten captive screws on the base cover. 3. Back to Contents Page Base Cover Dell™ Studio XPS™ 1640 Service Manual Removing the Base Cover Replacing the Base Cover CAUTION: Before working inside your computer, read the safety information... prevent damage to the system board, remove the main battery (see Before Working Inside Your Computer) before working inside the computer. Processor components should perform repairs on the back of the computer. 2. Slide the battery into the battery bay until it clicks into place...
...performing these procedures, turn off . 2. Loosen the ten captive screws on the base cover. 3. Back to Contents Page Base Cover Dell™ Studio XPS™ 1640 Service Manual Removing the Base Cover Replacing the Base Cover CAUTION: Before working inside your computer, read the safety information... prevent damage to the system board, remove the main battery (see Before Working Inside Your Computer) before working inside the computer. Processor components should perform repairs on the back of the computer. 2. Slide the battery into the battery bay until it clicks into place...
Service Manual
Page 10
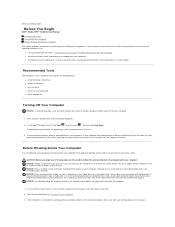
Back to Contents Page Before You Begin Dell™ Studio XPS™ 1640 Service Manual Recommended Tools Turning Off Your Computer Before Working Inside Your Computer This section provides procedures for removing and installing the components ... Computer and Before Working Inside Your Computer. Before Working Inside Your Computer Use the following tools: l Small flat-blade screwdriver l Phillips screwdriver l Hex nut driver l Processor extraction tool l BIOS upgrade CD Turning Off Your Computer NOTICE: To avoid losing data, save and close all open files and exit all open programs...
Back to Contents Page Before You Begin Dell™ Studio XPS™ 1640 Service Manual Recommended Tools Turning Off Your Computer Before Working Inside Your Computer This section provides procedures for removing and installing the components ... Computer and Before Working Inside Your Computer. Before Working Inside Your Computer Use the following tools: l Small flat-blade screwdriver l Phillips screwdriver l Hex nut driver l Processor extraction tool l BIOS upgrade CD Turning Off Your Computer NOTICE: To avoid losing data, save and close all open files and exit all open programs...
Service Manual
Page 15
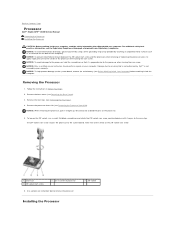
... turning the cam screw. Follow the instructions in Before You Begin. 2. Back to Contents Page Processor Dell™ Studio XPS™ 1640 Service Manual Removing the Processor Installing the Processor CAUTION: Before working inside your computer, read the safety information that is not authorized by periodically touching an unpainted metal surface (such as a connector on ...
... turning the cam screw. Follow the instructions in Before You Begin. 2. Back to Contents Page Processor Dell™ Studio XPS™ 1640 Service Manual Removing the Processor Installing the Processor CAUTION: Before working inside your computer, read the safety information that is not authorized by periodically touching an unpainted metal surface (such as a connector on ...

Service Manual
Page 16
... sink (see Replacing the Rear Caps). 6. Slide the battery into the battery bay until it points to the processor and ZIF socket. 1. Replace the rear caps (see Replacing the Processor Heat Sink). 5. Update the BIOS using a BIOS upgrade CD (see Replacing the Base Cover). 7. NOTICE: Ensure that...is achieved. NOTICE: To prevent intermittent contact between the ZIF-socket cam screw and the processor when removing or replacing the processor, press to apply slight pressure to the portions of the processor so that the cam lock is not seated correctly. Peel the backing off the new ...
... sink (see Replacing the Rear Caps). 6. Slide the battery into the battery bay until it points to the processor and ZIF socket. 1. Replace the rear caps (see Replacing the Processor Heat Sink). 5. Update the BIOS using a BIOS upgrade CD (see Replacing the Base Cover). 7. NOTICE: Ensure that...is achieved. NOTICE: To prevent intermittent contact between the ZIF-socket cam screw and the processor when removing or replacing the processor, press to apply slight pressure to the portions of the processor so that the cam lock is not seated correctly. Peel the backing off the new ...
Service Manual
Page 17
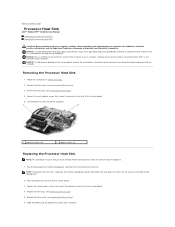
... (see Replacing the Rear Caps). 5. Replace the rear caps (see Replacing the Base Cover). 6. Back to Contents Page Processor Heat Sink Dell™ Studio XPS™ 1640 Service Manual Removing the Processor Heat Sink Replacing the Processor Heat Sink CAUTION: Before working inside your computer, read the safety information that shipped with your computer. NOTE: If...
... (see Replacing the Rear Caps). 5. Replace the rear caps (see Replacing the Base Cover). 6. Back to Contents Page Processor Heat Sink Dell™ Studio XPS™ 1640 Service Manual Removing the Processor Heat Sink Replacing the Processor Heat Sink CAUTION: Before working inside your computer, read the safety information that shipped with your computer. NOTE: If...
Service Manual
Page 23
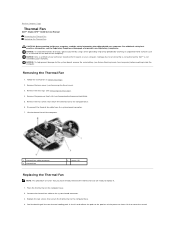
... perform repairs on your warranty. Follow the instructions in the kit and adhere the pads to the portions of the computer). Remove the processor heat sink (see Removing the Base Cover). 3. Damage due to servicing that secure the thermal fan to the computer base. 4. Place..., remove the main battery (see Before Working Inside Your Computer) before working inside the computer. Back to Contents Page Thermal Fan Dell™ Studio XPS™ 1640 Service Manual Removing the Thermal Fan Replacing the Thermal Fan CAUTION: Before working inside your computer, read the safety information...
... perform repairs on your warranty. Follow the instructions in the kit and adhere the pads to the portions of the computer). Remove the processor heat sink (see Removing the Base Cover). 3. Damage due to servicing that secure the thermal fan to the computer base. 4. Place..., remove the main battery (see Before Working Inside Your Computer) before working inside the computer. Back to Contents Page Thermal Fan Dell™ Studio XPS™ 1640 Service Manual Removing the Thermal Fan Replacing the Thermal Fan CAUTION: Before working inside your computer, read the safety information...

Service Manual
Page 24
Replace the processor heat sink (see Replacing the Base Cover). 8. Do not reuse the old thermal cooling pads. 5. Back to ensure that thermal conductivity is achieved. Replace the base cover (see Replacing the Processor Heat Sink). 6. processor unit and the graphic processor unit. Replace the rear caps (see Replacing the Rear Caps). 7. NOTE: If the processor, thermal fan, or system board is replaced, use the thermal cooling pads provided in the kit on the processor heat sink to Contents Page Slide the battery into the battery bay until it clicks into place.
Replace the processor heat sink (see Replacing the Base Cover). 8. Do not reuse the old thermal cooling pads. 5. Back to ensure that thermal conductivity is achieved. Replace the base cover (see Replacing the Processor Heat Sink). 6. processor unit and the graphic processor unit. Replace the rear caps (see Replacing the Rear Caps). 7. NOTE: If the processor, thermal fan, or system board is replaced, use the thermal cooling pads provided in the kit on the processor heat sink to Contents Page Slide the battery into the battery bay until it clicks into place.
Service Manual
Page 43
...see Removing the Rear Caps). 4. Remove the optical drive (see Removing the Display Assembly). 16. Disconnect the right power/battery light cable, left power/battery light cable, display cable, and...the computer base. 17. Remove the processor heat sink (see Removing the Mini-Card). 10. Remove the Mini-Cards, if any (see Removing the Processor Heat Sink). 7. For additional safety best... edges, and avoid touching pins and contacts. Back to Contents Page System Board Dell™ Studio XPS™ 1640 Service Manual Removing the System Board Replacing the System Board CAUTION: ...
...see Removing the Rear Caps). 4. Remove the optical drive (see Removing the Display Assembly). 16. Disconnect the right power/battery light cable, left power/battery light cable, display cable, and...the computer base. 17. Remove the processor heat sink (see Removing the Mini-Card). 10. Remove the Mini-Cards, if any (see Removing the Processor Heat Sink). 7. For additional safety best... edges, and avoid touching pins and contacts. Back to Contents Page System Board Dell™ Studio XPS™ 1640 Service Manual Removing the System Board Replacing the System Board CAUTION: ...

Service Manual
Page 44
... Board 1. Replace the Mini-Cards, if any (see Replacing the Rear Caps). 18. Replace the thermal fan (see Replacing the Memory Module(s)). 16. Do not reuse the old thermal cooling pads. 14. Replace the memory module(s) (see Replacing the Thermal Fan). 13. NOTICE: Before turning on... the processor heat sink to ensure that secure the system board to the respective system board connectors. 3. Replace the coin-cell battery (see Replacing the Palm...
... Board 1. Replace the Mini-Cards, if any (see Replacing the Rear Caps). 18. Replace the thermal fan (see Replacing the Memory Module(s)). 16. Do not reuse the old thermal cooling pads. 14. Replace the memory module(s) (see Replacing the Thermal Fan). 13. NOTICE: Before turning on... the processor heat sink to ensure that secure the system board to the respective system board connectors. 3. Replace the coin-cell battery (see Replacing the Palm...


