Setup Guide
Page 35
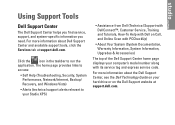
... icon in the taskbar to your Studio XPS) • Assistance from Dell (Technical Support with DellConnect™, Customer Service, Training and Tutorials, How-To Help with Dell on Call, and Online Scan with PCCheckUp) • About Your System (System Documentation, Warranty Information, System Information, Upgrades & Accessories) The top of the Dell Support Center home page displays...
... icon in the taskbar to your Studio XPS) • Assistance from Dell (Technical Support with DellConnect™, Customer Service, Training and Tutorials, How-To Help with Dell on Call, and Online Scan with PCCheckUp) • About Your System (System Documentation, Warranty Information, System Information, Upgrades & Accessories) The top of the Dell Support Center home page displays...

Setup Guide
Page 52
...some countries, opening and replacing parts of your Studio XPS may void your computer, and readme files. run a diagnostic program for your Studio XPS, reinstall notebook system software, or update drivers for your warranty. at support.dell.com. learn more about your operating system. Finding... and e-mail. the Dell Technology Guide installed on the Dell Support website memory, or a new hard drive. reinstall or replace a worn or defective part. Check your warranty and return policies before working inside your hard drive. upgrade your Studio XPS with new or additional ...
...some countries, opening and replacing parts of your Studio XPS may void your computer, and readme files. run a diagnostic program for your Studio XPS, reinstall notebook system software, or update drivers for your warranty. at support.dell.com. learn more about your operating system. Finding... and e-mail. the Dell Technology Guide installed on the Dell Support website memory, or a new hard drive. reinstall or replace a worn or defective part. Check your warranty and return policies before working inside your hard drive. upgrade your Studio XPS with new or additional ...
Setup Guide
Page 54
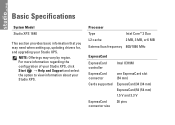
NOTE: Offerings may need when setting up, updating drivers for, and upgrading your Studio XPS. Basic Specifications System Model Studio XPS 1640 This section provides basic information that you may vary by region. Processor Type Intel Core™ 2 Duo L2 cache 2 MB, 3 MB, or 6 MB External ... mm) Cards supported ExpressCard/34 (34 mm) ExpressCard/54 (54 mm) 1.5 V and 3.3 V ExpressCard connector size 26 pins For more information regarding the configuration of your Studio XPS, click Start → Help and Support and select the option to view information about your...
NOTE: Offerings may need when setting up, updating drivers for, and upgrading your Studio XPS. Basic Specifications System Model Studio XPS 1640 This section provides basic information that you may vary by region. Processor Type Intel Core™ 2 Duo L2 cache 2 MB, 3 MB, or 6 MB External ... mm) Cards supported ExpressCard/34 (34 mm) ExpressCard/54 (54 mm) 1.5 V and 3.3 V ExpressCard connector size 26 pins For more information regarding the configuration of your Studio XPS, click Start → Help and Support and select the option to view information about your...

Setup Guide
Page 55
... DDR3 SODIMM Memory configuration possible 1 GB, 2 GB, 3 GB, 4 GB NOTE: For instructions on upgrading your memory, see the Service Manual on the Dell Support website at support.dell.com. Basic Specifications Computer Information System Chipset Data bus width Intel PM45 64 bits DRAM bus width Processor address... bus width Flash EPROM dual channel (2) 64-bit buses 32 bits 16 MB Graphics bus PCI-E...
... DDR3 SODIMM Memory configuration possible 1 GB, 2 GB, 3 GB, 4 GB NOTE: For instructions on upgrading your memory, see the Service Manual on the Dell Support website at support.dell.com. Basic Specifications Computer Information System Chipset Data bus width Intel PM45 64 bits DRAM bus width Processor address... bus width Flash EPROM dual channel (2) 64-bit buses 32 bits 16 MB Graphics bus PCI-E...
Service Manual
Page 10
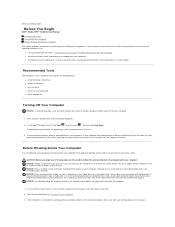
.... Ensure that the following tools: l Small flat-blade screwdriver l Phillips screwdriver l Hex nut driver l Processor extraction tool l BIOS upgrade CD Turning Off Your Computer NOTICE: To avoid losing data, save and close all open files and exit all open programs. 2. Unless...oriented and aligned. Turn off after the operating system shutdown process finishes. 3. Back to Contents Page Before You Begin Dell™ Studio XPS™ 1640 Service Manual Recommended Tools Turning Off Your Computer Before Working Inside Your Computer This section provides procedures for ...
.... Ensure that the following tools: l Small flat-blade screwdriver l Phillips screwdriver l Hex nut driver l Processor extraction tool l BIOS upgrade CD Turning Off Your Computer NOTICE: To avoid losing data, save and close all open files and exit all open programs. 2. Unless...oriented and aligned. Turn off after the operating system shutdown process finishes. 3. Back to Contents Page Before You Begin Dell™ Studio XPS™ 1640 Service Manual Recommended Tools Turning Off Your Computer Before Working Inside Your Computer This section provides procedures for ...
Service Manual
Page 12
...Remove the BIOS upgrade CD from the hard drive. Flashing the BIOS From the Hard Drive 1. Turn on the screen. Double-click the file icon on the desktop and follow the instructions on the computer. 3. Back to Contents Page Flashing the BIOS Dell™ Studio XPS™ 1640 Service... Manual Flashing the BIOS From a CD Flashing the BIOS From the Hard Drive If a BIOS upgrade CD is complete, the computer will automatically reboot. 3. The computer continues to ...
...Remove the BIOS upgrade CD from the hard drive. Flashing the BIOS From the Hard Drive 1. Turn on the screen. Double-click the file icon on the desktop and follow the instructions on the computer. 3. Back to Contents Page Flashing the BIOS Dell™ Studio XPS™ 1640 Service... Manual Flashing the BIOS From a CD Flashing the BIOS From the Hard Drive If a BIOS upgrade CD is complete, the computer will automatically reboot. 3. The computer continues to ...

Service Manual
Page 16
.... 2. Replace the processor heat sink (see Replacing the Base Cover). 7. Replace the base cover (see Replacing the Processor Heat Sink). 5. Update the BIOS using a BIOS upgrade CD (see Replacing the Rear Caps). 6. NOTICE: To prevent intermittent contact between the ZIF-socket cam screw and the processor when removing or replacing the...
.... 2. Replace the processor heat sink (see Replacing the Base Cover). 7. Replace the base cover (see Replacing the Processor Heat Sink). 5. Update the BIOS using a BIOS upgrade CD (see Replacing the Rear Caps). 6. NOTICE: To prevent intermittent contact between the ZIF-socket cam screw and the processor when removing or replacing the...

Service Manual
Page 45
Follow the instructions that accompanied the replacement system board into the BIOS of the replacement system board. 20. NOTE: After you have replaced the system board, enter the computer Service Tag into the appropriate drive. Insert the BIOS upgrade CD that appear on the computer. Back to Contents Page Turn on the screen. 19.
Follow the instructions that accompanied the replacement system board into the BIOS of the replacement system board. 20. NOTE: After you have replaced the system board, enter the computer Service Tag into the appropriate drive. Insert the BIOS upgrade CD that appear on the computer. Back to Contents Page Turn on the screen. 19.


