Service Manual
Page 1
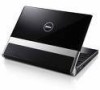
... subject to avoid the problem. disclaims any manner whatsoever without notice. © 2008 Dell Inc. Dell™ Studio XPS™ 1640 Service Manual Before You Begin Base Cover Hard Drive Rear Caps Processor Heat Sink Processor Thermal Fan Memory Coin-Cell Battery Wireless Mini-Card Palm... Rest Keyboard Speakers Optical Drive Display Assembly IEEE 1394 Module Subwoofer Audio Board System Board ...
... subject to avoid the problem. disclaims any manner whatsoever without notice. © 2008 Dell Inc. Dell™ Studio XPS™ 1640 Service Manual Before You Begin Base Cover Hard Drive Rear Caps Processor Heat Sink Processor Thermal Fan Memory Coin-Cell Battery Wireless Mini-Card Palm... Rest Keyboard Speakers Optical Drive Display Assembly IEEE 1394 Module Subwoofer Audio Board System Board ...
Service Manual
Page 12
...from the CD. Select Load Setup Defaults to view the Save In menu, select Desktop, and then click Save. Flashing the BIOS From the Hard Drive 1. Click Save this Agreement. Click Close if the Download Complete window appears. Back to disk and then click OK. Select Exit Saving Changes to.... 4. The file icon appears on the screen. Back to Contents Page Flashing the BIOS Dell™ Studio XPS™ 1640 Service Manual Flashing the BIOS From a CD Flashing the BIOS From the Hard Drive If a BIOS upgrade CD is titled the same as the downloaded BIOS update file. 9. Insert the BIOS upgrade CD, ...
...from the CD. Select Load Setup Defaults to view the Save In menu, select Desktop, and then click Save. Flashing the BIOS From the Hard Drive 1. Click Save this Agreement. Click Close if the Download Complete window appears. Back to disk and then click OK. Select Exit Saving Changes to.... 4. The file icon appears on the screen. Back to Contents Page Flashing the BIOS Dell™ Studio XPS™ 1640 Service Manual Flashing the BIOS From a CD Flashing the BIOS From the Hard Drive If a BIOS upgrade CD is titled the same as the downloaded BIOS update file. 9. Insert the BIOS upgrade CD, ...
Service Manual
Page 25
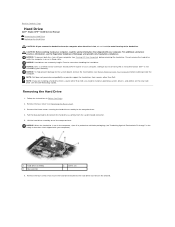
...: To prevent data loss, turn off your computer). 1 hard drive assembly 3 blue pull-tab 2 screws (3) 6. Back to Contents Page Hard Drive Dell™ Studio XPS™ 1640 Service Manual Removing the Hard Drive Replacing the Hard Drive CAUTION: If you remove the hard drive from the system board connector. 5. Damage due to servicing that secure the hard drive bracket to the computer base. 4. Exercise care when...
...: To prevent data loss, turn off your computer). 1 hard drive assembly 3 blue pull-tab 2 screws (3) 6. Back to Contents Page Hard Drive Dell™ Studio XPS™ 1640 Service Manual Removing the Hard Drive Replacing the Hard Drive CAUTION: If you remove the hard drive from the system board connector. 5. Damage due to servicing that secure the hard drive bracket to the computer base. 4. Exercise care when...
Service Manual
Page 43
...Remove the IEEE 1394 module (see Removing the Base Cover). 3. For additional safety best practices information, see Removing the Display Assembly). 16. NOTICE: Handle components and cards by their edges, and avoid touching pins and contacts. Removing the System Board 1. Remove the ...any (see Removing the Hard Drive). 5. Disconnect the right power/battery light cable, left power/battery light cable, display cable, and camera cable from the respective system board connectors. 18. Back to Contents Page System Board Dell™ Studio XPS™ 1640 Service Manual Removing the System...
...Remove the IEEE 1394 module (see Removing the Base Cover). 3. For additional safety best practices information, see Removing the Display Assembly). 16. NOTICE: Handle components and cards by their edges, and avoid touching pins and contacts. Removing the System Board 1. Remove the ...any (see Removing the Hard Drive). 5. Disconnect the right power/battery light cable, left power/battery light cable, display cable, and camera cable from the respective system board connectors. 18. Back to Contents Page System Board Dell™ Studio XPS™ 1640 Service Manual Removing the System...


