
Setup Guide
Page 25
... - Do not use batteries from Dell. CAUTION: Before removing the battery, shut down the Studio XPS and turn it in the given order). no lighting c. Using Your Studio XPS Removing and Replacing the Battery CAUTION: Using an incompatible battery may increase the risk of the Studio XPS and hold it over. 2. 3 Backlit Keyboard - The backlit keyboard provides visibility in use...
... - Do not use batteries from Dell. CAUTION: Before removing the battery, shut down the Studio XPS and turn it in the given order). no lighting c. Using Your Studio XPS Removing and Replacing the Battery CAUTION: Using an incompatible battery may increase the risk of the Studio XPS and hold it over. 2. 3 Backlit Keyboard - The backlit keyboard provides visibility in use...

Setup Guide
Page 36
Previous attempts at booting this checkpoint and contact Dell Technical Support - Replace the CPU fan. Hard-disk drive read failure - Keyboard failure or loose cable. Ensure that will help in the following examples, see "Contacting Dell" on page 49 for assistance). For assistance, see the Dell Technology Guide on your Studio XPS has an issue or error, it...
Previous attempts at booting this checkpoint and contact Dell Technical Support - Replace the CPU fan. Hard-disk drive read failure - Keyboard failure or loose cable. Ensure that will help in the following examples, see "Contacting Dell" on page 49 for assistance). For assistance, see the Dell Technology Guide on your Studio XPS has an issue or error, it...
Service Manual
Page 28
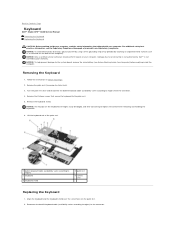
... screw holes on your warranty. Reconnect the backlit keyboard cable (availability varies according to region) to region) 3 keyboard 5 keyboard shield 2 palm rest 4 screws (13) Replacing the Keyboard 1. Removing the Keyboard 1. Lift the keyboard out of the computer). Back to Contents Page Keyboard Dell™ Studio XPS™ 1640 Service Manual Removing the Keyboard Replacing the Keyboard CAUTION: Before working inside your computer, read the...
... screw holes on your warranty. Reconnect the backlit keyboard cable (availability varies according to region) to region) 3 keyboard 5 keyboard shield 2 palm rest 4 screws (13) Replacing the Keyboard 1. Removing the Keyboard 1. Lift the keyboard out of the computer). Back to Contents Page Keyboard Dell™ Studio XPS™ 1640 Service Manual Removing the Keyboard Replacing the Keyboard CAUTION: Before working inside your computer, read the...

Service Manual
Page 29
Replace the palm rest (Replacing the Palm Rest). Be careful when removing and handling the keyboard. 4. Replace the thirteen screws that secure the keyboard to replace. NOTICE: The keycaps on the keyboard are fragile, easily dislodged, and time-consuming to the palm rest. Back to Contents Page 3.
Replace the palm rest (Replacing the Palm Rest). Be careful when removing and handling the keyboard. 4. Replace the thirteen screws that secure the keyboard to replace. NOTICE: The keycaps on the keyboard are fragile, easily dislodged, and time-consuming to the palm rest. Back to Contents Page 3.

Service Manual
Page 37
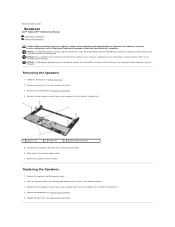
...panel) on your warranty. Disconnect the keyboard cable and the touch pad cable from the computer base. 5. Lift the palm rest off the computer base. Back to Contents Page Palm Rest Dell™ Studio XPS™ 1640 Service Manual Removing the Palm Rest Replacing the Palm Rest CAUTION: Before working... on the computer. Damage due to the system board, remove the main battery (see Removing the Rear Caps). 4. Starting at www.dell.com/regulatory_compliance. Remove the base cover (see the Regulatory Compliance Homepage at the back center of the palm rest. Remove the fourteen screws...
...panel) on your warranty. Disconnect the keyboard cable and the touch pad cable from the computer base. 5. Lift the palm rest off the computer base. Back to Contents Page Palm Rest Dell™ Studio XPS™ 1640 Service Manual Removing the Palm Rest Replacing the Palm Rest CAUTION: Before working... on the computer. Damage due to the system board, remove the main battery (see Removing the Rear Caps). 4. Starting at www.dell.com/regulatory_compliance. Remove the base cover (see the Regulatory Compliance Homepage at the back center of the palm rest. Remove the fourteen screws...

Service Manual
Page 38
... 5. 1 touch pad cable 3 palm rest 5 screws (2) 2 display cable 4 tabs (2) Replacing the Palm Rest 1. Replace the base cover (see Replacing the Rear Caps). 6. Slide the battery into the battery bay until it clicks into place. 2. Reconnect the keyboard cable and the touch pad cable to Contents Page Align the palm rest... tabs and the palm rest with the computer base and gently snap the palm rest into place. Turn the computer upside down and replace the fourteen screws in the ...
... 5. 1 touch pad cable 3 palm rest 5 screws (2) 2 display cable 4 tabs (2) Replacing the Palm Rest 1. Replace the base cover (see Replacing the Rear Caps). 6. Slide the battery into the battery bay until it clicks into place. 2. Reconnect the keyboard cable and the touch pad cable to Contents Page Align the palm rest... tabs and the palm rest with the computer base and gently snap the palm rest into place. Turn the computer upside down and replace the fourteen screws in the ...
Service Manual
Page 40
... your warranty. Removing the Speakers 1. Make note of the speaker cable routing. 7. Remove the keyboard (see the Regulatory Compliance Homepage at www.dell.com/regulatory_compliance. Back to Contents Page Speakers Dell™ Studio XPS™ 1640 Service Manual Removing the Speakers Replacing the Speakers CAUTION: Before working inside your computer, read the safety information that secure...
... your warranty. Removing the Speakers 1. Make note of the speaker cable routing. 7. Remove the keyboard (see the Regulatory Compliance Homepage at www.dell.com/regulatory_compliance. Back to Contents Page Speakers Dell™ Studio XPS™ 1640 Service Manual Removing the Speakers Replacing the Speakers CAUTION: Before working inside your computer, read the safety information that secure...


