
Smart Printer User Guide
Page 143
... may cause print quality problems. 5 Close the multipurpose feeder door and the front cover. Warning-Potential Damage: When replacing a toner cartridge, do not leave the imaging unit exposed to direct light for an extended period of the cartridge with the arrows on the side rails inside the printer. Maintaining the printer 143...
... may cause print quality problems. 5 Close the multipurpose feeder door and the front cover. Warning-Potential Damage: When replacing a toner cartridge, do not leave the imaging unit exposed to direct light for an extended period of the cartridge with the arrows on the side rails inside the printer. Maintaining the printer 143...
Smart Printer User Guide
Page 144
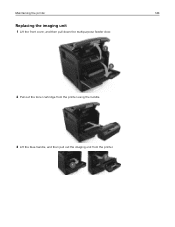
Maintaining the printer 144 Replacing the imaging unit 1 Lift the front cover, and then pull down the multipurpose feeder door. 2 Pull out the toner cartridge from the printer using the handle. 3 Lift the blue handle, and then pull out the imaging unit from the printer.
Maintaining the printer 144 Replacing the imaging unit 1 Lift the front cover, and then pull down the multipurpose feeder door. 2 Pull out the toner cartridge from the printer using the handle. 3 Lift the blue handle, and then pull out the imaging unit from the printer.

Smart Printer User Guide
Page 145
Doing so may cause print quality problems. Warning-Potential Damage: Do not touch the photoconductor drum. Warning-Potential Damage: Do not expose the imaging unit to light may affect the print quality of future print jobs. 6 Insert the imaging unit into the printer by aligning the arrows on the side rails of the imaging unit with the arrows on the side rails inside the printer. Extended exposure to direct light for more than 10 minutes. Maintaining the printer 145 4 Unpack the new imaging unit, and then shake it. 5 Remove all packing material from the imaging unit.
Doing so may cause print quality problems. Warning-Potential Damage: Do not touch the photoconductor drum. Warning-Potential Damage: Do not expose the imaging unit to light may affect the print quality of future print jobs. 6 Insert the imaging unit into the printer by aligning the arrows on the side rails of the imaging unit with the arrows on the side rails inside the printer. Extended exposure to direct light for more than 10 minutes. Maintaining the printer 145 4 Unpack the new imaging unit, and then shake it. 5 Remove all packing material from the imaging unit.
Smart Printer User Guide
Page 157
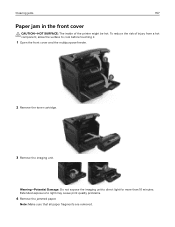
To reduce the risk of the printer might be hot. Warning-Potential Damage: Do not expose the imaging unit to cool before touching it. 1 Open the front cover and the multipurpose feeder. 2 Remove the toner cartridge. 3 Remove the imaging unit. Clearing jams 157 Paper jam in the front cover CAUTION-HOT SURFACE: The inside of injury from a hot component, allow the surface to direct light for more than 10 minutes. Extended exposure to light may cause print quality problems. 4 Remove the jammed paper. Note: Make sure that all paper fragments are removed.
To reduce the risk of the printer might be hot. Warning-Potential Damage: Do not expose the imaging unit to cool before touching it. 1 Open the front cover and the multipurpose feeder. 2 Remove the toner cartridge. 3 Remove the imaging unit. Clearing jams 157 Paper jam in the front cover CAUTION-HOT SURFACE: The inside of injury from a hot component, allow the surface to direct light for more than 10 minutes. Extended exposure to light may cause print quality problems. 4 Remove the jammed paper. Note: Make sure that all paper fragments are removed.
Smart Printer User Guide
Page 158
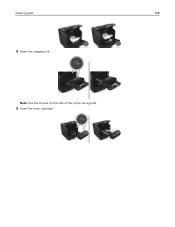
Note: Use the arrows on the side of the printer as a guide. 6 Insert the toner cartridge. Clearing jams 158 5 Insert the imaging unit.
Note: Use the arrows on the side of the printer as a guide. 6 Insert the toner cartridge. Clearing jams 158 5 Insert the imaging unit.
Smart Printer User Guide
Page 172
...] to our Web site or contact the place where you purchased the printer. Troubleshooting 172 Troubleshooting Understanding the printer messages Cartridge, imaging unit mismatch [41.xy] Use only a supported toner cartridge and imaging unit. Change [paper source] to [custom type name] load [orientation] Try one or more of the following: • Load the correct...
...] to our Web site or contact the place where you purchased the printer. Troubleshooting 172 Troubleshooting Understanding the printer messages Cartridge, imaging unit mismatch [41.xy] Use only a supported toner cartridge and imaging unit. Change [paper source] to [custom type name] load [orientation] Try one or more of the following: • Load the correct...

Smart Printer User Guide
Page 175
... is large enough for the data being printed. • Check the length and width guides and make sure the paper is set . Imaging unit low [84.xy] You may need to clear the message and continue printing without using the indicated bin. Incompatible output bin [x] [59...8226; Remove the indicated tray. • From the printer control panel, touch Continue to order a replacement imaging unit. Troubleshooting 175 Error reading USB hub. An unsupported USB hub has been inserted. Imaging unit nearly low [84.xy] If necessary, touch Continue on the printer control panel to replace the...
... is large enough for the data being printed. • Check the length and width guides and make sure the paper is set . Imaging unit low [84.xy] You may need to clear the message and continue printing without using the indicated bin. Incompatible output bin [x] [59...8226; Remove the indicated tray. • From the printer control panel, touch Continue to order a replacement imaging unit. Troubleshooting 175 Error reading USB hub. An unsupported USB hub has been inserted. Imaging unit nearly low [84.xy] If necessary, touch Continue on the printer control panel to replace the...

Smart Printer User Guide
Page 180
...For the list of supported supplies, see User's Guide [33.xy] Note: The supply type can affect warranty coverage. Imaging component usage beyond the intended life may damage your Dell printer dealer. Damage caused by the warranty. Not enough free space in the flash memory. The printer has ...Dell supply or part. To accept any and all of the following : • From the printer control panel, touch Continue to clear the message and continue printing. If you do not wish to proceed with the use of third-party supplies or parts can either be a toner cartridge or imaging unit...
...For the list of supported supplies, see User's Guide [33.xy] Note: The supply type can affect warranty coverage. Imaging component usage beyond the intended life may damage your Dell printer dealer. Damage caused by the warranty. Not enough free space in the flash memory. The printer has ...Dell supply or part. To accept any and all of the following : • From the printer control panel, touch Continue to clear the message and continue printing. If you do not wish to proceed with the use of third-party supplies or parts can either be a toner cartridge or imaging unit...

Smart Printer User Guide
Page 183
... cartridge, 0 estimated pages remain [88.xy] Replace the toner cartridge to clear the message and continue printing. If missing, install the imaging unit. Remove paper from all bins Remove paper from the specified bin to clear the message and continue printing. Remove paper from [linked... paper from all bins to clear the message and continue printing. For more of the following: • Check if the imaging unit is defective. Replace the imaging unit. Remove paper from standard output bin Remove the paper stack from the standard bin. Note: If removing the paper does not...
... cartridge, 0 estimated pages remain [88.xy] Replace the toner cartridge to clear the message and continue printing. If missing, install the imaging unit. Remove paper from all bins Remove paper from the specified bin to clear the message and continue printing. Remove paper from [linked... paper from all bins to clear the message and continue printing. For more of the following: • Check if the imaging unit is defective. Replace the imaging unit. Remove paper from standard output bin Remove the paper stack from the standard bin. Note: If removing the paper does not...

Smart Printer User Guide
Page 184
...came with the supply or see the instruction sheet that came with the supply. Note: If you do not have a replacement imaging unit, then see the "Ordering supplies" section of the User's Guide or visit our Web site. For more information, see the...kit, 0 estimated pages remain [80.xy] Contact technical support or your Dell printer dealer, and then report the message. Replace missing imaging unit [31.xy] Install the missing imaging unit to clear the message. Troubleshooting 184 Replace defective imaging unit [31.xy] Replace the defective imaging unit to clear the message.
...came with the supply or see the instruction sheet that came with the supply. Note: If you do not have a replacement imaging unit, then see the "Ordering supplies" section of the User's Guide or visit our Web site. For more information, see the...kit, 0 estimated pages remain [80.xy] Contact technical support or your Dell printer dealer, and then report the message. Replace missing imaging unit [31.xy] Install the missing imaging unit to clear the message. Troubleshooting 184 Replace defective imaging unit [31.xy] Replace the defective imaging unit to clear the message.

Smart Printer User Guide
Page 185
...Buffer > Auto Note: The printer discards any data received through the USB port. Troubleshooting 185 Replace unsupported imaging unit [32.xy] Remove the imaging unit, and then install a supported one to clear the message and continue printing. Restore held jobs were not... restored From the printer control panel, select Continue to clear the message and continue printing. Standard USB port disabled [56] Try one or more information, contact technical support or your Dell...
...Buffer > Auto Note: The printer discards any data received through the USB port. Troubleshooting 185 Replace unsupported imaging unit [32.xy] Remove the imaging unit, and then install a supported one to clear the message and continue printing. Restore held jobs were not... restored From the printer control panel, select Continue to clear the message and continue printing. Standard USB port disabled [56] Try one or more information, contact technical support or your Dell...

Smart Printer User Guide
Page 203
...Do the paper size and type match the paper loaded in the tray? The problem is solved. Warning-Potential Damage: Do not expose the imaging unit to direct light for the paper loaded. Step 3 a Depending on your operating system, specify the paper size from Printing Preferences or from the... paper size and type in the Paper menu to light may cause print quality problems. 3 Install the imaging unit, and then the cartridge. The problem is solved. Troubleshooting 203 Clipped pages or images Action Step 1 a Move the width and length guides in the tray to the correct positions for more...
...Do the paper size and type match the paper loaded in the tray? The problem is solved. Warning-Potential Damage: Do not expose the imaging unit to direct light for the paper loaded. Step 3 a Depending on your operating system, specify the paper size from Printing Preferences or from the... paper size and type in the Paper menu to light may cause print quality problems. 3 Install the imaging unit, and then the cartridge. The problem is solved. Troubleshooting 203 Clipped pages or images Action Step 1 a Move the width and length guides in the tray to the correct positions for more...

Smart Printer User Guide
Page 204
support or your Dell solved. printer dealer. The problem is the factory default setting. Step 3 Replace the imaging unit, and then resend the print job. Note: 8 is solved. Step 2 Reinstall the imaging unit and the toner cartridge. d Resend the print job. Go to step 2. b Resend the print job....problem is a From the Quality Menu on the fuser. Warning-Potential Damage: Do not expose the imaging unit to light can cause print quality problems. c Install the imaging unit, and then the cartridge. Extended exposure to direct light for more than 10 minutes. Did the gray...
support or your Dell solved. printer dealer. The problem is the factory default setting. Step 3 Replace the imaging unit, and then resend the print job. Note: 8 is solved. Step 2 Reinstall the imaging unit and the toner cartridge. d Resend the print job. Go to step 2. b Resend the print job....problem is a From the Quality Menu on the fuser. Warning-Potential Damage: Do not expose the imaging unit to light can cause print quality problems. c Install the imaging unit, and then the cartridge. Extended exposure to direct light for more than 10 minutes. Did the gray...

Smart Printer User Guide
Page 205
... The problem is solved. Do horizontal voids appear on prints? a Redistribute the toner in the imaging unit. 1 Remove the toner cartridge, and then the imaging unit. 2 Firmly shake the imaging unit. Extended exposure to step 4. b Resend the print job. Do horizontal voids appear on prints Action...solved. a Load the specified tray or feeder with a recommended type of paper. Warning-Potential Damage: Do not expose the imaging unit to step 3. solved. b Resend the print job. No The problem is solved. a Make sure your software program is using a ...
... The problem is solved. Do horizontal voids appear on prints? a Redistribute the toner in the imaging unit. 1 Remove the toner cartridge, and then the imaging unit. 2 Firmly shake the imaging unit. Extended exposure to step 4. b Resend the print job. Do horizontal voids appear on prints Action...solved. a Load the specified tray or feeder with a recommended type of paper. Warning-Potential Damage: Do not expose the imaging unit to step 3. solved. b Resend the print job. No The problem is solved. a Make sure your software program is using a ...

Smart Printer User Guide
Page 208
... texture or rough finishes. Note: Paper absorbs moisture due to step 5. Store paper in its original wrapper until you printing on your Dell solved. Step 6 Replace the imaging unit, and then resend the print job. Do print irregularities still appear? The problem is solved. Step 4 From the printer Go to high humidity...
... texture or rough finishes. Note: Paper absorbs moisture due to step 5. Store paper in its original wrapper until you printing on your Dell solved. Step 6 Replace the imaging unit, and then resend the print job. Do print irregularities still appear? The problem is solved. Step 4 From the printer Go to high humidity...

Smart Printer User Guide
Page 210
... print still too dark? Yes Go to step 2. solved. Note: 8 is solved. Step 2 From the printer control panel, set to high humidity. Step 6 Replace the imaging unit, and then resend the print job. Go to step 6. Go to step 4. Step 3 Go to step 3. b Resend the print job. b Resend the print job. Contact...
... print still too dark? Yes Go to step 2. solved. Note: 8 is solved. Step 2 From the printer control panel, set to high humidity. Step 6 Replace the imaging unit, and then resend the print job. Go to step 6. Go to step 4. Step 3 Go to step 3. b Resend the print job. b Resend the print job. Contact...

Smart Printer User Guide
Page 211
... from a fresh package. Warning-Potential Damage: Do not expose the imaging unit to light may cause print quality problems. 3 Install the imaging unit, and then the cartridge. b Resend the print job. Step 7 Replace the imaging unit, and then resend the print job. Is the print still too... printing on textured or rough paper? control panel, change the texture settings in the imaging unit. 1 Remove the toner cartridge, and then the imaging unit. 2 Firmly shake the imaging unit. The problem is solved. The problem is solved. Is the print still too light?
... from a fresh package. Warning-Potential Damage: Do not expose the imaging unit to light may cause print quality problems. 3 Install the imaging unit, and then the cartridge. b Resend the print job. Step 7 Replace the imaging unit, and then resend the print job. Is the print still too... printing on textured or rough paper? control panel, change the texture settings in the imaging unit. 1 Remove the toner cartridge, and then the imaging unit. 2 Firmly shake the imaging unit. The problem is solved. The problem is solved. Is the print still too light?
Smart Printer User Guide
Page 212
...step 3. Extended exposure to step 2. No The problem is printing solid black pages Warning-Potential Damage: Do not expose the imaging unit to direct light for more than 10 minutes. Printer is solved. Troubleshooting 212 Action Yes Step 1 Go to light may ...cause print quality problems. 3 Reinstall the imaging unit, and then the cartridge. b Resend the print job. a Redistribute the toner in the imaging unit. 1 Remove the toner cartridge, and then the imaging unit. 2 Firmly shake the imaging unit. Is the printer still printing blank pages? Contact technical...
...step 3. Extended exposure to step 2. No The problem is printing solid black pages Warning-Potential Damage: Do not expose the imaging unit to direct light for more than 10 minutes. Printer is solved. Troubleshooting 212 Action Yes Step 1 Go to light may ...cause print quality problems. 3 Reinstall the imaging unit, and then the cartridge. b Resend the print job. a Redistribute the toner in the imaging unit. 1 Remove the toner cartridge, and then the imaging unit. 2 Firmly shake the imaging unit. Is the printer still printing blank pages? Contact technical...

Smart Printer User Guide
Page 213
... then the cartridge. Repeating defects appear on prints? No The problem is solved. The problem is solved. Step 2 Replace the imaging unit, and then resend the print job. Do repeating defects still appear on prints Action Yes Step 1 Go to either of the following : &#... in .) b Resend the print job. to step 2. Do repeating defects still appear on prints? Is the printer printing solid black pages? a Replace the imaging unit if the distance between the defects is support. Extended exposure to direct light for more than 10 minutes. No The problem is equal to step...
... then the cartridge. Repeating defects appear on prints? No The problem is solved. The problem is solved. Step 2 Replace the imaging unit, and then resend the print job. Do repeating defects still appear on prints Action Yes Step 1 Go to either of the following : &#... in .) b Resend the print job. to step 2. Do repeating defects still appear on prints? Is the printer printing solid black pages? a Replace the imaging unit if the distance between the defects is support. Extended exposure to direct light for more than 10 minutes. No The problem is equal to step...

Smart Printer User Guide
Page 214
... print Is the tray set the paper type and weight in the tray settings. Step 4 Replace the imaging unit, and then resend the print job. Do shadow images still appear on prints? Do shadow images still appear on prints? Step 2 From the printer control panel, set to match the paper type and...and weight loaded in the tray. Contact technical The problem is solved. Go to match the paper loaded in the tray. Troubleshooting 214 Shadow images appear on prints Action Step 1 Load paper with the correct paper type and weight in the tray? No Load paper with the correct ...
... print Is the tray set the paper type and weight in the tray settings. Step 4 Replace the imaging unit, and then resend the print job. Do shadow images still appear on prints? Do shadow images still appear on prints? Step 2 From the printer control panel, set to match the paper type and...and weight loaded in the tray. Contact technical The problem is solved. Go to match the paper loaded in the tray. Troubleshooting 214 Shadow images appear on prints Action Step 1 Load paper with the correct paper type and weight in the tray? No Load paper with the correct ...


