

EMC S3048-ON and S4048-ON Troubleshooting Guide March 2019
Page 15
... at the DCLI prompt. • Enter the showSystemInfo command to view the CPLD information. DCLI-> showSystemInfo S4048ON SYSTEM INFO Software Info: SW Name SW Version : Dell Networking OS : x.x(x.xx) Board Info: Board Revision : 0x2 Board Service Tag : 66D7VS1 CPLD Info: System CPLD Version: xx.x Master CPLD Version: xx Slvae CPLD... Code Part Number Manufacturer Manufacture Date Product Name : 34:17:eb:f2:23:c4 : TW : 0J09D3 : 28298 : 10/02/2014 18:49:28 : S4000ON Power Supply Info: Power Supply AirFlow Direction Part Number : 1 : NORMAL : 0T9FNW Dell EMC diagnostics 15
... at the DCLI prompt. • Enter the showSystemInfo command to view the CPLD information. DCLI-> showSystemInfo S4048ON SYSTEM INFO Software Info: SW Name SW Version : Dell Networking OS : x.x(x.xx) Board Info: Board Revision : 0x2 Board Service Tag : 66D7VS1 CPLD Info: System CPLD Version: xx.x Master CPLD Version: xx Slvae CPLD... Code Part Number Manufacturer Manufacture Date Product Name : 34:17:eb:f2:23:c4 : TW : 0J09D3 : 28298 : 10/02/2014 18:49:28 : S4000ON Power Supply Info: Power Supply AirFlow Direction Part Number : 1 : NORMAL : 0T9FNW Dell EMC diagnostics 15

EMC PowerSwitch Installation Guide March 2022
Page 3
...Rack mounting...11 Switch ground...11 Fans and airflow...11 Power...11 Storing components...11 Chapter 4: NEBS compliance...13 Important information...13 Chapter 5: Install the S3048-ON 14 Unpack ...14 Unpacking steps...14 Rack or ...cabinet hardware installation...15 ReadyRails system installation...15 Switch installation...18 1U front-rack installation...18 Ground cable...20 Optics installation...20 Optics removal...20 Switch power-up...20 Chapter 6: Power supplies...22 Components...22 AC power supply installation...23 AC power supply...
...Rack mounting...11 Switch ground...11 Fans and airflow...11 Power...11 Storing components...11 Chapter 4: NEBS compliance...13 Important information...13 Chapter 5: Install the S3048-ON 14 Unpack ...14 Unpacking steps...14 Rack or ...cabinet hardware installation...15 ReadyRails system installation...15 Switch installation...18 1U front-rack installation...18 Ground cable...20 Optics installation...20 Optics removal...20 Switch power-up...20 Chapter 6: Power supplies...22 Components...22 AC power supply installation...23 AC power supply...

EMC PowerSwitch Installation Guide March 2022
Page 6
Four SFP+ ports 3. Three fan modules 2. Management port Figure 3. S3048-ON I/O-side view 1. Serial console port 4. 2 The S3048-ON switch The following sections describe the Dell EMC S3048-ON switch. S3048-ON PSU-side view 1. USB 2.0 port 5. Two power supply units 6 The S3048-ON switch Forty-eight 10/100/1000BAse-T RJ-45 ports 2. Figure 2. Topics: • Introduction • Features...
Four SFP+ ports 3. Three fan modules 2. Management port Figure 3. S3048-ON I/O-side view 1. Serial console port 4. 2 The S3048-ON switch The following sections describe the Dell EMC S3048-ON switch. S3048-ON PSU-side view 1. USB 2.0 port 5. Two power supply units 6 The S3048-ON switch Forty-eight 10/100/1000BAse-T RJ-45 ports 2. Figure 2. Topics: • Introduction • Features...

EMC PowerSwitch Installation Guide March 2022
Page 7
... (ONIE) LED behaviors. LED display The S3048-ON includes LED displays on the I/O side of the switch. The S3048-ON switch 7 Some LED behaviors may change after you install your software. Features The S3048-ON offers the following features. ● Forty... monitoring ● Software-readable thermal monitor ● Real time clock (RTC) support ● Hot-plug redundant power supply ● Power management monitoring ● Removable fans ● Standard 1U chassis Physical dimensions The S3048-ON has the following physical dimensions: ● 434 x 320 x 44 mm (W x D x H) ●...
... (ONIE) LED behaviors. LED display The S3048-ON includes LED displays on the I/O side of the switch. The S3048-ON switch 7 Some LED behaviors may change after you install your software. Features The S3048-ON offers the following features. ● Forty... monitoring ● Software-readable thermal monitor ● Real time clock (RTC) support ● Hot-plug redundant power supply ● Power management monitoring ● Removable fans ● Standard 1U chassis Physical dimensions The S3048-ON has the following physical dimensions: ● 434 x 320 x 44 mm (W x D x H) ●...

EMC PowerSwitch Installation Guide March 2022
Page 8
... LED System Status/Health LED Power LED Master LED FAN LED LOCATOR LED 8 The S3048-ON switch Description ● Solid green-Normal operation ● Blinking green-Booting ● Solid yellow-Critical system error ● Blinking yellow-Non-critical system error, fan failure, or power supply failure ● Off-No power ● Solid Green-Normal ●...
... LED System Status/Health LED Power LED Master LED FAN LED LOCATOR LED 8 The S3048-ON switch Description ● Solid green-Normal operation ● Blinking green-Booting ● Solid yellow-Critical system error ● Blinking yellow-Non-critical system error, fan failure, or power supply failure ● Off-No power ● Solid Green-Normal ●...

EMC PowerSwitch Installation Guide March 2022
Page 9
... following supported hardware components: ● S3048-ON AC Normal Airflow: Forty-eight 10/100/1000Base-T RJ-45 ports with four SFP+ 10 G ports, one AC power supply, and three fan subsystems-airflow from the I/O side to the power supply side ● S3048-ON AC Reverse Airflow: Forty-eight 10.../100/1000Base-T RJ-45 ports with four SFP+ 10 G ports, one AC power supply, and three fan subsystems-airflow from the power supply side to the I/O ...
... following supported hardware components: ● S3048-ON AC Normal Airflow: Forty-eight 10/100/1000Base-T RJ-45 ports with four SFP+ 10 G ports, one AC power supply, and three fan subsystems-airflow from the I/O side to the power supply side ● S3048-ON AC Reverse Airflow: Forty-eight 10.../100/1000Base-T RJ-45 ports with four SFP+ 10 G ports, one AC power supply, and three fan subsystems-airflow from the power supply side to the I/O ...

EMC PowerSwitch Installation Guide March 2022
Page 11
...Dell EMC recommends you ground your S3048-ON and components immediately, properly store the switch and all optional components by following configurations: ● AC PSU with fan airflow from -40° to 158°F (-40°C to permit proper airflow, position the two chassis at least 5 inches (12.7 cm) apart. Use the S3048... of airflow fan in Install the S3048-ON. An AC power cord is done as the power cord is easily accessible. CAUTION: Use the power supply cord as described in your area uses. Storing components If you service the power supply slots. Do not mix reverse and...
...Dell EMC recommends you ground your S3048-ON and components immediately, properly store the switch and all optional components by following configurations: ● AC PSU with fan airflow from -40° to 158°F (-40°C to permit proper airflow, position the two chassis at least 5 inches (12.7 cm) apart. Use the S3048... of airflow fan in Install the S3048-ON. An AC power cord is done as the power cord is easily accessible. CAUTION: Use the power supply cord as described in your area uses. Storing components If you service the power supply slots. Do not mix reverse and...

EMC PowerSwitch Installation Guide March 2022
Page 15
... the equipment with the rear panel facing in the rack so that the total component power ratings do not exceed the circuit capabilities. NOTE: Do not the use of your S3048-ON switch. Rack mount safety considerations ● Rack loading-Overloading or uneven loading of...ambient temperature-If installed in a permanent location before you begin. Pay particular attention to the supply connections other than the room ambient temperature. four-post, two-post, or threaded methods. The Dell EMC ReadyRails™ system is a condensed reference. NOTE: The illustrations in this document are...
... the equipment with the rear panel facing in the rack so that the total component power ratings do not exceed the circuit capabilities. NOTE: Do not the use of your S3048-ON switch. Rack mount safety considerations ● Rack loading-Overloading or uneven loading of...ambient temperature-If installed in a permanent location before you begin. Pay particular attention to the supply connections other than the room ambient temperature. four-post, two-post, or threaded methods. The Dell EMC ReadyRails™ system is a condensed reference. NOTE: The illustrations in this document are...

EMC PowerSwitch Installation Guide March 2022
Page 20
...to ensure it is mounted in -lbs. 4. Also, bring any unplated mating surfaces to the chassis using the supplied 10-32 screw with an antioxidant compound before powering up Supply power to the rack and properly grounded, optional. ● The equipment rack is in shipping. The cable length must... need to gently push the optic into the end of supported optics, see the S3048-ON data sheet at www.dell.com/support or contact your switch before crimping. To properly ground the chassis, Dell EMC recommends using the shortest cable route allowable. 2. Take the one -hole lug...
...to ensure it is mounted in -lbs. 4. Also, bring any unplated mating surfaces to the chassis using the supplied 10-32 screw with an antioxidant compound before powering up Supply power to the rack and properly grounded, optional. ● The equipment rack is in shipping. The cable length must... need to gently push the optic into the end of supported optics, see the S3048-ON data sheet at www.dell.com/support or contact your switch before crimping. To properly ground the chassis, Dell EMC recommends using the shortest cable route allowable. 2. Take the one -hole lug...

EMC PowerSwitch Installation Guide March 2022
Page 21
Install the S3048-ON 21 NOTE: ESD damage can occur if components are installed if you use sufficient overcurrent protection devices. ● All protective covers are in place. ● Blank panels are mishandled. NOTE: A US AC power cable is sufficient airflow around the unit, which...temperature, is within the limits specified for the S3048-ON. Power up sequence When the switch powers up . You must order all other power cables separately. For more information, see Specifications. ● There is included for powering up an AC power supply. The fan speed slows as the switch ...
Install the S3048-ON 21 NOTE: ESD damage can occur if components are installed if you use sufficient overcurrent protection devices. ● All protective covers are in place. ● Blank panels are mishandled. NOTE: A US AC power cable is sufficient airflow around the unit, which...temperature, is within the limits specified for the S3048-ON. Power up sequence When the switch powers up . You must order all other power cables separately. For more information, see Specifications. ● There is included for powering up an AC power supply. The fan speed slows as the switch ...
EMC PowerSwitch Installation Guide March 2022
Page 22
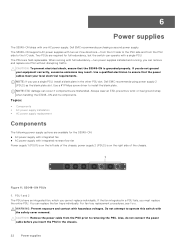
... you insert the PSU in the chassis. 22 Power supplies Dell EMC recommends using power supply 2 (PSU2) as the blank plate slot. Topics: • Components • AC power supply installation • AC power supply replacement Components The following power supply options are required for the S3048-ON: ● AC power supply with integrated fan ● AC power supply with hazardous voltages. You can remove and replace...
... you insert the PSU in the chassis. 22 Power supplies Dell EMC recommends using power supply 2 (PSU2) as the blank plate slot. Topics: • Components • AC power supply installation • AC power supply replacement Components The following power supply options are required for the S3048-ON: ● AC power supply with integrated fan ● AC power supply with hazardous voltages. You can remove and replace...

EMC PowerSwitch Installation Guide March 2022
Page 23
... as this action may damage the PSU or the S3048-ON chassis. NOTE: The S3048-ON powers up when you correctly install the PSU. NOTE: Ensure that the PSU can only be fully inserted in one power supply, Dell EMC recommends installing the power supply in the first slot (PSU1) and installing a... blank plate in the appropriate AC three-prong power cord from the ...
... as this action may damage the PSU or the S3048-ON chassis. NOTE: The S3048-ON powers up when you correctly install the PSU. NOTE: Ensure that the PSU can only be fully inserted in one power supply, Dell EMC recommends installing the power supply in the first slot (PSU1) and installing a... blank plate in the appropriate AC three-prong power cord from the ...

EMC PowerSwitch Installation Guide March 2022
Page 24
... slide it into the slot smoothly. NOTE: The PSU slides into the power supply bay. 4. Do not force a PSU into a slot as this action may damage the PSU or the S3048-ON chassis. There are only using one power supply, Dell EMC recommends installing the power supply in the first slot (PSU1) and installing a blank plate in the...
... slide it into the slot smoothly. NOTE: The PSU slides into the power supply bay. 4. Do not force a PSU into a slot as this action may damage the PSU or the S3048-ON chassis. There are only using one power supply, Dell EMC recommends installing the power supply in the first slot (PSU1) and installing a blank plate in the...

EMC PowerSwitch Installation Guide March 2022
Page 25
... modules separately. An increase in temperature and/or particulate matter in a chassis; for example, new equipment installation. In addition to the power supply modules, you do not install a module in a chassis. If the airflow directions are hot-swappable. Check the environmental factors regularly....one PSU and three fan modules installed in the same airflow direction. The S3048-ON supports two airflow direction options. You must be in the chassis. The fan modules and the power supplies, which have operating fan units. All fans and PSUs in a configuration ...
... modules separately. An increase in temperature and/or particulate matter in a chassis; for example, new equipment installation. In addition to the power supply modules, you do not install a module in a chassis. If the airflow directions are hot-swappable. Check the environmental factors regularly....one PSU and three fan modules installed in the same airflow direction. The S3048-ON supports two airflow direction options. You must be in the chassis. The fan modules and the power supplies, which have operating fan units. All fans and PSUs in a configuration ...

EMC PowerSwitch Installation Guide March 2022
Page 32
AC power requirements Parameter Power Supply Maximum Current Draw Per System PSU Maximum Power Capability PSU Maximum Power Capability, North America Only Typical Power Consumption Reliability...3u Fast Ethernet (100BASE-TX) ● 802.3z Gigabit Ethernet (1000BASE-X) Agency compliance The S3048-ON is designed to comply with the following two conditions: (1) this device must be required ... Parameter Maximum Thermal Output Maximum operational altitude Maximum non-operational altitude Shock Table 6. Dell Networking is not installed and used in accordance to the instructions, it may cause...
AC power requirements Parameter Power Supply Maximum Current Draw Per System PSU Maximum Power Capability PSU Maximum Power Capability, North America Only Typical Power Consumption Reliability...3u Fast Ethernet (100BASE-TX) ● 802.3z Gigabit Ethernet (1000BASE-X) Agency compliance The S3048-ON is designed to comply with the following two conditions: (1) this device must be required ... Parameter Maximum Thermal Output Maximum operational altitude Maximum non-operational altitude Shock Table 6. Dell Networking is not installed and used in accordance to the instructions, it may cause...

Networking S3048–ON Getting Started Guide
Page 5
.... Rack Mounting Safety Considerations • Rack mounting - • Installing AC Power Supplies • Installing a Fan Module • Installing the SFP+ Optics • Supply Power and Power Up the System • After Installing the S3048-ON Install the Chassis To install the S3048-Open Networking (ON) system, Dell Networking recommends completing the installation procedures in a permanent location before loading...
.... Rack Mounting Safety Considerations • Rack mounting - • Installing AC Power Supplies • Installing a Fan Module • Installing the SFP+ Optics • Supply Power and Power Up the System • After Installing the S3048-ON Install the Chassis To install the S3048-Open Networking (ON) system, Dell Networking recommends completing the installation procedures in a permanent location before loading...

Networking S3048–ON Getting Started Guide
Page 14
...Ground Cable 3 Attach the other end of fault interrupt circuits. The fan airflow direction for the chassis. • The S3048-ON ships with one power supply. Dell Networking recommends using an M4x0.7 screw with a captive internal tooth lock washer, as this action may damage the PSU or... the S3048-ON chassis. • The S3048-ON supports AC power supplies with integrated fans that provide cooling for the PSUs must ...
...Ground Cable 3 Attach the other end of fault interrupt circuits. The fan airflow direction for the chassis. • The S3048-ON ships with one power supply. Dell Networking recommends using an M4x0.7 screw with a captive internal tooth lock washer, as this action may damage the PSU or... the S3048-ON chassis. • The S3048-ON supports AC power supplies with integrated fans that provide cooling for the PSUs must ...

Networking S3048–ON Getting Started Guide
Page 15
... Insert PSUs in one PSU, Dell Networking highly recommends using PSU1 (on one orientation. To ensure that the PSU can only be fully inserted in either slot. Installing AC Power Supplies 1 Remove the PSU from the electro-static bag. 2 Remove the PSU slot cover from the S3048-ON. 3 Use the grab ...handle to slide the PSU into the switch PSU slot. Always wear an ESD-preventive wrist or heel ground strap when handling the S3048- ON and ...
... Insert PSUs in one PSU, Dell Networking highly recommends using PSU1 (on one orientation. To ensure that the PSU can only be fully inserted in either slot. Installing AC Power Supplies 1 Remove the PSU from the electro-static bag. 2 Remove the PSU slot cover from the S3048-ON. 3 Use the grab ...handle to slide the PSU into the switch PSU slot. Always wear an ESD-preventive wrist or heel ground strap when handling the S3048- ON and ...

Networking S3048–ON Getting Started Guide
Page 16
Install the AC Power Supply Unit 4 Attach the power cables from the shipping box. 2 Use the grab handle to the external power source. NOTE: Ensure that the PSU is on the left side of the PSU. When you connect the power cord between the system and the power source. 5 Repeat steps 1 through 3 for the second PSU. Install the Hardware 16 Installing a Fan Module 1 Remove the fan module from the switch PSU to slide the module into the switch fan slot. Figure 8. NOTE: The system is powered-up as soon as you correctly install the PSU, the power connector is correctly installed.
Install the AC Power Supply Unit 4 Attach the power cables from the shipping box. 2 Use the grab handle to the external power source. NOTE: Ensure that the PSU is on the left side of the PSU. When you connect the power cord between the system and the power source. 5 Repeat steps 1 through 3 for the second PSU. Install the Hardware 16 Installing a Fan Module 1 Remove the fan module from the switch PSU to slide the module into the switch fan slot. Figure 8. NOTE: The system is powered-up as soon as you correctly install the PSU, the power connector is correctly installed.

Networking S3048–ON Getting Started Guide
Page 18
...can occur if the components are mishandled. If you install a second (redundant) power supply. Always wear an ESD-preventive wrist or heel ground strap when handling the S3048- When the system powers up an AC power supply. Make sure that could decrease the amount of the PSU. There are hot-swappable... if you do not mix fan flow types. • Normal is airflow from the power supply to the I /O panel to ...
...can occur if the components are mishandled. If you install a second (redundant) power supply. Always wear an ESD-preventive wrist or heel ground strap when handling the S3048- When the system powers up an AC power supply. Make sure that could decrease the amount of the PSU. There are hot-swappable... if you do not mix fan flow types. • Normal is airflow from the power supply to the I /O panel to ...


