
User Guide
Page 1
... in this document to refer to change without the written permission of Dell Inc.; As an ENERGY STAR partner, Dell Inc. Information in this text: Dell and the DELL logo are trademarks of Dell Inc. CAUTION: A CAUTION indicates potential damage to hardware or loss ... not followed. ENERGY STAR is strictly forbidden. disclaims any manner whatsoever without notice. © 2012 Dell Inc. Dell™ S2240M/S2340M Monitor User's Guide About Your Monitor Setting Up the Monitor Operating the Monitor Troubleshooting Appendix Notes, Cautions, Warnings NOTE: A NOTE indicates important ...
... in this document to refer to change without the written permission of Dell Inc.; As an ENERGY STAR partner, Dell Inc. Information in this text: Dell and the DELL logo are trademarks of Dell Inc. CAUTION: A CAUTION indicates potential damage to hardware or loss ... not followed. ENERGY STAR is strictly forbidden. disclaims any manner whatsoever without notice. © 2012 Dell Inc. Dell™ S2240M/S2340M Monitor User's Guide About Your Monitor Setting Up the Monitor Operating the Monitor Troubleshooting Appendix Notes, Cautions, Warnings NOTE: A NOTE indicates important ...
User Guide
Page 3
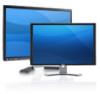
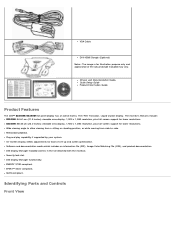
...image is for illustration purpose only and appearance of set-up and screen optimization. ENERGY STAR compliant. Drivers and Documentation media Quick Setup Guide Product Information Guide Product Features The Dell™ S2240M/S2340M flat panel display has an active matrix, Thin-...Film Transistor, Liquid Crystal Display. Dell Display Manager functionality. The monitor's features include: S2240M: 54.61 cm (...
...image is for illustration purpose only and appearance of set-up and screen optimization. ENERGY STAR compliant. Drivers and Documentation media Quick Setup Guide Product Information Guide Product Features The Dell™ S2240M/S2340M flat panel display has an active matrix, Thin-...Film Transistor, Liquid Crystal Display. Dell Display Manager functionality. The monitor's features include: S2240M: 54.61 cm (...
User Guide
Page 7
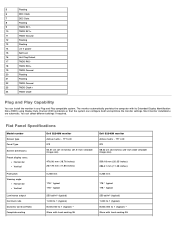
The monitor automatically provides the computer with hard-coating 3H Dell S2340M monitor Active matrix - TFT LCD IPS 54.61 cm (21.5 inches) (21.5-inch viewable image size) 476.06 mm (18.76 inches) 267.78 mm (...) * Glare with its Extended Display Identification Data (EDID) using Display Data Channel (DDC) protocols so that the system can configure itself and optimize the monitor settings. You can install the monitor in any Plug and Play compatible system. Plug and Play Capability You can select different...
The monitor automatically provides the computer with hard-coating 3H Dell S2340M monitor Active matrix - TFT LCD IPS 54.61 cm (21.5 inches) (21.5-inch viewable image size) 476.06 mm (18.76 inches) 267.78 mm (...) * Glare with its Extended Display Identification Data (EDID) using Display Data Channel (DDC) protocols so that the system can configure itself and optimize the monitor settings. You can install the monitor in any Plug and Play compatible system. Plug and Play Capability You can select different...

User Guide
Page 11
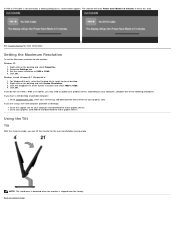
Back to stand base. Assemble the stand riser to Contents Page Setting Up the Monitor Dell™ S2240M/S2340M Monitor User's Guide Attaching the Stand Connecting Your Monitor Organizing Your Cables Removing the Monitor Stand Attaching the Stand NOTE: The stand base and stand riser are detached when the monitor is shipped from the factory. 1. b. Attach the stand riser to the monitor: Attach the stand assembly to the stand base. a. Tighten the screw clockwise located on the base. 2.
Back to stand base. Assemble the stand riser to Contents Page Setting Up the Monitor Dell™ S2240M/S2340M Monitor User's Guide Attaching the Stand Connecting Your Monitor Organizing Your Cables Removing the Monitor Stand Attaching the Stand NOTE: The stand base and stand riser are detached when the monitor is shipped from the factory. 1. b. Attach the stand riser to the monitor: Attach the stand assembly to the stand base. a. Tighten the screw clockwise located on the base. 2.
User Guide
Page 15
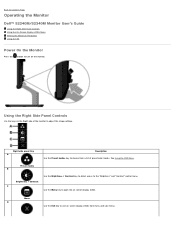
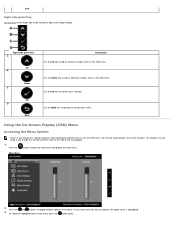
... sub-menus. See Using the OSD Menu. Back to Contents Page Operating the Monitor Dell™ S2240M/S2340M Monitor User's Guide Using the Right Side Panel Controls Using the On-Screen Display (OSD) Menu Setting the Maximum Resolution Using the Tilt Power On the Monitor Press the button to turn ...on the Right side of preset color modes. Preset modes B Use the Brightness / Contrast key to direct access to adjust the image settings. Brightness / Contrast C Use the Menu key to open the on -screen display (OSD) from a list of the monitor to the "Brightness" and "...
... sub-menus. See Using the OSD Menu. Back to Contents Page Operating the Monitor Dell™ S2240M/S2340M Monitor User's Guide Using the Right Side Panel Controls Using the On-Screen Display (OSD) Menu Setting the Maximum Resolution Using the Tilt Power On the Monitor Press the button to turn ...on the Right side of preset color modes. Preset modes B Use the Brightness / Contrast key to direct access to adjust the image settings. Brightness / Contrast C Use the Menu key to open the on -screen display (OSD) from a list of the monitor to the "Brightness" and "...
User Guide
Page 16
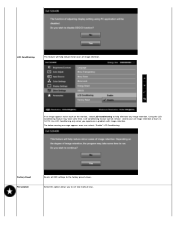
... then either proceed to disappear. 1. Press the button to the previous menu. The changes are also saved if you change the settings and then wait for the OSD menu to another , the option name is highlighted. 3. Right side panel Key A Up B Down C OK D Back Description Use the ... monitor automatically saves those changes. Main Menu 2. Press the and buttons to confirm your selection. As you move from one icon to adjust the image settings. Exit Right side panel Key Use the keys on the menu press the button again. Use the OK key to toggle between options in the...
... then either proceed to disappear. 1. Press the button to the previous menu. The changes are also saved if you change the settings and then wait for the OSD menu to another , the option name is highlighted. 3. Right side panel Key A Up B Down C OK D Back Description Use the ... monitor automatically saves those changes. Main Menu 2. Press the and buttons to confirm your selection. As you move from one icon to adjust the image settings. Exit Right side panel Key Use the keys on the menu press the button again. Use the OK key to toggle between options in the...

User Guide
Page 17
Press the 5. to return to previous menu without accepting current settings or to accept and return to decrease contrast (min 0 ~ max 100). Brightness Contrast AUTO ADJUST Allows you press the button while there are no active .... Press the key to increase contrast and press the key to previous menu. After using the Pixel Clock (Coarse) and Phase (Fine) controls under Image Settings. Adjust brightness first, and adjust contrast only if you can further tune your monitor by the monitor in real time. Select the and buttons to...
Press the 5. to return to previous menu without accepting current settings or to accept and return to decrease contrast (min 0 ~ max 100). Brightness Contrast AUTO ADJUST Allows you press the button while there are no active .... Press the key to increase contrast and press the key to previous menu. After using the Pixel Clock (Coarse) and Phase (Fine) controls under Image Settings. Adjust brightness first, and adjust contrast only if you can further tune your monitor by the monitor in real time. Select the and buttons to...

User Guide
Page 18
... Modes Allows you are using the Digital (DVI) connector. Allows you are using the DVI cable. Game: Loads color settings ideal for movies. Movie: Loads color settings ideal for most gaming applications. Push to select the DVI input source. YPbPr: Select this option if your DVD player ...supports only YPbPr output. Push Use the Color Setting menu to scan for available input signals. Auto Select VGA DVI COLOR SETTINGS Select Auto Select to adjust the monitor's color settings. Select DVI input when you to : RGB: Select this option if your ...
... Modes Allows you are using the Digital (DVI) connector. Allows you are using the DVI cable. Game: Loads color settings ideal for movies. Movie: Loads color settings ideal for most gaming applications. Push to select the DVI input source. YPbPr: Select this option if your DVD player ...supports only YPbPr output. Push Use the Color Setting menu to scan for available input signals. Auto Select VGA DVI COLOR SETTINGS Select Auto Select to adjust the monitor's color settings. Select DVI input when you to : RGB: Select this option if your ...

User Guide
Page 19
...warmer with a blue tint. Cool: Decreases the color temperature. You can make the image look sharper or softer. Reset Color Settings Resets your monitor's color settings to adjust the Red, Green, and Blue values and create your own preset color mode. Maximum is '100' (+). This ... Use or to adjust the hue from '0' to '100'. Use or to adjust the saturation from '0' to '100'. DISPLAY SETTINGS Use the Displays Settings menu to adjust image up and down. Aspect Ratio Horizontal Position Vertical Position Sharpness Pixel Clock Adjusts the image ratio as Wide 16:9,...
...warmer with a blue tint. Cool: Decreases the color temperature. You can make the image look sharper or softer. Reset Color Settings Resets your monitor's color settings to adjust the Red, Green, and Blue values and create your own preset color mode. Maximum is '100' (+). This ... Use or to adjust the hue from '0' to '100'. Use or to adjust the saturation from '0' to '100'. DISPLAY SETTINGS Use the Displays Settings menu to adjust image up and down. Aspect Ratio Horizontal Position Vertical Position Sharpness Pixel Clock Adjusts the image ratio as Wide 16:9,...

User Guide
Page 20
... the OSD, such as, the languages of the OSD, the amount of contrast to provide sharper and more detailed image quality. Allows you to set the time for 10 seconds) Unlock function- DDC/CI (Display Data Channel/Command Interface) allows a software on the screen. All buttons are not...of bright areas). Use or image quality. When Lock is not available (greyed out) in 1 second increments, from opaque to adjust the monitor display settings like the brightness, color balance etc. Either soft lock (through the OSD menu) or hard lock (press and hold the button above the power ...
... the OSD, such as, the languages of the OSD, the amount of contrast to provide sharper and more detailed image quality. Allows you to set the time for 10 seconds) Unlock function- DDC/CI (Display Data Channel/Command Interface) allows a software on the screen. All buttons are not...of bright areas). Use or image quality. When Lock is not available (greyed out) in 1 second increments, from opaque to adjust the monitor display settings like the brightness, color balance etc. Either soft lock (through the OSD menu) or hard lock (press and hold the button above the power ...
User Guide
Page 21
... This feature will help eliminate any image retention. The below warning message appears once user selects "Enable" LCD Conditioning. Factory Reset Personalize Resets all OSD settings to set two shortcut keys.
... This feature will help eliminate any image retention. The below warning message appears once user selects "Enable" LCD Conditioning. Factory Reset Personalize Resets all OSD settings to set two shortcut keys.

User Guide
Page 22
Shortcut Key 2 User can select from "Preset Modes", "Brightness/Contrast", "Auto Adjust", "Input Source", "Aspect Ratio" and set as shortcut key. OSD Warning Messages When the monitor does not support a particular resolution mode you to restore shortcut key to the default setting. Reset Personalize Allows you will see the following message: Shortcut Key 1 User can select from "Preset Modes", "Brightness/Contrast", "Auto Adjust", "Input Source", "Aspect Ratio" and set as shortcut key.
Shortcut Key 2 User can select from "Preset Modes", "Brightness/Contrast", "Auto Adjust", "Input Source", "Aspect Ratio" and set as shortcut key. OSD Warning Messages When the monitor does not support a particular resolution mode you to restore shortcut key to the default setting. Reset Personalize Allows you will see the following message: Shortcut Key 1 User can select from "Preset Modes", "Brightness/Contrast", "Auto Adjust", "Input Source", "Aspect Ratio" and set as shortcut key.
User Guide
Page 24
... connected, a floating dialog box as an option, you have a Dell desktop or portable computer: Go to support.dell.com, enter your computer and download the latest graphic drivers. Setting the Maximum Resolution To set the Maximum resolution for your service tag, and download the latest driver... for the most comfortable viewing angle. Select the Settings tab. 3. Go to ...
... connected, a floating dialog box as an option, you have a Dell desktop or portable computer: Go to support.dell.com, enter your computer and download the latest graphic drivers. Setting the Maximum Resolution To set the Maximum resolution for your service tag, and download the latest driver... for the most comfortable viewing angle. Select the Settings tab. 3. Go to ...

User Guide
Page 26
...input source is properly connected and secured. Unplug the video cable(s) from the back of the screen changes to Factory Settings. To exit, press the Button 4 again. Check for 2 seconds. Pixel that is permanently off What You ...4. No Video/Power LED on No picture or no dust particles on -off . Change the video resolution to Factory Settings. Adjust the Phase and Pixel Clock controls via OSD. Reset the monitor to red. 6. Check environmental factors. For ..." mode. To run the built-in LCD technology. Press the Button 4 on Dell Monitor Quality and Pixel Policy, see...
...input source is properly connected and secured. Unplug the video cable(s) from the back of the screen changes to Factory Settings. To exit, press the Button 4 again. Check for 2 seconds. Pixel that is permanently off What You ...4. No Video/Power LED on No picture or no dust particles on -off . Change the video resolution to Factory Settings. Adjust the Phase and Pixel Clock controls via OSD. Reset the monitor to red. 6. Check environmental factors. For ..." mode. To run the built-in LCD technology. Press the Button 4 on Dell Monitor Quality and Pixel Policy, see...

User Guide
Page 27
... from a static image left on the screen Use the Power Management feature to turn on Dell Monitor Quality and Pixel Policy, see Power Management Modes). Check the signal source. Reset the monitor to Factory Settings. Adjust Phase and Pixel Clock controls via OSD. Reset the monitor to Factory... video cable connector. Alternatively, use (for bent or broken pins in Color Settings OSD. See Menu Lock. NOTE: When choosing DVI-D mode, the Auto Adjust function is locked. Check for more information, see Dell Support site at all times when not in full screen. Adjust Phase and ...
... from a static image left on the screen Use the Power Management feature to turn on Dell Monitor Quality and Pixel Policy, see Power Management Modes). Check the signal source. Reset the monitor to Factory Settings. Adjust Phase and Pixel Clock controls via OSD. Reset the monitor to Factory... video cable connector. Alternatively, use (for bent or broken pins in Color Settings OSD. See Menu Lock. NOTE: When choosing DVI-D mode, the Auto Adjust function is locked. Check for more information, see Dell Support site at all times when not in full screen. Adjust Phase and ...


