
User's Guide
Page 3
Contents 1 Finding Information 15 2 About Your Computer 21 Front View (Tower Orientation 21 Back View (Tower Orientation 24 Front View (Desktop Orientation 25 Back View (Desktop Orientation 28 Back Panel Connectors 29 Specifications 31 3 Advanced Features 39 LegacySelect Technology Control 39 Manageability 39 Dell OpenManage™ IT Assistant 39 Dell OpenManage Client Instrumentation . . . . . 40 Power Management 40 4 About RAID Configurations 43 Using RAID with Hard Drive Passwords 43 Contents 3
Contents 1 Finding Information 15 2 About Your Computer 21 Front View (Tower Orientation 21 Back View (Tower Orientation 24 Front View (Desktop Orientation 25 Back View (Desktop Orientation 28 Back Panel Connectors 29 Specifications 31 3 Advanced Features 39 LegacySelect Technology Control 39 Manageability 39 Dell OpenManage™ IT Assistant 39 Dell OpenManage Client Instrumentation . . . . . 40 Power Management 40 4 About RAID Configurations 43 Using RAID with Hard Drive Passwords 43 Contents 3

User's Guide
Page 4
... Mode 48 Configuring Your Computer for RAID Using the Intel® RAID Option ROM Utility 48 Configuring Your Computer for RAID Using the Intel Matrix Storage Manager 52 Migrating to a RAID Level 0 Configuration . . . . . 56 Migrating to a RAID Level 1 Configuration . . . . . 57 Migrating to a RAID Level 5 Configuration . . . . . 57 Migrating to a RAID Level 10 Configuration . . . . 58 Creating a Spare Hard Drive...
... Mode 48 Configuring Your Computer for RAID Using the Intel® RAID Option ROM Utility 48 Configuring Your Computer for RAID Using the Intel Matrix Storage Manager 52 Migrating to a RAID Level 0 Configuration . . . . . 56 Migrating to a RAID Level 1 Configuration . . . . . 57 Migrating to a RAID Level 5 Configuration . . . . . 57 Migrating to a RAID Level 10 Configuration . . . . 58 Creating a Spare Hard Drive...
User's Guide
Page 32
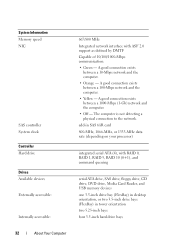
... Information Memory speed NIC SAS controller System clock Controller Hard drive Drives Available devices Externally accessible: Internally accessible: 667/800 MHz Integrated network interface with RAID 0, RAID 1, RAID 5, RAID 10 (0+1), and command queuing serial ATA drive, SAS drive, floppy drive, CD drive, DVD drive, Media Card Reader, and USB memory devices one 3.5-inch drive...
... Information Memory speed NIC SAS controller System clock Controller Hard drive Drives Available devices Externally accessible: Internally accessible: 667/800 MHz Integrated network interface with RAID 0, RAID 1, RAID 5, RAID 10 (0+1), and command queuing serial ATA drive, SAS drive, floppy drive, CD drive, DVD drive, Media Card Reader, and USB memory devices one 3.5-inch drive...

User's Guide
Page 43
... the same size to ensure that the hard drive password be used as RAID level 1+0. Your Dell Precicion computer supports RAID level 0, RAID level 1, RAID level 5, or RAID level 10, also known as a spare drive in the computer industry for high-performance programs, and a RAID level 1 configuration is present, then the drive(s) can be made part of...
... the same size to ensure that the hard drive password be used as RAID level 1+0. Your Dell Precicion computer supports RAID level 0, RAID level 1, RAID level 5, or RAID level 10, also known as a spare drive in the computer industry for high-performance programs, and a RAID level 1 configuration is present, then the drive(s) can be made part of...

User's Guide
Page 44
... perform regular backups. Data striping is a method of writing consecutive segments, or stripes, of drives in the configuration. NOTE: In a RAID level 0 configuration, the size of the configuration is equal to the size of the smallest drive multiplied by the number of data sequentially ...across the physical drive(s) to create a large virtual drive. RAID Level 0 NOTICE: Because a RAID level 0 configuration provides no data redundancy, a failure of one of the drives to read data while the other drive is searching ...
... perform regular backups. Data striping is a method of writing consecutive segments, or stripes, of drives in the configuration. NOTE: In a RAID level 0 configuration, the size of the configuration is equal to the size of the smallest drive multiplied by the number of data sequentially ...across the physical drive(s) to create a large virtual drive. RAID Level 0 NOTICE: Because a RAID level 0 configuration provides no data redundancy, a failure of one of the drives to read data while the other drive is searching ...

User's Guide
Page 45
... data to each drive in the configuration. When data is duplicated on at least three other volume that acts as data parity. serial ATA RAID configured for RAID level 1 segment 1 segment 2 segment 3 segment 4 segment 5 segment 6 hard drive 1 segment 1 duplicated segment 2 duplicated segment 3 ...drive in increments, placing data from the surviving drive. A RAID level 5 configuration has higher data-access rates, but requires more storage space than a RAID level 0 or RAID level 1 configuration. Unlike a RAID level 1 configuration which writes to the primary drive, the data...
... data to each drive in the configuration. When data is duplicated on at least three other volume that acts as data parity. serial ATA RAID configured for RAID level 1 segment 1 segment 2 segment 3 segment 4 segment 5 segment 6 hard drive 1 segment 1 duplicated segment 2 duplicated segment 3 ...drive in increments, placing data from the surviving drive. A RAID level 5 configuration has higher data-access rates, but requires more storage space than a RAID level 0 or RAID level 1 configuration. Unlike a RAID level 1 configuration which writes to the primary drive, the data...

User's Guide
Page 46
... data is then duplicated on four other volume that acts as data parity. A RAID level 10 configuration has higher data access rates but requires more storage space than a RAID level 0 or RAID level 1 configuration. 46 About RAID Configurations serial ATA RAID configured for RAID level 5 segment 1 segment 2 segment 3 segment 4 segment 5 segment 6 hard drive 1 segment 1 striped across...
... data is then duplicated on four other volume that acts as data parity. A RAID level 10 configuration has higher data access rates but requires more storage space than a RAID level 0 or RAID level 1 configuration. 46 About RAID Configurations serial ATA RAID configured for RAID level 5 segment 1 segment 2 segment 3 segment 4 segment 5 segment 6 hard drive 1 segment 1 striped across...

User's Guide
Page 47
...the Intel Matrix Storage Manager, or Intel Matrix Storage Console, and this method is performed before you purchased your computer to set up a RAID configuration. serial ATA RAID configured for RAID level 10 segment 1 segment 2 segment 3 segment 4 segment 5 segment 6 hard drive 1 segment 1 striped across 4 drives segment 2...surviving drives. You must have installed the operating system and the About RAID Configurations 47 A replacement drive can use one of the smallest drive in your computer. NOTE: In a RAID level 10 configuration, the size of the configuration is equal to the ...
...the Intel Matrix Storage Manager, or Intel Matrix Storage Console, and this method is performed before you purchased your computer to set up a RAID configuration. serial ATA RAID configured for RAID level 10 segment 1 segment 2 segment 3 segment 4 segment 5 segment 6 hard drive 1 segment 1 striped across 4 drives segment 2...surviving drives. You must have installed the operating system and the About RAID Configurations 47 A replacement drive can use one of the smallest drive in your computer. NOTE: In a RAID level 10 configuration, the size of the configuration is equal to the ...

User's Guide
Page 48
... . Do not use the following procedure. Both methods require that you set your computer to create a RAID configuration when using the following procedure to migrate an existing storage configuration to RAID level 0 configuration. 1 Set your operating system. and down -arrow keys to highlight Drives, then press... . 3 Press the up data that you want to RAID-Enabled Mode" on page 81). 2 Press the up- Configuring Your Computer for RAID Using the Intel® RAID Option ROM Utility NOTE: Although any data on page 82. 5 Press the left - ...
... . Do not use the following procedure. Both methods require that you set your computer to create a RAID configuration when using the following procedure to migrate an existing storage configuration to RAID level 0 configuration. 1 Set your operating system. and down -arrow keys to highlight Drives, then press... . 3 Press the up data that you want to RAID-Enabled Mode" on page 81). 2 Press the up- Configuring Your Computer for RAID Using the Intel® RAID Option ROM Utility NOTE: Although any data on page 82. 5 Press the left - ...

User's Guide
Page 49
... to use to make up - If you do not know the average file size, choose 128 KB as your strip size. 7 Press the up - Creating a RAID Level 1 Configuration 1 Set your configuration, and then press . and down -arrow keys to select RAID0(Stripe), and press . 6 If more than two hard drives are... keys to store on page 136). and down -arrow keys and spacebar to select the two or three drives that you want to create the RAID volume. 11 Confirm that the correct volume configuration is the maximum available size. 9 Press to create the volume. 10 Press to confirm that you want...
... to use to make up - If you do not know the average file size, choose 128 KB as your strip size. 7 Press the up - Creating a RAID Level 1 Configuration 1 Set your configuration, and then press . and down -arrow keys to select RAID0(Stripe), and press . 6 If more than two hard drives are... keys to store on page 136). and down -arrow keys and spacebar to select the two or three drives that you want to create the RAID volume. 11 Confirm that the correct volume configuration is the maximum available size. 9 Press to create the volume. 10 Press to confirm that you want...

User's Guide
Page 50
... on page 136). The default value is the maximum available size. 8 Press to create the volume. 9 Press to confirm that you want to create the RAID volume. 10 Confirm that you are more than two hard drives available, press the up your computer to make up - The default value is the... maximum available size. 8 Press to create the volume. 9 Press to enter the Intel RAID Option ROM utility. 3 Use the up - and down -arrow keys and spacebar to select the three or four drives you want to use to...
... on page 136). The default value is the maximum available size. 8 Press to create the volume. 9 Press to confirm that you want to create the RAID volume. 10 Confirm that you are more than two hard drives available, press the up your computer to make up - The default value is the... maximum available size. 8 Press to create the volume. 9 Press to enter the Intel RAID Option ROM utility. 3 Use the up - and down -arrow keys and spacebar to select the three or four drives you want to use to...

User's Guide
Page 51
... unbootable. 1 Press when you are prompted to make up - and down-arrow keys and spacebar to select the four drives you want to create the RAID volume. 10 Confirm that the correct volume configuration is the maximum available size. 8 Press to create the volume. 9 Press to confirm that you want to... Operating System" on page 136). 11 Use the up - The default value is displayed on page 136). and down -arrow keys to enter the Intel RAID Option ROM utility. 3 Use the up your computer will be lost. and down -arrow keys to select Exit, and press . 12 Install the operating ...
... unbootable. 1 Press when you are prompted to make up - and down-arrow keys and spacebar to select the four drives you want to create the RAID volume. 10 Confirm that the correct volume configuration is the maximum available size. 8 Press to create the volume. 9 Press to confirm that you want to... Operating System" on page 136). 11 Use the up - The default value is displayed on page 136). and down -arrow keys to enter the Intel RAID Option ROM utility. 3 Use the up your computer will be lost. and down -arrow keys to select Exit, and press . 12 Install the operating ...

User's Guide
Page 52
...to Programs→ Intel(R) Matrix Storage Manager→ Intel Matrix Storage Console to launch the Intel Storage Utility. Configuring Your Computer for RAID Using the Intel Matrix Storage Manager If you already have one hard drive with the operating system installed on it, and you want ...existing operating system and any data, you need to use the migrating option for a RAID level 0 configuration (see "RAID Level 0" on page 44) or a RAID level 1 configuration (see "RAID Level 1" on page 44.) Create a RAID level 0 volume or RAID level 1 volume only when: • You are adding two new drives to ...
...to Programs→ Intel(R) Matrix Storage Manager→ Intel Matrix Storage Console to launch the Intel Storage Utility. Configuring Your Computer for RAID Using the Intel Matrix Storage Manager If you already have one hard drive with the operating system installed on it, and you want ...existing operating system and any data, you need to use the migrating option for a RAID level 0 configuration (see "RAID Level 0" on page 44) or a RAID level 1 configuration (see "RAID Level 1" on page 44.) Create a RAID level 0 volume or RAID level 1 volume only when: • You are adding two new drives to ...

User's Guide
Page 53
...Specify Volume Size window, click the Volume Size desired, and then click Next. 7 Click Finish to create the volume, or click Back to RAID-Enabled Mode" on the new RAID volume. To add a third hard drive in the Selected window, and then click Next. 7 In the Specify Volume Size window, select the...then click Next to continue. 6 On the Select Volume Location screen, click the first hard drive you perform this operation, all data on the RAID drives will be lost. 1 Set your RAID level 0 volume, click the right arrow and click on the third drive until two drives appear in your computer to...
...Specify Volume Size window, click the Volume Size desired, and then click Next. 7 Click Finish to create the volume, or click Back to RAID-Enabled Mode" on the new RAID volume. To add a third hard drive in the Selected window, and then click Next. 7 In the Specify Volume Size window, select the...then click Next to continue. 6 On the Select Volume Location screen, click the first hard drive you perform this operation, all data on the RAID drives will be lost. 1 Set your RAID level 0 volume, click the right arrow and click on the third drive until two drives appear in your computer to...

User's Guide
Page 54
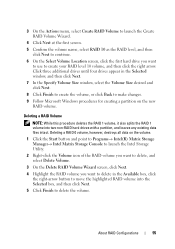
...option, you have not yet set your computer to RAID-enabled mode. 3 On the Actions menu, select Create RAID Volume to launch the Create RAID Volume Wizard. 4 Click Next at the first screen. 5 Confirm the volume name, select RAID 5 as the RAID level, and then click Next to continue. 6 ... Windows procedures for creating a partition on the new RAID volume. Creating a RAID Level 5 Configuration NOTE: When you perform this operation, all data on the RAID drives will be lost . 1 Set your computer to RAID-enabled mode (see "Setting Your Computer to RAID-Enabled Mode" on page 48). 2 Click the Start...
...option, you have not yet set your computer to RAID-enabled mode. 3 On the Actions menu, select Create RAID Volume to launch the Create RAID Volume Wizard. 4 Click Next at the first screen. 5 Confirm the volume name, select RAID 5 as the RAID level, and then click Next to continue. 6 ... Windows procedures for creating a partition on the new RAID volume. Creating a RAID Level 5 Configuration NOTE: When you perform this operation, all data on the RAID drives will be lost . 1 Set your computer to RAID-enabled mode (see "Setting Your Computer to RAID-Enabled Mode" on page 48). 2 Click the Start...
User's Guide
Page 55
...Location screen, click the first hard drive you want to use to create your RAID level 10 volume, and then click the right arrow. Deleting a RAID Volume NOTE: While this procedure deletes the RAID 1 volume, it also splits the RAID 1 volume into the Selected box, and then click Next. 5 Click Finish to... Console to launch the Intel Storage Utility. 2 Right-click the Volume icon of the RAID volume you want to delete, and select Delete Volume. 3 On the Delete RAID Volume Wizard screen, click Next. 4 Highlight the RAID volume you want to delete in the Selected window, and then click Next. 7 In...
...Location screen, click the first hard drive you want to use to create your RAID level 10 volume, and then click the right arrow. Deleting a RAID Volume NOTE: While this procedure deletes the RAID 1 volume, it also splits the RAID 1 volume into the Selected box, and then click Next. 5 Click Finish to... Console to launch the Intel Storage Utility. 2 Right-click the Volume icon of the RAID volume you want to delete, and select Delete Volume. 3 On the Delete RAID Volume Wizard screen, click Next. 4 Highlight the RAID volume you want to delete in the Selected window, and then click Next. 7 In...
User's Guide
Page 56
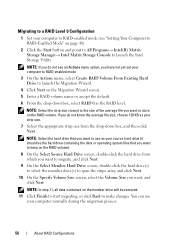
...drive (it should be removed. 11 Click Finish to start migrating, or click Back to launch the Intel Storage Utility. Migrating to a RAID Level 0 Configuration 1 Set your computer to RAID-enabled mode (see an Actions menu option, you want to use your computer normally during the migration process. 56 About... on the member drive will be the hard drive containing the data or operating system files that you do not see "Setting Your Computer to RAID-Enabled Mode" on page 48). 2 Click the Start button and point to All Programs→ Intel(R) Matrix Storage Manager→ Intel Matrix ...
...drive (it should be removed. 11 Click Finish to start migrating, or click Back to launch the Intel Storage Utility. Migrating to a RAID Level 0 Configuration 1 Set your computer to RAID-enabled mode (see an Actions menu option, you want to use your computer normally during the migration process. 56 About... on the member drive will be the hard drive containing the data or operating system files that you do not see "Setting Your Computer to RAID-Enabled Mode" on page 48). 2 Click the Start button and point to All Programs→ Intel(R) Matrix Storage Manager→ Intel Matrix ...

User's Guide
Page 57
...button and point to All Programs→ Intel(R) Matrix Storage Manager→ Intel Matrix Storage Console to launch the Intel Storage Utility. Migrating to a RAID Level 5 Configuration 1 Set your source hard drive (it should be the hard drive containing the data or operating system files that you have not... to launch the Migration Wizard. 4 Click Next on the first Migration Wizard screen. 5 Enter a RAID volume name or accept the default. 6 From the drop-down box, select RAID 1 as your computer to RAID-enabled mode (see an Actions menu option, you want to keep on the member drive will be...
...button and point to All Programs→ Intel(R) Matrix Storage Manager→ Intel Matrix Storage Console to launch the Intel Storage Utility. Migrating to a RAID Level 5 Configuration 1 Set your source hard drive (it should be the hard drive containing the data or operating system files that you have not... to launch the Migration Wizard. 4 Click Next on the first Migration Wizard screen. 5 Enter a RAID volume name or accept the default. 6 From the drop-down box, select RAID 1 as your computer to RAID-enabled mode (see an Actions menu option, you want to keep on the member drive will be...

User's Guide
Page 58
... data contained on the member drive will be the hard drive containing the data or operating system files that you want to keep on the RAID volume). 7 On the Select Source Hard Drive screen, double-click the hard drive from which you want to migrate, and click Next. 8 On the Select... member drives that you want to launch the Migration Wizard. 4 Click Next on the first Migration Wizard screen. 5 Enter a RAID volume name or accept the default. 6 From the drop-down box, select RAID 5 as your source hard drive (it should be removed. 10 Click Finish to start migrating, or click Back to...
... data contained on the member drive will be the hard drive containing the data or operating system files that you want to keep on the RAID volume). 7 On the Select Source Hard Drive screen, double-click the hard drive from which you want to migrate, and click Next. 8 On the Select... member drives that you want to launch the Migration Wizard. 4 Click Next on the first Migration Wizard screen. 5 Enter a RAID volume name or accept the default. 6 From the drop-down box, select RAID 5 as your source hard drive (it should be removed. 10 Click Finish to start migrating, or click Back to...

User's Guide
Page 59
... data contained on the member drive will be the hard drive containing the data or operating system files that you want to keep on the RAID volume). 7 On the Select Source Hard Drive screen, double-click the hard drive from a spare hard drive: 1 Right-click the spare hard-drive icon. ... a spare hard drive: 1 Click the Start button and point to Programs→ Intel(R) Matrix Storage Manager→ Intel Matrix Storage Console to Non-RAID About RAID Configurations 59 NOTE: Select the hard drive that you want to use in the configuration, and click Next. 9 On the Specify Volume Size screen, ...
... data contained on the member drive will be the hard drive containing the data or operating system files that you want to keep on the RAID volume). 7 On the Select Source Hard Drive screen, double-click the hard drive from a spare hard drive: 1 Right-click the spare hard-drive icon. ... a spare hard drive: 1 Click the Start button and point to Programs→ Intel(R) Matrix Storage Manager→ Intel Matrix Storage Console to Non-RAID About RAID Configurations 59 NOTE: Select the hard drive that you want to use in the configuration, and click Next. 9 On the Specify Volume Size screen, ...


