Owner's Manual (M4600)
Page 4
Installing The Base Cover 24 8 Keyboard Trim 25 Removing The Keyboard Trim 25 Installing The Keyboard Trim 26 9 Keyboard...27 Removing The Keyboard 27 Installing The Keyboard 29 10 Optical Drive 31 Removing The Optical Drive 31 Installing The Optical Drive 32 11 Hard Drive 33 Removing The Hard Drive 33 Installing The Hard Drive 35 12 Wireless Local Area Network...
Installing The Base Cover 24 8 Keyboard Trim 25 Removing The Keyboard Trim 25 Installing The Keyboard Trim 26 9 Keyboard...27 Removing The Keyboard 27 Installing The Keyboard 29 10 Optical Drive 31 Removing The Optical Drive 31 Installing The Optical Drive 32 11 Hard Drive 33 Removing The Hard Drive 33 Installing The Hard Drive 35 12 Wireless Local Area Network...
Owner's Manual (M4600)
Page 25
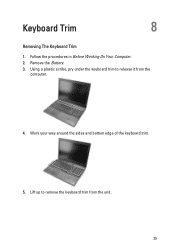
Lift up to release it from the unit. 25 Keyboard Trim 8 Removing The Keyboard Trim 1. Using a plastic scribe, pry under the keyboard trim to remove the keyboard trim from the computer. 4. Remove the Battery. 3. Work your way around the sides and bottom edge of the keyboard trim. 5. Follow the procedures in Before Working On Your Computer. 2.
Lift up to release it from the unit. 25 Keyboard Trim 8 Removing The Keyboard Trim 1. Using a plastic scribe, pry under the keyboard trim to remove the keyboard trim from the computer. 4. Remove the Battery. 3. Work your way around the sides and bottom edge of the keyboard trim. 5. Follow the procedures in Before Working On Your Computer. 2.
Owner's Manual (M4600)
Page 27
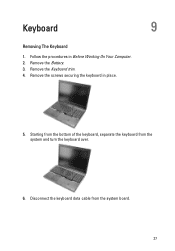
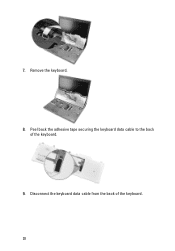
Disconnect the keyboard data cable from the system and turn the keyboard over. 6. Remove the screws securing the keyboard in Before Working On Your Computer. 2. Follow the procedures in place. 5. Starting from the bottom of the keyboard, separate the keyboard from the system board. 27 Keyboard 9 Removing The Keyboard 1. Remove the Keyboard trim. 4. Remove the Battery. 3.
Disconnect the keyboard data cable from the system and turn the keyboard over. 6. Remove the screws securing the keyboard in Before Working On Your Computer. 2. Follow the procedures in place. 5. Starting from the bottom of the keyboard, separate the keyboard from the system board. 27 Keyboard 9 Removing The Keyboard 1. Remove the Keyboard trim. 4. Remove the Battery. 3.
Owner's Manual (M4600)
Page 28
Peel back the adhesive tape securing the keyboard data cable to the back of the keyboard. 28 7. Remove the keyboard. 8. Disconnect the keyboard data cable from the back of the keyboard. 9.
Peel back the adhesive tape securing the keyboard data cable to the back of the keyboard. 28 7. Remove the keyboard. 8. Disconnect the keyboard data cable from the back of the keyboard. 9.

Owner's Manual (M4600)
Page 29
Tighten the keyboard screws. 6. Install the keyboard Trim. 7. Follow the procedures in After Working Inside Your Computer. 29 Connect the keyboard data cable to the back of the keyboard. 3. Install the battery. 8. Peel the keyboard data cable away from the keyboard and remove. Connect the keyboard data cable to the back of the keyboard. 2. Place the keyboard on the palm rest and align the screw holes. 5. Replace the adhesive tape to secure the keyboard data cable to the system board. 4. 10. Installing The Keyboard 1.
Tighten the keyboard screws. 6. Install the keyboard Trim. 7. Follow the procedures in After Working Inside Your Computer. 29 Connect the keyboard data cable to the back of the keyboard. 3. Install the battery. 8. Peel the keyboard data cable away from the keyboard and remove. Connect the keyboard data cable to the back of the keyboard. 2. Place the keyboard on the palm rest and align the screw holes. 5. Replace the adhesive tape to secure the keyboard data cable to the system board. 4. 10. Installing The Keyboard 1.
Owner's Manual (M4600)
Page 43
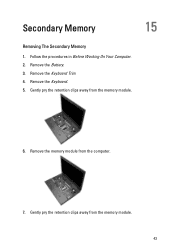
Remove the Keyboard. 5. Remove the memory module from the memory module. 43 Gently pry the retention clips away from the computer. 7. Gently pry the retention clips away from the memory module. 6. Remove the Keyboard Trim. 4. Secondary Memory 15 Removing The Secondary Memory 1. Remove the Battery. 3. Follow the procedures in Before Working On Your Computer. 2.
Remove the Keyboard. 5. Remove the memory module from the memory module. 43 Gently pry the retention clips away from the computer. 7. Gently pry the retention clips away from the memory module. 6. Remove the Keyboard Trim. 4. Secondary Memory 15 Removing The Secondary Memory 1. Remove the Battery. 3. Follow the procedures in Before Working On Your Computer. 2.
Owner's Manual (M4600)
Page 44
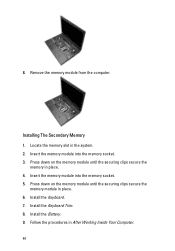
Press down on the memory module until the securing clips secure the memory in place. 6. Remove the memory module from the computer. Install the Keyboard. 7. Install the Battery. 9. Insert the memory module into the memory socket. 5. Press down on the memory module until the securing clips secure the memory module in place. 4. Insert the memory module into the memory socket. 3. Installing The Secondary Memory 1. Locate the memory slot in After Working Inside Your Computer. 44 Follow the procedures in the system. 2. 8. Install the Keyboard Trim. 8.
Press down on the memory module until the securing clips secure the memory in place. 6. Remove the memory module from the computer. Install the Keyboard. 7. Install the Battery. 9. Insert the memory module into the memory socket. 5. Press down on the memory module until the securing clips secure the memory module in place. 4. Insert the memory module into the memory socket. 3. Installing The Secondary Memory 1. Locate the memory slot in After Working Inside Your Computer. 44 Follow the procedures in the system. 2. 8. Install the Keyboard Trim. 8.
Owner's Manual (M4600)
Page 51
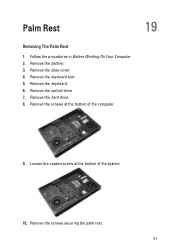
Remove the keyboard trim. 5. Remove the base cover. 4. Remove the screws securing the palm rest. 51 Palm Rest Removing The Palm Rest 1. Loosen the captive screw at the bottom of the system. 10. Remove the screws at the bottom of the computer. 19 9. Remove the hard drive. 8. Follow the procedures in Before Working On Your Computer 2. Remove the battery. 3. Remove the keyboard. 6. Remove the optical drive. 7.
Remove the keyboard trim. 5. Remove the base cover. 4. Remove the screws securing the palm rest. 51 Palm Rest Removing The Palm Rest 1. Loosen the captive screw at the bottom of the system. 10. Remove the screws at the bottom of the computer. 19 9. Remove the hard drive. 8. Follow the procedures in Before Working On Your Computer 2. Remove the battery. 3. Remove the keyboard. 6. Remove the optical drive. 7.
Owner's Manual (M4600)
Page 57
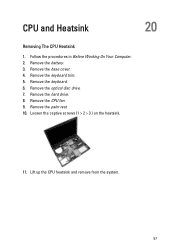
Remove the battery. 3. Remove the optical disc drive. 7. Loosen the captive screws (1 > 2 > 3 ) on the heatsink. 11. Lift up the CPU heatsink and remove from the system. 57 Remove the CPU fan. 9. Remove the palm rest. 10. Remove the keyboard trim. 5. Remove the keyboard. 6. Remove the base cover. 4. Remove the hard drive. 8. CPU and Heatsink 20 Removing The CPU Heatsink 1. Follow the procedures in Before Working On Your Computer. 2.
Remove the battery. 3. Remove the optical disc drive. 7. Loosen the captive screws (1 > 2 > 3 ) on the heatsink. 11. Lift up the CPU heatsink and remove from the system. 57 Remove the CPU fan. 9. Remove the palm rest. 10. Remove the keyboard trim. 5. Remove the keyboard. 6. Remove the base cover. 4. Remove the hard drive. 8. CPU and Heatsink 20 Removing The CPU Heatsink 1. Follow the procedures in Before Working On Your Computer. 2.
Owner's Manual (M4600)
Page 59
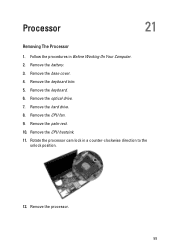
Remove the battery. 3. Remove the keyboard trim. 5. Remove the CPU fan. 9. Remove the CPU heatsink. 11. Remove the hard drive. 8. Rotate the processor cam lock in Before Working On Your Computer. 2. Remove the optical drive. 7. Remove the palm rest. 10. Remove the processor. 59 Follow the procedures in a counter-clockwise direction to the unlock position. 12. Remove the base cover. 4. Processor 21 Removing The Processor 1. Remove the keyboard. 6.
Remove the battery. 3. Remove the keyboard trim. 5. Remove the CPU fan. 9. Remove the CPU heatsink. 11. Remove the hard drive. 8. Rotate the processor cam lock in Before Working On Your Computer. 2. Remove the optical drive. 7. Remove the palm rest. 10. Remove the processor. 59 Follow the procedures in a counter-clockwise direction to the unlock position. 12. Remove the base cover. 4. Processor 21 Removing The Processor 1. Remove the keyboard. 6.
Owner's Manual (M4600)
Page 61
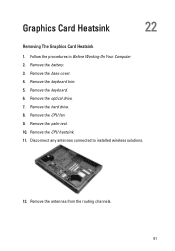
Remove the base cover. 4. Remove the keyboard. 6. Remove the hard drive. 8. Remove the CPU heatsink. 11. Remove the CPU fan. 9. Remove the palm rest. 10. Remove the optical drive. 7. Follow the procedures in Before Working On Your Computer 2. Remove the keyboard trim. 5. Remove the antennas from the routing channels. 61 Graphics Card Heatsink 22 Removing The Graphics Card Heatsink 1. Remove the battery. 3. Disconnect any antennas connected to installed wireless solutions. 12.
Remove the base cover. 4. Remove the keyboard. 6. Remove the hard drive. 8. Remove the CPU heatsink. 11. Remove the CPU fan. 9. Remove the palm rest. 10. Remove the optical drive. 7. Follow the procedures in Before Working On Your Computer 2. Remove the keyboard trim. 5. Remove the antennas from the routing channels. 61 Graphics Card Heatsink 22 Removing The Graphics Card Heatsink 1. Remove the battery. 3. Disconnect any antennas connected to installed wireless solutions. 12.
Owner's Manual (M4600)
Page 65
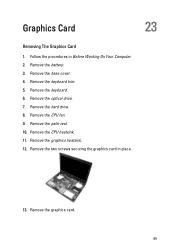
Remove the CPU fan. 9. Follow the procedures in place. 13. Remove the base cover. 4. Remove the CPU heatsink. 11. Remove the graphics heatsink. 12. Remove the keyboard trim. 5. Remove the graphics card. 65 Remove the battery. 3. Remove the keyboard. 6. Remove the optical drive. 7. Remove the two screws securing the graphics card in Before Working On Your Computer. 2. Graphics Card 23 Removing The Graphics Card 1. Remove the hard drive. 8. Remove the palm rest. 10.
Remove the CPU fan. 9. Follow the procedures in place. 13. Remove the base cover. 4. Remove the CPU heatsink. 11. Remove the graphics heatsink. 12. Remove the keyboard trim. 5. Remove the graphics card. 65 Remove the battery. 3. Remove the keyboard. 6. Remove the optical drive. 7. Remove the two screws securing the graphics card in Before Working On Your Computer. 2. Graphics Card 23 Removing The Graphics Card 1. Remove the hard drive. 8. Remove the palm rest. 10.

Owner's Manual (M4600)
Page 67
ExpressCard Module 24 Removing The ExpressCard Module 1. Follow the procedures in place. 67 Remove the keyboard trim. 5. Remove the keyboard. 6. Remove the battery. 3. Remove the base cover. 4. Remove the hard drive. 8. Remove the optical drive. 7. Remove the screws securing the ExpressCard module in Before Working On Your Computer. 2. Remove the palm rest. 9. Disconnect the ExpressCard cable. 10.
ExpressCard Module 24 Removing The ExpressCard Module 1. Follow the procedures in place. 67 Remove the keyboard trim. 5. Remove the keyboard. 6. Remove the battery. 3. Remove the base cover. 4. Remove the hard drive. 8. Remove the optical drive. 7. Remove the screws securing the ExpressCard module in Before Working On Your Computer. 2. Remove the palm rest. 9. Disconnect the ExpressCard cable. 10.

Owner's Manual (M4600)
Page 68
Installing The ExpressCard Module 1. Install the keyboard. 7. Connect the ExpressCard cable. 3. Install the hard drive. 5. Install the battery. 10. Install the keyboard trim. 8. Follow the procedures in place. 2. Remove the ExpressCard module. Install the palm rest. 4. 11. Install the optical drive. 6. Place the ExpressCard module in the system and tighten the three screws securing the ExpressCard module in After Working Inside Your Computer. 68 Install the base cover. 9.
Installing The ExpressCard Module 1. Install the keyboard. 7. Connect the ExpressCard cable. 3. Install the hard drive. 5. Install the battery. 10. Install the keyboard trim. 8. Follow the procedures in place. 2. Remove the ExpressCard module. Install the palm rest. 4. 11. Install the optical drive. 6. Place the ExpressCard module in the system and tighten the three screws securing the ExpressCard module in After Working Inside Your Computer. 68 Install the base cover. 9.
Owner's Manual (M4600)
Page 69
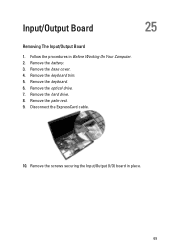
Remove the palm rest. 9. Follow the procedures in place. 69 Remove the keyboard. 6. Remove the keyboard trim. 5. Input/Output Board 25 Removing The Input/Output Board 1. Remove the optical drive. 7. Remove the base cover. 4. Disconnect the ExpressCard cable. 10. Remove the screws securing the Input/Output (I/O) board in Before Working On Your Computer. 2. Remove the battery. 3. Remove the hard drive. 8.
Remove the palm rest. 9. Follow the procedures in place. 69 Remove the keyboard. 6. Remove the keyboard trim. 5. Input/Output Board 25 Removing The Input/Output Board 1. Remove the optical drive. 7. Remove the base cover. 4. Disconnect the ExpressCard cable. 10. Remove the screws securing the Input/Output (I/O) board in Before Working On Your Computer. 2. Remove the battery. 3. Remove the hard drive. 8.
Owner's Manual (M4600)
Page 70
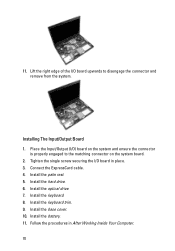
... I /O board upwards to the matching connector on the system and ensure the connector is properly engaged to disengage the connector and remove from the system. Connect the ExpressCard cable. 4. Install the keyboard. 8. Install the base cover. 10. Install the battery. 11. Install the palm rest. 5. Install the optical drive. 7. Follow the procedures... of the I /O board in After Working Inside Your Computer. 70 Place the Input/Output (I/O) board on the system board. 2. Install the hard drive. 6. Install the keyboard trim. 9.
... I /O board upwards to the matching connector on the system and ensure the connector is properly engaged to disengage the connector and remove from the system. Connect the ExpressCard cable. 4. Install the keyboard. 8. Install the base cover. 10. Install the battery. 11. Install the palm rest. 5. Install the optical drive. 7. Follow the procedures... of the I /O board in After Working Inside Your Computer. 70 Place the Input/Output (I/O) board on the system board. 2. Install the hard drive. 6. Install the keyboard trim. 9.

Owner's Manual (M4600)
Page 71
... DC-in cable from the routing channel. 71 Remove the keyboard trim. 5. Remove the CPU heatsink. 14. Remove the DC-in Jack 1. Remove the WWAN card. 10. Remove the keyboard. 6. Remove the optical drive. 7. Remove the Input/Output board. 17. Remove the base cover. 4. Remove the system board. 19. Remove the graphics card. 16. Remove the CPU fan. 11. Follow the procedures in...
... DC-in cable from the routing channel. 71 Remove the keyboard trim. 5. Remove the CPU heatsink. 14. Remove the DC-in Jack 1. Remove the WWAN card. 10. Remove the keyboard. 6. Remove the optical drive. 7. Remove the Input/Output board. 17. Remove the base cover. 4. Remove the system board. 19. Remove the graphics card. 16. Remove the CPU fan. 11. Follow the procedures in...
Owner's Manual (M4600)
Page 75
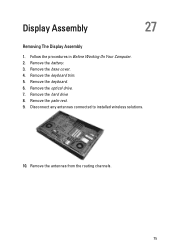
Remove the keyboard trim. 5. Remove the optical drive. 7. Disconnect any antennas connected to installed wireless solutions. 10. Remove the base cover. 4. Remove the antennas from the routing channels. 75 Remove the hard drive 8. Follow the procedures in Before Working On Your Computer. 2. Remove the palm rest. 9. Remove the keyboard. 6. Display Assembly 27 Removing The Display Assembly 1. Remove the battery. 3.
Remove the keyboard trim. 5. Remove the optical drive. 7. Disconnect any antennas connected to installed wireless solutions. 10. Remove the base cover. 4. Remove the antennas from the routing channels. 75 Remove the hard drive 8. Follow the procedures in Before Working On Your Computer. 2. Remove the palm rest. 9. Remove the keyboard. 6. Display Assembly 27 Removing The Display Assembly 1. Remove the battery. 3.
Owner's Manual (M4600)
Page 81
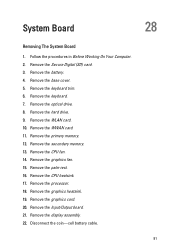
System Board 28 Removing The System Board 1. Remove the base cover. 5. Remove the graphics card. 20. Remove the battery. 4. Remove the hard drive. 9. Remove the WLAN card. 10. Remove the CPU fan. 14. Remove the palm rest. 16. Remove the graphics heatsink. 19. Remove the optical drive. 8. Remove the processor. 18. Remove the display assembly. 22. Remove the keyboard. 7. Remove the primary memory. 12. Remove the Secure...
System Board 28 Removing The System Board 1. Remove the base cover. 5. Remove the graphics card. 20. Remove the battery. 4. Remove the hard drive. 9. Remove the WLAN card. 10. Remove the CPU fan. 14. Remove the palm rest. 16. Remove the graphics heatsink. 19. Remove the optical drive. 8. Remove the processor. 18. Remove the display assembly. 22. Remove the keyboard. 7. Remove the primary memory. 12. Remove the Secure...

Owner's Manual (M4600)
Page 107
... bezel or the touchscreen display bezel. 11. Remove the base cover. 4. Remove the keyboard trim. 5. Remove the hard drive. 8. Remove the battery. 3. Remove the palm rest. 9. Remove the display hinge caps. 107 Follow the procedures in place. 13. Remove the keyboard. 6. Remove the standard display panel or the touchscreen display panel. 12. Remove the screws securing the display hinges in Before...
... bezel or the touchscreen display bezel. 11. Remove the base cover. 4. Remove the keyboard trim. 5. Remove the hard drive. 8. Remove the battery. 3. Remove the palm rest. 9. Remove the display hinge caps. 107 Follow the procedures in place. 13. Remove the keyboard. 6. Remove the standard display panel or the touchscreen display panel. 12. Remove the screws securing the display hinges in Before...


