
Quick Reference Guide
Page 23
... cage fan connector (FAN_CCAG) 4 internal speaker connector (INT_SPKR) 5 power connector (POWER2) 6 IDE drive connector (IDE) 7 password jumper (PSWD) 8 auxiliary hard-drive LED connector (AUX_LED) 9 battery socket (BATTERY) 10 SATA connectors (SATA_0, SATA_1, SATA_2) 11 RTC reset jumper (RTCRST) 12 main power connector (POWER1) 13 hard drive connector (HDD_3) 14 hard drive...
... cage fan connector (FAN_CCAG) 4 internal speaker connector (INT_SPKR) 5 power connector (POWER2) 6 IDE drive connector (IDE) 7 password jumper (PSWD) 8 auxiliary hard-drive LED connector (AUX_LED) 9 battery socket (BATTERY) 10 SATA connectors (SATA_0, SATA_1, SATA_2) 11 RTC reset jumper (RTCRST) 12 main power connector (POWER1) 13 hard drive connector (HDD_3) 14 hard drive...

User Guide
Page 6
... as x4 (SLOT7_PCIE) 8 auxiliary hard-drive LED connector (AUX_LED) 25 PCI-X card slot (SLOT6_PCIX) 9 air temperature sensor connector 26 PCI-X card slot (SLOT5_PCIX) 10 battery socket (BATTERY) 27 PCI card slot (SLOT4_PCI) 11 SATA connectors (SATA_0, SATA_1, SATA_2) NOTE: This slot is not available in the dualgraphics configuration 28 PCI-Express...
... as x4 (SLOT7_PCIE) 8 auxiliary hard-drive LED connector (AUX_LED) 25 PCI-X card slot (SLOT6_PCIX) 9 air temperature sensor connector 26 PCI-X card slot (SLOT5_PCIX) 10 battery socket (BATTERY) 27 PCI card slot (SLOT4_PCI) 11 SATA connectors (SATA_0, SATA_1, SATA_2) NOTE: This slot is not available in the dualgraphics configuration 28 PCI-Express...
User Guide
Page 26
Back to Contents Page Battery Dell Precision™ Workstation 690 User's Guide About the Battery Removing the Battery Replacing the Battery CAUTION: Before you begin any of the procedures in this section, follow the safety ... You Begin. In this computer requires a two-man lift. CAUTION: Your computer is incorrectly installed. See your computer from the electrical outlet. Locate the battery socket. Replace the battery only with the object. however, without a battery; avoid bending over , potentially resulting in system setup (see Removing the Computer Cover). 4. Failure to...
Back to Contents Page Battery Dell Precision™ Workstation 690 User's Guide About the Battery Removing the Battery Replacing the Battery CAUTION: Before you begin any of the procedures in this section, follow the safety ... You Begin. In this computer requires a two-man lift. CAUTION: Your computer is incorrectly installed. See your computer from the electrical outlet. Locate the battery socket. Replace the battery only with the object. however, without a battery; avoid bending over , potentially resulting in system setup (see Removing the Computer Cover). 4. Failure to...

User Guide
Page 27
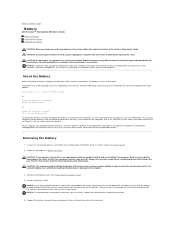
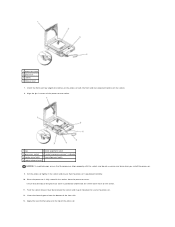
...the stand could result in the computer tipping over while lifting. Locate the battery socket. 4. NOTICE: To avoid damage to electrical outlets, and turn them on the positive side of battery connector 4 battery socket 7. Press the battery straight down firmly on . 10. Connect your computer ... 8. Hold the battery with the "+" facing up out of the securing tabs at the negative side of the connector. 1 system battery 2 battery socket tab 3 positive side of the connector. 6. this computer requires a two-man lift. Remove the computer cover (see Entering System Setup) and restore...
...the stand could result in the computer tipping over while lifting. Locate the battery socket. 4. NOTICE: To avoid damage to electrical outlets, and turn them on the positive side of battery connector 4 battery socket 7. Press the battery straight down firmly on . 10. Connect your computer ... 8. Hold the battery with the "+" facing up out of the securing tabs at the negative side of the connector. 1 system battery 2 battery socket tab 3 positive side of the connector. 6. this computer requires a two-man lift. Remove the computer cover (see Entering System Setup) and restore...

User Guide
Page 50
... in the release position so that all connectors are not installing a processor upgrade kit from Dell, reuse the original heat-sink assembly when you install your new processor. 7. Open the processor cover by sliding the release lever from the socket. 9. See Installing the Processor. If you are properly cabled and firmly seated.
... in the release position so that all connectors are not installing a processor upgrade kit from Dell, reuse the original heat-sink assembly when you install your new processor. 7. Open the processor cover by sliding the release lever from the socket. 9. See Installing the Processor. If you are properly cabled and firmly seated.

User Guide
Page 51
...you are replacing a processor, remove the processor (see Removing the Computer Cover). 3. NOTICE: You must position the processor correctly in the socket to avoid permanent damage to install the stand could result in bodily injury or damage to maneuver. Installing the Processor NOTICE: Ground yourself ... release lever from the computer. 1 memory shroud 2 thumbscrews (2) 3 memory fan (only present on the back of the pins inside the socket or allow any of the computer. NOTICE: When replacing the processor, do not touch any objects to avoid injury; Ensure that secure the memory...
...you are replacing a processor, remove the processor (see Removing the Computer Cover). 3. NOTICE: You must position the processor correctly in the socket to avoid permanent damage to install the stand could result in bodily injury or damage to maneuver. Installing the Processor NOTICE: Ground yourself ... release lever from the computer. 1 memory shroud 2 thumbscrews (2) 3 memory fan (only present on the back of the pins inside the socket or allow any of the computer. NOTICE: When replacing the processor, do not touch any objects to avoid injury; Ensure that secure the memory...
User Guide
Page 52
...correctly. 10. Clean the thermal grease from the bottom of the processor. When the processor is positioned underneath the center cover latch on the socket. 11. Apply the new thermal grease to secure the processor. 12. Orient the front and rear alignment notches on the processor with the front... and rear alignment notches on the processor cover is fully seated in the socket and ensure that the processor aligns properly with the socket, and do not use excessive force when you install the processor. 9. Ensure that the tab on the...
...correctly. 10. Clean the thermal grease from the bottom of the processor. When the processor is positioned underneath the center cover latch on the socket. 11. Apply the new thermal grease to secure the processor. 12. Orient the front and rear alignment notches on the processor with the front... and rear alignment notches on the processor cover is fully seated in the socket and ensure that the processor aligns properly with the socket, and do not use excessive force when you install the processor. 9. Ensure that the tab on the...

User Guide
Page 102
... application programming interface - Devices are 800 x 600 and 1024 x 768. video mode - A utility that plugs in the computer. A card that supports resolutions up to a 4-pin socket on computers equipped for this program. Text editors do not protect against lightning strikes or against electromagnetic interference, rather than system memory. A video standard for...
... application programming interface - Devices are 800 x 600 and 1024 x 768. video mode - A utility that plugs in the computer. A card that supports resolutions up to a 4-pin socket on computers equipped for this program. Text editors do not protect against lightning strikes or against electromagnetic interference, rather than system memory. A video standard for...
User Guide
Page 103
... wallpaper. Back to the open position. watt-hour - WLAN - Files or media that supports resolutions up to either the chip or its socket. A video standard for video cards and controllers that allows a computer chip to indicate the approximate capacity of power for 1 hour or 33...-protected - One W is infected, the boot virus may replicate itself onto all the floppy disks that have a filename extension of socket or connector that supports resolutions up to destroy data stored on your wallpaper through an infected disk, software downloaded from being changed . ...
... wallpaper. Back to the open position. watt-hour - WLAN - Files or media that supports resolutions up to either the chip or its socket. A video standard for video cards and controllers that allows a computer chip to indicate the approximate capacity of power for 1 hour or 33...-protected - One W is infected, the boot virus may replicate itself onto all the floppy disks that have a filename extension of socket or connector that supports resolutions up to destroy data stored on your wallpaper through an infected disk, software downloaded from being changed . ...

User Guide
Page 109
.... 10. Replace the memory shroud. Connect your computer and devices to electrical outlets, and turn off and disconnect your computer and devices from their sockets. 14. See Dell Diagnostics. The computer should have changed the value of Installed Memory to enter system setup and check the values listed under Memory Info. Return... NOTICE: The memory shroud holds the (optional) memory risers in order to secure the risers and to verify that they are operating properly. Run the Dell Diagnostics to avoid damage. 9.
.... 10. Replace the memory shroud. Connect your computer and devices to electrical outlets, and turn off and disconnect your computer and devices from their sockets. 14. See Dell Diagnostics. The computer should have changed the value of Installed Memory to enter system setup and check the values listed under Memory Info. Return... NOTICE: The memory shroud holds the (optional) memory risers in order to secure the risers and to verify that they are operating properly. Run the Dell Diagnostics to avoid damage. 9.

User Guide
Page 115
...the memory shroud. If the memory total is correct, skip to exit system setup. 23. this procedure, but instead of your computer from their sockets. 22. its thumbscrews must be installed at all times to lift, move, or tilt it is incorrect, turn them on the computer. 1. ...and to enter system setup and check the values listed under Memory Info. Always lift correctly to the computer. 2. Verify the new total. See Dell Diagnostics. NOTICE: To prevent static damage to step 1 of this computer requires a two-man lift. Follow the procedures in place; avoid bending over...
...the memory shroud. If the memory total is correct, skip to exit system setup. 23. this procedure, but instead of your computer from their sockets. 22. its thumbscrews must be installed at all times to lift, move, or tilt it is incorrect, turn them on the computer. 1. ...and to enter system setup and check the values listed under Memory Info. Always lift correctly to the computer. 2. Verify the new total. See Dell Diagnostics. NOTICE: To prevent static damage to step 1 of this computer requires a two-man lift. Follow the procedures in place; avoid bending over...
User Guide
Page 139
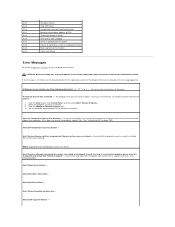
... Fan Failure - Chipset heatsink not detected. - The program that the computer cover is missing an essential file. If this checkpoint and contact Dell Technical Support - CPU Installed in Incorrect Socket - Alert! Ensure that you begin any of the following characters Do not use CPU_0. Previous attempts at checkpoint [nnnn]. Select the program...
... Fan Failure - Chipset heatsink not detected. - The program that the computer cover is missing an essential file. If this checkpoint and contact Dell Technical Support - CPU Installed in Incorrect Socket - Alert! Ensure that you begin any of the following characters Do not use CPU_0. Previous attempts at checkpoint [nnnn]. Select the program...


