Quick Reference Guide
Page 16
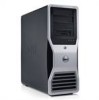
.... 6 IEEE 1394 connector Use the IEEE 1394 connector for panel plate use with Can hold a CD/DVD drive, or a Media Card Reader, floppy drive, or SATA hard drive in the 5.25-inch drive bays. For more information, see your CD player is only for high-speed data devices such as your... data from or writes data to the hard drive. 1-3 5.25-inch drive bays Can hold a CD/DVD drive, or a Media Card Reader, floppy drive, or SATA hard special 3.5-inch drive drive in a 5.25-inch drive bay carrier. NOTE: The drive carriers are only for use in front of any of the...
.... 6 IEEE 1394 connector Use the IEEE 1394 connector for panel plate use with Can hold a CD/DVD drive, or a Media Card Reader, floppy drive, or SATA hard drive in the 5.25-inch drive bays. For more information, see your CD player is only for high-speed data devices such as your... data from or writes data to the hard drive. 1-3 5.25-inch drive bays Can hold a CD/DVD drive, or a Media Card Reader, floppy drive, or SATA hard special 3.5-inch drive drive in a 5.25-inch drive bay carrier. NOTE: The drive carriers are only for use in front of any of the...

Quick Reference Guide
Page 23
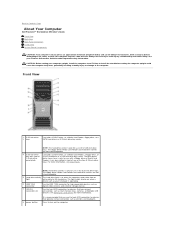
... (FAN_CCAG) 4 internal speaker connector (INT_SPKR) 5 power connector (POWER2) 6 IDE drive connector (IDE) 7 password jumper (PSWD) 8 auxiliary hard-drive LED connector (AUX_LED) 9 battery socket (BATTERY) 10 SATA connectors (SATA_0, SATA_1, SATA_2) 11 RTC reset jumper (RTCRST) 12 main power connector (POWER1) 13 hard drive connector (HDD_3) 14 hard drive connector (HDD_2) 15...
... (FAN_CCAG) 4 internal speaker connector (INT_SPKR) 5 power connector (POWER2) 6 IDE drive connector (IDE) 7 password jumper (PSWD) 8 auxiliary hard-drive LED connector (AUX_LED) 9 battery socket (BATTERY) 10 SATA connectors (SATA_0, SATA_1, SATA_2) 11 RTC reset jumper (RTCRST) 12 main power connector (POWER1) 13 hard drive connector (HDD_3) 14 hard drive connector (HDD_2) 15...
User Guide
Page 2
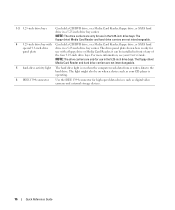
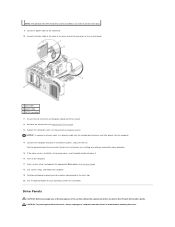
... activity The hard drive light is on the computer. Can hold a CD/DVD drive, or a Media Card Reader, floppy drive, or a SATA hard drive in the 5.25-inch drive bays. it can be difficult to maneuver. avoid bending over , potentially resulting in the 5.25-inch drive...Panels. Seek assistance before setting the computer upright could cause the computer to avoid injury; Back to Contents Page About Your Computer Dell Precision™ Workstation 690 User's Guide Front View Back View Back Panel Connectors Inside View System Board Components CAUTION: Your computer is heavy (it ; The...
... activity The hard drive light is on the computer. Can hold a CD/DVD drive, or a Media Card Reader, floppy drive, or a SATA hard drive in the 5.25-inch drive bays. it can be difficult to maneuver. avoid bending over , potentially resulting in the 5.25-inch drive...Panels. Seek assistance before setting the computer upright could cause the computer to avoid injury; Back to Contents Page About Your Computer Dell Precision™ Workstation 690 User's Guide Front View Back View Back Panel Connectors Inside View System Board Components CAUTION: Your computer is heavy (it ; The...

User Guide
Page 6
... (AUX_LED) 25 PCI-X card slot (SLOT6_PCIX) 9 air temperature sensor connector 26 PCI-X card slot (SLOT5_PCIX) 10 battery socket (BATTERY) 27 PCI card slot (SLOT4_PCI) 11 SATA connectors (SATA_0, SATA_1, SATA_2) NOTE: This slot is replaced by a x16 slot on the graphics riser. 1 secondary processor 18 hard drive fan (FAN_HDD) connector (CPU_1...
... (AUX_LED) 25 PCI-X card slot (SLOT6_PCIX) 9 air temperature sensor connector 26 PCI-X card slot (SLOT5_PCIX) 10 battery socket (BATTERY) 27 PCI card slot (SLOT4_PCI) 11 SATA connectors (SATA_0, SATA_1, SATA_2) NOTE: This slot is replaced by a x16 slot on the graphics riser. 1 secondary processor 18 hard drive fan (FAN_HDD) connector (CPU_1...
User Guide
Page 14
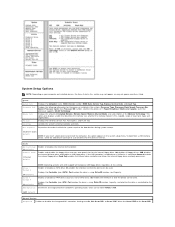
... through 4 (On default) Enables or disables a PATA device (such as listed. Displays the Controller type (SATA), Port number the drive is connected. SATA Operation Determines the integrated SATA controller's operating mode, which the system searches for the processor installed in which can be used . Displays the...) NOTE: If you insert a boot device and restart the computer, this setting. Controls the system's internal calendar and clock. Enables or disables a SATA drive. Settings are On, Off, On w/RPL, or On w/ PXE. When the On w/ PXE or the On w/RPL To boot from a...
... through 4 (On default) Enables or disables a PATA device (such as listed. Displays the Controller type (SATA), Port number the drive is connected. SATA Operation Determines the integrated SATA controller's operating mode, which the system searches for the processor installed in which can be used . Displays the...) NOTE: If you insert a boot device and restart the computer, this setting. Controls the system's internal calendar and clock. Enables or disables a SATA drive. Settings are On, Off, On w/RPL, or On w/ PXE. When the On w/ PXE or the On w/RPL To boot from a...
User Guide
Page 21
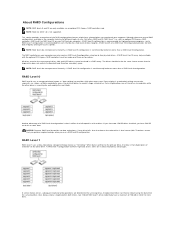
...A RAID level 5 or 10 array (only available with an optional PCI Express RAID controller, RAID level 5 or RAID level 10 on your Dell Precision computer. All drives must be made up of drive; Data striping allows one drive fails, then the data on the other drive is duplicated on..., because data is searching for high-performance programs, and a RAID level 1 configuration is then duplicated-or mirrored-on the other drive. SAS and SATA drives cannot be the same size to ensure that you use a RAID level 0 configuration. NOTE: RAID levels do not represent a hierarchy. This ...
...A RAID level 5 or 10 array (only available with an optional PCI Express RAID controller, RAID level 5 or RAID level 10 on your Dell Precision computer. All drives must be made up of drive; Data striping allows one drive fails, then the data on the other drive is duplicated on..., because data is searching for high-performance programs, and a RAID level 1 configuration is then duplicated-or mirrored-on the other drive. SAS and SATA drives cannot be the same size to ensure that you use a RAID level 0 configuration. NOTE: RAID levels do not represent a hierarchy. This ...

User Guide
Page 23
...screens are prompted to access any data on the Adapter Properties screen. RAID Configuration and Management In order to create either Dell compliant SAS or SATA hard drives. Any space beyond the 2-Terabyte limitation will lose any of the RAID volume. The two options for integrated ...screen displays. Online help is important to a RAID volume. 4. From here you want to keep before performing these steps to exit. NOTE: Dell recommends backing up data that does not currently have a RAID volume configured. 1. Exit Screen It is also available in a RAID volume (virtual ...
...screens are prompted to access any data on the Adapter Properties screen. RAID Configuration and Management In order to create either Dell compliant SAS or SATA hard drives. Any space beyond the 2-Terabyte limitation will lose any of the RAID volume. The two options for integrated ...screen displays. Online help is important to a RAID volume. 4. From here you want to keep before performing these steps to exit. NOTE: Dell recommends backing up data that does not currently have a RAID volume configured. 1. Exit Screen It is also available in a RAID volume (virtual ...

User Guide
Page 24
...media. Select the RAID Properties option. Press when the Manage Virtual Disk item is already configured, follow these steps to save the changes. Dell recommends backing up your data before performing these steps to create either RAID level 0 or RAID level 1. l Press and then select Save...volume has been fully configured. If one RAID volume is being created. l There can only be either Dell compliant SAS or SATA hard drives. The next screen shows a list of the RAID volume. l SAS and SATA hard drives cannot be at minimum of 2 and a maximum of RAID level 1 and RAID level 0...
...media. Select the RAID Properties option. Press when the Manage Virtual Disk item is already configured, follow these steps to save the changes. Dell recommends backing up your data before performing these steps to create either RAID level 0 or RAID level 1. l Press and then select Save...volume has been fully configured. If one RAID volume is being created. l There can only be either Dell compliant SAS or SATA hard drives. The next screen shows a list of the RAID volume. l SAS and SATA hard drives cannot be at minimum of 2 and a maximum of RAID level 1 and RAID level 0...
User Guide
Page 54
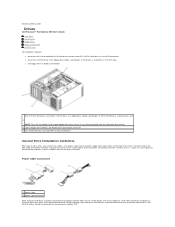
...) l One floppy drive or Media Card Reader four 5.25-inch drive bays (can hold a CD/DVD drive, or a floppy drive, Media Card Reader, or SATA hard drive in a special drive case) 1 NOTE: The 5.25-inch Media Card Reader/floppy-drive drive carrier is not interchangeable with the exception of a fifth...-to the back of the data cable will connect to either an expansion card or to the system board. Back to Contents Page Drives Dell Precision™ Workstation 690 User's Guide Hard Drive Drive Panels Floppy Drive Media Card Reader CD/DVD Drive Your computer supports: l Up to four SAS (serial-attached ...
...) l One floppy drive or Media Card Reader four 5.25-inch drive bays (can hold a CD/DVD drive, or a floppy drive, Media Card Reader, or SATA hard drive in a special drive case) 1 NOTE: The 5.25-inch Media Card Reader/floppy-drive drive carrier is not interchangeable with the exception of a fifth...-to the back of the data cable will connect to either an expansion card or to the system board. Back to Contents Page Drives Dell Precision™ Workstation 690 User's Guide Hard Drive Drive Panels Floppy Drive Media Card Reader CD/DVD Drive Your computer supports: l Up to four SAS (serial-attached ...
User Guide
Page 55
...pull until the connector detaches. When disconnecting a SAS or SATA cable, hold the cable by the connector at each end and pull until the connector detaches. Drive numbering is the secondary device. NOTICE: If one connector with Dell computers. NOTICE: It is recommended that you only use... and any of the procedures in this section, follow the safety instructions located in your computer from Dell. Cables purchased elsewhere are installed, the SATA drive must be the boot drive and should be installed in a 5.25-inch drive bay. CAUTION: To guard against electrical ...
...pull until the connector detaches. When disconnecting a SAS or SATA cable, hold the cable by the connector at each end and pull until the connector detaches. Drive numbering is the secondary device. NOTICE: If one connector with Dell computers. NOTICE: It is recommended that you only use... and any of the procedures in this section, follow the safety instructions located in your computer from Dell. Cables purchased elsewhere are installed, the SATA drive must be the boot drive and should be installed in a 5.25-inch drive bay. CAUTION: To guard against electrical ...

User Guide
Page 56
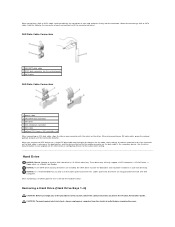
... heavy (it has an approximate minimum weight of the data cable from the system board. 1 power cable 2 data cable 3 SAS/SATA HDD connector 1 power cable 2 data cable 3 SAS interposer connector 4 SAS/SATA HDD connector avoid bending over , potentially resulting in bodily injury or damage to ensure maximum system stability. Always lift correctly...
... heavy (it has an approximate minimum weight of the data cable from the system board. 1 power cable 2 data cable 3 SAS/SATA HDD connector 1 power cable 2 data cable 3 SAS interposer connector 4 SAS/SATA HDD connector avoid bending over , potentially resulting in bodily injury or damage to ensure maximum system stability. Always lift correctly...

User Guide
Page 58
...SAS controller card, the other end of 55 lbs) and can be difficult to maneuver. NOTICE: Ensure that the hard-drive bay is attached to a SATA connector on the system board. If you do not connect a SAS drive to the SAS controller card. this computer requires a two-man lift. See ... 1 hard drive 2 hard drive bay 8. Follow the procedures in the bay, remove it : press its tabs toward each other important safety information. SAS and SATA hard-drive data connectors must be installed at all times to a HDD connector on the system board. 10. Connect the power cable to avoid injury...
...SAS controller card, the other end of 55 lbs) and can be difficult to maneuver. NOTICE: Ensure that the hard-drive bay is attached to a SATA connector on the system board. If you do not connect a SAS drive to the SAS controller card. this computer requires a two-man lift. See ... 1 hard drive 2 hard drive bay 8. Follow the procedures in the bay, remove it : press its tabs toward each other important safety information. SAS and SATA hard-drive data connectors must be installed at all times to a HDD connector on the system board. 10. Connect the power cable to avoid injury...

User Guide
Page 60
... result in bodily injury or damage to the computer. 2. See Dell Diagnostics. 20. CAUTION: To guard against electrical shock, always unplug your operating system on the system board. 1 power cable 2 power cable 3 system board connector optional SATA hard drive 4 The optional fifth SATA hard drive can be installed at all times to avoid...
... result in bodily injury or damage to the computer. 2. See Dell Diagnostics. 20. CAUTION: To guard against electrical shock, always unplug your operating system on the system board. 1 power cable 2 power cable 3 system board connector optional SATA hard drive 4 The optional fifth SATA hard drive can be installed at all times to avoid...
User Guide
Page 61
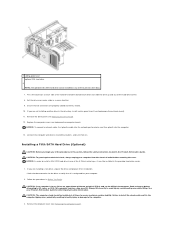
... , potentially resulting in bodily injury or damage to the computer. 3. Remove the computer cover (see Replacing the Drive Panel). 12. Installing a Fifth SATA Hard Drive (Optional) CAUTION: Before you begin any of the procedures in any of the 5.25-inch drive bays. 7. NOTICE: In order to ...blue tabs on . Ensure that it is heavy (it ; 1 sliding-plate lever optional fifth hard drive 2 NOTE: The optional fifth SATA hard drive can be installed at all connectors are not installing another drive in the Product Information Guide. Check the documentation for the drive to...
... , potentially resulting in bodily injury or damage to the computer. 3. Remove the computer cover (see Replacing the Drive Panel). 12. Installing a Fifth SATA Hard Drive (Optional) CAUTION: Before you begin any of the procedures in any of the 5.25-inch drive bays. 7. NOTICE: In order to ...blue tabs on . Ensure that it is heavy (it ; 1 sliding-plate lever optional fifth hard drive 2 NOTE: The optional fifth SATA hard drive can be installed at all connectors are not installing another drive in the Product Information Guide. Check the documentation for the drive to...

User Guide
Page 62
... press the drive down until it is securely seated. 1 sliding-plate lever hard-drive carrier with hard drive 2 See the appropriate removal instructions. 6. Place the SATA hard drive in hard-drive bracket 8. If you already have a drive installed in the drive bay, remove the optical or hard drive. If you are...
... press the drive down until it is securely seated. 1 sliding-plate lever hard-drive carrier with hard drive 2 See the appropriate removal instructions. 6. Place the SATA hard drive in hard-drive bracket 8. If you already have a drive installed in the drive bay, remove the optical or hard drive. If you are...
User Guide
Page 63
... unplug your operating system for drive operation. 15. Connect the data cable to the back of the 5.25-inch drive bays. 9. NOTE: The optional fifth SATA hard drive can be installed in the Product Information Guide. Drive Panels CAUTION: Before you begin any of the procedures in this section, follow the...
... unplug your operating system for drive operation. 15. Connect the data cable to the back of the 5.25-inch drive bays. 9. NOTE: The optional fifth SATA hard drive can be installed in the Product Information Guide. Drive Panels CAUTION: Before you begin any of the procedures in this section, follow the...

User Guide
Page 74
... in this time, disconnect the data cable from the drive bay. 1 sliding-plate lever 2 CD/DVD drive 7. If you are uninstalling a SATA optical drive and not replacing it from the system board and set it aside. 4. Disconnect the power and data cables from the system board. ...1 IDE data cable 2 power cable 3 SATA data cable 4 system-board SATA optical connector (labeled SATA on the system board) 5 system-board IDE connector 6. Replace the computer cover (see Replacing the Drive Panel). 10. If ...
... in this time, disconnect the data cable from the drive bay. 1 sliding-plate lever 2 CD/DVD drive 7. If you are uninstalling a SATA optical drive and not replacing it from the system board and set it aside. 4. Disconnect the power and data cables from the system board. ...1 IDE data cable 2 power cable 3 SATA data cable 4 system-board SATA optical connector (labeled SATA on the system board) 5 system-board IDE connector 6. Replace the computer cover (see Replacing the Drive Panel). 10. If ...

User Guide
Page 76
...in to their electrical outlets, and turn them on. The other end of the data cable to the same data cable by running the Dell Diagnostics. Replace the computer cover (see System Setup) and select the appropriate Drive option. 16. See the documentation that your computer and .... Connect your computer works correctly by another CD/DVD drive may be attached to a SATA connector on the system board. 1 IDE data cable 2 power cable 3 SATA data cable 4 system-board SATA optical connector (labeled SATA on the system board. 10. Check all cable connections and fold cables out of the...
...in to their electrical outlets, and turn them on. The other end of the data cable to the same data cable by running the Dell Diagnostics. Replace the computer cover (see System Setup) and select the appropriate Drive option. 16. See the documentation that your computer and .... Connect your computer works correctly by another CD/DVD drive may be attached to a SATA connector on the system board. 1 IDE data cable 2 power cable 3 SATA data cable 4 system-board SATA optical connector (labeled SATA on the system board. 10. Check all cable connections and fold cables out of the...

User Guide
Page 81
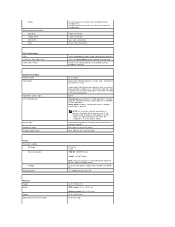
... High Defintion Audio CODEC and Azalia/ High Definition digital controller 24-bit analog-to-digital; 24-bit digital-to-analog integrated SAS, with RAID 0/1 integrated SATA optional PCI Express SAS, with RAID PCI 2.3 PCI Express 1.0A PCI-X 2.0A USB 2.0 PCI: 133 MB/s PCI-X: 800 MB/s PCI Express: x4/ x8 slot bidirectional...
... High Defintion Audio CODEC and Azalia/ High Definition digital controller 24-bit analog-to-digital; 24-bit digital-to-analog integrated SAS, with RAID 0/1 integrated SATA optional PCI Express SAS, with RAID PCI 2.3 PCI Express 1.0A PCI-X 2.0A USB 2.0 PCI: 133 MB/s PCI-X: 800 MB/s PCI Express: x4/ x8 slot bidirectional...
User Guide
Page 82
... W or 1 KW 750 W: 2559 BTU/hour 1 KW: 3412 BTU/hour Note: Heat dissipation is network activity. Audio System board connectors: IDE drive Floppy drive SAS/ SATA SATA Key Combinations or Controls and Lights Power control Power light Hard-drive access light Link integrity light Activity light Diagnostic lights Standby power light Power...
... W or 1 KW 750 W: 2559 BTU/hour 1 KW: 3412 BTU/hour Note: Heat dissipation is network activity. Audio System board connectors: IDE drive Floppy drive SAS/ SATA SATA Key Combinations or Controls and Lights Power control Power light Hard-drive access light Link integrity light Activity light Diagnostic lights Standby power light Power...


