User's Guide
Page 3
NOTE: To set up with any other stand, please refer to Contents Page About Your Monitor Dell™ P1913/P1913S/P2213 Monitor User's Guide Package Contents Product Features Identifying Parts and Controls Monitor Specifications Plug and Play Capability Universal Serial Bus (USB) ...and may be available in certain countries. Ensure that you have received all the components and contact Dell if something is BFR/PVC-free (Halogen-free) excluding external cables. Back to the respective stand setup guide for setup instructions. NOTE: Some items may not ship with the components shown below...
NOTE: To set up with any other stand, please refer to Contents Page About Your Monitor Dell™ P1913/P1913S/P2213 Monitor User's Guide Package Contents Product Features Identifying Parts and Controls Monitor Specifications Plug and Play Capability Universal Serial Bus (USB) ...and may be available in certain countries. Ensure that you have received all the components and contact Dell if something is BFR/PVC-free (Halogen-free) excluding external cables. Back to the respective stand setup guide for setup instructions. NOTE: Some items may not ship with the components shown below...
User's Guide
Page 4
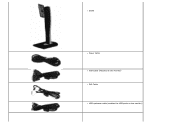
Stand Power Cable VGA Cable (Attached to the monitor) DVI Cable USB upstream cable (enables the USB ports on the monitor)
Stand Power Cable VGA Cable (Attached to the monitor) DVI Cable USB upstream cable (enables the USB ports on the monitor)
User's Guide
Page 5
...). 1680 x 1050 resolution, plus full-screen support for lower resolutions. ¦ Wide viewing angle to allow viewing from a sitting or standing position, or while moving from side-to-side. ¦ Tilt, swivel, vertical extension and rotate adjustment capability. ¦ Removable...to standard aspect ratio while maintaining the image quality. ¦ EPEAT Gold Rating. ¦ P1913/P1913S/P2213 monitor is BFR/PVC-free (Halogen-free) excluding external cables. ¦ TCO-Certified Displays. ¦ Dell Display Manager software included (comes in the CD shipped with the monitor). ¦ Arsenic-Free...
...). 1680 x 1050 resolution, plus full-screen support for lower resolutions. ¦ Wide viewing angle to allow viewing from a sitting or standing position, or while moving from side-to-side. ¦ Tilt, swivel, vertical extension and rotate adjustment capability. ¦ Removable...to standard aspect ratio while maintaining the image quality. ¦ EPEAT Gold Rating. ¦ P1913/P1913S/P2213 monitor is BFR/PVC-free (Halogen-free) excluding external cables. ¦ TCO-Certified Displays. ¦ Dell Display Manager software included (comes in the CD shipped with the monitor). ¦ Arsenic-Free...
User's Guide
Page 7
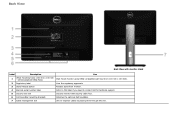
... this label if you need to organize cables by placing them through the slot. behind attached VESA Plate) 2 Regulatory label 3 Stand release button 4 Barcode serial number label 5 Security lock slot 6 Dell Soundbar mounting brackets 7 Cable management slot Use Wall mount monitor using VESA-compatible wall mount kit (100 mm x 100 mm). Back...
... this label if you need to organize cables by placing them through the slot. behind attached VESA Plate) 2 Regulatory label 3 Stand release button 4 Barcode serial number label 5 Security lock slot 6 Dell Soundbar mounting brackets 7 Cable management slot Use Wall mount monitor using VESA-compatible wall mount kit (100 mm x 100 mm). Back...
User's Guide
Page 8
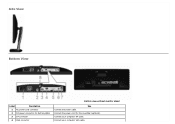
Connect the power cord for Dell Soundbar 3 DP connector 4 VGA connector Bottom view without monitor stand Use Connect the power cable. Connect your computer VGA cable. Connect your computer DP cable. Side View Bottom View Label Description 1 AC power cord connector 2 DC power connector for the soundbar (optional).
Connect the power cord for Dell Soundbar 3 DP connector 4 VGA connector Bottom view without monitor stand Use Connect the power cable. Connect your computer VGA cable. Connect your computer DP cable. Side View Bottom View Label Description 1 AC power cord connector 2 DC power connector for the soundbar (optional).
User's Guide
Page 9
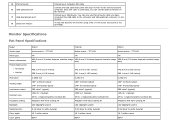
... to the computer and USB upstream connector on the monitor. 5 DVI connector 6 USB upstream port 7 USB downstream port 8 Stand lock feature Connect your monitor to the monitor and the computer. Monitor Specifications Flat Panel Specifications Model Screen type Panel type Screen dimensions... Preset display area: Horizontal Vertical Pixel pitch Viewing angle Luminance output Contrast ratio Faceplate coating Backlight Response time Color depth Color gamut P1913 P1913S P2213 Active matrix - TFT LCD Active matrix - TFT LCD Active matrix - Connect your USB device. You can only use ...
... to the computer and USB upstream connector on the monitor. 5 DVI connector 6 USB upstream port 7 USB downstream port 8 Stand lock feature Connect your monitor to the monitor and the computer. Monitor Specifications Flat Panel Specifications Model Screen type Panel type Screen dimensions... Preset display area: Horizontal Vertical Pixel pitch Viewing angle Luminance output Contrast ratio Faceplate coating Backlight Response time Color depth Color gamut P1913 P1913S P2213 Active matrix - TFT LCD Active matrix - TFT LCD Active matrix - Connect your USB device. You can only use ...
User's Guide
Page 12
...(HBR2), Fast AUX transaction, Multi-stream transport (MST), 3D stereo transport , HBR Audio (or high data rate audio) Physical Characteristics Model P1913 P1913S P2213 15-pin D-subminiature, blue 15-pin D-subminiature, blue 15-pin D-subminiature, blue Connector type connector; connector; DVI-D, white connector;... support* Separate horizontal and vertical synchronizations, polarity-free TTL level, SOG (Composite SYNC on green) 100 VAC to the monitor Dimensions (with stand) Height (extended) Height (compressed) Width 476.4 mm ( 18.76 inches) 356.9 mm (14.05 inches) 443.8 mm (17.47...
...(HBR2), Fast AUX transaction, Multi-stream transport (MST), 3D stereo transport , HBR Audio (or high data rate audio) Physical Characteristics Model P1913 P1913S P2213 15-pin D-subminiature, blue 15-pin D-subminiature, blue 15-pin D-subminiature, blue Connector type connector; connector; DVI-D, white connector;... support* Separate horizontal and vertical synchronizations, polarity-free TTL level, SOG (Composite SYNC on green) 100 VAC to the monitor Dimensions (with stand) Height (extended) Height (compressed) Width 476.4 mm ( 18.76 inches) 356.9 mm (14.05 inches) 443.8 mm (17.47...
User's Guide
Page 13
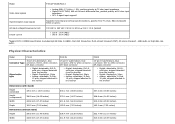
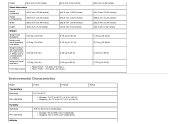
...) Weight Weight with packaging 5.87 kg (12.91 lb) 6.75 kg (14.85 lb) Weight with stand assembly and cables 4.75 kg (10.45 lb) 5.23 kg (11.51 lb) Weight without stand assembly (For wall mount or VESA mount considerations no cables) 2.52 kg (5.54 lb) 2.95 kg ...) 5.71 kg (12.56 lb) 3.43 kg (7.55 lb) 1.73 kg (3.81 lb) Environmental Characteristics Model Temperature Operating Non-operating Humidity Operating Non-operating Altitude P1913 P1913S 0 °C to 40 °C Storage: -20 °C to 60 °C (-4 °F to 140 °F) Shipping: -20 °C to 60 °C (-4 °F to 140 ...
...) Weight Weight with packaging 5.87 kg (12.91 lb) 6.75 kg (14.85 lb) Weight with stand assembly and cables 4.75 kg (10.45 lb) 5.23 kg (11.51 lb) Weight without stand assembly (For wall mount or VESA mount considerations no cables) 2.52 kg (5.54 lb) 2.95 kg ...) 5.71 kg (12.56 lb) 3.43 kg (7.55 lb) 1.73 kg (3.81 lb) Environmental Characteristics Model Temperature Operating Non-operating Humidity Operating Non-operating Altitude P1913 P1913S 0 °C to 40 °C Storage: -20 °C to 60 °C (-4 °F to 140 °F) Shipping: -20 °C to 60 °C (-4 °F to 140 ...
User's Guide
Page 21
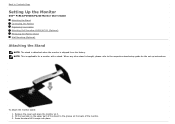
... to the groove on the back of the stand to Contents Page Setting Up the Monitor Dell™ P1913/P1913S/P2213 Monitor User's Guide Attaching the Stand Connecting the Monitor Organizing Your Cables Attaching Dell Soundbar AX510/AY511 (Optional) Removing the Monitor Stand Wall Mounting (Optional) Attaching the Stand NOTE: The stand is detached when the monitor is shipped...
... to the groove on the back of the stand to Contents Page Setting Up the Monitor Dell™ P1913/P1913S/P2213 Monitor User's Guide Attaching the Stand Connecting the Monitor Organizing Your Cables Attaching Dell Soundbar AX510/AY511 (Optional) Removing the Monitor Stand Wall Mounting (Optional) Attaching the Stand NOTE: The stand is detached when the monitor is shipped...
User's Guide
Page 24
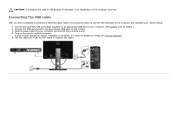
... the power cables for details.) 2. If your monitor setup: 1. Appearance of illustration only. Connect the USB peripherals to the downstream USB ports on the monitor stand to an appropriate USB port on the monitor and the computer. Turn on your computer. (See bottom view for your computer and monitor into a nearby...
... the power cables for details.) 2. If your monitor setup: 1. Appearance of illustration only. Connect the USB peripherals to the downstream USB ports on the monitor stand to an appropriate USB port on the monitor and the computer. Turn on your computer. (See bottom view for your computer and monitor into a nearby...
User's Guide
Page 26
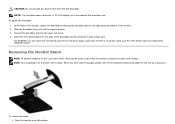
...: To prevent scratches on the LCD screen while removing the stand, ensure that the monitor is for the optional Dell Soundbar only. NOTE: The Soundbar power connector (+12 V DC output) ...PC if the Audio output is configured to the left until it snaps into place. 3. To remove the stand: 1. At the back of the monitor, attach the Soundbar by aligning the two slots with the two tabs... the monitor's audio output port. CAUTION: Do not use with any other than the Dell Soundbar. When any device other stand is applicable for the set-up instructions. For HDMI/DP, you can insert the mini...
...: To prevent scratches on the LCD screen while removing the stand, ensure that the monitor is for the optional Dell Soundbar only. NOTE: The Soundbar power connector (+12 V DC output) ...PC if the Audio output is configured to the left until it snaps into place. 3. To remove the stand: 1. At the back of the monitor, attach the Soundbar by aligning the two slots with the two tabs... the monitor's audio output port. CAUTION: Do not use with any other than the Dell Soundbar. When any device other stand is applicable for the set-up instructions. For HDMI/DP, you can insert the mini...
User's Guide
Page 27
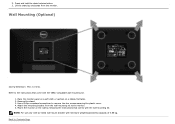
...flat table. 2. NOTE: For use only with UL-listed wall mount bracket with the wall mounting kit. Remove the stand. 3. 2. Refer to the monitor. 5. Press and hold the stand release button. 3. Use a Philips crosshead screwdriver to Contents Page Back to remove the four screws securing the plastic cover.... 4. Attach the mounting bracket from the monitor. Lift the stand up and away from the wall mounting kit...
...flat table. 2. NOTE: For use only with UL-listed wall mount bracket with the wall mounting kit. Remove the stand. 3. 2. Refer to the monitor. 5. Press and hold the stand release button. 3. Use a Philips crosshead screwdriver to Contents Page Back to remove the four screws securing the plastic cover.... 4. Attach the mounting bracket from the monitor. Lift the stand up and away from the wall mounting kit...

User's Guide
Page 48
4 Power indicator Using the Tilt, Swivel, and Vertical Extension NOTE: This is shipped from the factory. Vertical Extension NOTE: The stand extends vertically up instructions. Tilt, Swivel With the stand attached to the monitor, you can tilt and swivel the monitor for set up to 130 mm. The figure below illustrates how to the respective stand setup guide for the most comfortable viewing angle. NOTE: The stand is detached when the monitor is applicable for a monitor with a stand. When any other stand is bought, please refer to extend the stand vertically.
4 Power indicator Using the Tilt, Swivel, and Vertical Extension NOTE: This is shipped from the factory. Vertical Extension NOTE: The stand extends vertically up instructions. Tilt, Swivel With the stand attached to the monitor, you can tilt and swivel the monitor for set up to 130 mm. The figure below illustrates how to the respective stand setup guide for the most comfortable viewing angle. NOTE: The stand is detached when the monitor is applicable for a monitor with a stand. When any other stand is bought, please refer to extend the stand vertically.


