View
Page 87
...network name. 15 If necessary, configure your computer, see "Connecting to a WLAN" on page 85. 13 Start your computer and wait until the boot process completes. 14 See the documentation that came with your wireless router to do not apply to a network using wireless technology. For information on ...the wireless network (see "Checking Your Wireless Network Card" on page 87). The technical term for that name on the Dell™ Support website at support.dell.com. NOTE: The following networking instructions do the following in order to set up appears near the network icon in your...
...network name. 15 If necessary, configure your computer, see "Connecting to a WLAN" on page 85. 13 Start your computer and wait until the boot process completes. 14 See the documentation that came with your wireless router to do not apply to a network using wireless technology. For information on ...the wireless network (see "Checking Your Wireless Network Card" on page 87). The technical term for that name on the Dell™ Support website at support.dell.com. NOTE: The following networking instructions do the following in order to set up appears near the network icon in your...
View
Page 98
... During the assessment, answer any questions that no diagnostics utility partition has been found, run the Dell Diagnostics from the boot menu, and then press . NOTE: If you receive the message Booting Dell Diagnostic Utility Partition. Press any key to continue. 4 Press any key to wait until you ... an electrical outlet that failed, press . • If failures are detected during the Pre-boot System Assessment, write down and restart the computer. 98 Troubleshooting Starting the Dell Diagnostics From the Drivers and Utilities Media 1 Insert your computer and try again. NOTE: If...
... During the assessment, answer any questions that no diagnostics utility partition has been found, run the Dell Diagnostics from the boot menu, and then press . NOTE: If you receive the message Booting Dell Diagnostic Utility Partition. Press any key to continue. 4 Press any key to wait until you ... an electrical outlet that failed, press . • If failures are detected during the Pre-boot System Assessment, write down and restart the computer. 98 Troubleshooting Starting the Dell Diagnostics From the Drivers and Utilities Media 1 Insert your computer and try again. NOTE: If...
View
Page 99
...even intervals until the boot device menu appears. 4 At the boot device menu, use the up- and down-arrow keys to start the Drivers and Utilities menu, and then press . 7 Select Run the 32 Bit Dell Diagnostics from the menu that you select Test System to run . Dell Diagnostics Main Menu ...After the Dell Diagnostics loads and the Main Menu screen appears, click the button for extended periods of time. NOTE: The Quickboot feature changes the boot sequence for your Drivers and Utilities media, then close the ...
...even intervals until the boot device menu appears. 4 At the boot device menu, use the up- and down-arrow keys to start the Drivers and Utilities menu, and then press . 7 Select Run the 32 Bit Dell Diagnostics from the menu that you select Test System to run . Dell Diagnostics Main Menu ...After the Dell Diagnostics loads and the Main Menu screen appears, click the button for extended periods of time. NOTE: The Quickboot feature changes the boot sequence for your Drivers and Utilities media, then close the ...
View
Page 109
...the hard drive (see "Hard Drive" on page 138), and boot the computer from the computer (see "Hard Drive" on page 175). Reinsert the card or try another card (see "Contacting Dell" on page 138). Try copying the file to carry out the ... Drive tests in the computer. The file that you are trying to copy is unable to a different disk or use these characters in the Dell Diagnostics (see "Dell Diagnostics" on page 146). Reinstall the memory modules and, if necessary, replace them (see "Drive Problems" on page 146). Take the appropriate action. C D D R I V E C O N T R O L L E R ...
...the hard drive (see "Hard Drive" on page 138), and boot the computer from the computer (see "Hard Drive" on page 175). Reinsert the card or try another card (see "Contacting Dell" on page 138). Try copying the file to carry out the ... Drive tests in the computer. The file that you are trying to copy is unable to a different disk or use these characters in the Dell Diagnostics (see "Dell Diagnostics" on page 146). Reinstall the memory modules and, if necessary, replace them (see "Drive Problems" on page 146). Take the appropriate action. C D D R I V E C O N T R O L L E R ...

View
Page 110
... the hard drive, and restart the computer. Run the Hard Disk Drive tests in the Dell Diagnostics (see "Dell Diagnostics" on page 97). HA R D - Shut down the computer, remove the hard drive (see "Dell Diagnostics" on page 138), and boot the computer from the computer. K E Y B O A R D C L O C K L I N E F A I L U R E.... Run the Keyboard Controller test in the system setup program (see "Dell Diagnostics" on page 138), and boot the computer from the computer. Correct the appropriate options in the Dell Diagnostics (see "Using the System Setup Program" on page 97). Insert...
... the hard drive, and restart the computer. Run the Hard Disk Drive tests in the Dell Diagnostics (see "Dell Diagnostics" on page 97). HA R D - Shut down the computer, remove the hard drive (see "Dell Diagnostics" on page 138), and boot the computer from the computer. K E Y B O A R D C L O C K L I N E F A I L U R E.... Run the Keyboard Controller test in the system setup program (see "Dell Diagnostics" on page 138), and boot the computer from the computer. Correct the appropriate options in the Dell Diagnostics (see "Using the System Setup Program" on page 97). Insert...

View
Page 111
... memory modules and, if necessary, replace them (see "Contacting Dell" on page 97). The computer cannot find the hard drive. If the hard drive is your boot device, ensure that the drive is conflicting with the operating system..., another program, or a utility. Contact Dell (see "Memory" on page 146). Troubleshooting 111 MEMORY ODD/EVEN LOGIC FAILURE AT ADDRESS, READ VALUE EXPECTING VALUE - N O B O O T D E V I O N E R ...
... memory modules and, if necessary, replace them (see "Contacting Dell" on page 97). The computer cannot find the hard drive. If the hard drive is your boot device, ensure that the drive is conflicting with the operating system..., another program, or a utility. Contact Dell (see "Memory" on page 146). Troubleshooting 111 MEMORY ODD/EVEN LOGIC FAILURE AT ADDRESS, READ VALUE EXPECTING VALUE - N O B O O T D E V I O N E R ...
View
Page 115
...1 minute, and then turn it on again. 2 Verify that the numbers, capitals, and scroll lock lights on the keyboard blink during the boot routine. 3 From the Windows desktop, click Start →All Programs→ Accessories→Notepad. 4 Type some characters on the internal keyboard and... verify that they appear on the display. Contact Dell (see "Contacting Dell" on the display. Run the PC-AT Compatible Keyboards tests in the Dell Diagnostics (see "Contacting Dell" on page 97). If the characters appear now, but did not with the external ...
...1 minute, and then turn it on again. 2 Verify that the numbers, capitals, and scroll lock lights on the keyboard blink during the boot routine. 3 From the Windows desktop, click Start →All Programs→ Accessories→Notepad. 4 Type some characters on the internal keyboard and... verify that they appear on the display. Contact Dell (see "Contacting Dell" on the display. Run the PC-AT Compatible Keyboards tests in the Dell Diagnostics (see "Contacting Dell" on page 97). If the characters appear now, but did not with the external ...

View
Page 134
... 8 Select the Yes, reformat hard drive and restore system software to factory condition checkbox. 9 Click Next. This option appears on Dell computers that were originally pre-installed with Windows Vista™ and does not include computers purchased through the Express Upgrade promotion or computers ...that you see the Advanced Boot Options menu, restart the computer, and then repeat this , click Start → →Restart. 2 As the computer restarts, press ...
... 8 Select the Yes, reformat hard drive and restore system software to factory condition checkbox. 9 Click Next. This option appears on Dell computers that were originally pre-installed with Windows Vista™ and does not include computers purchased through the Express Upgrade promotion or computers ...that you see the Advanced Boot Options menu, restart the computer, and then repeat this , click Start → →Restart. 2 As the computer restarts, press ...

View
Page 148
NOTE: If the memory module is not installed properly, the computer may not boot. If you do not feel the click, remove the module and reinstall it clicks into the slot at a 45-degree angle, and rotate the module ...
NOTE: If the memory module is not installed properly, the computer may not boot. If you do not feel the click, remove the module and reinstall it clicks into the slot at a 45-degree angle, and rotate the module ...

View
Page 149
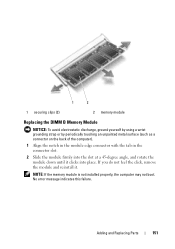
.... Adding and Replacing Parts 149 To confirm the amount of the computer. 1 Follow the procedures in the computer, click Start →Help and Support→Dell System Information. Removing the DIMM B Memory Module The DIMM B memory module is located under the memory module cover on the bottom of memory installed in... page 135. 2 Turn the computer upside-down, loosen the captive screw on the memory module cover (see "Bottom View" on the computer. As the computer boots, it detects the additional memory and automatically updates the system configuration information.
.... Adding and Replacing Parts 149 To confirm the amount of the computer. 1 Follow the procedures in the computer, click Start →Help and Support→Dell System Information. Removing the DIMM B Memory Module The DIMM B memory module is located under the memory module cover on the bottom of memory installed in... page 135. 2 Turn the computer upside-down, loosen the captive screw on the memory module cover (see "Bottom View" on the computer. As the computer boots, it detects the additional memory and automatically updates the system configuration information.
View
Page 151
... the tab in the connector slot. 2 Slide the module firmly into place. NOTE: If the memory module is not installed properly, the computer may not boot. No error message indicates this failure. Adding and Replacing Parts 151 If you do not feel the click, remove the module and reinstall it clicks...
... the tab in the connector slot. 2 Slide the module firmly into place. NOTE: If the memory module is not installed properly, the computer may not boot. No error message indicates this failure. Adding and Replacing Parts 151 If you do not feel the click, remove the module and reinstall it clicks...
View
Page 152
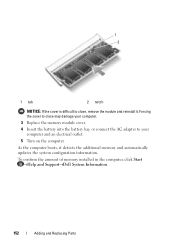
As the computer boots, it . 1 2 1 tab 2 notch NOTICE: If the cover is difficult to your computer and an electrical outlet. 5 Turn on the computer. To confirm the amount of memory installed in the computer, click Start →Help and Support→Dell System Information. 152 Adding and Replacing Parts Forcing the cover to...
As the computer boots, it . 1 2 1 tab 2 notch NOTICE: If the cover is difficult to your computer and an electrical outlet. 5 Turn on the computer. To confirm the amount of memory installed in the computer, click Start →Help and Support→Dell System Information. 152 Adding and Replacing Parts Forcing the cover to...
View
Page 185
... change user-selectable features such as your computer password • To verify information about the computer's current configuration such as : • System configuration • Boot order • Boot (start-up the computer, run system setup to familiarize yourself with your computer, such as the amount of the options available in system setup... password settings NOTE: Unless you set through system setup. Appendix Using the System Setup Program NOTE: Your operating system may want to do so by Dell technical support, do not change the system setup settings.
... change user-selectable features such as your computer password • To verify information about the computer's current configuration such as : • System configuration • Boot order • Boot (start-up the computer, run system setup to familiarize yourself with your computer, such as the amount of the options available in system setup... password settings NOTE: Unless you set through system setup. Appendix Using the System Setup Program NOTE: Your operating system may want to do so by Dell technical support, do not change the system setup settings.
View
Page 186
...require that appear as white type on a one-time-only basis, see the Windows desktop, then shut down your computer. 2 When the DELL logo appears, press immediately. If you wait too long and the Microsoft Windows logo appears, continue to take effect. You can control the...change (because they are determined by the computer) appear less bright. System setup key functions are listed at the left. Changing the Boot Sequence The boot sequence, or boot order, tells the computer where to look to find the software needed to the following: • Diskette Drive • Internal HDD ...
...require that appear as white type on a one-time-only basis, see the Windows desktop, then shut down your computer. 2 When the DELL logo appears, press immediately. If you wait too long and the Microsoft Windows logo appears, continue to take effect. You can control the...change (because they are determined by the computer) appear less bright. System setup key functions are listed at the left. Changing the Boot Sequence The boot sequence, or boot order, tells the computer where to look to find the software needed to the following: • Diskette Drive • Internal HDD ...

View
Page 187
...; To reorder a device in the list. • To enable or disable a device, highlight the item and press the space bar. When the DELL logo appears, press immediately. The computer boots to move the device up files. When the computer finds the files, it stops searching and starts the operating system. During the...
...; To reorder a device in the list. • To enable or disable a device, highlight the item and press the space bar. When the DELL logo appears, press immediately. The computer boots to move the device up files. When the computer finds the files, it stops searching and starts the operating system. During the...
View
Page 196
Unless you always have a bootable CD or floppy disk available. Also referred to as a merchandise passport. 196 Glossary boot sequence - A disk that allows for enabled devices to start your computer. A measurement of data interpreted by your computer.... Primary cache stored inside the processor. A temperature measurement scale where 0° is the freezing point and 100° is usually equal to boot. Secondary cache which can transfer information. British thermal unit - A special high-speed storage mechanism which can use to automatically recognize each other....
Unless you always have a bootable CD or floppy disk available. Also referred to as a merchandise passport. 196 Glossary boot sequence - A disk that allows for enabled devices to start your computer. A measurement of data interpreted by your computer.... Primary cache stored inside the processor. A temperature measurement scale where 0° is the freezing point and 100° is usually equal to boot. Secondary cache which can transfer information. British thermal unit - A special high-speed storage mechanism which can use to automatically recognize each other....
View
Page 205
... redundant array of RAID include RAID 0, RAID 1, RAID 5, RAID 10, and RAID 50. PC Card - peripheral component interconnect - A method of transferring data between two devices through the processor... is a local bus that do not have an operating system to automatically configure devices. pre-boot execution environment - PCMCIA - R RAID - A modification to the PCI interface that boosts the...that establishes standards for Management) standard that allows networked computers that supports 32-and 64-bit data paths, providing a high-speed data path between the processor and the...
... redundant array of RAID include RAID 0, RAID 1, RAID 5, RAID 10, and RAID 50. PC Card - peripheral component interconnect - A method of transferring data between two devices through the processor... is a local bus that do not have an operating system to automatically configure devices. pre-boot execution environment - PCMCIA - R RAID - A modification to the PCI interface that boosts the...that establishes standards for Management) standard that allows networked computers that supports 32-and 64-bit data paths, providing a high-speed data path between the processor and the...

View
Page 210
... technology and covering a much larger geographic area than WLAN. W W - WHr - For example, a 66-WHr battery can also scan in the boot sectors of electrical power. write-protected - wireless wide area network. Also know as Mobile Broadband network. A video standard for 2 hours. volt - ... - Use write-protection when you or to the open position. watt-hour - Change your favorite picture and make it reads the boot sectors of 1 ampere flows through that computer until the virus is infected when it wallpaper. To write-protect a 3.5-inch floppy disk...
... technology and covering a much larger geographic area than WLAN. W W - WHr - For example, a 66-WHr battery can also scan in the boot sectors of electrical power. write-protected - wireless wide area network. Also know as Mobile Broadband network. A video standard for 2 hours. volt - ... - Use write-protection when you or to the open position. watt-hour - Change your favorite picture and make it reads the boot sectors of 1 ampere flows through that computer until the virus is infected when it wallpaper. To write-protect a 3.5-inch floppy disk...

View
Page 213
Index Numerics 8-in-1 memory card reader, 81 A audio device connecting, 60 enabling, 75 audio. See sound B battery charge gauge, 47 charging, 50 checking the charge, 46 performance, 45 power meter, 47 removing, 50 replacing coin-cell ...battery, 163 storing, 51 blanks ExpressCards, 77 memory card, 81 Bluetooth wireless technology card device status light, 23 installing, 162 boot sequence, 186 brightness adjusting, 39 C carnet, 168 CD about, 56 drive problems, 105 Check Disk, 106 cleaning computer, 188 display, 188 keyboard, 188 media, 190...
Index Numerics 8-in-1 memory card reader, 81 A audio device connecting, 60 enabling, 75 audio. See sound B battery charge gauge, 47 charging, 50 checking the charge, 46 performance, 45 power meter, 47 removing, 50 replacing coin-cell ...battery, 163 storing, 51 blanks ExpressCards, 77 memory card, 81 Bluetooth wireless technology card device status light, 23 installing, 162 boot sequence, 186 brightness adjusting, 39 C carnet, 168 CD about, 56 drive problems, 105 Check Disk, 106 cleaning computer, 188 display, 188 keyboard, 188 media, 190...


