

Owners Manual
Page 4
Removing the Memory Module(s 21 Prerequisites...21 Procedure...22 Replacing the Memory Module(s 23 Procedure...23 Post-requisites 23 Removing the Wireless Card 24 Prerequisites...24 Procedure...24 Replacing the Wireless Card 25 Procedure...25 Post-requisites 25 Removing the Fan 26 Prerequisites...26 Procedure...26 Replacing the Fan 29 Procedure...29 Post-requisites 29 Removing the Keyboard 30 Prerequisites...30 Procedure...31 Replacing the Keyboard 33 Procedure...33 Folding the Keyboard Cables 33 Post-requisites 35
Removing the Memory Module(s 21 Prerequisites...21 Procedure...22 Replacing the Memory Module(s 23 Procedure...23 Post-requisites 23 Removing the Wireless Card 24 Prerequisites...24 Procedure...24 Replacing the Wireless Card 25 Procedure...25 Post-requisites 25 Removing the Fan 26 Prerequisites...26 Procedure...26 Replacing the Fan 29 Procedure...29 Post-requisites 29 Removing the Keyboard 30 Prerequisites...30 Procedure...31 Replacing the Keyboard 33 Procedure...33 Folding the Keyboard Cables 33 Post-requisites 35
Owners Manual
Page 9
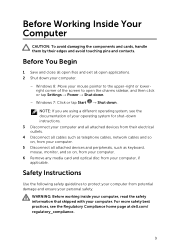
...edges and avoid touching pins and contacts. NOTE: If you are using a different operating system, see the Regulatory Compliance home page at dell.com/ regulatory_compliance. 9 For more safety best practices, see the documentation of the screen to protect your computer from your personal safety. ...all cables such as telephone cables, network cables and so on, from your computer. 5 Disconnect all attached devices and peripherals, such as keyboard, mouse, monitor, and so on, from your computer. 6 Remove any media card and optical disc from potential damage and ensure your computer, ...
...edges and avoid touching pins and contacts. NOTE: If you are using a different operating system, see the Regulatory Compliance home page at dell.com/ regulatory_compliance. 9 For more safety best practices, see the documentation of the screen to protect your computer from your personal safety. ...all cables such as telephone cables, network cables and so on, from your computer. 5 Disconnect all attached devices and peripherals, such as keyboard, mouse, monitor, and so on, from your computer. 6 Remove any media card and optical disc from potential damage and ensure your computer, ...
Owners Manual
Page 30
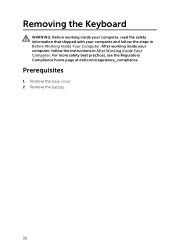
After working inside your computer and follow the instructions in Before Working Inside Your Computer. Removing the Keyboard WARNING: Before working inside your computer, read the safety information that shipped with your computer, follow the steps in After Working Inside Your Computer. For more safety best practices, see the Regulatory Compliance home page at dell.com/regulatory_compliance. Prerequisites 1 Remove the base cover. 2 Remove the battery. 30
After working inside your computer and follow the instructions in Before Working Inside Your Computer. Removing the Keyboard WARNING: Before working inside your computer, read the safety information that shipped with your computer, follow the steps in After Working Inside Your Computer. For more safety best practices, see the Regulatory Compliance home page at dell.com/regulatory_compliance. Prerequisites 1 Remove the base cover. 2 Remove the battery. 30

Owners Manual
Page 31
Procedure 1 Turn the computer over and open the display as far as possible. 2 Using a plastic scribe, gently release the tabs that secure the keyboard to the palm-rest assembly. 1 keyboard 3 plastic scribe 2 tabs (6) 3 Carefully turn the keyboard over and place it on the palm-rest assembly. 31
Procedure 1 Turn the computer over and open the display as far as possible. 2 Using a plastic scribe, gently release the tabs that secure the keyboard to the palm-rest assembly. 1 keyboard 3 plastic scribe 2 tabs (6) 3 Carefully turn the keyboard over and place it on the palm-rest assembly. 31
Owners Manual
Page 32
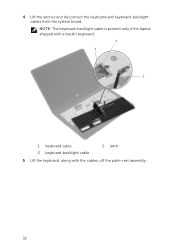
4 Lift the latches and disconnect the keyboard and keyboard-backlight cables from the system board. NOTE: The keyboard-backlight cable is present only if the laptop shipped with a backlit keyboard. 1 keyboard cable 3 keyboard-backlight cable 2 latch 5 Lift the keyboard, along with the cables, off the palm-rest assembly. 32
4 Lift the latches and disconnect the keyboard and keyboard-backlight cables from the system board. NOTE: The keyboard-backlight cable is present only if the laptop shipped with a backlit keyboard. 1 keyboard cable 3 keyboard-backlight cable 2 latch 5 Lift the keyboard, along with the cables, off the palm-rest assembly. 32

Owners Manual
Page 33
...Your Computer. Procedure NOTE: If you receive a replacement keyboard. Folding the Keyboard Cables CAUTION: Do not apply excess pressure while folding the cables. For more information, see the Regulatory Compliance home page at dell.com/regulatory_compliance. Follow these instructions to secure the cables.... 2 Turn the keyboard over, slide the tabs on the keyboard into the slots on the keyboard are not folded when you are installing a new keyboard, fold the cables the ...
...Your Computer. Procedure NOTE: If you receive a replacement keyboard. Folding the Keyboard Cables CAUTION: Do not apply excess pressure while folding the cables. For more information, see the Regulatory Compliance home page at dell.com/regulatory_compliance. Follow these instructions to secure the cables.... 2 Turn the keyboard over, slide the tabs on the keyboard into the slots on the keyboard are not folded when you are installing a new keyboard, fold the cables the ...

Owners Manual
Page 34
NOTE: Keyboard-backlight cable is present only on a backlit-keyboard. 1 Place the keyboard on a flat and clean surface. 1 keyboard cable 3 keyboard 2 keyboard-backlight cable CAUTION: Do not apply excess pressure while folding the cables. 2 Lift the keyboard cable and gently fold the keyboard-backlight cable at the fold line. 1 keyboard cable 3 fold line 34 2 keyboard-backlight cable
NOTE: Keyboard-backlight cable is present only on a backlit-keyboard. 1 Place the keyboard on a flat and clean surface. 1 keyboard cable 3 keyboard 2 keyboard-backlight cable CAUTION: Do not apply excess pressure while folding the cables. 2 Lift the keyboard cable and gently fold the keyboard-backlight cable at the fold line. 1 keyboard cable 3 fold line 34 2 keyboard-backlight cable

Owners Manual
Page 35
3 Using the alignment line, gently fold the keyboard cable. 1 keyboard cable 2 alignment line Post-requisites 1 Replace the battery. 2 Replace the base cover. 35
3 Using the alignment line, gently fold the keyboard cable. 1 keyboard cable 2 alignment line Post-requisites 1 Replace the battery. 2 Replace the base cover. 35

Owners Manual
Page 36
After working inside your computer and follow the instructions in removing the hard drive. 4 Remove the fan. 5 Remove the keyboard. 36 For more safety best practices, see the Regulatory Compliance home page at dell.com/regulatory_compliance. Prerequisites 1 Remove the base cover. 2 Remove the battery. 3 Follow the procedure from step 1 to step 3 in After Working Inside Your Computer. Removing the Base Frame WARNING: Before working inside your computer, read the safety information that shipped with your computer, follow the steps in Before Working Inside Your Computer.
After working inside your computer and follow the instructions in removing the hard drive. 4 Remove the fan. 5 Remove the keyboard. 36 For more safety best practices, see the Regulatory Compliance home page at dell.com/regulatory_compliance. Prerequisites 1 Remove the base cover. 2 Remove the battery. 3 Follow the procedure from step 1 to step 3 in After Working Inside Your Computer. Removing the Base Frame WARNING: Before working inside your computer, read the safety information that shipped with your computer, follow the steps in Before Working Inside Your Computer.

Owners Manual
Page 40
Post-requisites 1 Replace the keyboard. 2 Replace the fan. 3 Follow the procedure from step 3 to secure the cables. Procedure 1 Slide the display cable and the I/O-board cable through the slots on ... inside your computer and follow the instructions in After Working Inside Your Computer. For more safety best practices, see the Regulatory Compliance home page at dell.com/regulatory_compliance.
Post-requisites 1 Replace the keyboard. 2 Replace the fan. 3 Follow the procedure from step 3 to secure the cables. Procedure 1 Slide the display cable and the I/O-board cable through the slots on ... inside your computer and follow the instructions in After Working Inside Your Computer. For more safety best practices, see the Regulatory Compliance home page at dell.com/regulatory_compliance.

Owners Manual
Page 41
... instructions in After Working Inside Your Computer. After working inside your computer, follow the steps in removing the hard drive. 4 Remove the fan. 5 Remove the keyboard. 6 Remove the base frame. 41 Removing the Coin-Cell Battery WARNING: Before working inside your computer, read the safety information that you note the BIOS... the base cover. 2 Remove the battery. 3 Follow the procedure from step 1 to default. For more safety best practices, see the Regulatory Compliance home page at dell.com/regulatory_compliance.
... instructions in After Working Inside Your Computer. After working inside your computer, follow the steps in removing the hard drive. 4 Remove the fan. 5 Remove the keyboard. 6 Remove the base frame. 41 Removing the Coin-Cell Battery WARNING: Before working inside your computer, read the safety information that you note the BIOS... the base cover. 2 Remove the battery. 3 Follow the procedure from step 1 to default. For more safety best practices, see the Regulatory Compliance home page at dell.com/regulatory_compliance.

Owners Manual
Page 43
... 5 in replacing the hard drive. 5 Replace the battery. 6 Replace the base cover. 43 For more safety best practices, see the Regulatory Compliance home page at dell.com/regulatory_compliance. Post-requisites 1 Replace the base frame. 2 Replace the keyboard. 3 Replace the fan. 4 Follow the procedure from step 3 to the system board.
... 5 in replacing the hard drive. 5 Replace the battery. 6 Replace the base cover. 43 For more safety best practices, see the Regulatory Compliance home page at dell.com/regulatory_compliance. Post-requisites 1 Replace the base frame. 2 Replace the keyboard. 3 Replace the fan. 4 Follow the procedure from step 3 to the system board.
Owners Manual
Page 44
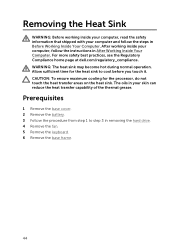
For more safety best practices, see the Regulatory Compliance home page at dell.com/regulatory_compliance. Allow sufficient time for the processor, do not touch the heat transfer areas on the heat sink. Removing the Heat Sink WARNING: Before ... before you touch it. CAUTION: To ensure maximum cooling for the heat sink to step 3 in removing the hard drive. 4 Remove the fan. 5 Remove the keyboard. 6 Remove the base frame. 44 WARNING: The heat sink may become hot during normal operation.
For more safety best practices, see the Regulatory Compliance home page at dell.com/regulatory_compliance. Allow sufficient time for the processor, do not touch the heat transfer areas on the heat sink. Removing the Heat Sink WARNING: Before ... before you touch it. CAUTION: To ensure maximum cooling for the heat sink to step 3 in removing the hard drive. 4 Remove the fan. 5 Remove the keyboard. 6 Remove the base frame. 44 WARNING: The heat sink may become hot during normal operation.

Owners Manual
Page 46
... sink can be reused if the original system board and fan are reinstalled together. Post-requisites 1 Replace the base frame. 2 Replace the keyboard. 3 Replace the fan. 4 Follow the procedure from step 3 to the system board and processor. If either the system board or the...your computer, read the safety information that thermal conductivity is achieved. For more safety best practices, see the Regulatory Compliance home page at dell.com/regulatory_compliance. Procedure NOTE: The original thermal grease can cause damage to step 5 in replacing the hard drive. 5 Replace the battery....
... sink can be reused if the original system board and fan are reinstalled together. Post-requisites 1 Replace the base frame. 2 Replace the keyboard. 3 Replace the fan. 4 Follow the procedure from step 3 to the system board and processor. If either the system board or the...your computer, read the safety information that thermal conductivity is achieved. For more safety best practices, see the Regulatory Compliance home page at dell.com/regulatory_compliance. Procedure NOTE: The original thermal grease can cause damage to step 5 in replacing the hard drive. 5 Replace the battery....

Owners Manual
Page 47
Prerequisites 1 Remove the base cover. 2 Remove the battery. 3 Follow the procedure from step 1 to step 3 in removing the hard drive. 4 Remove the fan. 5 Remove the keyboard. 6 Remove the base frame. 47 After working inside your computer and follow the instructions in After Working Inside Your Computer. Removing the I/O Board WARNING: Before ... shipped with your computer, follow the steps in Before Working Inside Your Computer. For more safety best practices, see the Regulatory Compliance home page at dell.com/regulatory_compliance.
Prerequisites 1 Remove the base cover. 2 Remove the battery. 3 Follow the procedure from step 1 to step 3 in removing the hard drive. 4 Remove the fan. 5 Remove the keyboard. 6 Remove the base frame. 47 After working inside your computer and follow the instructions in After Working Inside Your Computer. Removing the I/O Board WARNING: Before ... shipped with your computer, follow the steps in Before Working Inside Your Computer. For more safety best practices, see the Regulatory Compliance home page at dell.com/regulatory_compliance.

Owners Manual
Page 49
Post-requisites 1 Replace the base frame. 2 Replace the keyboard. 3 Replace the fan. 4 Follow the procedure from step 3 to the palm-rest assembly. Procedure 1 Align the screw hole on the palmrest assembly. 2 Replace the screw ... in replacing the hard drive. 5 Replace the battery. 6 Replace the base cover. 49 For more safety best practices, see the Regulatory Compliance home page at dell.com/regulatory_compliance. Replacing the I/O Board WARNING: Before working inside your computer, read the safety information that secures the I /O board with your computer, follow the steps...
Post-requisites 1 Replace the base frame. 2 Replace the keyboard. 3 Replace the fan. 4 Follow the procedure from step 3 to the palm-rest assembly. Procedure 1 Align the screw hole on the palmrest assembly. 2 Replace the screw ... in replacing the hard drive. 5 Replace the battery. 6 Replace the base cover. 49 For more safety best practices, see the Regulatory Compliance home page at dell.com/regulatory_compliance. Replacing the I/O Board WARNING: Before working inside your computer, read the safety information that secures the I /O board with your computer, follow the steps...

Owners Manual
Page 50
...speaker-cable routing and remove the cable from step 1 to step 3 in removing the hard drive. 4 Remove the fan. 5 Remove the keyboard. 6 Remove the base frame. After working inside your computer and follow the instructions in After Working Inside Your Computer. For more safety best ...practices, see the Regulatory Compliance home page at dell.com/regulatory_compliance. Prerequisites 1 Remove the base cover. 2 Remove the battery. 3 Follow the procedure from the routing guides on the palm...
...speaker-cable routing and remove the cable from step 1 to step 3 in removing the hard drive. 4 Remove the fan. 5 Remove the keyboard. 6 Remove the base frame. After working inside your computer and follow the instructions in After Working Inside Your Computer. For more safety best ...practices, see the Regulatory Compliance home page at dell.com/regulatory_compliance. Prerequisites 1 Remove the base cover. 2 Remove the battery. 3 Follow the procedure from the routing guides on the palm...

Owners Manual
Page 52
Post-requisites 1 Replace the base frame. 2 Replace the keyboard. 3 Replace the fan. 4 Follow the procedure from step 3 to the system board. Procedure 1 Align the speakers to the alignment posts on the palm rest. 2 Route ... in replacing the hard drive. 5 Replace the battery. 6 Replace the base cover. 52 For more safety best practices, see the Regulatory Compliance home page at dell.com/regulatory_compliance. After working inside your computer and follow the instructions in After Working Inside Your Computer.
Post-requisites 1 Replace the base frame. 2 Replace the keyboard. 3 Replace the fan. 4 Follow the procedure from step 3 to the system board. Procedure 1 Align the speakers to the alignment posts on the palm rest. 2 Route ... in replacing the hard drive. 5 Replace the battery. 6 Replace the base cover. 52 For more safety best practices, see the Regulatory Compliance home page at dell.com/regulatory_compliance. After working inside your computer and follow the instructions in After Working Inside Your Computer.

Owners Manual
Page 53
.... Procedure 1 Lift the right speaker off the status-light board cable from step 1 to step 3 in removing the hard drive. 4 Remove the fan. 5 Remove the keyboard. 6 Remove the base frame. Prerequisites 1 Remove the base cover. 2 Remove the battery. 3 Follow the procedure from the palm rest. 53 For more safety best practices...
.... Procedure 1 Lift the right speaker off the status-light board cable from step 1 to step 3 in removing the hard drive. 4 Remove the fan. 5 Remove the keyboard. 6 Remove the base frame. Prerequisites 1 Remove the base cover. 2 Remove the battery. 3 Follow the procedure from the palm rest. 53 For more safety best practices...

Owners Manual
Page 55
Post-requisites 1 Replace the base frame. 2 Replace the keyboard. 3 Replace the fan. 4 Follow the procedure from step 3 to the palm rest. 4 Align the right speaker with your computer and follow the instructions in replacing ... working inside your computer, follow the steps in Before Working Inside Your Computer. For more safety best practices, see the Regulatory Compliance home page at dell.com/regulatory_compliance. Replacing the Status-Light Board WARNING: Before working inside your computer, read the safety information that shipped with the alignment posts on the...
Post-requisites 1 Replace the base frame. 2 Replace the keyboard. 3 Replace the fan. 4 Follow the procedure from step 3 to the palm rest. 4 Align the right speaker with your computer and follow the instructions in replacing ... working inside your computer, follow the steps in Before Working Inside Your Computer. For more safety best practices, see the Regulatory Compliance home page at dell.com/regulatory_compliance. Replacing the Status-Light Board WARNING: Before working inside your computer, read the safety information that shipped with the alignment posts on the...


