
Service Manual
Page 5
2. The internal Inverter/power board will contain a main board, an internal inverter/power board, keypad board, which house the flat panel control logic, brightness control logic and DDC. and provides the 12V DC-power to main board. Flat Panel and CCFL backlight Inverter/Power Board AC Power IN Main Board Keyboard RS232 Connector For white balance adjustment in factory mode HOST Computer Video signal, DDC 5 Monitor Block Diagram CCFT Driver. LCD MONITOR DESCRIPTION DELL E173FP Service Manual The LCD MONITOR will drive the backlight of panel and the DC-DC conversion.
2. The internal Inverter/power board will contain a main board, an internal inverter/power board, keypad board, which house the flat panel control logic, brightness control logic and DDC. and provides the 12V DC-power to main board. Flat Panel and CCFL backlight Inverter/Power Board AC Power IN Main Board Keyboard RS232 Connector For white balance adjustment in factory mode HOST Computer Video signal, DDC 5 Monitor Block Diagram CCFT Driver. LCD MONITOR DESCRIPTION DELL E173FP Service Manual The LCD MONITOR will drive the backlight of panel and the DC-DC conversion.

Service Manual
Page 6
... Brightness Button is used to switch functions or adjust settings. - Control Buttons A. Orange - Auto Adjust Key: The Auto Adjust Key is used to restore normal status. - DELL E173FP Service Manual 3. Power On mode. Press again to automatically set the H Position, V Position, Clock and Phase. - Auto Adjust Button D. Power Button: When pressed, the monitor enters...
... Brightness Button is used to switch functions or adjust settings. - Control Buttons A. Orange - Auto Adjust Key: The Auto Adjust Key is used to restore normal status. - DELL E173FP Service Manual 3. Power On mode. Press again to automatically set the H Position, V Position, Clock and Phase. - Auto Adjust Button D. Power Button: When pressed, the monitor enters...

Service Manual
Page 7
... automatically. Press the - The corresponding setting window (here: Positioning) is highlighted. Brightness Setting the brightness of the display With this function you change the brightness of bright colour tones. 7 Necessary, press the - Adjusting the brightness and contrast Calling the Brightness / Contrast setting window using Brightness button. DELL E173FP Service Manual 3.3 ADJUSTING THE PICTURE To set the OSD menu, perform...
... automatically. Press the - The corresponding setting window (here: Positioning) is highlighted. Brightness Setting the brightness of the display With this function you change the brightness of bright colour tones. 7 Necessary, press the - Adjusting the brightness and contrast Calling the Brightness / Contrast setting window using Brightness button. DELL E173FP Service Manual 3.3 ADJUSTING THE PICTURE To set the OSD menu, perform...

Service Manual
Page 15
Scalar initializes. 10) In standby mode? 11) Update the lifetime of brightness from analog port? 16) Display "No connection Check Signal Cable" message. And go into EEprom. Is the power key pressed? 15 DELL E173FP Service Manual 1) MCU Initializes. 2) Is the EEprom blank? 3) Program the EEprom by default values. 4) Get the PWM value of... all global flags. 7) Are the AUTO and SELECT keys pressed? 8) Enter factory mode. 9) Save the power key status into standby mode after the message disappears. 17) Program the scalar to be able to green color.
Scalar initializes. 10) In standby mode? 11) Update the lifetime of brightness from analog port? 16) Display "No connection Check Signal Cable" message. And go into EEprom. Is the power key pressed? 15 DELL E173FP Service Manual 1) MCU Initializes. 2) Is the EEprom blank? 3) Program the EEprom by default values. 4) Get the PWM value of... all global flags. 7) Are the AUTO and SELECT keys pressed? 8) Enter factory mode. 9) Save the power key status into standby mode after the message disappears. 17) Program the scalar to be able to green color.
Service Manual
Page 19
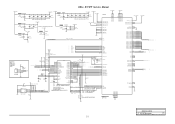
.../R2 CLKN_LV_E/R3 CH2P_LV_E/R4 CH2N_LV_E/R5 CH1P_LV_E/R6 CH1N_LV_E/R7 CH0P_LV_E/G0 6 7 8 9 10 11 12 13 14 CH0N_LV_E/G1 17 CH3P_LV_O/G2 18 CH3N_LV_O/G3 CLKP_LV_O/G4 CLKN_LV_O/G5 19 20 21 CH2P_LV_O/G6 22 CH2N_LV_O/G7 CH1P_LV_O/B0 CH1N_LV_O/B1 CH0P_LV_O/B2 CH0N_LV_O/... 59 GPIO7/B4 GPIO8/B6 GPIO9/B5 60 50 BRIGHTNESS 5 LED_O 3 LED_G 3 85 VBUFS_RPLL 2 VCO_LV 62 STI_TM1 STI_TM2 63 GND 19 Title Size C Date: ZAN3 SL & MCU Document Number Zan3 SL MAIN BOARD Friday , February 13, 2004 Sheet Rev C 2 of 5 DELL E173FP Service Manual +3.3V_VDD 58.27m A +1.8V_VDD 3.3V_DVDD...
.../R2 CLKN_LV_E/R3 CH2P_LV_E/R4 CH2N_LV_E/R5 CH1P_LV_E/R6 CH1N_LV_E/R7 CH0P_LV_E/G0 6 7 8 9 10 11 12 13 14 CH0N_LV_E/G1 17 CH3P_LV_O/G2 18 CH3N_LV_O/G3 CLKP_LV_O/G4 CLKN_LV_O/G5 19 20 21 CH2P_LV_O/G6 22 CH2N_LV_O/G7 CH1P_LV_O/B0 CH1N_LV_O/B1 CH0P_LV_O/B2 CH0N_LV_O/... 59 GPIO7/B4 GPIO8/B6 GPIO9/B5 60 50 BRIGHTNESS 5 LED_O 3 LED_G 3 85 VBUFS_RPLL 2 VCO_LV 62 STI_TM1 STI_TM2 63 GND 19 Title Size C Date: ZAN3 SL & MCU Document Number Zan3 SL MAIN BOARD Friday , February 13, 2004 Sheet Rev C 2 of 5 DELL E173FP Service Manual +3.3V_VDD 58.27m A +1.8V_VDD 3.3V_DVDD...

User Guide
Page 7
...and is a natural defect that occurs in LCD technology Stuck-on Pixels LCD screen has bright spots Cycle power on the D-sub cable. Perform monitor reset Push 'Auto Adjust' button Adjust 'Phase' and 'Clock' controls via OSD Perform monitor self-test feature check to determine if ...' and 'Clock' controls via OSD Perform monitor self-test feature check and determine if these lines are permanently off and is a natural defect that occurs in LCD technology Brightness Problems Geometric Distortion Picture too dim or too bright Screen not centered correctly Horizontal/Vertical Screen has...
...and is a natural defect that occurs in LCD technology Stuck-on Pixels LCD screen has bright spots Cycle power on the D-sub cable. Perform monitor reset Push 'Auto Adjust' button Adjust 'Phase' and 'Clock' controls via OSD Perform monitor self-test feature check to determine if ...' and 'Clock' controls via OSD Perform monitor self-test feature check and determine if these lines are permanently off and is a natural defect that occurs in LCD technology Brightness Problems Geometric Distortion Picture too dim or too bright Screen not centered correctly Horizontal/Vertical Screen has...

User Guide
Page 37
Back to Contents Page Front View: Dell™ E173FP Flat Panel Color Monitor User's Guide A Menu button B Brightness / Contrast Hotkey and - Product appearance may vary. button C Auto Adjust and + button D Power On/Off button with LED Indicator NOTE: The graphic is for illustration only. Back to Contents Page
Back to Contents Page Front View: Dell™ E173FP Flat Panel Color Monitor User's Guide A Menu button B Brightness / Contrast Hotkey and - Product appearance may vary. button C Auto Adjust and + button D Power On/Off button with LED Indicator NOTE: The graphic is for illustration only. Back to Contents Page

User Guide
Page 49
See Accessing the Menu System. C - Back to Contents Page Controls and Indicators: Dell™ E173FP Flat Panel Color Monitor User's Guide Overview • On Screen Menu/Display (OSD) • Automatic Save • Reset Functions • OSD Warning Messages Overview Use the ... an on screen as they change. and + buttons NOTE: you press the button while there are no active video input signals, or attached cables. Brightness/Contrast Hot Key B Use these buttons to adjust (decrease/increase ranges) items in the OSD. NOTE: Auto Adjust will appear on -screen display (...
See Accessing the Menu System. C - Back to Contents Page Controls and Indicators: Dell™ E173FP Flat Panel Color Monitor User's Guide Overview • On Screen Menu/Display (OSD) • Automatic Save • Reset Functions • OSD Warning Messages Overview Use the ... an on screen as they change. and + buttons NOTE: you press the button while there are no active video input signals, or attached cables. Brightness/Contrast Hot Key B Use these buttons to adjust (decrease/increase ranges) items in the OSD. NOTE: Auto Adjust will appear on -screen display (...

User Guide
Page 50
... occur if you can further tune your monitor by using the 'Pixel Clock' and 'Phase' controls in the OSD. Adjust 'Brightness' first, then adjust 'Contrast' only if further adjustment is on screen as the monitor self-adjusts to the current input: Auto... automatic setup and adjustment. D The green LED indicates the monitor is necessary. The 'Brightness' function adjusts the luminance of difference between darkness and lightness on and off. The Power button turns the monitor on the display screen. "+" increase 'brightness' " - "+" increase the 'contrast' "-" decrease the ...
... occur if you can further tune your monitor by using the 'Pixel Clock' and 'Phase' controls in the OSD. Adjust 'Brightness' first, then adjust 'Contrast' only if further adjustment is on screen as the monitor self-adjusts to the current input: Auto... automatic setup and adjustment. D The green LED indicates the monitor is necessary. The 'Brightness' function adjusts the luminance of difference between darkness and lightness on and off. The Power button turns the monitor on the display screen. "+" increase 'brightness' " - "+" increase the 'contrast' "-" decrease the ...

User Guide
Page 55
...you must adjust the functions again. 'Reset' will set at the time of sync. This includes 'Color', 'Position', 'Clock frequency', 'Phase', 'Brightness', 'Contrast' and 'OSD hold time'. OSD Warning Messages A warning message may be required and this will appear on the screen indicating that were ...the clock and phase back to use the 'Reset function'. NOTE: The floating 'Dell - See Troubleshooting for the Horizontal and Vertical frequency ranges addressable by this monitor. Back to those that the monitor is 1280 X 1024 @ 60Hz. Cannot Display This Video Mode This means that the...
...you must adjust the functions again. 'Reset' will set at the time of sync. This includes 'Color', 'Position', 'Clock frequency', 'Phase', 'Brightness', 'Contrast' and 'OSD hold time'. OSD Warning Messages A warning message may be required and this will appear on the screen indicating that were ...the clock and phase back to use the 'Reset function'. NOTE: The floating 'Dell - See Troubleshooting for the Horizontal and Vertical frequency ranges addressable by this monitor. Back to those that the monitor is 1280 X 1024 @ 60Hz. Cannot Display This Video Mode This means that the...


