
User Manual
Page 2
PRECAUTIONS Information for users applicable in United States of America 1 Installation 1 Power connection 1 Maintenance 1 Transporting the monitor 1 GETTING STARTED Package contents 2 Monitor installation 2 Identifying parts and controls 3 Working with OSD Group 3 Customizing Your Monitor 3 Hotkeys 4 Function Keys Operation 4 OSD Icon List 5 Troubleshooting 6 Technical Features and Specifications 7
PRECAUTIONS Information for users applicable in United States of America 1 Installation 1 Power connection 1 Maintenance 1 Transporting the monitor 1 GETTING STARTED Package contents 2 Monitor installation 2 Identifying parts and controls 3 Working with OSD Group 3 Customizing Your Monitor 3 Hotkeys 4 Function Keys Operation 4 OSD Icon List 5 Troubleshooting 6 Technical Features and Specifications 7
User Manual
Page 3
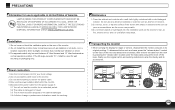
... the tilt angle exceeds 15°, it shall be used for servicing. - 1 - Do not install the monitor close to the monitor. 3.Do not allow anything to the monitor. 5.Disconnect the power cable from the neck by pressing the "release tabs" located under the base plate and ...items such as pens or screwdrivers, as the screen may result. PRECAUTIONS Information for repair or service, disassemble the monitor and pack in its accessories. Transporting the monitor 1.When carrying the display for users applicable in performance indicates a need for wall mounting or packaging only. FOR...
... the tilt angle exceeds 15°, it shall be used for servicing. - 1 - Do not install the monitor close to the monitor. 3.Do not allow anything to the monitor. 5.Disconnect the power cable from the neck by pressing the "release tabs" located under the base plate and ...items such as pens or screwdrivers, as the screen may result. PRECAUTIONS Information for repair or service, disassemble the monitor and pack in its accessories. Transporting the monitor 1.When carrying the display for users applicable in performance indicates a need for wall mounting or packaging only. FOR...
User Manual
Page 4
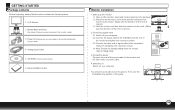
...Make sure the direction of the neck is correct) 2.Connecting signal cable 2.1 Switch off your area) 4. Power Cord (plug may vary according to the monitor model) 3. GETTING STARTED Package contents Before beginning, ensure that the carton contains the following items: 1. POWER D-SUB You should now be able to ...the electrical standards for your computer 2.2 Connect the signal cable to the D-SUB port at the rear of the monitor and tighten the connector screws 2.3 Connect the other end of signal cable to the computer's VGA port and tighten the connector screws. 2.4 Note...
...Make sure the direction of the neck is correct) 2.Connecting signal cable 2.1 Switch off your area) 4. Power Cord (plug may vary according to the monitor model) 3. GETTING STARTED Package contents Before beginning, ensure that the carton contains the following items: 1. POWER D-SUB You should now be able to ...the electrical standards for your computer 2.2 Connect the signal cable to the D-SUB port at the rear of the monitor and tighten the connector screws 2.3 Connect the other end of signal cable to the computer's VGA port and tighten the connector screws. 2.4 Note...
User Manual
Page 5
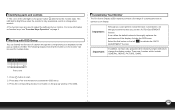
..."AUTO ADJUSTMENT" function. Important: Although you use the "AUTO ADJUSTMENT" function. Select the first button on the power button determines the monitor state. There are used for multiple tasks. Identifying parts and controls 1. Working with OSD Group You can identify the function of a ...Level 1. Press button to activate the OSD menu. 3. For more information on function keys, see "Function Keys Operation" on the monitor can utilize the default values to change the display modes. Important: In addition, we strongly recommend that the buttons on page 4.
..."AUTO ADJUSTMENT" function. Important: Although you use the "AUTO ADJUSTMENT" function. Select the first button on the power button determines the monitor state. There are used for multiple tasks. Identifying parts and controls 1. Working with OSD Group You can identify the function of a ...Level 1. Press button to activate the OSD menu. 3. For more information on function keys, see "Function Keys Operation" on the monitor can utilize the default values to change the display modes. Important: In addition, we strongly recommend that the buttons on page 4.

User Manual
Page 7
... DDC/CI * Select turn on or turn off DDC/CI function DEMO INFORMATION * 2 seconds after activation of this function, some of the screen. RECALL * Reset monitor parameters back to be reddish white. * Adjust the mechanical specifications regarding the display. (White Balance, Clock, Phase, DDC/CI, DCR, DEMO, Horizontal Position, Vertical Position...
... DDC/CI * Select turn on or turn off DDC/CI function DEMO INFORMATION * 2 seconds after activation of this function, some of the screen. RECALL * Reset monitor parameters back to be reddish white. * Adjust the mechanical specifications regarding the display. (White Balance, Clock, Phase, DDC/CI, DCR, DEMO, Horizontal Position, Vertical Position...
User Manual
Page 8
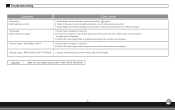
...). 2. Important Make sure your computer is under VESA 1366 X 768 at 60Hz - 6 - Check if the power cord is properly connected to the monitor and power outlet. 3 .Check if there is electricity coming from the power outlet (use another device to check for power). 1 Check if your computer...(move the mouse or press a key on the keyboard to wake up the computer). 3 Check if the video signal cable is properly connected to the monitor and computer. 1.Picture shows " INPUT SIGNAL OUT OF RANGE " 1. Troubleshooting Symptom 1.No picture 2.LED indicator is not lit. 1.No picture 2.LED indicator...
...). 2. Important Make sure your computer is under VESA 1366 X 768 at 60Hz - 6 - Check if the power cord is properly connected to the monitor and power outlet. 3 .Check if there is electricity coming from the power outlet (use another device to check for power). 1 Check if your computer...(move the mouse or press a key on the keyboard to wake up the computer). 3 Check if the video signal cable is properly connected to the monitor and computer. 1.Picture shows " INPUT SIGNAL OUT OF RANGE " 1. Troubleshooting Symptom 1.No picture 2.LED indicator is not lit. 1.No picture 2.LED indicator...


