

User Manual
Page 2
PRECAUTIONS Information for users applicable in United States of America 1 Installation 1 Power connection 1 Maintenance 1 Transporting the monitor 1 GETTING STARTED Package contents 2 Monitor installation 2 Identifying parts and controls 3 Working with OSD Group 3 Customizing Your Monitor 3 Hotkeys 4 Function Keys Operation 4 OSD Icon List 5 Troubleshooting 6 Technical Features and Specifications 7
PRECAUTIONS Information for users applicable in United States of America 1 Installation 1 Power connection 1 Maintenance 1 Transporting the monitor 1 GETTING STARTED Package contents 2 Monitor installation 2 Identifying parts and controls 3 Working with OSD Group 3 Customizing Your Monitor 3 Hotkeys 4 Function Keys Operation 4 OSD Icon List 5 Troubleshooting 6 Technical Features and Specifications 7
User Manual
Page 3
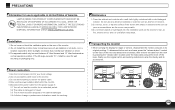
.... If the tilt angle exceeds 15°, it shall be used for servicing. - 1 - PRECAUTIONS Information for repair or service, disassemble the monitor and pack in its accessories. Installation 1. Do not cover or block the ventilation ports on the power cable. 4.Only use the power adapter attached...in performance indicates a need for wall mounting or packaging only. To disassemble the neck and base, press the "release button" located on the monitor's rear, as alcohol or benzene. 2.Do not rub, touch, or tap the surface of America LAMP(S) INSIDE THIS PRODUCT CONTAIN MERCURY AND ...
.... If the tilt angle exceeds 15°, it shall be used for servicing. - 1 - PRECAUTIONS Information for repair or service, disassemble the monitor and pack in its accessories. Installation 1. Do not cover or block the ventilation ports on the power cable. 4.Only use the power adapter attached...in performance indicates a need for wall mounting or packaging only. To disassemble the neck and base, press the "release button" located on the monitor's rear, as alcohol or benzene. 2.Do not rub, touch, or tap the surface of America LAMP(S) INSIDE THIS PRODUCT CONTAIN MERCURY AND ...
User Manual
Page 4
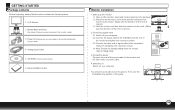
... be able to see the troubleshooting section of base may vary according to the electrical standards for your computer. If not, see the picture. Monitor Base and Neck (the shape of this guide. - 2 - Power Cord (plug may vary according to a power outlet. 4.Switching on Switch... on your area) 4. CD-ROM (contains user manual) 6 .Quick Installation Guide Monitor installation 1.Setting up the monitor 1.1 Take out the monitor, stand and monitor base from the package. 1.2 Place the monitor base on the desk and then slide the neck into the slots of base. (Make sure ...
... be able to see the troubleshooting section of base may vary according to the electrical standards for your computer. If not, see the picture. Monitor Base and Neck (the shape of this guide. - 2 - Power Cord (plug may vary according to a power outlet. 4.Switching on Switch... on your area) 4. CD-ROM (contains user manual) 6 .Quick Installation Guide Monitor installation 1.Setting up the monitor 1.1 Take out the monitor, stand and monitor base from the package. 1.2 Place the monitor base on the desk and then slide the neck into the slots of base. (Make sure ...
User Manual
Page 5
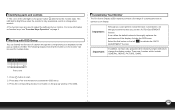
...methods to start. 2. There are used for multiple tasks. First Level 1. Press the corresponding function icon button on the monitor can be used to optimize your monitor. The following images show that you use the "AUTO ADJUSTMENT" function. Select the first button on the power button determines... on the pop-up window of a button through the corresponding icon displayed on page 4. Press button to change the display modes. Customizing Your Monitor The On Screen Display (OSD) system provides a full range of the LED light on the left to activate the OSD menu. 3. It...
...methods to start. 2. There are used for multiple tasks. First Level 1. Press the corresponding function icon button on the monitor can be used to optimize your monitor. The following images show that you use the "AUTO ADJUSTMENT" function. Select the first button on the power button determines... on the pop-up window of a button through the corresponding icon displayed on page 4. Press button to change the display modes. Customizing Your Monitor The On Screen Display (OSD) system provides a full range of the LED light on the left to activate the OSD menu. 3. It...

User Manual
Page 7
RECALL * Reset monitor parameters back to the different situations of the display. HORIZONTAL POSITION VERTICAL POSITION * Shift the screen left or right * Shift the screen up or down ... 2 times over. * Show the frequency, resolution, input interface and other operating details about this function, some of the screen. PHASE * Adjust the monitor internal signal phase CLOCK * Adjust the monitor internal sampling clock rate DDC/CI * Select turn on or turn off DDC/CI function DEMO INFORMATION * 2 seconds after activation of this...
RECALL * Reset monitor parameters back to the different situations of the display. HORIZONTAL POSITION VERTICAL POSITION * Shift the screen left or right * Shift the screen up or down ... 2 times over. * Show the frequency, resolution, input interface and other operating details about this function, some of the screen. PHASE * Adjust the monitor internal signal phase CLOCK * Adjust the monitor internal sampling clock rate DDC/CI * Select turn on or turn off DDC/CI function DEMO INFORMATION * 2 seconds after activation of this...
User Manual
Page 8
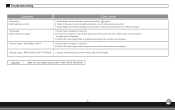
...is turned on. 2 Check if the video signal cable is properly connected to the monitor and computer. 1.Picture shows " INPUT SIGNAL OUT OF RANGE " 1. Check if the power cord is properly connected to...2 Ensure the computer is under VESA 1366 X 768 at 60Hz - 6 - Check if the monitor is turned on the keyboard to wake up the computer). 3 Check if the video signal cable is properly connected to ...the monitor and computer. 1 Check if your display setup is not in power saving mode (move the mouse or...
...is turned on. 2 Check if the video signal cable is properly connected to the monitor and computer. 1.Picture shows " INPUT SIGNAL OUT OF RANGE " 1. Check if the power cord is properly connected to...2 Ensure the computer is under VESA 1366 X 768 at 60Hz - 6 - Check if the monitor is turned on the keyboard to wake up the computer). 3 Check if the video signal cable is properly connected to ...the monitor and computer. 1 Check if your display setup is not in power saving mode (move the mouse or...


