Specifications
Page 16
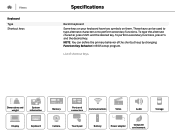
... the desired key. To type the alternate character, press Shift and the desired key. List of the shortcut keys by changing Function Key Behavior in BIOS setup program. Dimensions and weight System information Memory Ports and connectors Communications Video Audio Storage Display Keyboard Camera Touch pad Battery Power adapter Computer environment...
... the desired key. To type the alternate character, press Shift and the desired key. List of the shortcut keys by changing Function Key Behavior in BIOS setup program. Dimensions and weight System information Memory Ports and connectors Communications Video Audio Storage Display Keyboard Camera Touch pad Battery Power adapter Computer environment...
Service Manual
Page 9
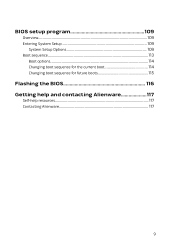
BIOS setup program 109 Overview...109 Entering System Setup 109 System Setup Options 109 Boot sequence 113 Boot options 114 Changing boot sequence for the current boot 114 Changing boot sequence for future boots 115 Flashing the BIOS 116 Getting help and contacting Alienware 117 Self-help resources 117 Contacting Alienware 117 9
BIOS setup program 109 Overview...109 Entering System Setup 109 System Setup Options 109 Boot sequence 113 Boot options 114 Changing boot sequence for the current boot 114 Changing boot sequence for future boots 115 Flashing the BIOS 116 Getting help and contacting Alienware 117 Self-help resources 117 Contacting Alienware 117 9

Service Manual
Page 75
...Follow the procedure from the connector on the system board. 75 For more safety best practices, see the Regulatory Compliance home page at www.dell.com/regulatory_compliance. Prerequisites 1 Remove the base panel. 2 Follow the procedure from step 1 to step 5 in "Removing the solid-state drive...Before working inside your computer, read the safety information that you note the BIOS setup program's settings before removing the coin-cell battery. CAUTION: Removing the coin-cell battery resets the BIOS setup program's settings to step 5 in Before working inside your computer. Procedure...
...Follow the procedure from the connector on the system board. 75 For more safety best practices, see the Regulatory Compliance home page at www.dell.com/regulatory_compliance. Prerequisites 1 Remove the base panel. 2 Follow the procedure from step 1 to step 5 in "Removing the solid-state drive...Before working inside your computer, read the safety information that you note the BIOS setup program's settings before removing the coin-cell battery. CAUTION: Removing the coin-cell battery resets the BIOS setup program's settings to step 5 in Before working inside your computer. Procedure...

Service Manual
Page 78
...the system board removes any changes you replace the system board. For more safety best practices, see the Regulatory Compliance home page at www.dell.com/regulatory_compliance. NOTE: Your computer's Service Tag is stored in After working inside your computer. Prerequisites 1 Remove the base panel. 2 ...with the system board. 78 You must enter the Service Tag in the BIOS setup program after you replace the system board. NOTE: Before disconnecting the cables from step 1 to the BIOS using the BIOS setup program. Removing the system board WARNING: Before working inside your computer,...
...the system board removes any changes you replace the system board. For more safety best practices, see the Regulatory Compliance home page at www.dell.com/regulatory_compliance. NOTE: Your computer's Service Tag is stored in After working inside your computer. Prerequisites 1 Remove the base panel. 2 ...with the system board. 78 You must enter the Service Tag in the BIOS setup program after you replace the system board. NOTE: Before disconnecting the cables from step 1 to the BIOS using the BIOS setup program. Removing the system board WARNING: Before working inside your computer,...
Service Manual
Page 80
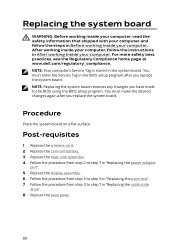
... from step 5 to step 9 in "Replacing the palm rest". 7 Follow the procedure from step 3 to the BIOS using the BIOS setup program. For more safety best practices, see the Regulatory Compliance home page at www.dell.com/regulatory_compliance. NOTE: Replacing the system board removes any changes you have made to step 7 in the.... Replacing the system board WARNING: Before working inside your computer, read the safety information that shipped with your computer and follow the instructions in the BIOS setup program after you replace the system board.
... from step 5 to step 9 in "Replacing the palm rest". 7 Follow the procedure from step 3 to the BIOS using the BIOS setup program. For more safety best practices, see the Regulatory Compliance home page at www.dell.com/regulatory_compliance. NOTE: Replacing the system board removes any changes you have made to step 7 in the.... Replacing the system board WARNING: Before working inside your computer, read the safety information that shipped with your computer and follow the instructions in the BIOS setup program after you replace the system board.

Service Manual
Page 109
... so on your computer and its installed devices, the items listed in your computer. 2 During POST, when the Dell logo is displayed, watch for it is lost. If you are an expert computer user, do not change BIOS setup program, it , and then press F2. System Setup Options NOTE: Depending on...may or may not appear. 109 If you wait too long and the operating system logo appears, continue to wait until you write down the BIOS setup program screen information for the F2 prompt to : • Get information about the hardware installed in this keystroke is recommended that the ...
... so on your computer and its installed devices, the items listed in your computer. 2 During POST, when the Dell logo is displayed, watch for it is lost. If you are an expert computer user, do not change BIOS setup program, it , and then press F2. System Setup Options NOTE: Depending on...may or may not appear. 109 If you wait too long and the operating system logo appears, continue to wait until you write down the BIOS setup program screen information for the F2 prompt to : • Get information about the hardware installed in this keystroke is recommended that the ...

Service Manual
Page 110
Displays the processor identification code. Displays the integrated graphics. Displays the extended memory. Displays the BIOS version. Displays the processor L3 cache size. Displays the first discrete graphics installed on your computer. Displays the asset tag of your computer. ...Displays the processor L1 cache size. Displays the memory speed. 110 Displays the processor speed. Main System Time System Date BIOS Version Product Name Service Tag Asset Tag CPU Type CPU Speed CPU ID CPU L1 Cache CPU L2 Cache CPU L3 Cache Integrated Graphics Discrete...
Displays the processor identification code. Displays the integrated graphics. Displays the extended memory. Displays the BIOS version. Displays the processor L3 cache size. Displays the first discrete graphics installed on your computer. Displays the asset tag of your computer. ...Displays the processor L1 cache size. Displays the memory speed. 110 Displays the processor speed. Main System Time System Date BIOS Version Product Name Service Tag Asset Tag CPU Type CPU Speed CPU ID CPU L1 Cache CPU L2 Cache CPU L3 Cache Integrated Graphics Discrete...
Service Manual
Page 111
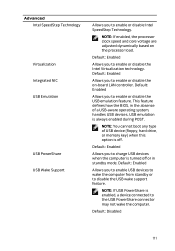
..., or memory key) when this option is enabled, a device connected to the USB PowerShare connector may not wake the computer. This feature defines how the BIOS, in standby mode. Default: Enabled Allows you to enable USB devices to wake the computer from standby or to disable the USB wake support feature...
..., or memory key) when this option is enabled, a device connected to the USB PowerShare connector may not wake the computer. This feature defines how the BIOS, in standby mode. Default: Enabled Allows you to enable USB devices to wake the computer from standby or to disable the USB wake support feature...

Service Manual
Page 114
... - When F12 Boot Options appear in the drive, or if the disc is in the lower-right corner of the screen, press F12. The BIOS detects the device and adds the USB flash option to a USB device, the device must be bootable. The computer attempts to boot from the primary... hard drive. The computer attempts to boot from the network. Changing boot sequence for example, to boot from the optical drive to run Dell Diagnostics from a USB device, connect the USB device to reinstall your computer and try again. Network - change the boot sequence for the current boot, ...
... - When F12 Boot Options appear in the drive, or if the disc is in the lower-right corner of the screen, press F12. The BIOS detects the device and adds the USB flash option to a USB device, the device must be bootable. The computer attempts to boot from the primary... hard drive. The computer attempts to boot from the network. Changing boot sequence for example, to boot from the optical drive to run Dell Diagnostics from a USB device, connect the USB device to reinstall your computer and try again. Network - change the boot sequence for the current boot, ...

Service Manual
Page 116
...may need to flash (update) the BIOS when an update is complete, navigate to www.dell.com/support. 3 Click Product Support, enter the Service Tag of the BIOS for your computer and click Submit. To flash the BIOS: 1 Turn on your computer. 6 Scroll down the page and expand BIOS. 7 Click Download File to download ...the latest version of your computer. 8 Save the file and, once the download is available or when you saved the BIOS update file. 9 Double-click the BIOS update file icon and follow the instructions on the screen. 116 NOTE: If you do not have the Service Tag, use the ...
...may need to flash (update) the BIOS when an update is complete, navigate to www.dell.com/support. 3 Click Product Support, enter the Service Tag of the BIOS for your computer and click Submit. To flash the BIOS: 1 Turn on your computer. 6 Scroll down the page and expand BIOS. 7 Click Download File to download ...the latest version of your computer. 8 Save the file and, once the download is available or when you saved the BIOS update file. 9 Double-click the BIOS update file icon and follow the instructions on the screen. 116 NOTE: If you do not have the Service Tag, use the ...


